Managing multiple configuration files across different environments can be challenging, and several tools are trying to solve this problem with different approaches. However, in this article, we’ll learn how to use node-config to create and manage Node.js configuration files across different deployment environments.

Node-config allows you to create configuration files in your Node application for different deployment environments. With it, you can define a default configuration file that you intend to repeat across environments, then extend the default config to other environments, such as development, staging, etc.
You can override the parameters using some temporary command line parameters, such as adding NODE_ENV=development to your command line argument.
Node-config makes it easier to create and manage a consistent configuration interface shared among all of your deployment environments.
To better understand how to set up this configuration, let’s use a sample Node application. First, run the command below on your terminal to clone this repository, or download it from here and unzip it.
bash
git clone https://github.com/ezesundayeze/node-env-sample
To install the Node dependencies, run:
bash
npm install
Or:
bash
yarn
Because node-config is an npm package, we can install it with npm or yarn by running either of these commands.
bash
npm install config
Or:
bash
yarn add config
Node-config supports many file extensions. At the time of publication, the current version of node-config (3.3.6) supports the following extensions:
- .json
- .json5
- .hjson
- .yaml or .yml
- .coffee
- .js
- .cson
- .properties
- .toml
- .ts
- .xml
This means you can create your configuration files with any of the supported extensions, but it makes sense to choose one for your project and stick to it throughout your build.
We’ll use the .json extension in this tutorial.
The truth is, even though you’ll eventually have different files for different environments, there’ll be some variables that will remain the same across all environments. For example, the HOST and PORT variables. More so, you also want to have the variables your application to fall back to in case the environment variables haven’t been set for that particular environment.
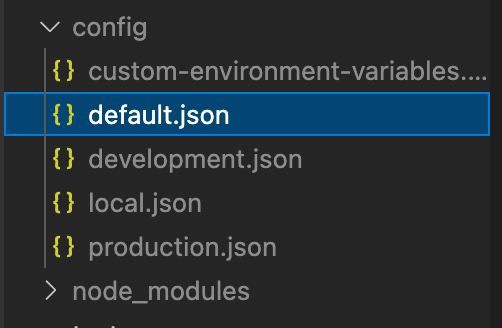
Create a config directory and add a config/default.json file to it. This will be the default config file and will contain all your default environment variables.
It should look like this in our sample app:
config/default.json
json
{
    "server": {
      "host": "localhost",
      "port": 0,
    }
  }
We’ll access it in our app by importing config and using the get method to access the variables.
js
const config = require('config');
const port = config.get('server.port');
const host = config.get('server.host');
Let’s create a server.js file and add the code below.
js
const express = require('express');
const config = require('config');
const app = express();
const port = config.get('server.port');
const host = config.get('server.host');

app.get('/', (req, res) => {
    res.send('Hello World');
});
const server = app.listen(port, host, (err) => {
    if (err) {
        console.log(err);
        process.exit(1);
    }
    console.log(`Server is running on ${host}:${server.address().port}`);
});
You can use node-config in other parts of your application in a similar way.
You can extend the default config file by creating other configuration files. For example, you can create configuration files for development, production, QA, staging, local, etc. Let’s cover the primary types of config files we’ll be using in our app.

Local config files are created to override the deployed version of your config files. For example, for your development deployment, you can have a local-development.json file that stores all of your local development configurations — something that mirrors the kind of behavior you expect in your deployed development environment.
So, you can have something like this:
local-{instance}.EXT
local-{deployment}.EXT
local-{deployment}-{instance}.EXT
You can also use short and full hostnames to define your config files on specific platforms in case you are going to deploy on multiple instances. For example, you can have a {short_hostname}, which will represent your server name up to the first dot. If your hostname is demo.example.com, the config can be demo.EXT (demo.json).
Also, if your {full_hostname} is your entire server name, you can use it when {short_hostname} collides with other machines. So, in the case where your hostname is demo.example.com, your config file name will be demo.example.com.json.
You might also want to create a custom configuration file to house some environment variable overrides. Node-config provides support for the config file type that you can define with the name custom-environment-variables.EXT (custom-environment-variables.json).
If your environment variables are not set, the services that use them will break. So, you should ensure your environment variables are tested. Node-config provides multiple utilities, one of which is the config.has() method that allows you to verify that environment variables are set.
You can create a test file or add it to your pre-commit hook to ensure you have your configuration files all set up.
Here is an example of how you can use the config.has() to check that a config variable exists:
js
if (config.has('dbConfig')) {
...
}
You can also use it in your Jest test, like this:
js
const config = require('config');
test('Server config exist', () => {
    expect(config.has("server")).toBe(true);
});
test('Default config exist', () => {
    expect(config.has("server.port")).toBe(true);
    expect(config.has("server.host")).toBe(true);
});
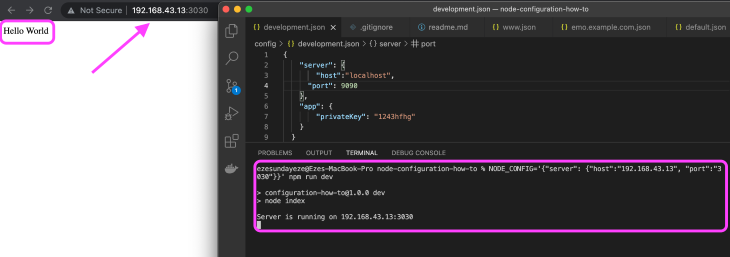
Using command line override allows you to specify the configuration parameters on the fly from your terminal or command line. You’ll need to set the configuration by specifying the NODE_CONFIG='{...}' command when starting the application. The parameters must be in a JSON string format.
Here is an example:
bash
NODE_CONFIG='{"server": {"host":"192.168.43.13", "port":"3030"}}' npm run dev

The single quotation marks around the JSON value allow you to use the double quotation marks safely. On some occasions, depending on your operating system, you might need to escape some characters. You can also use the command line export to avoid typing the command all the time.
Running the command below on your terminal will override the host and port of your server or any other configuration you choose to override.
bash
export NODE_CONFIG='{"server": {"host":"192.168.43.13", "port":"3030"}}'
If you prefer to use JavaScript, you can add it to your server file before calling the configuration library, as shown below:
js
const express = require('express');
process.env.NODE_CONFIG = '{"server": {"host":"localhost", "port":"3030"}}';
const config = require('config');
The trick is to set the NODE_CONFIG variable to a JSON string before config loads.
This happens because the command line override takes precedence over all other types of overrides. Below are some reserved words you cannot use as environment variables when using node-config, as the library offers implementations of them that might collide with yours.
get
has
util
getConfigSources
makeHidden
makeImmutable
setModuleDefaults
watch
_attachProtoDeep
_cloneDeep
_diffDeep
This is not an exhaustive list, so be sure to check out the docs.
There are a few plugins that you can integrate into node-config to enhance its usage. For example, config-secrets allows you to efficiently use node-config with Docker to manage secrets in your container, config-reloadable allows you to reload node-config automatically (as you may already know, configurations are not automatically loaded on file change), and the config-uncache plugin allows you to uncache your config variables.
There are endless ways to configure your Node app when using node-config. With it, you can easily manage your config files and extend them as you desire, allowing for maximum flexibility, reliability, and consistency within your project. Thanks for reading.
 Monitor failed and slow network requests in production
Deploying a Node-based web app or website is the easy part. Making sure your Node instance continues to serve resources to your app is where things get tougher. If you’re interested in ensuring requests to the backend or third-party services are successful, try LogRocket.

LogRocket lets you replay user sessions, eliminating guesswork around why bugs happen by showing exactly what users experienced. It captures console logs, errors, network requests, and pixel-perfect DOM recordings — compatible with all frameworks.
LogRocket's Galileo AI watches sessions for you, instantly identifying and explaining user struggles with automated monitoring of your entire product experience.
LogRocket instruments your app to record baseline performance timings such as page load time, time to first byte, slow network requests, and also logs Redux, NgRx, and Vuex actions/state. Start monitoring for free.
Would you be interested in joining LogRocket's developer community?
Join LogRocket’s Content Advisory Board. You’ll help inform the type of content we create and get access to exclusive meetups, social accreditation, and swag.
Sign up now
Learn how to integrate MediaPipe’s Tasks API into a React app for fast, in-browser object detection using your webcam.

Integrating AI into modern frontend apps can be messy. This tutorial shows how the Vercel AI SDK simplifies it all, with streaming, multimodal input, and generative UI.

Interviewing for a software engineering role? Hear from a senior dev leader on what he looks for in candidates, and how to prepare yourself.

Set up real-time video streaming in Next.js using HLS.js and alternatives, exploring integration, adaptive streaming, and token-based authentication.
2 Replies to "Creating configuration files in Node.js using node-config"
Would be great if you could extend this article to explain how to ensure remote credentials are loaded in config (e.g. from Azure Keyvault) as part of config setup as this is a common scenario when deploying (e.g. Docker etc). Explain how to avoid application not finding required config as JS is non-blocking so startup execution may continue before remote keys are retrieved.
the config directory has to be outside src?