Over the last decade, businesses of all kinds have started building out ecommerce platforms to make more sales and reach new customers globally. Business owners and developers alike have adopted Shopify, WooCommerce, Magento, openCart, and PrestaShop, among others, to build out their ecommerce offerings.

But in this tutorial, we’ll be exploring a new alternative to building an ecommerce platform using the JAMstack.
The Replay is a weekly newsletter for dev and engineering leaders.
Delivered once a week, it's your curated guide to the most important conversations around frontend dev, emerging AI tools, and the state of modern software.
The JAM in JAMstack stands for JavaScript, API, and Markup. This stack provides a simpler way to build web applications. The JAMstack started in 2016 when a group of developers came together with the belief that static websites should be completely static.
By 2017, the JAMstack started gaining adoption by a wider group of developers, and the first set of enterprise JAMstack projects was announced. In 2018, the first JAMstack conference was held, and ever since, tools like Netlify, Gatsby, and Contentful have been helping in promoting the stack, and the community is rapidly growing.
The JAMstack provides:
In this tutorial, we’ll be building a simple fashion ecommerce platform using the jamstack-ecommerce starter template. It’s built with the Gatsby framework and uses Tailwind CSS for styling.
Gatsby is an open-source, React-based framework for creating websites and apps. With Gatsby, you can integrate data from APIs, databases, CMS, static files, etc., or multiple sources at once. With more than 2,000 plugins, Gatsby has performance, scalability, and security built in by default.
Before you install Gatsby, you need Node.js installed and set up properly. To install Gatsby:
npm install -g gatsby-cli
To make sure Gatsby is installed properly and see all available commands:
gatsby --help
To create a Gatsby project:
gatsby new jamstack-commerce
This will go ahead and install all the necessary dependencies. Once the Gatsby project has been created, navigate to the project folder in your terminal and run:
gatsby develop
As long as your development server is running, you can visit the site locally at http://localhost:8000/.
To get started with the jamstack-ecommerce starter template:
git clone https://github.com/jamstack-cms/jamstack-ecommerce.git jamstack_fashion
Out of the box, a typical Gatsby project will contain the following files and folders:
/src – contains all the code related to what you will see on the frontend of our application, such as the site header, page template, etc./components – contains templates for programmatically creating pages/context – contains context logic to be used in our application/images – contains images to be used on the pages of our application/layouts – contains the base layout and layout styling used by our application/pages – components under src/pages become pages automatically, with paths based on their filename/styles – contains CSS style rules and directives to be used on the pages of our application/templates – components under src/templates are page templates used to create application pages in our application/providers – contains all the code related to the logic of our application, such as fetching and resolving data and all other API operations/static – contains all the static assets used in our application, such as fonts, product images, etc./snippets – contains logic such as payment logic for different processors/utils – contains all other smaller functions and logic used in our applicationgatsby-browser.js – this file is where Gatsby expects to find any usage of the Gatsby browser APIs, if any. This allows customization/extension of default Gatsby settings affecting the browsergatsby-config.js – this is the main configuration file for a Gatsby site. This is where you can specify information about your site (metadata) like the site title and description, which Gatsby plugins you’d like to include, etc.gatsby-node.js – this file is where Gatsby expects to find any usage of the Gatsby node APIs if any. This allows customization/extension of default Gatsby settings affecting pieces of the site build process.gatsby-ssr.js – this file is where Gatsby expects to find any usage of the Gatsby server-side rendering APIs, if any. This allows customization of default Gatsby settings affecting server-side renderingWe’ll be using Tailwind CSS to style our application. To install Tailwind:
# Using npm
npm install tailwindcss
# Using Yarn
yarn add tailwindcss
Every product on our fashion website will have its product image. Let’s go ahead and delete all the images in the static/images folder and add ours. You can go ahead and further categorize them as you wish by category name, product type, etc.
If you’ll have a custom font you’d like to use, replace the contents of the static/fonts folder with your custom font. Now, our /static folder looks like this:
|-- /static
    |-- /fonts
    |-- /images
        |-- /product_image.png
To add your site logo and favicon, you can replace the site logo and icon located in the src/images folder. Files in the static folder will be built and served in the public folder.
With the jamstack-ecommerce starter template, every product is an inventory item, and they’re all hardcoded into a simple array. This can easily be reconfigured to instead fetch from a remote source like Shopify or another CMS or data source by changing the inventory provider in providers/inventoryProvider.
For our fashion website, let’s hardcode our fashion inventory. Replace the inventory list with the one below. Make sure you add the correct path to the product image.
The inventory schema will follow the convention below. You can decide to expand this scheme or remove certain fields, depending on your needs.
type Product {
  id: ID!
  categories: [String]!
  price: Float!
  name: String!
  image: String!
  description: String!
  currentInventory: Int!
  brand: String
}
Our inventory array in providers/inventory.js will look like this:
let inventory = [
  // Arrivals
  { categories: ['new arrivals', 'men'], name: 'Blue Stripes', price: '1000', image: '../images/products/man1.jpg', description: 'Lorem ipsum dolor sit amet, consectetur adipiscing elit. Nam fringilla augue nec est tristique auctor. Donec non est at libero vulputate rutrum.', brand: 'Jason Bourne', currentInventory: 4 },
  { categories: ['new arrivals', 'men'], name: 'Checkers', price: '1000', image: '../images/products/man2.jpg', description: 'Lorem ipsum dolor sit amet, consectetur adipiscing elit. Nam fringilla augue nec est tristique auctor. Donec non est at libero vulputate rutrum.' , brand: 'Jason Bourne' , currentInventory: 2 },
  { categories: ['new arrivals', 'men'], name: 'Black Leather Jacket', price: '800', image: '../images/products/man3.jpg', description: 'Lorem ipsum dolor sit amet, consectetur adipiscing elit. Nam fringilla augue nec est tristique auctor. Donec non est at libero vulputate rutrum.', brand: 'Jason Bourne', currentInventory: 8 },
  { categories: ['new arrivals', 'men'], name: 'Corperate Blue', price: '900', image: '../images/products/man4.jpg', description: 'Lorem ipsum dolor sit amet, consectetur adipiscing elit. Nam fringilla augue nec est tristique auctor. Donec non est at libero vulputate rutrum.' , brand: 'Jason Bourne', currentInventory: 10},
  { categories: ['new arrivals', 'women'], name: 'Red Gown', price: '1200', image: '../images/products/woman1.jpg', description: 'Lorem ipsum dolor sit amet, consectetur adipiscing elit. Nam fringilla augue nec est tristique auctor. Donec non est at libero vulputate rutrum.', brand: 'Jason Bourne' , currentInventory: 7 },
  { categories: ['new arrivals', 'women'], name: 'Brown Stripe Armless', price: '500', image: '../images/products/woman2.jpg', description: 'Lorem ipsum dolor sit amet, consectetur adipiscing elit. Nam fringilla augue nec est tristique auctor. Donec non est at libero vulputate rutrum.' , brand: 'Jason Bourne', currentInventory: 13},
  { categories: ['new arrivals', 'women'], name: 'America 88', price: '650', image: '../images/products/woman3.jpg', description: 'Lorem ipsum dolor sit amet, consectetur adipiscing elit. Nam fringilla augue nec est tristique auctor. Donec non est at libero vulputate rutrum.' , brand: 'Jason Bourne', currentInventory: 9},
  { categories: ['new arrivals', 'women'], name: 'Peach Belt Gown', price: '1230', image: '../images/productswoman4.jpg', description: 'Lorem ipsum dolor sit amet, consectetur adipiscing elit. Nam fringilla augue nec est tristique auctor. Donec non est at libero vulputate rutrum', brand: 'Jason Bourne', currentInventory: 24 },
  //Outdoor
  { categories: ['outdoor'], name: 'Grey Top', price: '800', image: '../images/products/outdoor1.jpg', description: 'Lorem ipsum dolor sit amet, consectetur adipiscing elit. Nam fringilla augue nec est tristique auctor. Donec non est at libero vulputate rutrum.', brand: 'Jason Bourne', currentInventory: 43 },
  { categories: ['outdoor'], name: 'Red Mini Gown', price: '900', image: '../images/products/outdoor2.jpg', description: 'Lorem ipsum dolor sit amet, consectetur adipiscing elit. Nam fringilla augue nec est tristique auctor. Donec non est at libero vulputate rutrum.', brand: 'Jason Bourne' , currentInventory: 2},
  { categories: ['outdoor'], name: 'Outdoor Chiffon', price: '1200', image: '../images/products/outdoor3.jpg', description: 'Lorem ipsum dolor sit amet, consectetur adipiscing elit. Nam fringilla augue nec est tristique auctor. Donec non est at libero vulputate rutrum.', brand: 'Jason Bourne', currentInventory: 14 },
  // Women
  { categories: ['women'], name: 'Red Gown', price: '300', image: '../images/products/woman1.jpg', description: 'Lorem ipsum dolor sit amet, consectetur adipiscing elit. Nam fringilla augue nec est tristique auctor. Donec non est at libero vulputate rutrum.' , brand: 'Jason Bourne', currentInventory: 12 },
  { categories: ['women'], name: 'Brown Stripe Armless', price: '825', image: '../images/products/woman2.jpg', description: 'Lorem ipsum dolor sit amet, consectetur adipiscing elit. Nam fringilla augue nec est tristique auctor. Donec non est at libero vulputate rutrum.' , brand: 'Jason Bourne', currentInventory: 13},
  { categories: ['women'], name: 'America 88', price: '720', image: '../images/products/woman3.jpg', description: 'Lorem ipsum dolor sit amet, consectetur adipiscing elit. Nam fringilla augue nec est tristique auctor. Donec non est at libero vulputate rutrum.' , brand: 'Jason Bourne', currentInventory: 33},
  { categories: ['women'], name: 'Peach Belt Gown', price: '2000', image: '../images/products/woman4.jpg', description: 'Lorem ipsum dolor sit amet, consectetur adipiscing elit. Nam fringilla augue nec est tristique auctor. Donec non est at libero vulputate rutrum.', brand: 'Jason Bourne', currentInventory: 23 },
  { categories: ['women'], name: 'Blue Sweater', price: '1100', image: '../images/products/woman5.jpg', description: 'Lorem ipsum dolor sit amet, consectetur adipiscing elit. Nam fringilla augue nec est tristique auctor. Donec non est at libero vulputate rutrum.' , brand: 'Jason Bourne', currentInventory: 13},
  { categories: ['women'], name: 'Black Female Singlet', price: '600', image: '../images/products/woman6.jpg', description: 'Lorem ipsum dolor sit amet, consectetur adipiscing elit. Nam fringilla augue nec est tristique auctor. Donec non est at libero vulputate rutrum.', brand: 'Jason Bourne', currentInventory: 15 },
  // Men
  { categories: ['men'], name: 'Blue Stripes', price: '775', image: '../images/products/man1.jpg', description: 'Lorem ipsum dolor sit amet, consectetur adipiscing elit. Nam fringilla augue nec est tristique auctor. Donec non est at libero vulputate rutrum.', brand: 'Jason Bourne', currentInventory: 44 },
  { categories: ['men'], name: 'Checkers', price: '1200', image: '../images/products/man2.jpg', description: 'Lorem ipsum dolor sit amet, consectetur adipiscing elit. Nam fringilla augue nec est tristique auctor. Donec non est at libero vulputate rutrum.', brand: 'Jason Bourne', currentInventory: 17 },
  { categories: ['men'], name: 'Black Leather Jacket', price: '1600', image: '../images/products/man3.jpg', description: 'Lorem ipsum dolor sit amet, consectetur adipiscing elit. Nam fringilla augue nec est tristique auctor. Donec non est at libero vulputate rutrum.', brand: 'Jason Bourne', currentInventory: 28 },
  { categories: ['men'], name: 'Corporate Blue', price: '550', image: '../images/products/man4.jpg', description: 'Lorem ipsum dolor sit amet, consectetur adipiscing elit. Nam fringilla augue nec est tristique auctor. Donec non est at libero vulputate rutrum.', brand: 'Jason Bourne', currentInventory: 31 },  // {
]
As seen above, our inventory schema requires each inventory item to have a:
From our inventory list above, We’ve created four categories:
You can always add more categories as needed. An inventory item can also belong to multiple categories.
Depending on your preference, you might require the store currency to be changed. To assign another currency to be used by our website, change the DENOMINATION variable to your preferred currency denomination symbol in your inventory provider.
import inventory from './inventory';
async function getInventory() {
  return new Promise((resolve, reject) => {
    resolve(inventory)
  })
}
const DENOMINATION = '£'
export { DENOMINATION, getInventory as default }
By default, the currency denomination used is dollars, $.
We need to create a theme for our application. With the theme, we’ll be able to define our primary and secondary colors. These colors will be used to style our application, especially components such as the call to action buttons, cart items, etc.
Open the theme file, src/theme.js, from the project root and edit the primary and secondary colors to those of your choice:
const colors = {
  primary: '#000000',
  secondary: '#00baa6'
}
export {
  colors
}
The jamstack-ecommerce starter template comes with a modern UI layout, and you might find you don’t need to change it much, if at all. If you’re looking to give your site a new layout or modify the existing one, the src/pages/index.js file is the site’s landing page.
For the sake of this tutorial, I’ve gone ahead and modified the default layout, adding more categories and a trending section that shows what items are being purchased by other customers. Replace the content of the src/pages/index.js with the below:
import React from "react"
import SEO from "../components/seo"
import { Center, Footer, Tag, Showcase, DisplaySmall, DisplayMedium } from '../components'
import CartLink from '../components/CartLink'
import { titleIfy, slugify } from '../../utils/helpers'
import { graphql } from 'gatsby'
const Home = ({ data: gqlData }) => {
  const { inventoryInfo, categoryInfo: { data }} = gqlData
  const categories = data.slice(0, 8)
  const inventory = inventoryInfo.data.slice(0, 8)
  return (
    <>
      <CartLink />
      <SEO title="Home" />
      <div className="w-full">
        <div className="bg-green-200
        lg:h-hero
        p-6 pb-10 smpb-6
        flex lg:flex-row flex-col">
          <div className="pt-4 pl-2 sm:pt-12 sm:pl-12 flex flex-col">
            <Tag
              year="2020"
              category="Men"
            />
            <Center
              price="200"
              title={inventory[1].name}
              link={slugify(inventory[1].name)}
            />
            <Footer
              designer="Jason Bourne"
            />
          </div>
          <div className="flex flex-1 justify-center items-center relative">
              <Showcase
                imageSrc={inventory[1].image}
              />
              <div className="absolute
              w-48 h-48 sm:w-72 sm:h-72 xl:w-88 xl:h-88
              bg-white z-0 rounded-full" />
          </div>
        </div>
      </div>
      <div className="my-4 lg:my-8 flex flex-col lg:flex-row justify-between">
        <DisplayMedium imageSrc={categories[0].image} subtitle={`${categories[0].itemCount} items`} title={titleIfy(categories[0].name)} link={slugify(categories[0].name)} />
        <DisplayMedium imageSrc={categories[1].image} subtitle={`${categories[1].itemCount} items`} title={titleIfy(categories[1].name)} link={slugify(categories[1].name)} />
      </div>
      <div className="my-4 lg:my-8 flex flex-col lg:flex-row justify-between">
        <DisplayMedium imageSrc={categories[2].image} subtitle={`${categories[2].itemCount} items`} title={titleIfy(categories[2].name)} link={slugify(categories[2].name)} />
        <DisplayMedium imageSrc={categories[3].image} subtitle={`${categories[3].itemCount} items`} title={titleIfy(categories[3].name)} link={slugify(categories[3].name)} />
      </div>
      <div className="pt-10 pb-6 flex flex-col items-center">
        <h2 className="text-4xl mb-3">Trending Now</h2>
        <p className="text-gray-600 text-sm">See what others are buying this summer.</p>
      </div>
      <div className="my-8 flex flex-col lg:flex-row justify-between">
        <DisplaySmall imageSrc={inventory[0].image} title={inventory[0].name} subtitle={inventory[0].categories[0]} link={slugify(inventory[0].name)} />
        <DisplaySmall imageSrc={inventory[4].image} title={inventory[4].name} subtitle={inventory[4].categories[0]} link={slugify(inventory[4].name)} />
        <DisplaySmall imageSrc={inventory[1].image} title={inventory[1].name} subtitle={inventory[1].categories[0]} link={slugify(inventory[1].name)} />
        <DisplaySmall imageSrc={inventory[5].image} title={inventory[5].name} subtitle={inventory[5].categories[0]} link={slugify(inventory[5].name)} />
      </div>
    </>
  )
}
export const pageQuery = graphql`
  query {
    navInfo {
      data
    }
    categoryInfo {
      data {
        name
        image
        itemCount
      }
    }
    inventoryInfo {
      data {
        image
        name
        categories
        description
        id
      }
    }
  }
`
export default Home
From the above, we use GraphQL to query our inventory to fetch categories and inventory items. The Hero section uses three components: Tag, C``enter, Footer, Showcase. Each necessary component attribute has also been passed.
We use the DisplayMedium component to create two sections to display our categories to our users, and finally, we use the DisplaySmall component to display trending items.
The inventory items displayed can easily be changed as they’re hardcoded.
Now that we’ve fully built all our components, let’s our application:
gatsby develop
This will compile our application and serve it as a public folder on localhost:8000. Open the link in your browser and you should see something similar to the below:

An ecommerce platform is never complete without SEO. Using the JAMstack, we’re able to easily achieve SEO using React Helmet. React Helmet tailors page metadata to each page’s contents to improve SEO. To install:
npm install --save gatsby-plugin-react-helmet react-helmet
And then import it in our code like so:
import { Helmet } from "react-helmet";
Create the src/components/seo.js file:
import React from "react"
import PropTypes from "prop-types"
import Helmet from "react-helmet"
import { useStaticQuery, graphql } from "gatsby"
function SEO({ description, lang, meta, title }) {
  const { site } = useStaticQuery(
    graphql`
      query {
        site {
          siteMetadata {
            title
            description
            author
          }
        }
      }
    `
  )
  const metaDescription = description || site.siteMetadata.description
  return (
    <Helmet
      htmlAttributes={{
        lang,
      }}
      title={title}
      titleTemplate={`%s | ${site.siteMetadata.title}`}
      meta={[
        {
          name: `description`,
          content: metaDescription,
        },
        {
          property: `og:title`,
          content: title,
        },
        {
          property: `og:description`,
          content: metaDescription,
        },
        {
          property: `og:type`,
          content: `website`,
        },
        {
          name: `twitter:card`,
          content: `summary`,
        },
        {
          name: `twitter:creator`,
          content: site.siteMetadata.author,
        },
        {
          name: `twitter:title`,
          content: title,
        },
        {
          name: `twitter:description`,
          content: metaDescription,
        },
      ].concat(meta)}
    />
  )
}
SEO.defaultProps = {
  lang: `en`,
  meta: [],
  description: ``,
}
SEO.propTypes = {
  description: PropTypes.string,
  lang: PropTypes.string,
  meta: PropTypes.arrayOf(PropTypes.object),
  title: PropTypes.string.isRequired,
}
export default SEO
Gatsby recently introduced useStaticQuery, a new feature that allows us to use React Hooks to query with GraphQL in real time. This allows our React components to retrieve data via a GraphQL query that will be parsed, evaluated, and injected into the component.
Using the useStaticQuery Hook, we query the site title, description, and author from our gatsby-config.js. The code above makes a query to the GraphQL API to get the metadata of the website, which includes the title, description, and author. It then passes the title into the title prop and the meta array. Each entry has the name with the meta attribute name and the content for the value.
The metadata can be changed in the gatsby-config.js file and the SEO component can be used anywhere.
Now that we’ve got everything working fine, we need to deploy our website and make it live:
gatsby build
This will create a folder called public. The public folder will contain the website ready to be deployed in a production environment. You can follow this guide to deploy on Netlify, Surge, AWS, Digital Ocean, Azure, GitLab, Heroku, Firebase, etc.
The JAMstack is relatively new, but the possibilities are endless. It’s a new set of emerging technologies with increasing adoption rate. It brings a new experience in building web applications.
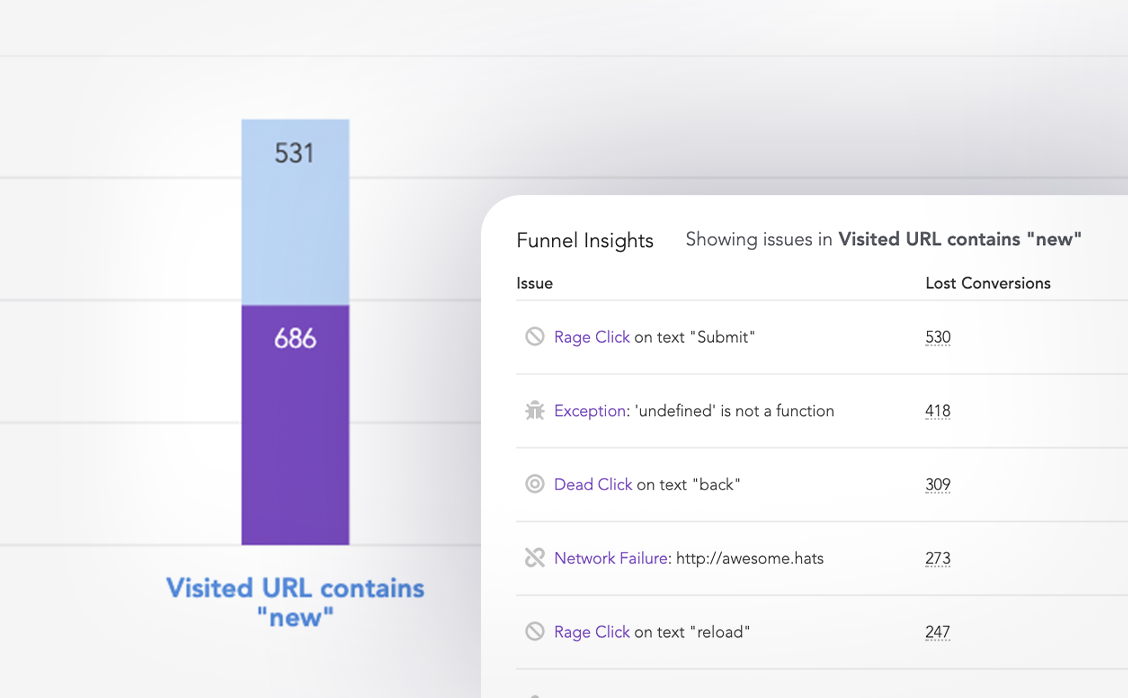
LogRocket lets you replay user sessions, eliminating guesswork around why users don't convert by showing exactly what users experienced. It captures console logs, errors, network requests, and pixel-perfect DOM recordings — compatible with all frameworks.
LogRocket's Galileo AI watches sessions for you, instantly identifying and explaining user struggles with automated monitoring of your entire product experience.
Start proactively monitoring your ecommerce apps — try LogRocket for free.

useEffect breaks AI streaming responses in ReactSee why useEffect breaks AI streaming in React, and how moving stream state outside React fixes flicker and stale updates.

A real-world debugging session using Claude to solve a tricky Next.js UI bug, exploring how AI helps, where it struggles, and what actually fixed the issue.

CSS wasn’t built for dynamic UIs. Pretext flips the model by measuring text before rendering, enabling accurate layouts, faster performance, and better control in React apps.

Why do real-time frontends break at scale? Learn how event-driven patterns reduce drift, race conditions, and inconsistent UI state.
Would you be interested in joining LogRocket's developer community?
Join LogRocket’s Content Advisory Board. You’ll help inform the type of content we create and get access to exclusive meetups, social accreditation, and swag.
Sign up now

