Phoenix is the most loved framework by developers in 2022, and by some margin too. It’s great for web development as part of the Elixir ecosystem and its reliability and scalability make it a good choice for any project.

In this tutorial, we will explore what Elixir is, the Phoenix web framework, and how to build a REST API with Elixir and Phoenix for your projects.
Skip ahead
Elixir is a functional, dynamically-typed language that is built on top of Erlang. Jose Valim, who developed Elixir, worked on the Ruby on Rails team and created it when he was attempting to solve performance bottlenecks with Ruby on Rails and Erlang.
For this reason, the syntax of Elixir has many similarities with Ruby on Rails syntax.
Elixir is mainly used to create highly scalable applications that are fault-tolerant and easily maintainable. Some of the key features of Elixir are:
Since Elixir is built on top of BEAM, an Erlang VM, it has some key characteristics that help to build great apps. These characteristics are:
When it comes to building web applications, it is difficult to build basic functionalities from scratch every time, which is where the Phoenix web framework comes into the picture.
Phoenix is a web framework in the Elixir ecosystem. It comes with modules out-the-box that help build highly scalable and fault-tolerant applications. Phoenix is a Model-View-Controller (MVC) framework similar to Ruby on Rails and Django.
One of the killer features of Phoenix framework is LiveView. Phoenix LiveView is a library that is built on top of Phoenix which helps in building real-time applications without writing client-side JavaScript. It calculates the page changes and push updates through WebSocket.
Plugs are the basic element of Phoenix. Plugs are a specification for composing a web application with functions — Phoenix receives an incoming request and converts it into Conn, which is a data structure that handles requests and responses in HTTP connections.
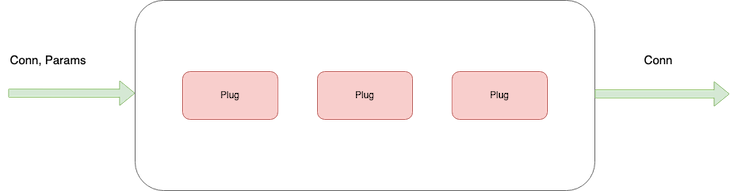
Conn data structure is passed through several plugs to complete the functionality and return a response. To simplify it:
connAs we’ve noted, an incoming request in phoenix goes through several plugs to return the required response — let’s look into the details of the plugs and process:
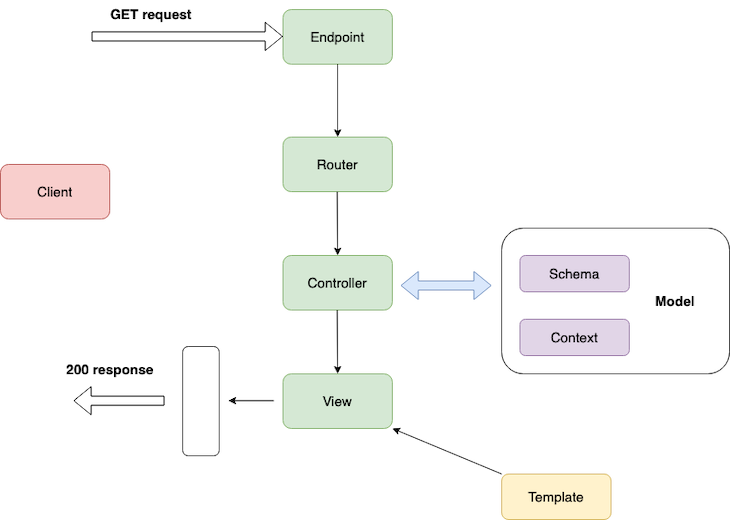
Phoenix receives a request at the endpoint and the endpoint converts it into a Conn data structure, forwarding it to the router.
The router pipelines the Conn data structure into the controller, and the controller interacts with the model to fetch data from the database and render it using templates. Templates can be HTML or JSON files. Here, the endpoint, router, and controllers are plugs — everything in Phoenix is a composable function that transforms data into different structure.
Now we are familiar with the Phoenix web framework, let’s build a REST API with Elixir and Phoenix to use for a project. Here, we are going to create a REST API which delivers users information to a Postgres database.
The API will serve user information under /api/users, with GET, PUT, POST, DELETE requests.
To do this, we need to create database schema with required fields that are stored in the database:
id → Primary key in the table.name → String contains user name.email → Email field, it should be unique.role → User role.address → User address.Before you proceed further, I’d recommend you meet the following prerequisites:
First and foremost, let’s install Elixir on your machine. To install elixir on macOS, you can use Homebrew package manager.
Installing Elixir on macOS
Before installation, update Homebrew using:
$ brew update
After this, you can install Elixir using the following:
$ brew install elixir
You also need to install the Elixir package manager Hex. Run the following command to install Hex:
$ mix local.hex
To verify that the installation is successful, you can run this to check the version:
$ elixir -v

(Note: For other operating systems, you can refer the Elixir official guide that provides a simple step-by-step guide for installation)
Installing Phoenix
Now we’ve installed Elixir, Let’s bootstrap a project using the Phoenix framework to build a REST API.
$ mix archive.install hex phx_new 1.5.3
This installs Phoenix 1.5.3 on your machine. To create a new project, you need to run the following command in the terminal:
$ mix phx.new users_api --no-html --no-webpack --binary-id

$ cd users_api
This will create a users_api directory, with all the boilerplate for a Phoenix application. It follows a directory structure like this:
├── _build
├── assets
├── config
├── deps
├── lib
│   ├── hello
│   ├── hello.ex
│   ├── hello_web
│   └── hello_web.ex
├── priv
└── test
(Note: The official Phoenix docs explain the directory structure in detail, and you can refer to it here)
The --no-html and --no-webpack parameters instruct the command to not generate HTML files and static assets since we’re only building a REST API.
--binary-id will configure Ecto to use a UUID for database schemas such as primary key values.
Now, we will scaffold the application with boilerplate code. Let’s run the Postgres database and connect the application to the database.
Firstly, make sure you install Docker on your machine. Running Postgres via Docker is simple; just need run the following command:
$ docker run --name phoenix-postgres -e POSTGRES_USER=postgres -e POSTGRES_PASSWORD=postgres -p 5500:5432 -d postgres
Here, we specify --name for the Docker container and environment for POSTGRES_USER and POSTGRES_PASSWORD. We also need to map the port by specifying -p . Finally, we pull the Docker image in detached mode.
Once Postgres is up and running, we configure the database in the Phoenix application. Phoenix provides a config directory to setup databases, cron jobs, loggers, and stack traces in the application.
To configure the database in the development environment, change config/dev.exs with Postgres database credentials.
# Configure your database
config :users_api, UsersApi.Repo,
  username: "postgres",
  password: "postgres",
  database: "users_api_dev",
  hostname: "localhost",
  port: "5500",
  show_sensitive_data_on_connection_error: true,
  pool_size: 10
After this, you can create a database for the development environment like so:
$ mix ecto.create
And you can drop the database using this:
$ mix ecto.drop
Once you create a database and configure it in the application, you need to model the data to access it inside the app.
Phoenix contexts
Before we start with schema design, it’s important to know about Phoenix contexts. Contexts are modules that group the related functionalities together. When you design an application, Phoenix helps to group modules based on the context. Think of it like domains in Domain-Driven Design.
Context will group different modules together based on the functionalities.
To give an example, Elixir Logger.info/1 is made up of several modules, but we can access those modules in a single Logger module context.
To create context for modeling, you can use the Phoenix generator command in the application:
$ mix phx.gen.context Admin User users
  name:string email:string:unique role:string address:string
Here, we have:
Admin, as a context’s module nameUser, as the schema’s module nameUsers, as the database table nameTo define the users field and its type while generating the database table, you can refer to the schema field definition from the hex docs.
Once you run the command, it will create lib/admin/user.ex, which contains the schema definition.
defmodule UsersApi.Admin.User do
  use Ecto.Schema
  import Ecto.Changeset
  @primary_key {:id, :binary_id, autogenerate: true}
  @foreign_key_type :binary_id
  schema "users" do
    field :address, :string
    field :email, :string
    field :name, :string
    field :role, :string
    timestamps()
  end
  @doc false
  def changeset(user, attrs) do
    user
    |> cast(attrs, [:name, :email, :role, :address])
    |> validate_required([:name, :email, :role, :address])
    |> unique_constraint(:email)
  end
end
It also scaffolds the REST API for the users module in users_api/admin.ex.
defmodule UsersApi.Admin do
  @moduledoc """
  The Admin context.
  """
  import Ecto.Query, warn: false
  alias UsersApi.Repo
  alias UsersApi.Admin.User
  @doc """
  Returns the list of users.
  ## Examples
      iex> list_users()
      [%User{}, ...]
  """
  def list_users do
    Repo.all(User)
  end
  @doc """
  Gets a single user.
  Raises `Ecto.NoResultsError` if the User does not exist.
  ## Examples
      iex> get_user!(123)
      %User{}
      iex> get_user!(456)
      ** (Ecto.NoResultsError)
  """
  def get_user!(id), do: Repo.get!(User, id)
  @doc """
  Creates a user.
  ## Examples
      iex> create_user(%{field: value})
      {:ok, %User{}}
      iex> create_user(%{field: bad_value})
      {:error, %Ecto.Changeset{}}
  """
  def create_user(attrs \\ %{}) do
    %User{}
    |> User.changeset(attrs)
    |> Repo.insert()
  end
  @doc """
  Updates a user.
  ## Examples
      iex> update_user(user, %{field: new_value})
      {:ok, %User{}}
      iex> update_user(user, %{field: bad_value})
      {:error, %Ecto.Changeset{}}
  """
  def update_user(%User{} = user, attrs) do
    user
    |> User.changeset(attrs)
    |> Repo.update()
  end
  @doc """
  Deletes a user.
  ## Examples
      iex> delete_user(user)
      {:ok, %User{}}
      iex> delete_user(user)
      {:error, %Ecto.Changeset{}}
  """
  def delete_user(%User{} = user) do
    Repo.delete(user)
  end
  @doc """
  Returns an `%Ecto.Changeset{}` for tracking user changes.
  ## Examples
      iex> change_user(user)
      %Ecto.Changeset{data: %User{}}
  """
  def change_user(%User{} = user, attrs \\ %{}) do
    User.changeset(user, attrs)
  end
end
To run the migration for the defined data schema, you need to run the following command:
$ mix ecto.migrate
Once you run the migration, it will create a table in the database with the defined fields, as in the schema.
Now, we have the database schema and model defined in the application, we need to wire it with Controller and View to return the response.
To generate Controller and View for a specific module, Phoenix provides a generator command that can generate boilerplate code:
$ mix phx.gen.json Admin User users
  name:string email:string:unique role:string address:string --no-context --no-schema
The above command generates:
lib/users_api_web/controllers/users_controller.exlib/users_api_web/view/users_view.exWe also mention --no-context and --no-schema, since we already generated them while creating the database schema.
Phoenix also provides users_api_web/controllers/fallback_controller.ex to handle errors and fallbacks for any failures. We can edit them to handle different error codes. For example, you can edit fallback controllers to handle UnAuthorized errors.
defmodule MyFallbackController do
  use Phoenix.Controller

  def call(conn, {:error, :not_found}) do
    conn
    |> put_status(:not_found)
    |> put_view(MyErrorView)
    |> render(:"404")
  end

  def call(conn, {:error, :unauthorized}) do
    conn
    |> put_status(403)
    |> put_view(MyErrorView)
    |> render(:"403")
  end
end
By default, Phoenix configures the fallback controller in the main controller — you can change them in users_api_web/controllers/user_controller.ex.
action_fallback UsersApiWeb.FallbackController
Once you create a controller and view, you need to add a route for the controller in lib/users_api_web/router.ex.
defmodule UsersApiWeb.Router do
  use UsersApiWeb, :router
  pipeline :api do
    plug :accepts, ["json"]
  end
  scope "/api", UsersApiWeb do
    pipe_through :api
    get "/users", UserController, :index
    put "/users", UserController, :edit
    post "/users", UserController, :create
    delete "/users", UserController, :delete
  end
  # Enables LiveDashboard only for development
  #
  # If you want to use the LiveDashboard in production, you should put
  # it behind authentication and allow only admins to access it.
  # If your application does not have an admins-only section yet,
  # you can use Plug.BasicAuth to set up some basic authentication
  # as long as you are also using SSL (which you should anyway).
  if Mix.env() in [:dev, :test] do
    import Phoenix.LiveDashboard.Router
    scope "/" do
      pipe_through [:fetch_session, :protect_from_forgery]
      live_dashboard "/dashboard", metrics: UsersApiWeb.Telemetry
    end
  end
end
As you can see, you can group different routes into a single endpoint. Here, we nest all the /users routes inside /api scope. Inside /api scope, we configure CRUD for the Users API.
There is another simplified version for configuring a CRUD request for a module. We can use resources from the Phoenix router module:
resources "/users", UserController
By configuring its resources like this; it simplifies all the requests in a single line.
 scope "/api", UsersApiWeb do
    pipe_through :api
    resources "/users", UserController, except: [:new, :edit]
Now, you can run the application using the following:
$ mix phx.server

And you’re done! Thanks for following along with this tutorial, I hope you found it useful and feel free to post your findings in the comments below. You can test the API at http://localhost:4000, and you can refer the complete code for this tutorial here.
Install LogRocket via npm or script tag. LogRocket.init() must be called client-side, not
server-side
$ npm i --save logrocket

// Code:

import LogRocket from 'logrocket';
LogRocket.init('app/id');
// Add to your HTML:

<script src="https://cdn.lr-ingest.com/LogRocket.min.js"></script>
<script>window.LogRocket && window.LogRocket.init('app/id');</script>

From RSC vulnerabilities and the Vercel breach to TypeScript 7.0 Beta and AI agents — the nine frontend storylines that defined H1 2026, ranked.

AI tools generate working React code fast, but miss race conditions, empty states, debouncing, and accessibility. Here’s how to catch bugs before production.

Learn how to use Gemini CLI subagents to delegate frontend, backend, testing, and docs tasks to specialized agents with guardrails and clear ownership.

Learn how next-browser gives AI agents runtime context for debugging Next.js apps, including React props, hydration, PPR, forms, and performance.
Would you be interested in joining LogRocket's developer community?
Join LogRocket’s Content Advisory Board. You’ll help inform the type of content we create and get access to exclusive meetups, social accreditation, and swag.
Sign up now

