Editor’s note: This article was last updated on 18 August 2022 to reflect changes made in Firebase v9 and Vue v3.

When building any type of application, privacy and security are two important factors to keep in mind. With cyber criminals becoming more advanced, authentication is an important step to deter hacking and protect your users’ most valuable information.
Firebase Authentication provides backend services to help authenticate users in your application, supporting different authentication methods, like passwords and phone numbers, and supporting identity providers including Google, Twitter, and Facebook.
To integrate Firebase Authentication into your application, you can use either the Firebase UI, which handles the UI flows for signing users in with different providers, or you can manually set up the Firebase SDK in your project and configure support for whatever provider you would like to use.
In this tutorial, we’ll set up Firebase manually. We’ll create the different views needed for user registration and sign-in, then finally provide support for email and password authentication.
To follow along with this article, you can access the full codebase. Let’s get started!
Dashboard componentTo get started, we’ll use the Vue CLI v3.0 to quickly scaffold a new Vue project. If you already have an older version of the CLI installed, you can uninstall it by running the command below:
npm uninstall -g vue/cli
Then, install the new CLI globally by running the following command:
npm install -g @vue/cli
Next, create a new Vue project by running the command below:
vue create firebase-auth
You’ll be prompted to pick a preset. Select Default ([Vue 3] babel, eslint), which will scaffold a new Vue application in the specified location.
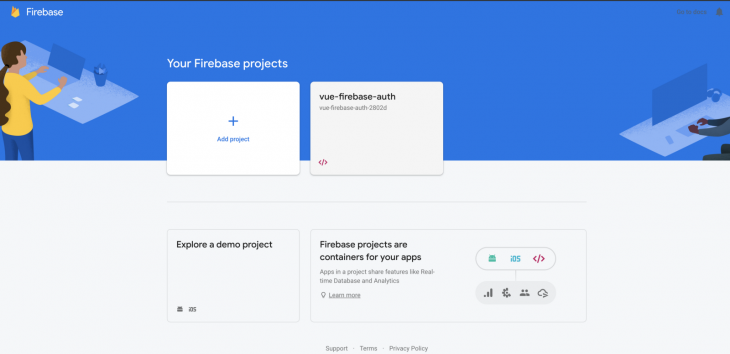
To begin using Firebase, you’ll need a Gmail account. Head over to https://console.firebase.google.com/u/0/ and create a new project:
Firebase provides support for authentication using different methods, like social auth, phone numbers, and the standard email and password.
In this tutorial, we’ll use the email and password authentication method. We need to enable it for the project we just created in Firebase because it is disabled by default.
Under the authentication section for your project, click the sign-in method, and you should see a list of the providers Firebase currently supports:
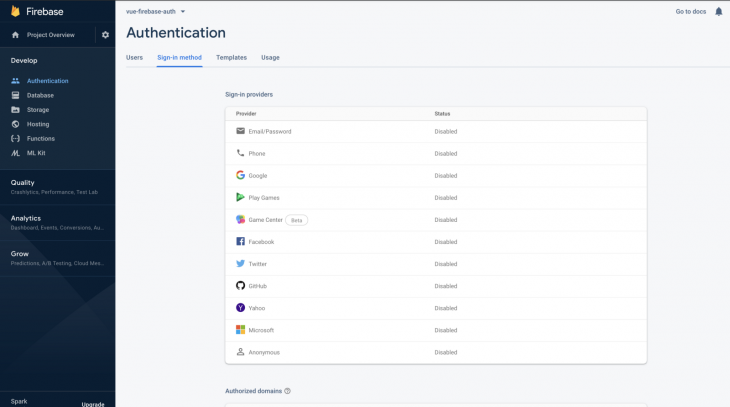
Next, click the edit icon on the Email/Password provider and switch the Enable toggle on:
![]()
Next, you need to register your application under your Firebase project. On the project’s overview page, under Get started by adding Firebase to your app, select the web icon:
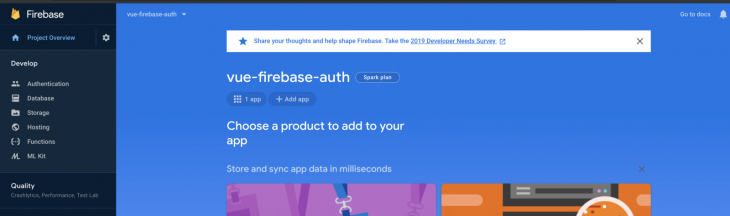
Once you’re done registering the application, you’ll be presented with an Add Firebase SDK section containing your application credentials. Take note of the firebaseConfig object, which we’ll use shortly in our Vue application.
Next, cd into your project’s directory and run the following command to install all the required dependencies:
npm i firebase vue-router@4 vuex@next
Now, we can set up Firebase with our Vue project. In the main.js file, we’ll import the Firebase package and configure it to use the application credentials we noted from the Firebase console earlier. In the src folder, create a file called firebaseConfig.js, then add the application credentials, which should be similar to the code below:
// Import the functions you need from the SDKs you need
import { initializeApp } from "firebase/app";
import { getAuth } from 'firebase/auth'


const firebaseConfig = {
  apiKey: process.env.VUE_APP_FIREBASE_API_KEY,
  authDomain: process.env.VUE_APP_FIREBASE_AUTH_DOMAIN,
  databaseURL: process.env.VUE_APP_FIREBASE_DATABASE_URL,
  projectId: process.env.VUE_APP_FIREBASE_PROJECT_ID,
  storageBucket: process.env.VUE_APP_FIREBASE_STORAGE_BUCKET,
  messagingSenderId: process.env.VUE_APP_FIREBASE_MESSAGING_SENDER_ID,
  appId: process.env.VUE_APP_FIREBASE_APP_ID,
  measurementId: process.env.VUE_APP_FIREBASE_MEASUREMENT_ID
};

// Initialize Firebase
const app = initializeApp(firebaseConfig);

//initialize firebase auth
const auth = getAuth()


export { app, auth }
Don’t forget to replace the firebaseConfig vales with the Firebase credentials we noted earlier.
Now, we can go ahead and create the required components for our project.
Register.vue : Handles the logic for allowing users to register, as well as displaying the register viewLogin.vue : Handles allowing users to log in and display the login viewDashboard.vue: Shown once users have successfully registered or been authenticatedNavbar.vue : The navbar component that will be shared across all other componentsHead over to the src/components directory and run the following command to create the components we just listed above:
touch Register.vue Login.vue Dashboard.vue Navbar.vue
Before we begin working on our components, let’s add the routes that our application will have. Create a routes folder inside the src directory. Inside the folder, add an index.js file and edit the file with the following code:
import { createRouter, createWebHistory } from 'vue-router'
import Login from '../views/Login.vue';
import Register from '../views/Register.vue';
import Dashboard from '../views/Dashboard.vue';


const routes = [
        {
        path: '/login',
        name: 'login',
        component: Login
    },
    {
        path: '/register',
        name: 'Register',
        component: Register
    },
    {
        path: '/',
        name: 'Dashboard',
        component: Dashboard
    }
]


const router = createRouter({
    history: createWebHistory(),
    routes
  })

  export default router
Next, replace the content of the App.vue file with the <router-view/> tag:
<template>
<div>
<main class="py-4">
<router-view></router-view>
</main>
</div>
</template>
<script>
export default {
};
</script>
Vuex is a state management library that provides a centralized store to help manage the components in your Vue application. Create a store.js file in the src directory and add the following code to the file:
import { createStore } from 'vuex'

const store = createStore({
})

// export the store
export default store
First, we define the state that would contain a user object, which contains information about the logged-in user:
state: {
  user: {
    loggedIn: false,
    data: null
  }
},
The loggedIn property, which has a default value of false, is a boolean that tells us whether the user has been authenticated or not. The data property holds information about the logged-in user:
getters: {
    user(state){
      return state.user
    }
  },
In Vuex, getters generally provide a way of accessing data stored in the state. We’ve defined a simple getter called user that returns the user object from the state:
mutations: {
  SET_LOGGED_IN(state, value) {
    state.user.loggedIn = value;
  },
  SET_USER(state, data) {
    state.user.data = data;
  }
}
Mutations allow us to make changes to our state; here, we’ve defined two mutations. The first is SET_LOGGED_IN, which sets the loggedIn property on state.user to the value that was passed to it. SET_USER makes changes to the data property on state.user:
  actions: {
      async register(context, { email, password, name}){
          const response = await createUserWithEmailAndPassword(auth, email, password)
          if (response) {
              context.commit('SET_USER', response.user)
              response.user.updateProfile({displayName: name})
          } else {
              throw new Error('Unable to register user')
          }
      },

      async logIn(context, { email, password }){
        const response = await signInWithEmailAndPassword(auth, email, password)
        if (response) {
            context.commit('SET_USER', response.user)
        } else {
            throw new Error('login failed')
        }
    },

    async logOut(context){
        await signOut(auth)
        context.commit('SET_USER', null)
    },

    async fetchUser(context ,user) {
      context.commit("SET_LOGGED_IN", user !== null);
      if (user) {
        context.commit("SET_USER", {
          displayName: user.displayName,
          email: user.email
        });
      } else {
        context.commit("SET_USER", null);
      }
  }
  }
Actions are similar to mutations, but instead of mutating the state, they commit mutations.
For an easier flow, we’ll define all the actions for the authentication in the actions, and we’ll then dispatch them in the method.
register action uses the createUserWithEmailAndPassword() method from firebase.auth() by passing in the email and password of the user we’d like to register on Firebase.
We don’t need to hash the password since Firebase takes care of that automatically. If the registration is successful, we call the updateProfile() method on the user object that was returned to associate the name field with the user. Otherwise, we throw an exception for an error, which is then displayed to the user.
The logIn action uses the same logic as the register action (), but with a different method of signInWithEmailAndPassword().
The logout() action uses the signOut() method, which then updates the user state as null. The fetchUser action accepts the user as a parameter to update the state based on its current value.
Let’s see how we can register users and store their details on Firebase. Edit src/components/Register.vue with the following code:
<template>
  <div class="container">
    <div class="row justify-content-center">
      <div class="col-md-8">
        <div class="card">
          <div class="card-header">Register</div>
          <div class="card-body">
            <div v-if="error" class="alert alert-danger">{{error}}</div>
            <form action="#" @submit.prevent="Register">
              <div class="form-group row">
                <label for="name" class="col-md-4 col-form-label text-md-right">Name</label>

                <div class="col-md-6">
                  <input
                    id="name"
                    type="name"
                    class="form-control"
                    name="name"
                    value
                    required
                    autofocus
                    v-model="name"
                  />
                </div>
              </div>

              <div class="form-group row">
                <label for="email" class="col-md-4 col-form-label text-md-right">Email</label>

                <div class="col-md-6">
                  <input
                    id="email"
                    type="email"
                    class="form-control"
                    name="email"
                    value
                    required
                    autofocus
                    v-model="email"
                  />
                </div>
              </div>

              <div class="form-group row">
                <label for="password" class="col-md-4 col-form-label text-md-right">Password</label>

                <div class="col-md-6">
                  <input
                    id="password"
                    type="password"
                    class="form-control"
                    name="password"
                    required
                    v-model="password"
                  />
                </div>
              </div>

              <div class="form-group row mb-0">
                <div class="col-md-8 offset-md-4">
                  <button type="submit" class="btn btn-primary">Register</button>
                </div>
              </div>
            </form>
          </div>
        </div>
      </div>
    </div>
  </div>
</template>


<script>
import { ref } from 'vue'
import { useStore } from 'vuex'
import { useRouter } from 'vue-router'

export default {
  name: "RegisterComponent",
 setup() {
    const name = ref('')
    const email = ref('')
    const password = ref('')
    const error = ref(null)

    const store = useStore()
    const router = useRouter()

    const Register = async () => {
      try {
        await store.dispatch('register', {
          email: email.value,
          password: password.value,
          name: name.value
        })
        router.push('/')
      }
      catch (err) {
        error.value = err.message
            }
    }

    return { Register, name,email, password, error }
  }
};
</script>
Within the <template></template> tag, we’ve created a simple bootstrap form for registering users. Each input field in the form is defined in the setup() Hook from the Composition API. When the form is submitted, the Register function is called, which handles the actual registration of the user on Firebase.
To further understand what’s happening, let’s take a look at the Register function in detail:
const Register = async () => {
      try {
        await store.dispatch('register', {
          email: email.value,
          password: password.value,
          name: name.value
        })
        router.push('/')
      }
      catch (err) {
        error.value = err.message
            }
    }
In the submit() method, firebase.auth() gives us access to our default app’s authentication service.
Next, we call createUserWithEmailAndPassword(), passing in the email and password of the user we’d like to register on Firebase. We don’t need to hash the password because Firebase takes care of that automatically.
From this, we’ve defined an asynchronous function, Register, which dispatches the Register action from the store and the email, then passes the password and name as the payload. If successful, the user is redirected to the dashboard page. Otherwise, the error is displayed in the page.
Next, let’s learn how we can allow a user to log in. Go ahead and edit the Login.vue component we created earlier with the following code:
<template>
  <div class="container">
    <div class="row justify-content-center">
      <div class="col-md-8">
        <div class="card">
          <div class="card-header">Login</div>
          <div class="card-body">
            <div v-if="error" class="alert alert-danger">{{error}}</div>
            <form action="#"  @submit.prevent="Login">
              <div class="form-group row">
                <label for="email" class="col-md-4 col-form-label text-md-right">Email</label>

                <div class="col-md-6">
                  <input
                    id="email"
                    type="email"
                    class="form-control"
                    name="email"
                    value
                    required
                    autofocus
                    v-model="email"
                  />
                </div>
              </div>

              <div class="form-group row">
                <label for="password" class="col-md-4 col-form-label text-md-right">Password</label>

                <div class="col-md-6">
                  <input
                    id="password"
                    type="password"
                    class="form-control"
                    name="password"
                    required
                    v-model="password"
                  />
                </div>
              </div>

              <div class="form-group row mb-0">
                <div class="col-md-8 offset-md-4">
                  <button type="submit" class="btn btn-primary">Login</button>
                </div>
              </div>
            </form>
          </div>
        </div>
      </div>
    </div>
  </div>
</template>

<script>
import { ref } from 'vue'
import { useStore } from 'vuex'
import { useRouter } from 'vue-router'

export default {
  name: "LoginComponent",
    setup() {
    const email = ref('')
    const password = ref('')
    const error = ref(null)

    const store = useStore()
    const router = useRouter()

    const Login = async () => {
      try {
        await store.dispatch('logIn', {
          email: email.value,
          password: password.value
        })
        router.push('/')
      }
      catch (err) {
        error.value = err.message
      }
    }
    return { Login, email, password, error }
  }
};
</script>
The Login.vue component is similar to the Register.vue component. Each input field in the form is defined in the setup() Hook from the Composition API. When the user submits the form, the Login function is called, handling the actual registration of the user on Firebase:
    const Login = async () => {
      try {
        await store.dispatch('logIn', {
          email: email.value,
          password: password.value
        })
        router.push('/')
      }
      catch (err) {
        error.value = err.message
      }
    }
Dashboard componentNext, we’ll define a simple dashboard view with a bootstrap alert that informs the user that they’ve successfully logged in, displays the users profile, and shows the log out button. Add the code below to the src/components/Dashboard.vue file:
<template>
  <div class="container">
    <div class="row justify-content-center">
      <div class="col-md-8">
        <div class="card">
          <div v-if="user.loggedIn">

          <div class="card-header">Welcome, {{user.data.displayName}}</div>
          <div class="card-body">
            <div class="alert alert-success" role="alert">
            You are logged in!
            <div class="my-4">
                  <button  @click.prevent="signOut" class="btn btn-primary">Log Out</button>
            </div>
             </div>
          </div>

          </div>
            <div v-else class="alert alert-danger" role="alert">
              You are not logged in!
            </div>
        </div>
      </div>
    </div>
  </div>
</template>

<script>
import { useStore} from "vuex";
import { useRouter } from "vue-router";
import {computed} from "vue";
import { auth } from '../firebaseConfig'


export default {
  name: "DashboardComponent",

  setup() {

  const store = useStore()
  const router = useRouter()

  auth.onAuthStateChanged(user => {
    store.dispatch("fetchUser", user);
  });

  const user = computed(() => {
    return store.getters.user;
  });

  const signOut = async () => {
        await store.dispatch('logOut')
        router.push('/')
  }

    return {user,signOut}
 }


};
</script>
With the onAuthStateChanged() observer, we can dispatch the fetchUser() action when a user has been successfully authenticated:
  auth.onAuthStateChanged(user => {
    store.dispatch("fetchUser", user);
  });
Using the computed properties, we can easily update the user object from the store getters:
  const user = computed(() => {
    return store.getters.user;
  });
The profile information of the user is then displayed on the dashboard page.
In the Dashboard.vue component, we defined a signOut() function. The function dispatches the logout action from the store, and it’s then redirected back to the login page:
const signOut = async () => {
        await store.dispatch('logOut')
        router.push('/login')
  }
In this tutorial, we’ve learned how we can set up a simple authentication system using the email and password provider that Firebase supports. Firebase is a great tool for improving the security of your application, and as you can see, Firebase Authentication is fairly simple to use.
To build on this project, you can add middlewares to certain routes and allow only authenticated users to access those routes. I hope you enjoyed this tutorial, and be sure to leave a comment if you have any questions. Happy coding!
Debugging Vue.js applications can be difficult, especially when users experience issues that are difficult to reproduce. If you’re interested in monitoring and tracking Vue mutations and actions for all of your users in production, try LogRocket.

LogRocket lets you replay user sessions, eliminating guesswork by showing exactly what users experienced. It captures console logs, errors, network requests, and pixel-perfect DOM recordings — compatible with all frameworks.
With Galileo AI, you can instantly identify and explain user struggles with automated monitoring of your entire product experience.
Modernize how you debug your Vue apps — start monitoring for free.
Would you be interested in joining LogRocket's developer community?
Join LogRocket’s Content Advisory Board. You’ll help inform the type of content we create and get access to exclusive meetups, social accreditation, and swag.
Sign up now
Discover how the Interface Segregation Principle (ISP) keeps your code lean, modular, and maintainable using real-world analogies and practical examples.

<selectedcontent> element improves dropdowns

Learn how to implement an advanced caching layer in a Node.js app using Valkey, a high-performance, Redis-compatible in-memory datastore.

Learn how to properly handle rejected promises in TypeScript using Angular, with tips for retry logic, typed results, and avoiding unhandled exceptions.


15 Replies to "Authentication with Vue 3 and Firebase"
Great tutorial. Just a few pointers. When creating the vue project via the vue cli it’s better to select the correct options right away as they’re then automatically configured properly for you (scaffolding). So the vue-router and vuex shouldn’t be installed via npm, but rather selected out of the box or added later via vue add.
So instead of:
npm i firebase vue-router vuex
Add vue-router and vuex afterwards this way:
vue add vuex
vue add vue-router
And since you’re using bootstrap you may as well install bootstrap-vue the same way:
vue add bootstrap-vue
Doesn’t this leave your firebase api key in plain text on your index.html?
Hello J, thats not a problem, firebase keys can be left public, security must be configured from the firebase dashboard 🙂
Dotun Jolaoso. Thank you very much for sharing your knowledge.
The application can be logged with an email and password registered in firebase. That works correctly.
I don’t know if I’m doing something wrong, but when I type this link in the browser:
http://localhost:8080/dashboard
without having logged in, I was able to access the dashboard.
The correct thing is that it does not show me the dashboard, because I am not logged in..
This pate I have not understood well:
// map `this.user` to` this. $ store.getters.user`
And what of
Using the store I don’t know exactly where and how to use it;
firebase.auth (). onAuthStateChanged (user => {
if (user) {
// User is signed in.
} else {
// No user is signed in.
}
});
Thank you
I was also able to open any page without logging in.Is there something missing?
Kind Regards,
Lukasz
Hi All,
The reason you can access any page is you you have not added route guards to them see here: https://medium.com/js-dojo/how-to-implement-route-guard-in-vue-js-9929c93a13db
Regards Mike 🙂
Oscar Bravo Arrieta,
In your HTML template above I had to use, inside my v-if :
v-if=”user.loggedIn”
this should allow you to evaluate if the boolean on the object is true or false
I am getting a linting error like this:
$ vue-cli-service lint
error: ‘data’ is defined but never used (no-unused-vars) at src/views/Login.vue:98:15:
96 | .auth()
97 | .signInWithEmailAndPassword(this.form.email, this.form.password)
> 98 | .then(data => {
| ^
99 | this.$router.replace({ name: “Home” });
100 | })
101 | .catch(err => {
Do anybody know why this is happening?
I’ve run into the Same issue. Can you confirm if you found a way to resolve this?
Since the code was just changing routes anyway I changes the .then and .catch functions to the following and got it to work.
Just make sure to import router inside the tag in the Login component.
.then(function() {
router.push({ path: ‘dashboard’ })
})
.catch(function(err) {
this.error = err.message;
});
Is there a reason you access firebase inside of components and not in vuex? What’s the point of using vuex then?
Hello. Could anyone help me by explaining how to connect the registered users to their specific data? I can register the users, they are able to send some data of theirs but any logged user has access to everybody’s data. Trying to clarify it: I want the user to have access only to the data he/she created. Thank you in advance.
Assuming you’re using Firestore within Firebase, you can limit a user to only their own data in the Firestore security rules themselves: https://firebase.google.com/docs/firestore/security/get-started
Note that the rules don’t actually filter data, they just protect it, i.e. they’ll get an error if they query on all widgets because they don’t own some.
In order to filter data, you’ll need to effectively do a where clause in your retrieval. Here’s follow on documentation that fills the gaps: https://firebase.google.com/docs/firestore/security/rules-query
Thanks for the great article! Question: was there a reason you chose to present user using a getter/mapGetters rather than mapState?
Module not found: Error: Package path . is not exported from package /Users/nidhikumari/Desktop/firebase-auth/node_modules/firebase (see exports field in /Users/nidhikumari/Desktop/firebase-auth/node_modules/firebase/package.json)
Getting this error, i am using firebase version 9 and vue3