Editor’s note: This React and Express.js login authentication tutorial was last updated by David Omotayo on 5 April 2024 to detail the creation of a login component using the React Context API and React Router DOM. Additionally, it covers the integration of form validation on both the client and server side, as well as how to implement role-based access controls. It was previously updated to evaluate the benefits of server-side login authentication in React apps, as well as to include information about logging out and how to connect to a MongoDB database.

It’s well-known that the client side is unsafe due to its exposed nature. In your web application, you can conditionally render views to show different content to different users. But, if that information is already stored on the client side, it’s no longer secure.
To ensure that only users with a secure login can see the limited content, you should ship the content data from your server upon authentication.
In this tutorial, we’ll show you how to secure your React app by implementing basic server-side authentication for an Express.js server. Although the client side will be a React app, you can apply it to virtually any other type of client-side application. We’ll also discuss some React authentication best practices for implementing secure login functionality on the server side.
The Replay is a weekly newsletter for dev and engineering leaders.
Delivered once a week, it's your curated guide to the most important conversations around frontend dev, emerging AI tools, and the state of modern software.
Server-side login authentication is a method of authenticating the identity of a user attempting to log in to a server. This type of authentication typically involves the user providing a username and password, which are then sent to the server for verification. If the credentials are valid, the server allows the user to log in and access the resources on the server.
There are several uses for and benefits to using server-side login authentication. First and foremost, it helps ensure the security of the server and the resources it contains. By requiring users to provide a username and password, the server can verify that the person attempting to log in is authorized to do so.
Another benefit of server-side login authentication is that it can provide a centralized system for managing user accounts. This means that the server administrator can easily add, remove, or update user accounts, and the changes will be immediately reflected across the entire server. This can make it easier to manage user access and ensure that only authorized users have access to the server and its resources.
In addition, server-side login authentication can provide a way for users to securely access resources from any device — as long as they have the necessary credentials. This can be especially useful for organizations with multiple locations or employees needing to access resources remotely.
The easiest way to bootstrap a React project is to use the Vite Create package. When you create a project with this package and run npm start, you essentially start a Vite server. This works fine on your local machine, but when you want to deploy it to a remote server, you need your own server to serve your React application. This is basically a package of HTML, JavaScript, and CSS.
We’ll refer to the following folder structure for this React authentication example project:
--- Project Folder
 |__ client (React App)
 |__ server.js
 |__ package.json
There is a Project Folder and, inside it, a client folder containing the React app. The folder also contains server.js and package.json files, which you can create by using the following commands on the terminal in the project directory:
npm init -y
touch server.js
There are two primary approaches to serving the React application when building with the MERN stack:
build/dist folder containing static files (HTML, CSS, and JavaScript)express.static() middleware within your Express app to serve these static files from the build folder. This allows you to access your React application through the Express serverThe following code snippet is a basic Express.js server that serves the client’s dist folder. As we progress, we’ll add authentication and additional functionalities on top of this structure:
const express = require('express');
const path = require('path');
const app = express();

const PORT = process.env.PORT || 5000;

app
  .use(express.static(path.join(__dirname, "../client", "dist")));
  .listen(PORT, () => console.log(`Listening on ${PORT}`));

app.get('/', (req, res) => {
  res.sendFile(path.join(__dirname, '/client/build/index.html'));
});
The choice between these methods depends on your specific needs and preferences. Serving separately offers greater flexibility but requires managing two separate processes. Serving with Express simplifies deployment and streamlines development, but can introduce limitations in complex routing scenarios.
When serving your React application with Express, you’re typically required to rebuild the app every time there’s a change. To avoid this, you can serve the application using the built-in Vite server with the npm run dev command and proxy your React app to a specific port.
That way, you can run the React app locally and avoid CORS errors when communicating with the Express server.
Add the following code to the vite.config.js file in your client directory, assuming that the Express server will be serving on port 5000:
import { defineConfig } from 'vite';
import react from '@vitejs/plugin-react';

export default defineConfig({
  plugins: [react()],
  server: {
      proxy: {
        '/api': {
          target: 'http://localhost:5000',
          changeOrigin: true,
        },
      },
    },
});
This configuration will re-route all requests with the /api suffix to the backend URL http://localhost:5000.
As mentioned earlier, the React app will still use the Vite server and proxy to port 5000. However, we still have to run the Express server separately.
The Nodemon package is very handy for running and listening for changes. You can install it globally:
npm i -g nodemon
Then run the server by simply running nodemon server.js in the main directory of the project folder.
Although this is an optional step, it’s important to mention. Let’s assume we want to deploy our application to a Heroku dyno.
Heroku detects a Node.js application, installs dependencies, and runs it automatically. But you still have to tell it to go into the specific folder, install dependencies, and build the React app for production. In our case, this is going into /client running npm install and then npm run build, respectively.
For this purpose, Heroku has a post-build command: "heroku-postbuild": "cd client && npm install && npm run build".
Add this under the "scripts" key inside the package.json of the server. Also, make sure your entry point for the Node.js application is server.js in the package.json file.
This is likely to be index.js if you initialized your npm package with -y flag as npm init -y with "main": "server.js".
As the name suggests, express-basic-auth is a convenient and easy-to-use package for basic authentication purposes.
First, install the package and then require it at the top of your server.js. We’ll define the secure login credentials by using the instance of the package:
const basicAuth = require('express-basic-auth');

const auth = basicAuth({
  users: {
    admin: '123',
    user: '456',
  },
});
Now, when the auth variable is used as an endpoint parameter, the endpoint’s response reaches back to the client only if the credentials were sent along with the request match.
In the code below, you’ll see both the /authenticate endpoint on the server side and the GET request sent from the client, along with the auth object, which contains the credentials:
// End-point on Server

app.get('/api/authenticate', auth, (req, res) => {
  if (req.auth.user === 'admin') {
    res.send('admin');
  } else if (req.auth.user === 'user') {
    res.send('user');
  }
});

// Request on Client

const auth = async () => {
  try {
    const res = await axios.get('/api/authenticate', { auth: { username: 'admin', password: '123' } });
    console.log(res.data);
  } catch (e) {
    console.log(e);
  }
};
In the example above, passing the correct credentials sends back either admin or user as a string response, depending on the username used. Wrong login credentials will simply return a response of 401 (Unauthorized).
Now that we’ve figured out how to send data from server to client if the credentials are correct, the next step is to persist that authentication through a cookie session.
Instead of sending a response from the authenticate endpoint, we can set a cookie on the client from the server. By deploying another endpoint, we can check for the cookie and send the data to populate the view.
Once the user is authenticated, this information should be stored somewhere on the client side so that the user does not need to authenticate every time. The common practice is to use cookies to store this session information. Cookies are safe as long as the correct flags are set.
httpOnly cookieWhen using a cookie session to persist authentication in React, the httpOnly flag ensures that no client-side script can access the cookie other than the server.
The secure flag ensures that cookie information is sent to the server with an encrypted request over the HTTPS protocol. When using the secure flag, you also need a key to sign the cookie. For this purpose, we use cookie-parser middleware for the Express.js server.
A cookie simply has a name and a value. Even with the aforementioned flags, never disclose any vulnerable information within cookie parameters.
In the code example below, server.js sets a unique cookie upon authentication. As you can see, after setting the cookie, the response is also sending an object with the screen:admin or screen:user key-value pair.
This response will later be used in the React application on the client side:
const cookieParser = require('cookie-parser');

// A random key for signing the cookie
app.use(cookieParser('82e4e438a0705fabf61f9854e3b575af'));

app.get('/api/authenticate', auth, (req, res) => {
  const options = {
    httpOnly: true,
    signed: true,
  };

  if (req.auth.user === 'admin') {
    res.cookie('name', 'admin', options).send({ screen: 'admin' });
  } else if (req.auth.user === 'user') {
    res.cookie('name', 'user', options).send({ screen: 'user' });
  }
});
As the cookie has an httpOnly flag, we can neither read nor delete it on the client side. Therefore, we need two more endpoints to read and delete the cookie and send back a response accordingly.
Reading a cookie from a server is quite straightforward, but you should keep in mind that the endpoint for this functionality should not have the auth variable because authentication for this endpoint should not be required.
Below the log-out user section, we have two endpoints: /read-cookie and /clear-cookie. The signedCookies object with the res contains the name:value pair that we set for the cookie:
res.cookie('name', 'admin', options)
Depending on the value of the cookie name, we’ll send a response.
As for the /clear-cookie endpoint, deleting the cookie is done by referring to the name of the cookie, which is name. This, in turn, performs a simple logout functionality, as it clears out the users’ session:
app.get('/api/read-cookie', (req, res) => {
  if (req.signedCookies.name === 'admin') {
    res.send({ screen: 'admin' });
  } else if (req.signedCookies.name === 'user') {
    res.send({ screen: 'user' });
  } else {
    res.send({ screen: 'auth' });
  }
});

app.get('/clear-cookie', (req, res) => {
  res.clearCookie('name').end();
});
By following this logic, you can create several endpoints to send different types of data depending on the nature of your application. All you need to do is check the cookie and send the response accordingly.
Below, you can find the complete server.js file, which serves the client-side React application that we’ll cover in the next section:
const express = require('express');
const basicAuth = require('express-basic-auth');
const cookieParser = require('cookie-parser');
const path = require('path');

const app = express();

const auth = basicAuth({
  users: {
    admin: '123',
    user: '456',
  },
});

const PORT = process.env.PORT || 5000;

app.use(cookieParser('82e4e438a0705fabf61f9854e3b575af'));

app
  .use(express.static(path.join(__dirname, '/client/build')))
  .listen(PORT, () => console.log(`Listening on ${PORT}`));

app.get('/', (req, res) => {
  res.sendFile(path.join(__dirname, '/client/build/index.html'));
});

app.get('/api/authenticate', auth, (req, res) => {
  const options = {
    httpOnly: true,
    signed: true,
  };

  console.log(req.auth.user);

  if (req.auth.user === 'admin') {
    res.cookie('name', 'admin', options).send({ screen: 'admin' });
  } else if (req.auth.user === 'user') {
    res.cookie('name', 'user', options).send({ screen: 'user' });
  }
});

app.get('/api/read-cookie', (req, res) => {
  console.log(req.signedCookies);
  if (req.signedCookies.name === 'admin') {
    res.send({ screen: 'admin' });
  } else if (req.signedCookies.name === 'user') {
    res.send({ screen: 'user' });
  } else {
    res.send({ screen: 'auth' });
  }
});

app.get('/api/clear-cookie', (req, res) => {
  res.clearCookie('name').end();
});

app.get('/api/get-data', (req, res) => {
  if (req.signedCookies.name === 'admin') {
    res.send('This is admin panel');
  } else if (req.signedCookies.name === 'user') {
    res.send('This is user data');
  } else {
    res.end();
  }
});
Assume you have an admin screen and a regular user screen, in which you show different contents. The first thing we need is an authentication request, which sends the credentials to the server. We also need another request that we send from the componentDidMount lifecycle Hook to check whether there is already a cookie so that we can log in automatically.
Then, we might need some other requests to get extra data. Eventually, we need to be able to send a request to clear the cookie so that the session does not persist anymore.
You can find the complete client-side code on CodeSandbox. However, to get it working, you should run it alongside the server.
Ideally, for cleaner and more maintainable code, it’s recommended to create a dedicated login component that encapsulates all the authentication logic. This helps with the separation of concerns within your application.
However, creating a login component is just the first step. We also need to create protected routes. These routes will verify a user’s authentication status before granting access. Unauthenticated users attempting to access protected pages would be redirected to the login page.
To do this, we’ll use two key tools:
AuthContext and AuthProviderTo get started, navigate to the client path in your terminal and run the following command to install react-router-dom as a dependency:
npm i react-router-dom
Next, we need to create a context called AuthContext that manages and shares authentication-related data across our application and an AuthProvider component responsible for providing the authentication context to its children.
Go to the client folder and create an AuthProvider.jsx file within the src folder and add the following code:
import { useContext, createContext, useState } from "react";
import axios from "axios";
import { useNavigate } from "react-router-dom";
const AuthContext = createContext();

const AuthProvider = ({ children }) => {
  const navigate = useNavigate();
  const [screen, setScreen] = useState("auth");

  const loginAuth = async (data) => {
    try {
      const res = await axios.get("/api/authenticate", {
        auth: data,
      });
      if (res.data.screen !== undefined) {
        readCookie();
        return;
      }
    } catch (e) {
      console.log(e);
    }
  };

  const readCookie = async () => {
    try {
      const res = await axios.get("/api/read-cookie");
      if (res.data.screen !== undefined) {
        setScreen(res.data.screen);
        navigate("/view");
        return;
      }
    } catch (e) {
      setScreen("auth");
      console.log(e);
    }
  };

  const logoutAuth = async () => {
    try {
      await axios.get("/api/clear-cookie");
      setScreen("auth");
      navigate("/login");
      return;
    } catch (e) {
      console.log(e);
    }
  };

  return (
    <AuthContext.Provider value={{ screen, loginAuth, logoutAuth }}>
      {children}
    </AuthContext.Provider>
  );
};
export default AuthProvider;
export const useAuth = () => {
  return useContext(AuthContext);
};
Here, we’ve defined three context methods: loginAuth, readCookie, and logoutAuth, which handle the login, cookie reading, and logout functionalities, respectively. Additionally, we define a screen state variable that stores the screen response retrieved from the backend.
The loginAuth method handles user login by sending credentials (passed as the data parameter) to the /authenticate endpoint. Upon successful login, it triggers the readCookie function.
The readCookie, when invoked by the loginAuth method, retrieves the current screen string value from the /read-cookie endpoint. It then updates the screen state and navigates the user to the /view page using navigate("/view").
The logoutAuth method handles user logout. It clears the cookie by querying the /clear-cookie endpoint, updates the screen state to auth, and redirects the user back to the login page with navigate("/login").
Now that we have the AuthProvider set up, let’s integrate it into our application. We can achieve this by wrapping the application’s root component with the AuthProvider. Because we’ll also define our routes in the same component, we might as well set everything up there.
Go to the App.jsx file and update it with the following:
import "./App.css";
import AuthProvider from "./AuthProvider.jsx";
import ProtectedRoute from "../components/protectedRoute.jsx";
import Login from "../components/login";
import View from "../components/view.jsx";
import { Routes, Route, BrowserRouter as Router } from "react-router-dom";
function App() {
  return (
    <div className="App">
      <Router>
        <AuthProvider>
          <Routes>
            <Route path="/login" element={<Login />} />
            <Route element={<ProtectedRoute />}>
              <Route path="/view" element={<View />} />
            </Route>
          </Routes>
        </AuthProvider>
      </Router>
    </div>
  );
}
export default App;
In the code above, we define a /login and a protectedRoute route containing a nested /view route. These routes are wrapped with the AuthProvider component, which allows us to access the AuthContext within these components using the useAuth Hook.
The ProtectedRoute component acts as a gatekeeper for our protected content, which, in this case, is the /view component. So our main task in the protectedRoute component is to verify whether the current value of screen state is not auth, and then render the /view component; otherwise, we render the /login component.
To do this, create a component folder in the client’s root and add a ProtectedRoute.jsx file with the following content:
import React from "react";
import { Navigate, Outlet } from "react-router-dom";
import { useAuth } from "../src/AuthProvider";

const ProtectedRoute = () => {
  const auth = useAuth();
  if (auth.screen == "auth") return <Navigate to="/login" />;
  return <Outlet />;
};

export default ProtectedRoute;
Next, create another file within component, name it View.jsx, and add the following code:
import { useState } from "react";
import { useAuth } from "../src/AuthProvider";
import axios from "axios";
export default function View() {
  const { logoutAuth, screen } = useAuth();
  const [data, setData] = useState();

  const getData = async () => {
    try {
      const res = await axios.get("/api/get-data");
      console.log(res);
      setData(res.data);
    } catch (e) {
      console.log(e);
    }
  };
  return (
    <div>
      <p>{screen}</p>
      <p>{data}</p>
      <button onClick={getData}>Get Data</button>
      <button onClick={logoutAuth}>Logout</button>
    </div>
  );
}
In the code above, we fetch data from the /get-data endpoint and display the response alongside the current value of the screen state. Additionally, we use the logoutAuth context method to log out the current user when the Logout button is clicked.
The login component is the final piece of the puzzle. In this component, we’ll obtain the data (username and password) needed to initiate the authentication process.
Create the Login component by adding a Login.jsx file within the components folder and populating it with the following code:
import React, { useState } from "react";
import { useAuth } from "../src/AuthProvider";

export default function () {
  const [input, setInput] = useState({
    username: "",
    password: "",
  });
  const auth = useAuth();
  const handleSubmit = (e) => {
    e.preventDefault();
    if (input.username !== "" && input.password !== "") {
      auth.loginAuth(input);
      return;
    }
    alert("please provide a valid input");
  };
  return (

    <form onSubmit={handleSubmit}>
      <label>Username: </label>
      <br />
      <input
        type="text"
        onChange={(e) => setInput({ ...input, username: e.target.value })}
      />
      <br />
      <label>Password: </label>
      <br />
      <input
        type="password"
        onChange={(e) => setInput({ ...input, password: e.target.value })}
      />
      <br />
      <button type="submit">Login</button>
    </form>
  );
}
The key aspect of this code is the handleSubmit function, which transfers the data argument (containing the username and password) to the loginAuth context method for authentication.
Now, if you start your Express server and React’s development server, your application should work as expected, with the added security of protected routes:
Form validation is essential when handling authentication; it not only helps the users provide the right input, but it also protects your application from malicious users who may want to inject malicious scripts into your backend.
When validating a form for authentication purposes, you are required to implement validation on the client and the server. The client’s validation will check if all the required fields are filled and the user’s input, while the server validation will check if the credentials provided match an existing account.
HTML5 provides a powerful yet straightforward native approach to validating form inputs. It offers built-in attributes, such as min and max, required, minLength, maxLength, type, and pattern, which enable complex validations using regular expressions:
form onSubmit={handleSubmit}>
      <label>Username: </label>
      <input
        required
        type="text"
        minLength={4}
        ...
      />
      <br />
      <label>Password: </label>
      <input
        required
        type="password"
        minLength={3}
        ...
      />
      <br />
      <button type="submit">Login</button>
    </form>
These attributes will provide the required validation for our application. However, in cases where we want to take full control of the validation and render customized error messages or implement more complex validation, we can opt for one of many JavaScript validation libraries, such as Yup, ValidatorJS, Formik, etc.
These libraries offer sophisticated client-side validation in a simplified manner, or we can simply use a similar function as follows:
  const validateForm = (input) => {
    let errors = {username: "", password: ""};
    if (input.username.length < 5) {
      errors.username = "username is too short";
    }
    if (input.password.length < 3) {
      errors.password = "Password is too short";
    }
    return errors;
  };
We can update the handleSubmit function in our login component to work with the function above like this:
  const handleSubmit = (e) => {
    e.preventDefault();
    const error = validateForm(input);
    if (error.username === "" && error.password === "") {
      auth.loginAuth(input);
    }
  };
Server-side validation comes in two forms: validating payloads (post data) and validating if the payload corresponds with existing data.
Payloads can be validated using a similar method as we used during client validation, i.e., creating a function that checks the payload and sends a response if successful. However, several JavaScript libraries are more efficient and simplify payload validation, including Joi, Hapi, and Yup.
When validating using existing data, we can send a response back to the client if the validation fails. We can then display customized error messages based on that response. In our case, we’ve already implemented this validation using the following code snippet within the /authenticate route in our Express server:
app.get("/api/authenticate", auth, (req, res) => {
  const options = {
    httpOnly: true,
    signed: true,
  };
  if (req.auth.user === "admin") {
    res.cookie("name", "admin", options).send({ screen: "admin" });
  } else if (req.auth.user === "user") {
    res.cookie("name", "user", options).send({ screen: "user" });
  }
});
In a real-world application where the user’s credentials are stored in a database, you’d query the database and compare the payload with the existing data in the database.
Role-based access control is an authentication approach that restricts data access based on user roles. A classic example is a dashboard with an admin who has complete control over the dashboard and a user who has limited access.
Implementing role-based access control features involves creating a check on the server or client that verifies a user’s role after authentication and routes them to the appropriate page or route.
Luckily for us, we’ve implemented this into our Express server with the following code:
app.get("/api/authenticate", auth, (req, res) => {
  ...
  if (req.auth.user === "admin") {
    res.cookie("name", "admin", options).send({ screen: "admin" });
  } else if (req.auth.user === "user") {
    res.cookie("name", "user", options).send({ screen: "user" });
  }
});
The if statement in the code snippet above checks if the authentication request’s username is either admin or user, and then sends back a screen response with either "admin" or "user" string values.
We can then use the protected route we created earlier to render the appropriate components/page based on the logged-in user. However, in our case, the endpoint that sends the data, /read-data, checks the role of the currently logged-in user before sending the appropriate data:
app.get("/api/get-data", (req, res) => {
  if (req.signedCookies.name === "admin") {
    res.send("This is admin panel");
  } else if (req.signedCookies.name === "user") {
    res.send("This is user data");
  } else {
    res.end();
  }
});
Therefore, we don’t have to do much work in the protectedRoute component. We only need to verify if the current screen is not auth. If so, the /view route is rendered, where the appropriate data can be fetched:
const ProtectedRoute = () => {
  const auth = useAuth();
  if (auth.screen == "auth") return <Navigate to="/login" />;
  return <Outlet />;
};
The following shows the data returned based on the currently logged-in user’s role:
You can find the complete code for this project in this GitHub repository.
To connect a Node.js application to a MongoDB Atlas database, you will need to perform the following steps.
Install the MongoDB driver for Node.js, which will allow you to connect and interact with a MongoDB database from a Node.js application. You can do this by running npm install mongodb in your terminal.
Create a MongoDB Atlas account. This will give you a URL that you can use to connect to your database. After successfully creating an account, click the Build a Database button on your dashboard.
Select the free Shared option. Then, create a Cluster by clicking the Create Cluster button at the bottom of the page. You can edit and make changes to your Cluster on this page. For now, simply set a username and password for your Cluster. Then, scroll down to the bottom of the page, click Connect to My Local Environment, and add your IP address.
If you followed the above steps correctly, you should be able to see the page shown in the image below:
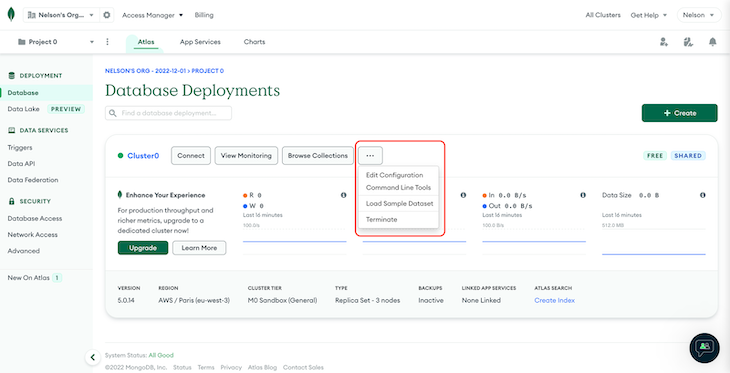
From there, click the Menu button highlighted in red, then click Load Sample Dataset. MongoDB provides us with a mock dataset that we can quickly use to test the connection from our application to the DB.
Next, select the Connect button on the far left. You should see a pop-up modal. Select the Connect Your Application option. This will help us connect to our application using one of MongoDB’s Native Drivers, and in our case, it’s the Node Native Driver.
Copy your connection string from the next pop-up modal that appears on the screen. We’ll add this to our server.js file.
In your Node.js application, use the MongoDB Driver to connect to your database using the URL provided by MongoDB Atlas. You can do this using the following code:
const MongoClient = require('mongodb').MongoClient;
const url = 'mongodb+srv://<username>:<password>@cluster0.mongodb.net/test?retryWrites=true&w=majority';

MongoClient.connect(url, { useNewUrlParser: true, useUnifiedTopology: true }, (err, client) => {
  if (err) {
    console.log(err);
  } else {
    console.log('Connected to MongoDB Atlas');
    // do something with your database here
  }
});
In this code, you will need to replace <username> and <password> with your MongoDB Atlas username and password.
Once your Node.js application is connected to your MongoDB Atlas database, you can use the MongoDB Driver to perform CRUD operations on your database. For example, you can use the insertOne() method to insert a document into a collection or the find() method to retrieve documents from a collection.
Let’s review the most important steps of securing a React app with login authentication.
We have three different state variables: screen, username, password. username and password are for storing the input field data and sending it to the server over the /authenticate endpoint through the auth function. Therefore, the onClick event of the login button calls the auth function. This is only required if the user is authenticating initially.
To check whether the user has already logged in, we use the /read-cookie endpoint in the readCookie context method. This function is only called when the user is authenticated. The response from this endpoint sets the screen state to change the view to the admin or user screen.
In this React authentication example, both the admin and user screens are the same component. However, because the response from the server changes depending on the authentication, the same component renders different contents.
Additionally, the /get-data endpoint demonstrates another use case for cookie-specific responses from the server.
Lastly, /clear-cookie is used with the onClick event of the logout button to clear the cookie and set the screen state variable back to its initial state.
This tutorial aims to give you a foundational understanding of basic server-side React authentication on an Express.js server with the express-basic-auth npm package. The potential use cases for such a simple authentication system range from small personal projects to a secured page for an interface with a fixed number of users.
The need to protect data behind a secure login mechanism is nearly universal. If you know how to implement secure login authentication in React and Express.js, you can achieve the same in virtually any other type of client-side application.
If you’re interested in how to further your web application security in Node.js, check out our guide to password hashing in Node.js with bcrypt.
Install LogRocket via npm or script tag. LogRocket.init() must be called client-side, not
server-side
$ npm i --save logrocket

// Code:

import LogRocket from 'logrocket';
LogRocket.init('app/id');
// Add to your HTML:

<script src="https://cdn.lr-ingest.com/LogRocket.min.js"></script>
<script>window.LogRocket && window.LogRocket.init('app/id');</script>

Learn how Vite+ unifies Vite, Vitest, Oxlint, Oxfmt, Rolldown, and Node.js management in one CLI.

AI companies are buying developer tools as coding agents turn runtimes, package managers, and linters into strategic infrastructure.

Learn how AI-assisted development governance uses rules, agents, hooks, and protocols to help AI coding tools produce safer, more consistent code.

A step-by-step guide to building your first MCP server using Node.js, covering core concepts, tool design, and upgrading from file storage to MySQL.
Would you be interested in joining LogRocket's developer community?
Join LogRocket’s Content Advisory Board. You’ll help inform the type of content we create and get access to exclusive meetups, social accreditation, and swag.
Sign up now

