GraphQL has become the new normal for developing APIs. It has its own advantages and flexibility. One such advantage is that it allows you to implement permissions and granular access control in the API.

Getting granular access control is a big pain in large REST APIs. In GraphQL, you can achieve granularity quite easily.
In this article, we will see different patterns to implement permissions in a GraphQL API.
Access control – Checking whether the user is authorized to access the API.
Usually if a user is not logged in but the API endpoint requires a logged in user, the API throws an authentication error.
If the user is logged in but doesn’t have enough permission to perform the operation, the API will throw a forbidden error or an unauthorized error.
Permissions – Permissions is a set of rules that help to make the decision as to whether the user will get access to a particular API.
Let’s check some example use cases for permissions.
Consider the Twitter app:
As you can see, both the author and other users have different levels of permissions, even though the level of authorization is same. They are all authorized as users, but based on activity, they have different rights of access.
You can implement permissions in different ways in a GraphQL API. For instance, you can implement permissions through GraphQL directives in the schema or by checking permissions in GraphQL middleware (such as resolvers).
Depth of permissions
In GraphQL, you can go to any depth to implement permissions.
You can do query level permissions, object level permissions, and field level permissions.
Different ways to implement permissions in GraphQL
There are different techniques to implement these permissions: directives, middleware resolvers, and the GraphQL shield library.
We will see all these techniques in our example. Now, let’s build a simple GraphQL server example.
First, create a new npm project:
npm init
Add your express, apollo-server-express and graphql package.
npm i express apollo-server-express
Next, create an index.js file with the sample GraphQL server:
const express = require('express');
const { ApolloServer, gql } = require('apollo-server-express');

// Construct a schema, using GraphQL schema language
const typeDefs = gql`
  type Query {
    hello: String
  }
`;

// Provide resolver functions for your schema fields
const resolvers = {
  Query: {
    hello: () => 'Hello world!',
  },
};

const server = new ApolloServer({ typeDefs, resolvers });
const app = express();
server.applyMiddleware({ app });

app.listen({ port: 4000 }, () =>
  console.log(`🚀 Server ready at http://localhost:4000${server.graphqlPath}`)
);
Let’s add nodemon to run the server locally. Nodemon helps to reload the server by watching the files for changes during development:
npm i -D nodemon
Add scripts to run the server in the package.json file:
"scripts": {
    "start": "node index.js",
    "dev": "nodemon index.js"
},
Let’s start the server in the terminal:
npm run dev
The server will open at the port 4000.
Let’s create few more files and split the code. We’ll use a schema.js file for the GraphQL type definitions:
// schema.js

const { gql } = require("apollo-server-express");
// Construct a schema, using GraphQL schema language
module.exports = gql`
  type Query {
    hello: String
  }
`;
And resolver.js file for the resolvers:
// schema.js

const { gql } = require("apollo-server-express");
// Construct a schema, using GraphQL schema language
module.exports = gql`
  type Query {
    hello: String
  }
`;
Let’s create some data and corresponding queries and resolvers for a simple Tweet application.
The data.js file will be:
// data.js

module.exports = [
  {
    id: 0,
    content: "HTML is a programming language",
    author: "Param",
  },
  {
    id: 1,
    content: "JavaScript programmers are beginners",
    author: "Param",
  },
  {
    id: 2,
    content: "HTML and CSS pages are enough to build a bank project",
    author: "Joshua",
  },
  {
    id: 3,
    content: "React Js can prove earth as flat in 2025",
    author: "Joshua",
  },
];
Now, we will create queries and resolvers to display this Tweet data:
// schema.js

const { gql } = require("apollo-server-express");
// Construct a schema, using GraphQL schema language
module.exports = gql`
  type Query {
    hello: String
    tweets: [Tweet]!
    tweet(id: Int!): Tweet!
  }

  type Tweet {
    id: Int!
    content: String!
    author: String!
  }
`;
Resolvers for the tweets and tweet query:
// resolvers.js

const { ApolloError } = require("apollo-server-express");
const tweets = require("./data");

// Provide resolver functions for your schema fields
module.exports = {
  Query: {
    hello: () => "Hello world!",
    tweets: () => {
      return tweets;
    },
    tweet: (_, { id }) => {
      const tweetId = tweets.findIndex((tweet) => tweet.id === id);
      if (tweetId === -1) return new ApolloError("Tweet not found");
      return tweets[tweetId];
    },
  },
};
We now have the basic GraphQL server ready. Let’s jump into the graphQL permissions through examples.
These examples are hypothetical and only for learning purpose. In a real application, most of these scenarios don’t make sense.
For this example, first we need to get the details for the logged in user from the HTTP request.
This permission can be implemented in different ways.
Naive solution inside resolver
First, we will add the user to the request context. For the purpose of simplicity, we just pass the header user to the request.
// index.js
...
const server = new ApolloServer({
  typeDefs,
  resolvers,
  context: ({ req }) => {
    return {
      user: req.headers.user || "",
    };
  },
});
...
Then, add the logic to make sure only logged in users can see the Tweet query:
// resolvers.js
const { ApolloError, ForbiddenError } = require("apollo-server-express");

...
tweet: (_, { id }, { user }) => {
      // Check whether user is logged-in
      if (!user) return new ForbiddenError("Not Authorized");

      const tweetId = tweets.findIndex((tweet) => tweet.id === id);
      if (tweetId === -1) return new ApolloError("Tweet not found");
      return tweets[tweetId];
}
...
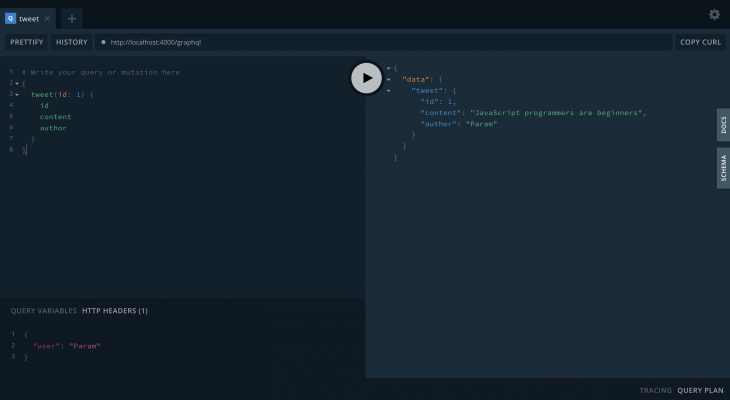
If you pass the user in the playground, it will show the Tweet:
If there is no user passed in the header, it will throw a ForbiddenError:
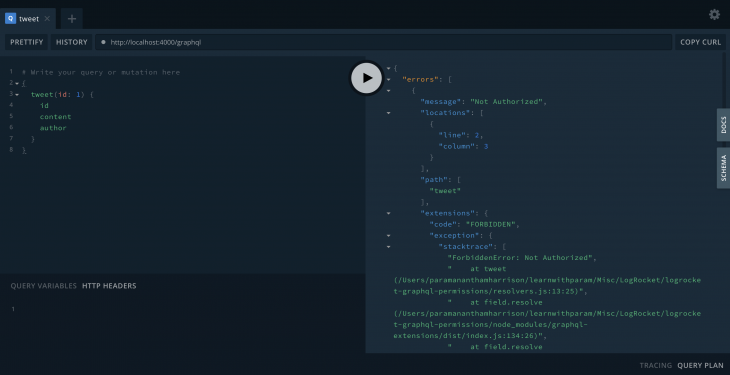
This way of protection is not scalable and reusable. But still it works for this use case.
Let’s create a GraphQL directive isLoggedin and apply it to the tweet query:
// schema.js

const { gql } = require("apollo-server-express");

// Construct a schema, using GraphQL schema language
module.exports = gql`
  directive @isLoggedin on FIELD_DEFINITION
  type Query {
    hello: String
    tweets: [Tweet]!
    tweet(id: Int!): Tweet! @isLoggedin
  }
  ...
`;
Then, add the logic for the directive on the GraphQL server. Create a directives.js file:
// directives.js

const {
  ForbiddenError,
  SchemaDirectiveVisitor,
} = require("apollo-server-express");
const { defaultFieldResolver } = require("graphql");

class isLoggedinDirective extends SchemaDirectiveVisitor {
  visitFieldDefinition(field) {
    const originalResolve = field.resolve || defaultFieldResolver;
    field.resolve = async function (...args) {
      const context = args[2];
      const user = context.user || "";
      if (!user) {
        throw new ForbiddenError("Not Authorized");
      }
      const data = await originalResolve.apply(this, args);
      return data;
    };
  }
}

module.exports = { isLoggedinDirective };
The syntax for creating a directive is a bit absurd. You can explore more in the Apollo docs. We need to link the directive on the server:
// index.js

const { isLoggedinDirective } = require("./directives");

...
const server = new ApolloServer({
  typeDefs,
  resolvers,
  schemaDirectives: {
    isLoggedin: isLoggedinDirective,
  },
  context: ({ req }) => {
    return {
      user: req.headers.user || "",
    };
  },
});
...
Run the server and check the with and without user header in the GraphQL playground. The directive will work exactly like our naive solution, but it is easy to reuse on multiple places since the logic is decoupled.
Middleware is also a resolver. Instead of directly resolving the query, first the checks happen in the middleware resolvers and then pass to the next resolver. You can combine multiple resolvers using this technique.
For this, we are going to use the package called graphql-resolvers.
npm i graphql-resolvers
Let’s create our isLoggedin middleware resolver in middlewares.js file:
// middlewares.js

const { ForbiddenError } = require("apollo-server-express");

// Middleware resolver
const isLoggedin = (parent, args, { user }, info) => {
  if (!user) throw new ForbiddenError("Not Authorized");
};

module.exports = { isLoggedin };
Now, we can add this middleware to the tweet resolver:
// resolvers.js
...
const { combineResolvers } = require("graphql-resolvers");
const { isLoggedin } = require("./middlewares");

...
tweet: combineResolvers(isLoggedin, (_, { id }) => {
      const tweetId = tweets.findIndex((tweet) => tweet.id === id);
      if (tweetId === -1) return new ApolloError("Tweet not found");
      return tweets[tweetId];
})
...
Using combineResolvers, we are able to combine multiple middleware resolvers before resolving the actual query.
This method is also reusable since we extract the logic out of the real resolver.
With the same example, we apply the directive to the whole Tweet type. Then we’ll enable object level permissions. Instead of protecting just the query, we can protect the entire object across all queries.
Let’s see it as example. This example is similar to our schema directive example:
// schema.js

const { gql } = require("apollo-server-express");

// Construct a schema, using GraphQL schema language
module.exports = gql`
  directive @isLoggedin on OBJECT

  type Query {
    hello: String
    tweets: [Tweet]!
    tweet(id: Int!): Tweet!
  }

  type Tweet @isLoggedin {
    id: Int!
    content: String!
    author: String!
  }
`;
Directive is attached on the type Tweet. Also if you notice, we changed the directive declaration on OBJECT. This requires some modification in the directives.js:
// directives.js

const {
  ForbiddenError,
  SchemaDirectiveVisitor,
} = require("apollo-server-express");
const { defaultFieldResolver } = require("graphql");

class isLoggedinDirective extends SchemaDirectiveVisitor {
  visitObject(obj) {
    const fields = obj.getFields();
    Object.keys(fields).forEach((fieldName) => {
      const field = fields[fieldName];
      const originalResolve = field.resolve || defaultFieldResolver;
      field.resolve = async function (...args) {
        const context = args[2];
        const user = context.user || "";
        if (!user) {
          throw new ForbiddenError("Not Authorized");
        }
        const data = await originalResolve.apply(this, args);
        return data;
      };
    });
  }
}

module.exports = { isLoggedinDirective };
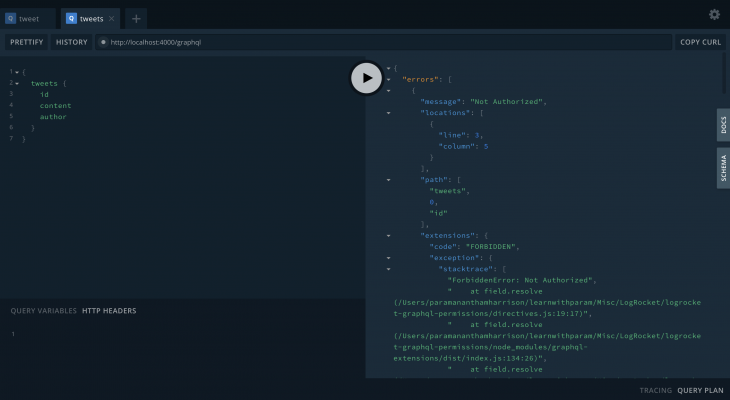
If you check the tweets query without login, then it will throw an error, because tweets query returns an array of Tweets.
Without user in the header:
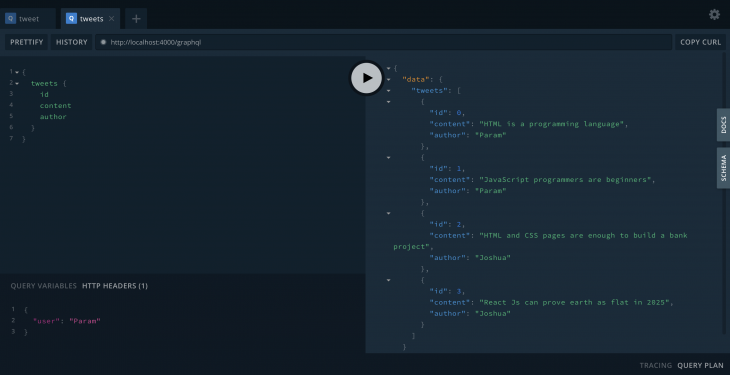
With user in the header:
We can do field level granular permissions too. For example, a user with an admin role can see certain fields. Meanwhile, a user with normal access won’t see such fields.
A typical example for such scenario is billing and subscription information. Only admins will see that info and a remaining user won’t see it. You can give permissions with such granularity on a GraphQL API.
For the last example, we used directives. We will use a new technique to do our field level permissions. As I mentioned before, you can implement permissions in a lot of different ways. It’s up to you to pick one and it depends on the project.
GraphQL shield can be used for doing very extensive or exhaustive permissions setup in a GraphQL API. We will see how to achieve granular permissions using graphql-shield.
Let’s install it:
npm i graphql-shield graphql-middleware @graphql-tools/schema
Next, create a permissions.js file. Let’s deny all the request and allow only a hello query:
// permissions.js

const { allow, deny, shield } = require("graphql-shield");

const permissions = shield({
  Query: {
    "*": deny,
    hello: allow,
  },
});

module.exports = permissions;
Wildcard will deny every request and then granularly allow the hello query. Now, apply permissions in the server:
// index.js

const express = require("express");
const { ApolloServer } = require("apollo-server-express");
const { applyMiddleware } = require("graphql-middleware");
const { makeExecutableSchema } = require("@graphql-tools/schema");

const typeDefs = require("./schema");
const resolvers = require("./resolvers");
const permissions = require("./permissions");

const schema = makeExecutableSchema({
  typeDefs,
  resolvers,
});

const server = new ApolloServer({
  schema: applyMiddleware(schema, permissions),
  resolvers,
  context: ({ req }) => {
    return {
      user: req.headers.user || "",
    };
  },
});

const app = express();
server.applyMiddleware({ app });

app.listen({ port: 4000 }, () =>
  console.log(`🚀 Server ready at http://localhost:4000${server.graphqlPath}`)
);
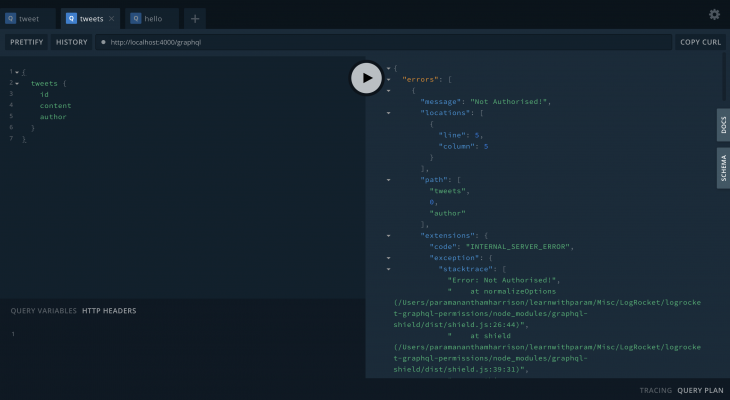
Go and check the tweets or tweet query. It will throw a Not Authorized! error. Only a hello query will work.
Let’s allow every query now, and deny only the field author in the Tweet type:
// permissions.js

const { allow, shield, deny } = require("graphql-shield");

const permissions = shield({
  Query: {
    "*": allow,
  },
  Tweet: {
    author: deny,
  },
});

module.exports = permissions;
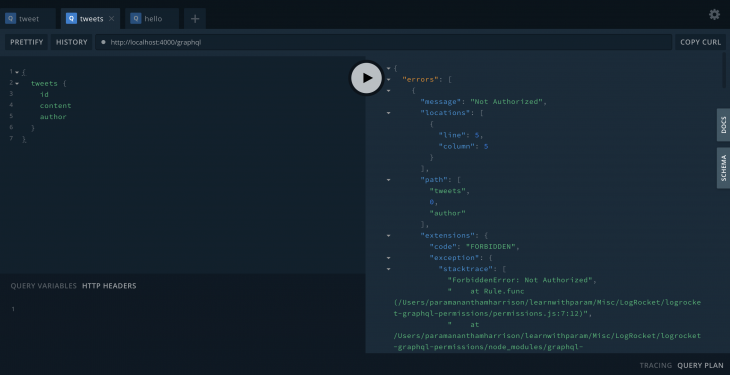
If you send a query with an author field, it will show an error like this:
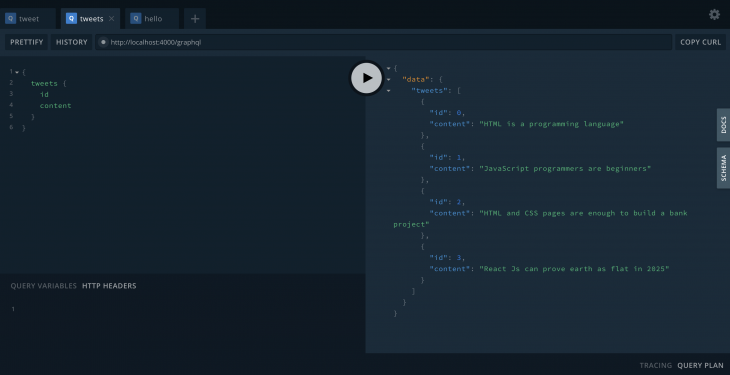
If you send the request without the author, then it will show the tweets data:
Now, instead of denying completely, we will add a rule to show the author only if the user is logged in. Otherwise, we’ll deny those requests that query for the field author.
The GraphQL shield library has extensive way to create rules. wW can create our isLoggedin rule:
// permissions.js

const { ForbiddenError } = require("apollo-server-express");
const { allow, shield, rule } = require("graphql-shield");

// Rule for shield
const isLoggedin = rule({ cache: "contextual" })(
  async (parent, args, { user }, info) => {
    if (user) return true;
    return new ForbiddenError("Not Authorized");
  }
);

const permissions = shield({
  Query: {
    "*": allow,
  },
  Tweet: {
    author: isLoggedin,
  },
});

module.exports = permissions;
If the field is requested, then GraphQL shield will check for the user. If a user is present in the header, then it allows the tweet result. Otherwise, it denies the request.
Without a user in the header:
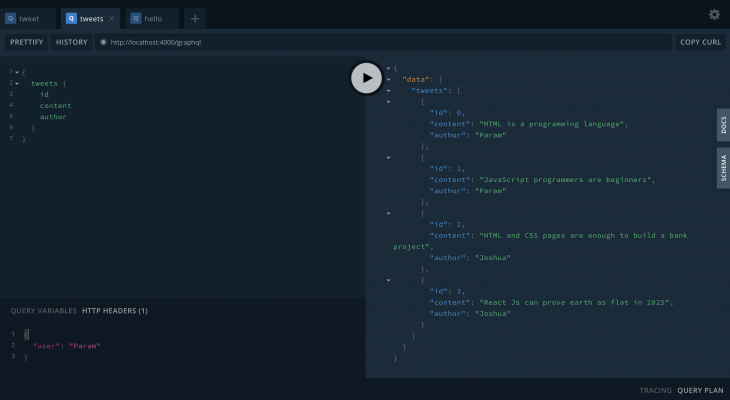
With a user in the header:
We covered implementing permissions in the GraphQL API. Let me know in the comments if you find the article useful to implement permissions in your GraphQL API.
You can find the source code here. You need to look for different branches to see each example. All are prefixed with a number for easy navigation.
While GraphQL has some features for debugging requests and responses, making sure GraphQL reliably serves resources to your production app is where things get tougher. If you’re interested in ensuring network requests to the backend or third party services are successful, try LogRocket.


LogRocket lets you replay user sessions, eliminating guesswork around why bugs happen by showing exactly what users experienced. It captures console logs, errors, network requests, and pixel-perfect DOM recordings — compatible with all frameworks.
LogRocket's Galileo AI watches sessions for you, instantly aggregating and reporting on problematic GraphQL requests to quickly understand the root cause. In addition, you can track Apollo client state and inspect GraphQL queries' key-value pairs.

Learn how to use Skybridge, an open-source React framework, to build and deploy cross-platform AI apps and interactive UI widgets for ChatGPT, Claude, and MCP clients from a single codebase.

Learn how to set up Meilisearch, index documents, and build keyword, semantic, and hybrid search with AI-powered retrieval.

Compare pnpm and npm across security defaults, disk usage, dependency strictness, and workspace policy to decide which package manager fits your project.

I migrated 20 production-style components from Tailwind to StyleX. Here’s what the data showed about LOC, CSS bundle size, build time, and type safety.
Hey there, want to help make our blog better?
Join LogRocket’s Content Advisory Board. You’ll help inform the type of content we create and get access to exclusive meetups, social accreditation, and swag.
Sign up now

