These days, there is a lot going on in the web evolution space — you have probably heard about Web 3.0. If you are new to this space and do not completely understand what it means, or if you are overwhelmed by this new technology — well, not to worry! This post is meant just for you.

In this post, we are going to dive into the world of the decentralized web, also known as Web 3.0, with the Ethereum blockchain. We will make use of the web3.py client, a Python programming language client for interfacing with the Ethereum blockchain.
At the end of the day, our plan is to cover how to connect to and interact with the Ethereum blockchain. To fully understand and follow along this post, you should have:
Before we dive into the meat of this post, let us attempt to understand on a high level the current state of the web and how Web 3.0 fits into that.
As you may already know, we are emerging from the Web 2.0 era, which basically enforces centralization and places too much control in the hands of a few powerful individuals. This, of course, comes with a lot of challenges and problems relating to fair data usage, privacy and so on.
With Web 3.0, there is a sense of autonomy that enforces a fair and open web for everyone to thrive as a player. Basically, it is a movement to make the web decentralized, verifiable, and secure. The ecosystem works and thrives on the idea of eliminating untrusted third-party intermediaries by relying on highly interoperable systems.
A verifiable and fair user experience in terms of how users’ data is owned, managed, and transacted is indeed the true essence of this evolution.
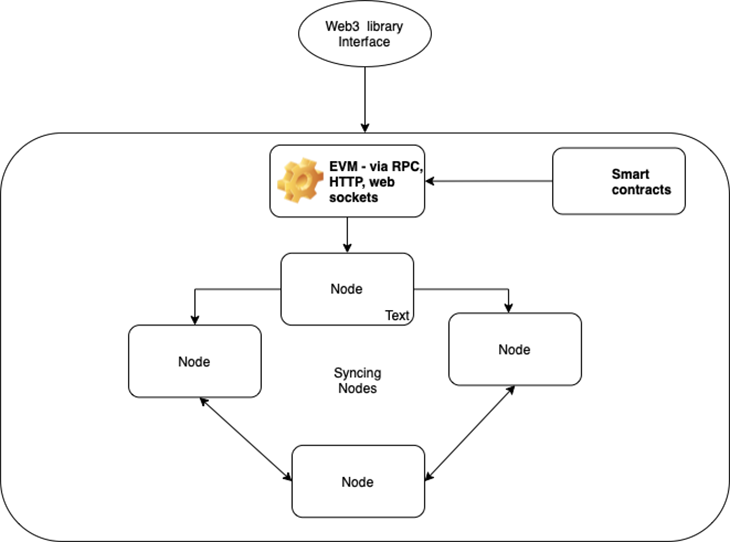
Unlike in Web 2.0, Web 3.0 enables a sort of peer-to-peer networking model, where each peer maintains a copy of the same data on the network and the entire network is also kept in sync. These peers are also known as nodes, in this sense.
Web 3.0 enables the verifiablilty of online information for users and provides a set of protocols for building new kinds of applications where the users are aware of the level of information they are giving and receiving — more like an open web, enabling peer-to-peer apps, autonomous decentralized applications (DApps), cryptographically secure apps, and so on.
Transactions are highly secure and users own and operate on their data. Networks serve as a connection of data interconnected and interoperable in a decentralized manner via various protocols and acted upon via smart contracts.
The Web3 Foundation defines some main points about this new technology, highlighting the need for online information to be as open as possible.
Below is some terminology to know before we dive right into it:

The Ethereum blockchain is a decentralized tech powering millions of applications, usually decentralized (DApps) today. It also powers the cryptocurrency Ether.
There are a lot of different ways to connect to the Ethereum blockchain using different programming language clients. In this post, we will be focusing on interacting with this technology using the web3.py library, which is based on Python.
To begin, you’ll need to set up some basic things. If you are not sure you have the latest Python version installed on your machine, please go ahead and check. You’ll also need an Ethereum node, which is a sort of way to connect to this technology or network, the same way we would need a URL to connect to an external third-party API.
python --version
We’ll also cover some of the basic features needed to get the ground wet and set you up for more advanced features when it comes to interacting with the Ethereum blockchain. Basically, we are going to cover:
First things first, let us choose and connect to an Ethereum node. Then, we’ll perform some basic operations.
When it comes to the choice of node or provider to use, we can either choose to go with a local or a hosted node option. In this post, we’ll make use of Infura, a hosted version, for the simple reason that connecting to a local node requires a lot of work in terms of the time it takes to download the full history of the blockchain, disk space, computation time, bandwidth, and so on. Setting up, running, and maintaining a node are very complex, and are not actually the purpose of this post.
There are a host of others that offer free plans, too, but Infura best fits our use case for this post because we are only interested in learning about this technology, and do not intend to build a blockchain start-up just yet.
If you’re interested, the web3.py documentation extensively outlines an argument for when to use a local versus a hosted node and the best use cases for both of them. Two self-run provider options I would recommend are Geth and Parity, which are local providers used to connect to the Ethereum blockchain.
Usually, there are three basic ways to connect to Ethereum nodes:
The most supported nodes these days are the HTTP ones, but IPC nodes are more secure because they rely on the local file system.
Now, let’s head over to Infura and create an account. With Infura, we have instant access to the Ethereum network via the HTTP and WebSocket protocols.
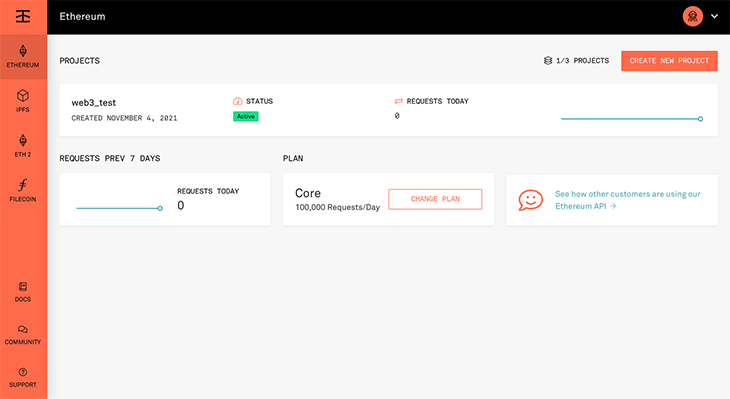
Go ahead and sign up, verify your email, and create a new project on the infura.io dashboard. Give the project any name of your choice. I have called mine web3_test here for demonstration purposes.
On the project dashboard, you can see the keys and all the credentials needed for the project as well as the endpoints needed to connect to a hosted Ethereum network or node. Note that we can also set other kinds of security on our application, for example using JWT for our app authentication. Check out this post on the LogRocket blog for a detailed overview of working with JWT.

The format for connecting to your Ethereum node is shown below:
https://<endpoint>.infura.io/v3/<project_id>
The endpoints can be mainnet, ropsten, Kovan, rinkeby and so on. The dashboard shows the url in both HTTP and WebSockets formats so that you can choose the one that suits your use case.
web3.py ships with some default providers we can also use. Usually, only a single connection to the blockchain via a provider is supported per instance of a running application with the web3.py library. This is usually sufficient for our basic use cases, but we can also make use of multiple providers to spin up multiple web3.py instances.
In this post, we are going to be using the HTTP endpoint. Let’s go ahead and add the endpoint to our .env file. So please do make sure to create a new .env file incase you have not already done that. Also, make sure to add that file to the .gitignore file as well.
Now that we have this all set up, we’ll create a small repo that we can use to try interacting with the Ethereum blockchain.
First, let’s create a new folder on our machines. Navigate to the folder, and follow the steps outlined to create a virtual environment. Make sure to install your newly created virtual environment on your local machine, just in case you do not want to do a system-wide installation.
Inside the folder, we have the .env file, the .gitignore file, and a test_web3.py file, which is the file we are going to be using for our demo. The .env file contains our Infura URL with the key stored as INFURA_URL. We should make sure to include the .env file in the .gitignore file as well.
Also make sure you have pip, the package manager for Python, installed and updated to the latest version. To install the web3.py library and start building, we need to install web3 by running:
pip install web3
Our test_web3.py file looks like this for now, since we are just going to test if the connection to the network is live:
from web3 import Web3
from decouple import config

infura_url = config('INFURA_URL')
print(infura_url)

# HTTPProvider:
w3 = Web3(Web3.HTTPProvider(infura_url))
res = w3.isConnected()
print(res)
As you can see, we have also installed a new package, decouple, which allows our code to have access to the environment variables irrespective of the environment in which it’s running. Note that this is a personal choice, as we can also make use of the python dot env package to get access to the environment variable in this case.
pip install python-decouple
When we run python test_web3.py in our terminal, we get the following as output:
(.venv-py3) retina@alexander web3py_tutorial % python test_web3.py
https://mainnet.infura.io/v3/<project_id>
True
This means that we can access our env variable and we are connected to the network. So, let’s begin querying. For example, to get the latest block, we can do:
latest_block = w3.eth.get_block('latest')

print(latest_block)
and get the result below:
True
AttributeDict({'baseFeePerGas': 106360190089, 'difficulty': 10166935943834278, 'extraData': HexBytes('0xe4b883e5bda9e7a59ee4bb99e9b1bc380021'), 'gasLimit': 29980831, 'gasUsed': 1834730, 'hash': HexBytes('0x9519c67cff19cc78de4c79c5a83a695a9ee532d813ee8eeb2f880d048563f8d6'), 'logsBloom': HexBytes('0x9022500244180211008021008181033400080000280400000045000a020280402414000008000020000009000248010002004080488021008a40000000200002000000802200082818000208010000640000284020600200000030008000000a102200000200808000241000000008c02100000000200400430001d00008c010000100060280000000c0000000600188804004010140000804020040001000800a0002000080280206014090c80280100000000100008000408204020048100340000002010000a40800000040400000000802010500001000000006010120000118200000000000020000004008009040000004000000404058401000000004'), 'miner': '0x829BD824B016326A401d083B33D092293333A830', 'mixHash': HexBytes('0xe4b3c7d6e45ea145a0b386ce5c68c522d85ab28f782648236ec6930e5fe8d913'), 'nonce': HexBytes('0x53dec07d101b2e87'), 'number': 13549938, 'parentHash': HexBytes('0x34045975d949f8a5c0db0c1e9e2461f8453a4aab3a3dd6e7602ef1eb331874fe'), 'receiptsRoot': HexBytes('0x77ddb86550c14c8a02185239f56861e011cfdba87409b9b8abcbd66cbcbcfbc7'), 'sha3Uncles': HexBytes('0x1dcc4de8dec75d7aab85b567b6ccd41ad312451b948a7413f0a142fd40d49347'), 'size': 5611, 'stateRoot': HexBytes('0xa8c91e4a0ec984bc8e0606b2b8bf603bf9a6daf3c8aef6c1342f8683c968b2d7'), 'timestamp': 1636025184, 'totalDifficulty': 33727232539851256019228, 'transactions': [HexBytes('0x6df18cdb083066fd81f2376f82b7ebbdc26d0e6eee2a73dcc7d0e14f0d2e647e'), HexBytes('0xa5d3fc54f0d7c3f1b03882f72d6b1cb90dbc93ea9a3ff8701d905aa5b95007c3'),HexBytes('0x93f0ae71ad39561dba27bee65f8800de8228d97b9ce460d2f983759f8e0d7abd'), 'uncles': []})
(.venv-py3) retina@alexander web3py_tutorial %
As we can see above, each block has a reference to the block that came before it or that produced it. This is referred to as the parentHash and is simply the hash of a previous block.
Let’s see how we can check if an Ethereum address is valid.
//checking an eth address is valid with the is_address method
is_address_valid = w3.isAddress('0x6dAc6E2Dace28369A6B884338B60f7CbBF7fb9be')

print(is_address_valid) //returns True
Basically, this method returns True if the value is one of the recognized Ethereum address formats. There are methods to verify the address is a checksummed address and also to convert an address to a checksum address.
To get the balance in an Ethereum address, we do the following:
check_sum = w3.toChecksumAddress('0xd7986a11f29fd623a800adb507c7702415ee7718')
balance = w3.eth.get_balance(check_sum)
print(balance)

// run the code above
(.venv-py3) retina@alexander web3py_tutorial % python test_web3.py
156805980000000000
Notice that we firstly convert the address to a checksum address before we are able to check the balance. Without doing so, we get the following error below:
  File "/Users/retina/.venv-py3/lib/python3.8/site-packages/web3/_utils/validation.py", line 182, in validate_address
    raise InvalidAddress(
web3.exceptions.InvalidAddress: ('Web3.py only accepts checksum addresses. The software that gave you this non-checksum address should be considered unsafe, please file it as a bug on their platform. Try using an ENS name instead. Or, if you must accept lower safety, use Web3.toChecksumAddress(lower_case_address).', '0xd7986a11f29fd623a800adb507c7702415ee7718')
So it’s always a good idea to convert to checksum addresses. Also, notice the balance gotten is in a format called Wei. To convert this currency to something we’re familiar with — which is most likely Ether — we can use the below method.
ether_value  = w3.fromWei(balance, 'ether')
print(ether_value)
Decimal('')

// we get the result below which the balance in that account
0.15680598
Note that this method returns the value in Wei converted to the specified currency. The value is returned as a decimal to ensure a very high level of precision.
We can also look up a transaction via the transaction hash, like so:
trans = w3.eth.get_transaction('0x0e3d45ec3e1d145842ce5bc56ad168e4a98508e0429da96c1ff89f11076da36d')

print(trans)

AttributeDict({'accessList': [], 'blockHash': None, 'blockNumber': None, 'chainId': '0x1', 'from': '0xeEE20e4eE5381042bd81c44f1a0Fcf5c5345464a', 'gas': 56659, 'gasPrice': 120459037304, 'hash': HexBytes('0x0e3d45ec3e1d145842ce5bc56ad168e4a98508e0429da96c1ff89f11076da36d'), 'input': '0x095ea7b30000000000000000000000007a250d5630b4cf539739df2c5dacb4c659f2488dffffffffffffffffffffffffffffffffffffffffffffffffffffffffffffffff', 'maxFeePerGas': 120459037304, 'maxPriorityFeePerGas': 1567486718, 'nonce': 237, 'r': HexBytes('0xb14b058d01455f54579260c47bfbeccc82fdcdf3939e58fcc808d59f67470ffc'), 's': HexBytes('0x209ca148e807d34f794ca1fa82007b6ef52ede94c0d98b37c1e75722101323c8'), 'to': '0xd665ce6Ef8AdA72B1CF946A6a71508bDD6D2EE04', 'transactionIndex': None, 'type': '0x2', 'v': 0, 'value': 0})
(.venv-py3) retina@alexander web3py_tutorial %
Or we can look up a transaction receipt, as shown below:
trans_receipt = w3.eth.get_transaction_receipt('0xd0f9e247581f9d4c5177fb315e7115e50fc9f673e0915b4b64f3ef5c1b8b81aa')
print(trans_receipt)

AttributeDict({'blockHash': HexBytes('0x166eff2ec3e1375ff70c1dd49b7e4e00dab4802f094fbf81d4021d6d0ac48cb8'), 'blockNumber': 13557150, 'contractAddress': None, 'cumulativeGasUsed': 1719841, 'effectiveGasPrice': 270600000000, 'from': '0xDBD0C0C297035F3D9FD6788B6deC7A28dAd97C63', 'gasUsed': 47216, 'logs': [AttributeDict({'address': '0xd665ce6Ef8AdA72B1CF946A6a71508bDD6D2EE04', 'blockHash': HexBytes('0x166eff2ec3e1375ff70c1dd49b7e4e00dab4802f094fbf81d4021d6d0ac48cb8'), 'blockNumber': 13557150, 'data': '0xffffffffffffffffffffffffffffffffffffffffffffffffffffffffffffffff', 'logIndex': 23, 'removed': False, 'topics': [HexBytes('0x8c5be1e5ebec7d5bd14f71427d1e84f3dd0314c0f7b2291e5b200ac8c7c3b925'), HexBytes('0x000000000000000000000000dbd0c0c297035f3d9fd6788b6dec7a28dad97c63'), HexBytes('0x0000000000000000000000007a250d5630b4cf539739df2c5dacb4c659f2488d')], 'transactionHash': HexBytes('0xd0f9e247581f9d4c5177fb315e7115e50fc9f673e0915b4b64f3ef5c1b8b81aa'), 'transactionIndex': 46})], 'logsBloom': HexBytes('0x00000000000000000000000000000000000000000000000000010400000000000000000000000000000000000000000000000000000880000000000000200000000000000000000000000000000000000000000000000000000000000000000000080000000000000000000000000000000000000000000000000000000000000000000000000000004000000000000000000000000000000000000000000000020000000000000000000000000000000000000000000000000000000000000000000000200000000000800000000000000000000000000000000000000020000010000000000000000000000000000000000000000000000000000000000000'), 'status': 1, 'to': '0xd665ce6Ef8AdA72B1CF946A6a71508bDD6D2EE04', 'transactionHash': HexBytes('0xd0f9e247581f9d4c5177fb315e7115e50fc9f673e0915b4b64f3ef5c1b8b81aa'), 'transactionIndex': 46, 'type': '0x0'})
(.venv-py3) retina@alexander web3py_tutorial %
Smart contracts are basically programs that run on the blockchain and are based on some certain pre-defined conditions. At their most basic, they consist of functions that control the state of the data residing at a particular address on the Ethereum blockchain.
A smart contract is different from a regular user account in that they are programmed and deployed on the blockchain and will run as programmed. As with regular user accounts, a smart contract has an address, which means we can make transactions on them as we would on a user account/address on the blockchain.
On a side note, creating a contract can cost some amount, usually referred to as “gas fees”, since you’ll be making use of computing and network storage. Also, transactions from an external account to a contract address can trigger code, which can in turn cause a lot of actions depending on how the smart contract was programmed.
Interacting or working with smart contracts requires a host of tools to help us achieve our aim quickly. They include, among others:
In this tutorial, we will only be making use of a contract address and its ABI to call smart contract functions.
Now, let’s proceed to interacting with smart contract publicly exposed functions on the Ethereum blockchain using web3.py.
As you may have guessed, there are several methods we can use to interact with smart contracts. However, in order to interact with publicly exposed smart contract functions, we need information about their addresses and abstract binary interfaces (ABIs), which are JSON arrays that contain details about how a smart contract works.
The APIs exposed by the web3.py library interacts with the Ethereum blockchain via JSON RPC, which is a lightweight and stateless protocol. For more information on the JSON RPC protocol, please check the specification link. As this is not a post on writing smart contracts, we are going to be interacting with an existing contract deployed on the Ethereum blockchain. To do so, we need an address of a deployed contract and its ABI.
Let’s head over to Etherscan, a block explorer, to get one. Copy the address of SHIBACHU, which is 0xd665ce6Ef8AdA72B1CF946A6a71508bDD6D2EE04. Now, to read the state of the current contract, we pass the address and the ABI:
address = '0xd665ce6Ef8AdA72B1CF946A6a71508bDD6D2EE04'
abi = '[{"inputs":[],"stateMutability":"nonpayable","type":"constructor"},{"anonymous":false,"inputs":[{"indexed":true,"internalType":"address","name":"owner","type":"address"},{"indexed":true,"internalType":"address","name":"spender","type":"address"},{"indexed":false,"internalType":"uint256","name":"value","type":"uint256"}],"name":"Approval","type":"event"},{"anonymous":false,"inputs":[{"indexed":false,"internalType":"uint256","name":"_maxTxAmount","type":"uint256"}],"name":"MaxTxAmountUpdated","type":"event"},{"anonymous":false,"inputs":[{"indexed":true,"internalType":"address","name":"previousOwner","type":"address"},{"indexed":true,"internalType":"address","name":"newOwner","type":"address"}],"name":"OwnershipTransferred","type":"event"},{"anonymous":false,"inputs":[{"indexed":true,"internalType":"address","name":"from","type":"address"},{"indexed":true,"internalType":"address","name":"to","type":"address"},{"indexed":false,"internalType":"uint256","name":"value","type":"uint256"}],"name":"Transfer","type":"event"},{"inputs":[{"internalType":"address","name":"owner","type":"address"},{"internalType":"address","name":"spender","type":"address"}],"name":"allowance","outputs":[{"internalType":"uint256","name":"","type":"uint256"}],"stateMutability":"view","type":"function"},{"inputs":[{"internalType":"address","name":"spender","type":"address"},{"internalType":"uint256","name":"amount","type":"uint256"}],"name":"approve","outputs":[{"internalType":"bool","name":"","type":"bool"}],"stateMutability":"nonpayable","type":"function"},{"inputs":[{"internalType":"address","name":"account","type":"address"}],"name":"balanceOf","outputs":[{"internalType":"uint256","name":"","type":"uint256"}],"stateMutability":"view","type":"function"},{"inputs":[],"name":"decimals","outputs":[{"internalType":"uint8","name":"","type":"uint8"}],"stateMutability":"pure","type":"function"},{"inputs":[{"internalType":"address","name":"notbot","type":"address"}],"name":"delBot","outputs":[],"stateMutability":"nonpayable","type":"function"},{"inputs":[],"name":"manualsend","outputs":[],"stateMutability":"nonpayable","type":"function"},{"inputs":[],"name":"manualswap","outputs":[],"stateMutability":"nonpayable","type":"function"},{"inputs":[],"name":"name","outputs":[{"internalType":"string","name":"","type":"string"}],"stateMutability":"pure","type":"function"},{"inputs":[],"name":"openTrading","outputs":[],"stateMutability":"nonpayable","type":"function"},{"inputs":[],"name":"owner","outputs":[{"internalType":"address","name":"","type":"address"}],"stateMutability":"view","type":"function"},{"inputs":[],"name":"removeStrictTxLimit","outputs":[],"stateMutability":"nonpayable","type":"function"},{"inputs":[],"name":"renounceOwnership","outputs":[],"stateMutability":"nonpayable","type":"function"},{"inputs":[{"internalType":"address[]","name":"bots_","type":"address[]"}],"name":"setBots","outputs":[],"stateMutability":"nonpayable","type":"function"},{"inputs":[{"internalType":"bool","name":"onoff","type":"bool"}],"name":"setCooldownEnabled","outputs":[],"stateMutability":"nonpayable","type":"function"},{"inputs":[],"name":"symbol","outputs":[{"internalType":"string","name":"","type":"string"}],"stateMutability":"pure","type":"function"},{"inputs":[],"name":"totalSupply","outputs":[{"internalType":"uint256","name":"","type":"uint256"}],"stateMutability":"pure","type":"function"},{"inputs":[{"internalType":"address","name":"recipient","type":"address"},{"internalType":"uint256","name":"amount","type":"uint256"}],"name":"transfer","outputs":[{"internalType":"bool","name":"","type":"bool"}],"stateMutability":"nonpayable","type":"function"},{"inputs":[{"internalType":"address","name":"sender","type":"address"},{"internalType":"address","name":"recipient","type":"address"},{"internalType":"uint256","name":"amount","type":"uint256"}],"name":"transferFrom","outputs":[{"internalType":"bool","name":"","type":"bool"}],"stateMutability":"nonpayable","type":"function"},{"stateMutability":"payable","type":"receive"}]'

contract_instance = w3.eth.contract(address=address, abi=abi)
res = contract_instance.functions.totalSupply().call()
print(res)
//1000000000000000000000
(.venv-py3) retina@alexander web3py_tutorial %
As we can see from the above, we have called the public function totalSupply(), which gives us the total supply of the token.
We can also call other publicly exposed methods available in the contract definition. For example, we can check the symbol:
symbol = contract_instance.functions.symbol().call()
print(symbol)
//SHIBACHU
(.venv-py3) retina@alexander web3py_tutorial %
We have now learned how to read data from a deployed smart contract. It’s important to note that there are other public methods or functions that exist on this contract, such as the balanceOf method for querying account balances, performing external transfers, approvals for external transfer.
Other operations we can also perform on the blockchain include:
Other contract APIs not covered here are available for your reference in this section of the documentation. You can also refer to the Hardhat documentation if you want to learn how to compile, deploy, and test your smart contracts and DApps.
For making transactions on the Ethereum blockchain, we need access to our private keys, which we need to manage on our own if we are making use of a remote or hosted node. A key is needed if we intend to perform actions such as signing transactions, messages, and so on.
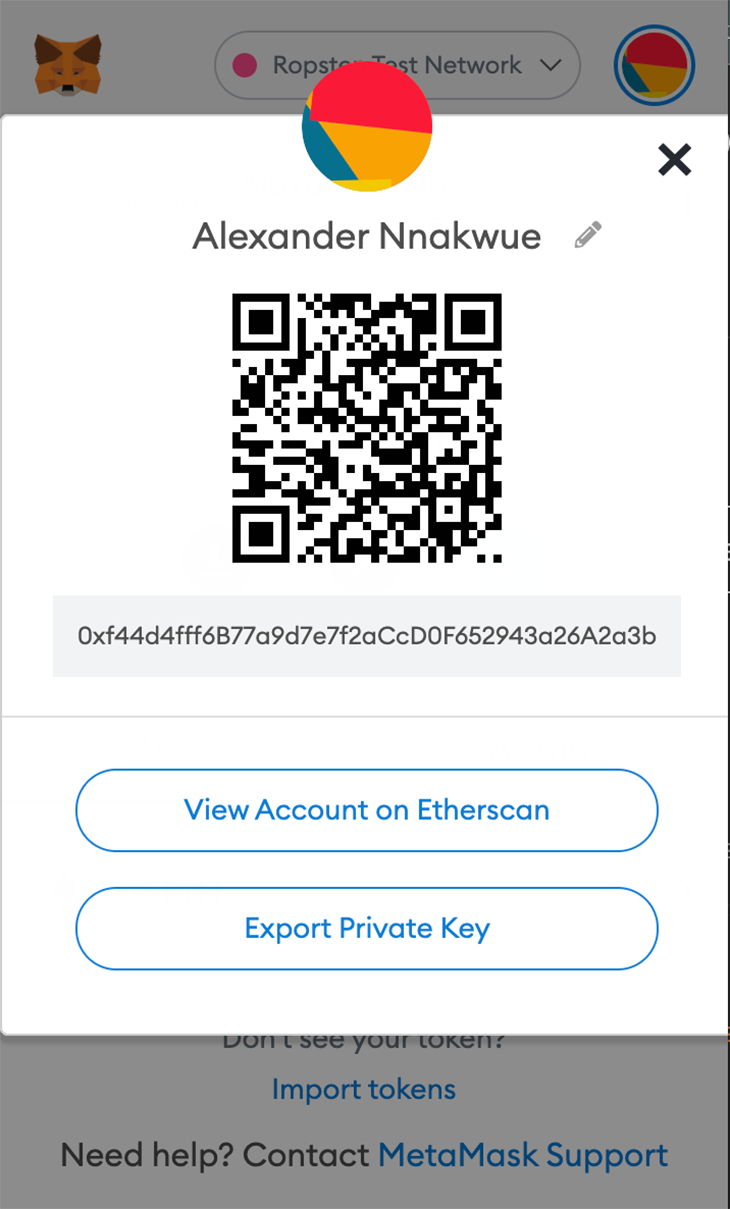
If we are using metamask (a wallet that allows users easy access to their Ethereum wallet via a browser extension and then be able to interact with DApps), we can easily export our private key and use the local private key tools in web3.py to sign and send transactions.

Web3.py interacts with the Ethereum blockchain via a set of publicly exposed APIs. This library is built off of the initial work on the web3.js library.
The web3.py library provides a programming language-specific client interface used to interact with data that is already present in the Ethereum blockchain. With the web3.py library, we can create or execute new transactions on the blockchain, read data from the blockchain, store this data, and make use of it for any specific use case we intend.
More examples of interacting with the Ethereum blockchain have been covered extensively in the example section of the web3.py documentation. You can also find the API Documentation for the web3.eth library and all the needed methods required to interact with the Ethereum blockchain there.
The LogRocket blog has earlier covered how to develop, test, and deploy smart contracts using Ganache and written an extensive post on developing Ethereum smart contracts using Truffle Suite, as well as a similar tutorial on making use of web3.js. Cheers, and until next time! 🥂
Client-side issues that impact users’ ability to activate and transact in your apps can drastically affect your bottom line. If you’re interested in monitoring UX issues, automatically surfacing JavaScript errors, and tracking slow network requests and component load time, try LogRocket.

LogRocket lets you replay user sessions, eliminating guesswork around why bugs happen by showing exactly what users experienced. It captures console logs, errors, network requests, and pixel-perfect DOM recordings — compatible with all frameworks.
LogRocket's Galileo AI watches sessions for you, instantly identifying and explaining user struggles with automated monitoring of your entire product experience.
Modernize how you debug web and mobile apps — start monitoring for free.
Would you be interested in joining LogRocket's developer community?
Join LogRocket’s Content Advisory Board. You’ll help inform the type of content we create and get access to exclusive meetups, social accreditation, and swag.
Sign up now
A breakdown of the wrapper and container CSS classes, how they’re used in real-world code, and when it makes sense to use one over the other.

This guide walks you through creating a web UI for an AI agent that browses, clicks, and extracts info from websites powered by Stagehand and Gemini.

This guide explores how to use Anthropic’s Claude 4 models, including Opus 4 and Sonnet 4, to build AI-powered applications.

Which AI frontend dev tool reigns supreme in July 2025? Check out our power rankings and use our interactive comparison tool to find out.
2 Replies to "Web3.py tutorial: A guide to Ethereum blockchain development with Python"
This article is crap. Nonsense. Everyone can retrieve data from the blockchain. The writer made explanation about retrieving data but could not send transactions which is the core aspect of this article. So it is of no use.
I think that the article is great for beginners, for me it was a good start.