PropTypes
Editor’s note: This article was last updated 17 August 2022 to verify code accuracy.

Props and PropTypes are important mechanisms for passing read-only attributes between React components.
We can use React props, short for properties, to send data from one component to another. If a component receives the wrong type of props, it can cause bugs and unexpected errors in your app.
Since JavaScript doesn’t have a built-in type checking solution, many developers use extensions like TypeScript and Flow. However, React has an internal mechanism for props validation called PropTypes. In this article, we’ll learn how to validate props with React PropTypes.
prop-types library in ReactPercentageStat in ReactIf you’re more of a visual learner, I recommend checking out the following video tutorial on React PropTypes:
The Replay is a weekly newsletter for dev and engineering leaders.
Delivered once a week, it's your curated guide to the most important conversations around frontend dev, emerging AI tools, and the state of modern software.
With React props, you can send data to a component when you call on that component, including numbers, strings, functions, objects, and arrays. If you have multiple components, you can pass data from one component to another.
To pass props between components, you can add them when the component is called, just like you would pass arguments when calling on a regular JavaScript function.
When developing a React application, you’ll need to structure and define your props to avoid bugs and errors. Just like a function might have mandatory arguments, a React component might require a prop to be defined, otherwise, it will not render properly. Forgetting to pass a required prop into a component that needs it could cause your app to behave unexpectedly.
Consider the code below:
import React from 'react';
import ReactDOM from 'react-dom';

function PercentageStat({ label, score = 0, total = Math.max(1, score) }) {
  return (
    <div>
      <h6>{ label }</h6>
      <span>{ Math.round(score / total * 100) }%</span>
    </div>
  )
}

function App() {
  return (
    <div>
      <h1>Male Population</h1>
      <div>
        <PercentageStat label="Class 1" total={360} score={203} />
        <PercentageStat label="Class 2" total={206} />
        <PercentageStat label="Class 3" score={107} />
        <PercentageStat label="Class 4" />
      </div>
    </div>
  )
}

const rootElement = document.getElementById('root');
ReactDOM.render(<App />, rootElement);
In the code above, the PercentageStat component requires three props to render properly, label, score, and total. Default values are set for the score and total props in case they are not provided. PercentageStat is rendered four times in the App component, each time with different props.
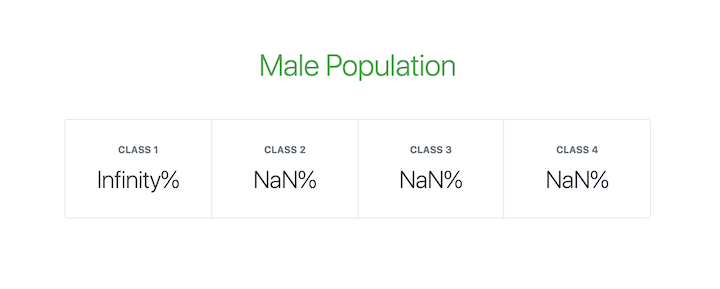
The image below shows what the app would look like with some additional Bootstrap styling:

Based on usage, the label prop is expected to be a string. In the same vein, score and total are required to be numeric values since they are used for computing percent. In addition, total is expected to never be 0 since it is being used as a divisor.
The code below shows a modified app that renders PercentageStat components with invalid props:
function App() {
  return (
    <div>
      <h1>Male Population</h1>
      <div>
        <PercentageStat label="Class 1" total="0" score={203} />
        <PercentageStat label="Class 2" total={0} />
        <PercentageStat label="Class 3" score={f => f} />
        <PercentageStat label="Class 4" total={{}} score="0" />
      </div>
    </div>
  )
}
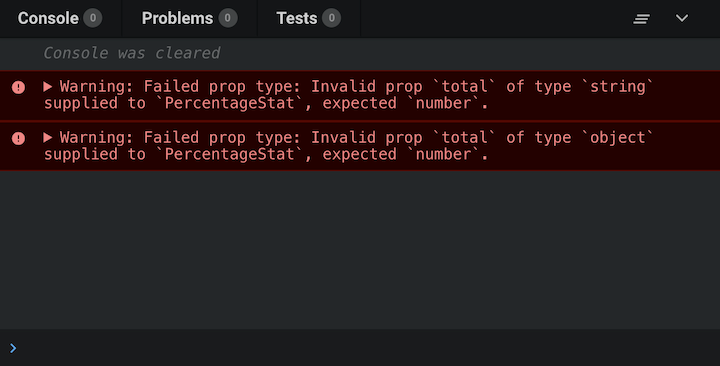
Now, the app view looks like the following image:

PropTypes is React’s internal mechanism for adding type checking to component props. React components use a special property called propTypes to set up type checking:
/**
 * FUNCTIONAL COMPONENTS
 */
function ReactComponent(props) {
  // ...implement render logic here
}

ReactComponent.propTypes = {
  // ...prop type definitions here
}


/**
 * CLASS COMPONENTS: METHOD 1
 */
class ReactComponent extends React.Component {
  // ...component class body here
}

ReactComponent.propTypes = {
  // ...prop type definitions here
}


/**
 * CLASS COMPONENTS: METHOD 2
 * Using the `static` class properties syntax
 */
class ReactComponent extends React.Component {
  // ...component class body here

  static propTypes = {
    // ...prop type definitions here
  }
}
When props are passed to a React component, they are checked against the type definitions configured in the propTypes property. When an invalid value is passed for a prop, a warning is displayed on the JavaScript console:

If default props are set for the React component, the values are first resolved before type checking against propTypes. Therefore, default values are also subject to the prop type definitions.
Keep in mind that type checking propTypes can happen only in development mode, enabling you to catch bugs in your React application before releasing it to the production environment.
prop-types library in ReactPrior to React v15.5.0, a utility called PropTypes was available as part of the React package, which provided a lot of validators for configuring type definitions for component props. You could access it with React.PropTypes.
However, in later versions of React, this utility has been moved to a separate package called prop-types. To get access to the PropTypes utility, you need to add prop-types as a dependency for your project:
npm install prop-types --save
You can import it into your project files as follows:
import PropTypes from 'prop-types';
To learn more about how you can use prop-types and how it differs from using React.PropTypes and all the available validators, check out the official prop-types documentation.
The PropTypes utility exports a wide range of validators for configuring type definitions. Below, we’ll list the available validators for basic, renderable, instance, multiple, collection, and required prop types.
Below are the validators for the basic data types:
PropTypes.any: The prop can be of any data typePropTypes.bool: The prop should be a BooleanPropTypes.number: The prop should be a numberPropTypes.string: The prop should be a stringPropTypes.func: The prop should be a functionPropTypes.array: The prop should be an arrayPropTypes.object: The prop should be an objectPropTypes.symbol: The prop should be a symbolComponent.propTypes = {
anyProp: PropTypes.any,
booleanProp: PropTypes.bool,
numberProp: PropTypes.number,
stringProp: PropTypes.string,
functionProp: PropTypes.func,
arrayProp: PropTypes.array,
objectPerop: PropTypes.object,
symbolProp: PropTypes.symbol,
}
PropTypes also exports the following validators to ensure that React can render the value passed to a prop.
PropTypes.node: The prop should be anything that React can render, like a number, string, element, array, or fragment containing these typesPropTypes.element: The prop should be a React elementComponent.propTypes = {
nodeProp: PropTypes.node,
elementProp: PropTypes.element
}
One common use for the PropTypes.element validator is in ensuring that a component has a single child. If the component has no children or multiple children, a warning is displayed on the JavaScript console:
Component.propTypes = {
  children: PropTypes.element.isRequired
}
In cases where you require a prop to be an instance of a particular JavaScript class, you can use the PropTypes.instanceOf validator, which leverages the underlying JavaScript instanceof operator:
Component.propTypes = {
  personProp: PropTypes.instanceOf(Person)
}
PropTypes also exports validators that can allow a limited set of values or multiple sets of data types for a prop.
PropTypes.oneOf: The prop is limited to a specified set of values, treating it like an enumPropTypes.oneOfType: The prop should be one of a specified set of types, behaving like a union of typesComponent.propTypes = {
enumProp: PropTypes.oneOf([true, false, 0, 'Unknown']),
unionProp: PropTypes.oneOfType([
PropType.bool,
PropType.number,
PropType.string,
PropType.instanceOf(Person)
])
}
In addition to the PropTypes.array and PropTypes.object validators, PropTypes also provides validators for more fine-tuned validation of arrays and objects.
PropTypes.arrayOfPropTypes.arrayOf ensures that the prop is an array in which all items match the specified type:
Component.propTypes = {

  peopleArrayProp: PropTypes.arrayOf(
    PropTypes.instanceOf(Person)
  ),

  multipleArrayProp: PropTypes.arrayOf(
    PropTypes.oneOfType([
      PropType.number,
      PropType.string
    ])
  )

}
PropTypes.objectOfPropTypes.objectOf ensures that the prop is an object in which all property values match the specified type:
Component.propTypes = {

  booleanObjectProp: PropTypes.objectOf(
    PropTypes.bool
  ),

  multipleObjectProp: PropTypes.objectOf(
    PropTypes.oneOfType([
      PropType.func,
      PropType.number,
      PropType.string,
      PropType.instanceOf(Person)
    ])
  )

}
PropTypes.shapeWhen a more detailed validation of an object prop is required, you can use PropTypes.shape. It ensures that the prop is an object that contains a set of specified keys with values of the specified types:
Component.propTypes = {
  profileProp: PropTypes.shape({
    id: PropTypes.number,
    fullname: PropTypes.string,
    gender: PropTypes.oneOf(['M', 'F']),
    birthdate: PropTypes.instanceOf(Date),
    isAuthor: PropTypes.bool
  })
}
PropTypes.exactFor strict or exact object matching, PropTypes.exact will give warnings if extra properties exist in a component:
Component.propTypes = {
  subjectScoreProp: PropTypes.exact({
    subject: PropTypes.oneOf(['Maths', 'Arts', 'Science']),
    score: PropTypes.number
  })
}
So far, all the PropTypes validators we’ve explored allow for the prop to be optional. However, you can chain isRequired to any prop validator to ensure that a warning is shown whenever the prop is not provided:
Component.propTypes = {

  requiredAnyProp: PropTypes.any.isRequired,
  requiredFunctionProp: PropTypes.func.isRequired,
  requiredSingleElementProp: PropTypes.element.isRequired,
  requiredPersonProp: PropTypes.instanceOf(Person).isRequired,
  requiredEnumProp: PropTypes.oneOf(['Read', 'Write']).isRequired,

  requiredShapeObjectProp: PropTypes.shape({
    title: PropTypes.string.isRequired,
    date: PropTypes.instanceOf(Date).isRequired,
    isRecent: PropTypes.bool
  }).isRequired

}
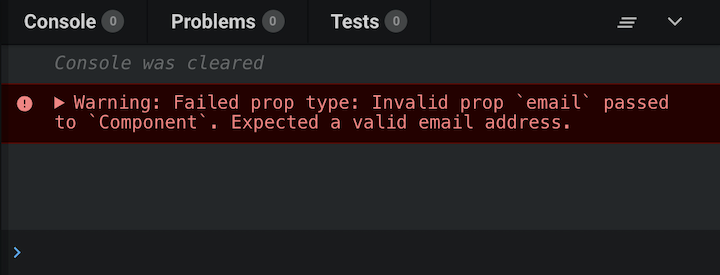
Usually, you need to define some custom validation logic for component props, for example, to ensure that a prop is passed a valid email address. prop-types allows you to define custom validation functions that you can use for type checking props.
The custom validation function takes three arguments:
props: An object containing all the props passed to the componentpropName: The name of the prop to be validatedcomponentName: The name of the componentIf the validation fails, it should return an Error object. The error should not be thrown. Additionally, you shouldn’t use console.warn inside the custom validation function:
const isEmail = function(props, propName, componentName) {
  const regex = /^((([^<>()[]\.,;:s@"]+(.[^<>()[]\.,;:s@"]+)*)|(".+"))@(([[0-9]{1,3}.[0-9]{1,3}.[0-9]{1,3}.[0-9]{1,3}])|(([a-zA-Z-0-9]+.)+[a-zA-Z]{2,})))?$/;

  if (!regex.test(props[propName])) {
    return new Error(`Invalid prop `${propName}` passed to `${componentName}`. Expected a valid email address.`);
  }
}

Component.propTypes = {
  email: isEmail,
  fullname: PropTypes.string,
  date: PropTypes.instanceOf(Date)
}

You can also use custom validation functions with PropTypes.oneOfType. The example below uses the isEmail custom validation function from the previous code snippet:
Component.propTypes = {
  email: PropTypes.oneOfType([
    isEmail,
    PropTypes.shape({
      address: isEmail
    })
  ])
}
The component will be valid in both of these scenarios:
<Component email="[email protected]" />
<Component email={{ address: '[email protected]' }} />
You can also use custom validation functions with PropTypes.arrayOf and PropTypes.objectOf. When used this way, the custom validation function is called for each key in the array or object.
The custom validation function takes five arguments instead of three:
propValue: The array or object itselfkey: The key of the current item in the iterationcomponentName: The name of the componentlocation: The location of the validated data, usually proppropFullName: The fully resolved name of the current item being validated. For an array, this will be array[index]; for an object, it will be object.keyBelow is a modified version of the isEmail custom validation function for use with collection types:
const isEmail = function(propValue, key, componentName, location, propFullName) {
  const regex = /^((([^<>()[]\.,;:s@"]+(.[^<>()[]\.,;:s@"]+)*)|(".+"))@(([[0-9]{1,3}.[0-9]{1,3}.[0-9]{1,3}.[0-9]{1,3}])|(([a-zA-Z-0-9]+.)+[a-zA-Z]{2,})))?$/;

  if (!regex.test(propValue[key])) {
    return new Error(`Invalid prop `${propFullName}` passed to `${componentName}`. Expected a valid email address.`);
  }
}

Component.propTypes = {
  emails: PropTypes.arrayOf(isEmail)
}
Taking everything we’ve learned about custom validation functions into account, let’s go ahead and create all-purpose custom validators that we can use as standalone validators as well as with collection types.
We can make the isEmail custom validation function an all-purpose validator with just a slight modification. We’ll add a prop variable that returns either the propFullName or the key. With this, our custom validator can either be used on its own or with collections:
const isEmail = function(propValue, key, componentName, location, propFullName) {
  // Get the resolved prop name based on the validator usage
  const prop = (location && propFullName) ? propFullName : key;

  const regex = /^((([^<>()[]\.,;:s@"]+(.[^<>()[]\.,;:s@"]+)*)|(".+"))@(([[0-9]{1,3}.[0-9]{1,3}.[0-9]{1,3}.[0-9]{1,3}])|(([a-zA-Z-0-9]+.)+[a-zA-Z]{2,})))?$/;

  if (!regex.test(propValue[key])) {
    return new Error(`Invalid prop `${prop}` passed to `${componentName}`. Expected a valid email address.`);
  }
}

Component.propTypes = {
  email: PropTypes.oneOfType([
    isEmail,
    PropTypes.shape({
      address: isEmail
    })
  ]),
  emails: PropTypes.arrayOf(isEmail)
}
PercentageStat in ReactThe following code snippet adds prop types to the PercentageStat component that we reviewed at the beginning of this tutorial:
import React from 'react';
import PropTypes from 'prop-types';

// The PercentageStat component
function PercentageStat({ label, score = 0, total = Math.max(1, score) }) {
  return (
    <div>
      <h6>{ label }</h6>
      <span>{ Math.round(score / total * 100) }%</span>
    </div>
  )
}

// Checks if a value is numeric
// Either a finite number or a numeric string
function isNumeric(value) {
  const regex = /^(\+|-)?((\d*\.?\d+)|(\d+\.?\d*))$/;
  return Number.isFinite(value) || ((typeof value === "string") && regex.test(value));
}


// Checks if value is non-zero
// Value is first converted to a number
function isNonZero(value) {
  return +value !== 0;
}


// Takes test functions as arguments and returns a custom validation function.
// Each function passed in as argument is expected to take a value argument
// expected to accept a value and return a Boolean if it passes the validation.
// All tests must pass for the custom validator to be marked as passed.
function validatedType(...validators) {
  return function(props, propName, componentName) {

    const value = props[propName];

    const valid = validators.every(validator => {
      if (typeof validator === "function") {
        const result = validator(value);
        return (typeof result === "boolean") && result;
      }

      return false;
    });

    if (!valid) {
      return new Error(`Invalid prop \`${propName}\` passed to \`${componentName}\`. Validation failed.`);
    }

  }
}

// Set the propTypes for the component
PercentageStat.propTypes = {
  label: PropTypes.string.isRequired,
  score: validatedType(isNumeric),
  total: validatedType(isNumeric, isNonZero)
}
In this tutorial, we’ve learned how to improve our React components and ensure that they work as expected using prop types. By validating our props with prop types in our development environment, we can prevent errors and bugs from impacting our application once it is deployed.
If you want to learn more about validating component props in React, I recommend checking out the docs.
Install LogRocket via npm or script tag. LogRocket.init() must be called client-side, not
server-side
$ npm i --save logrocket

// Code:

import LogRocket from 'logrocket';
LogRocket.init('app/id');
// Add to your HTML:

<script src="https://cdn.lr-ingest.com/LogRocket.min.js"></script>
<script>window.LogRocket && window.LogRocket.init('app/id');</script>

@container scroll-state: Replace JS scroll listeners nowCSS @container scroll-state lets you build sticky headers, snapping carousels, and scroll indicators without JavaScript. Here’s how to replace scroll listeners with clean, declarative state queries.

Explore 10 Web APIs that replace common JavaScript libraries and reduce npm dependencies, bundle size, and performance overhead.

Russ Miles, a software development expert and educator, joins the show to unpack why “developer productivity” platforms so often disappoint.

Discover what’s new in The Replay, LogRocket’s newsletter for dev and engineering leaders, in the February 18th issue.
Would you be interested in joining LogRocket's developer community?
Join LogRocket’s Content Advisory Board. You’ll help inform the type of content we create and get access to exclusive meetups, social accreditation, and swag.
Sign up now
7 Replies to "How to validate React props using <code>PropTypes</code>"
Awesome tutorial, thank you for share this. I believe you covered almost all cases of propTypes usage.
Great article. Only one thing that is needed to fix: in the section “Multiple types” in the unionProp example you wrote PropType instead of PropTypes (found this problem after copying this to my code).
Thanks for pointing this out! The typo is fixed.
Thanks for sharing!
Provided you’re using standard eslint rule set, you should be returning from your custom validator function isEmail at the end of it too, to be consistent with the consistent-return eslint rule (https://eslint.org/docs/rules/consistent-return). It expects that if you use a condition to return from your function when that condition is true, you would also return something (probably different) when condition is false.
“A Complete Guide” is exactly right … fantastic article … thank you so much! (You have an awesome name, too!)
Hello,
In the article it says prop-types is used only in development mode, However when installing the package you are using –save option to install it on production… ? is that correct, shouldn’t it be –dev instead?