In the modern digital age, users expect information to be processed instantly. Lags and buffering can have severe consequences for your UX, regardless of the type of application.

In the past, sending and receiving messages using methods like HTTP polling was a real challenge. Blocks on the server caused delays and frustrations for developers and users alike. However, the release of WebSockets in 2008 introduced an effective and simple solution for building real-time apps.
In this article, we’ll learn how to implement a to-do app using WebSockets in Go. We’ll explore WebSockets in-depth, set up WebSockets for Go, and finally, explore some use cases for WebSockets.
If you’re new to Go, I recommend getting familiar with web servers in Go first. Let’s get started!
The Replay is a weekly newsletter for dev and engineering leaders.
Delivered once a week, it's your curated guide to the most important conversations around frontend dev, emerging AI tools, and the state of modern software.
WebSockets are a communications protocol that use full-duplex communication channels over a single durable Transmission Control Protocol (TCP) connection.
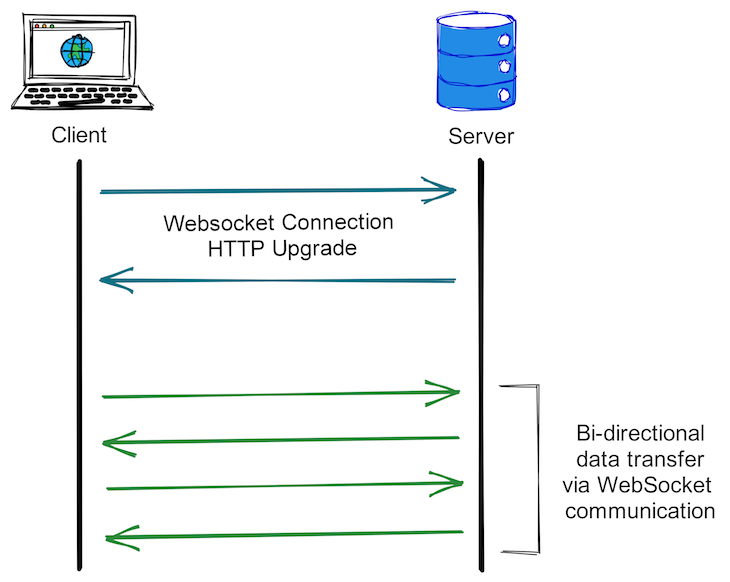
With full-duplex communication, both the server and the client can transmit and receive data simultaneously without being blocked, reducing overhead in comparison to alternatives that use half-duplex communication like HTTP polling.
With less overhead, WebSockets enable real-time communication and rapid data transferring between the web server and the web browser or client application. WebSocket communication initiates a handshake, which uses the HTTP Upgrade() header to change from the HTTP protocol to the WebSocket protocol.
Data can be transferred from the server without a prior request from the client, allowing messages to be passed back and forth and keeping the connection open until the client or server kills it. Thus, a two-way real-time data transfer can take place between the client and the server. WebSocket communications are usually done via TCP port number 443.
The WebSocket protocol specification defines two URI schemes:
ws): used for non-encrypted connectionswss): used for encrypted connections
Let’s explore each step in building an app using WebSockets.
WebSockets are built on top of HTTP, so first, we’ll set up a basic HTTP server that can accept client connections and serve messages. Add the following code to your server.go file:
package main

import (
    "fmt"
    "net/http"
)

func main() {
    http.HandleFunc("/", func (w http.ResponseWriter, r *http.Request) {
        fmt.Fprintf(w, "Setting up the server!")
    })
    http.ListenAndServe(":8080", nil)
}
Start the server by running go run server.go. When you visit localhost:3000, you should see the following output:
Setting up the server!
To set up a WebSocket connection, a one-time handshake is required between the client and the server. A handshake uses the Upgrade() method to upgrade the HTTP server connection to the WebSocket protocol. We’ll also use defer to close the connection once the server is stopped.
Let’s modify our server.go file to set up a WebSocket handshake:
Note: The client must send the first handshake request. Then, the server can authenticate this WebSocket request and reply to the client with an appropriate response.
conn, err := upgrader.Upgrade(w, r, nil)
if err != nil {
log.Print("upgrade failed: ", err)
return
}
defer conn.Close()
Now that we have a basic app set up in WebSockets, let’s add features for adding and completing a task. We’ll set up these two commands in our app from the client, and in response to the commands, we’ll send the current to-do list.
First, we’ll add a web template and set up our client to request the connection and send messages to the server. We’ll use a simple HTML file with a script that creates a socket connection.
As you build your application further, you can move your JavaScript code out to a separate file. We’ll add the following code to websockets.html:
<html>
  <div>
    <h1>Go websockets TODO example</h1>
    <p>Available commands for todo app</p>
    <p>- add [task]</p>
    <p>- done [task]</p>
    <input id="input" type="text" size="40" />
    <button onclick="send()">Send</button>
    <pre id="output"></pre>
  </div>
  <style>
    html {
      text-align: center;
      font-size: 16px;
    }
    div {
      padding: 1rem;
    }
    #input {
      font-size: 16px;
    }
    p {
        font-size: 16px;
    }
  </style>
  <script>
    var input = document.getElementById("input");
    var output = document.getElementById("output");
    var socket = new WebSocket("ws://localhost:8080/todo");

    socket.onopen = function () {
      output.innerHTML += "Status: Connected\n";
    };

    socket.onmessage = function (e) {
      output.innerHTML += "\nServer: " + e.data + "\n";
    };

    function send() {
      socket.send(input.value);
      input.value = "";
    }
  </script>
</html>
Now that our client is ready, let’s update our handler to manage the functionality of our to-do app.
We’ll add commands add and done for completing a task. The to-do handler will also respond with the current state of our to-do list.
Copy the following code into server.go:
package main

import (
    "log"
    "net/http"
    "strings"

    "github.com/gorilla/websocket"
)

var upgrader = websocket.Upgrader{}
var todoList []string

func getCmd(input string) string {
    inputArr := strings.Split(input, " ")
    return inputArr[0]
}

func getMessage(input string) string {
    inputArr := strings.Split(input, " ")
    var result string
    for i := 1; i < len(inputArr); i++ {
        result += inputArr[i]
    }
    return result
}

func updateTodoList(input string) {
    tmpList := todoList
    todoList = []string{}
    for _, val := range tmpList {
        if val == input {
            continue
        }
        todoList = append(todoList, val)
    }
}

func main() {

    http.HandleFunc("/todo", func(w http.ResponseWriter, r *http.Request) {
        // Upgrade upgrades the HTTP server connection to the WebSocket protocol.
        conn, err := upgrader.Upgrade(w, r, nil)
        if err != nil {
            log.Print("upgrade failed: ", err)
            return
        }
        defer conn.Close()

        // Continuosly read and write message
        for {
            mt, message, err := conn.ReadMessage()
            if err != nil {
                log.Println("read failed:", err)
                break
            }
            input := string(message)
            cmd := getCmd(input)
            msg := getMessage(input)
            if cmd == "add" {
                todoList = append(todoList, msg)
            } else if cmd == "done" {
                updateTodoList(msg)
            }
            output := "Current Todos: \n"
            for _, todo := range todoList {
                output += "\n - " + todo + "\n"
            }
            output += "\n----------------------------------------"
            message = []byte(output)
            err = conn.WriteMessage(mt, message)
            if err != nil {
                log.Println("write failed:", err)
                break
            }
        }
    })

    http.HandleFunc("/", func(w http.ResponseWriter, r *http.Request) {
        http.ServeFile(w, r, "websockets.html")
    })

    http.ListenAndServe(":8080", nil)
}
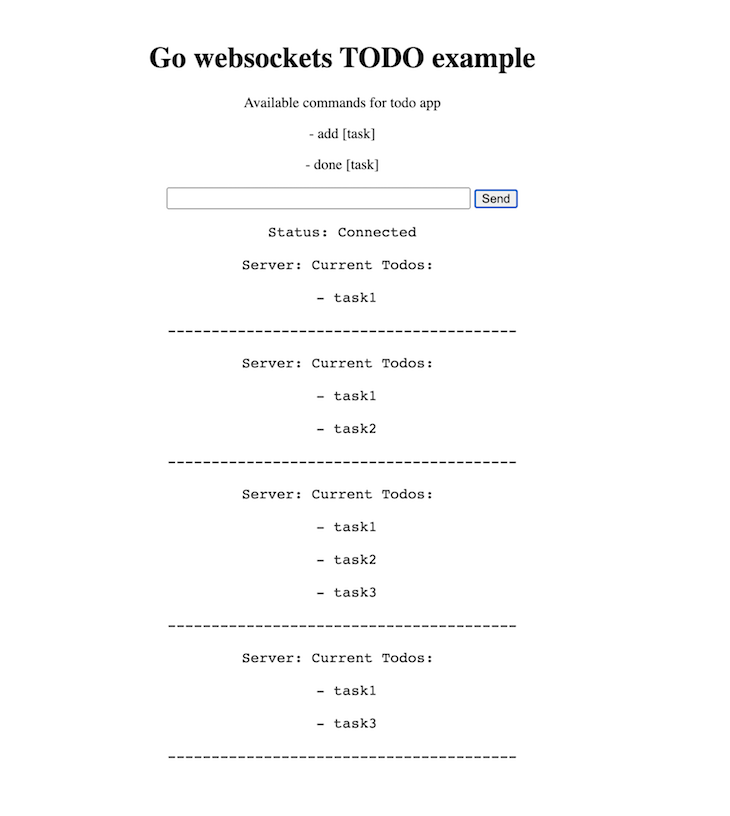
Now, run your server, and you should see the working to-do app on localhost:8080. Feel free to add new items to personalize your to-do list.
After adding and completing a couple of tasks, the to-do app should look like the following screenshot:

WebSockets’ primary purpose is to support full-duplex, or two-way communication. In addition to providing real-time updates, WebSockets include a single, lightweight server that can support multiple open WebSocket connections. WebSockets can sustain the connection between the client and server over a longer period of time than most other methods.
Currently, WebSockets offers cross-platform support for Android, iOS, web, and desktop applications, and WebSockets are commonly used in the following types of applications:
In this article, we explored WebSockets with a brief introduction on how they work, looking closely at full-duplex communication. To understand how WebSockets work in Go, we built a simple to-do application with features for adding and removing tasks. Finally, we looked at several additional features that make WebSockets useful and versatile, and reviewed some practical applications of WebSockets.
Using WebSockets in Go is fairly simple and straightforward, but this combination can have dramatic results on your application’s performance.
Install LogRocket via npm or script tag. LogRocket.init() must be called client-side, not
server-side
$ npm i --save logrocket

// Code:

import LogRocket from 'logrocket';
LogRocket.init('app/id');
// Add to your HTML:

<script src="https://cdn.lr-ingest.com/LogRocket.min.js"></script>
<script>window.LogRocket && window.LogRocket.init('app/id');</script>

@container scroll-state: Replace JS scroll listeners nowCSS @container scroll-state lets you build sticky headers, snapping carousels, and scroll indicators without JavaScript. Here’s how to replace scroll listeners with clean, declarative state queries.

Russ Miles, a software development expert and educator, joins the show to unpack why “developer productivity” platforms so often disappoint.

Discover what’s new in The Replay, LogRocket’s newsletter for dev and engineering leaders, in the February 18th issue.

Learn how to recreate Claude Skills–style workflows in GitHub Copilot using custom instruction files and smarter context management.
Hey there, want to help make our blog better?
Join LogRocket’s Content Advisory Board. You’ll help inform the type of content we create and get access to exclusive meetups, social accreditation, and swag.
Sign up now
One Reply to "Using WebSockets in Golang"
Great article but I noticed you have a typo.
I first code example you use port 8080
http.ListenAndServe(“:8080”, nil)
but when suggest testing you have
localhost:3000