Editor’s note: This article was reviewed and updated in July 2021 to ensure accurate information and updated code when building a chat application using WebRTC.

WebRTC (Web Real-Time Communication) is a specification that enables web browsers, mobile devices, and native clients to exchange video, audio, and general information via APIs. With this technology, communication is usually peer-to-peer and direct.
In essence, WebRTC allows for easy access to media devices on hardware technology. It works by instantiating a connection between different peers via signaling, which then enables or facilitates streaming or exchanging of media data. It is important to note that these technologies are implemented as an open web standard/specification and are exposed via JavaScript APIs in all major browsers.
There are several libraries that wrap the browser’s implementation of WebRTC, enabling web developers to build WebRTC-based apps. They include simpleRTC, peerJS, RTCMultiConnection, webRTC.io, and so on. To learn more about the specific implementation of these libraries, we can have a look at their respective documentation.
In this article, we will learn how to build a chat application using the browser implementation of WebRTC. This is so that we can learn how WebRTC works under the hood.
Before we proceed, it’s important to learn about some of the buzz words used in the WebRTC world. Let’s explore some of them below.
Signaling: the process of determining communication protocols, channels, media codecs and formats, method of data transfer, and routing information needed to exchange information between peers.
RTCPeerConnection: an interface that represents a connection between two peers that monitors the state of the connection and closes the connection after the exchange of data or when a connection is no longer required.
RTCDataChannel: an interface that constitutes a network tunnel/channel that can be used for back-and-forth communication between peers. A data channel is associated with an RTCPeerConnection.
The theoretical maximum channels that can be associated with a connection is 65,534 (although this may be browser-dependent).
STUN(Session Traversal Utilities for NAT(Network Address Translator)) server: returns the IP address, port, and connectivity status of a networked device behind a NAT.
TURN(Traversal Using Relays around NAT) server: a protocol that enables devices to receive and send data from behind a NAT or firewall.
Note: A TURN server, in some cases, will be used to transmit data between peers if they are unable to connect. Usually, TURN servers are expensive to run and should be session authenticated to prevent unauthorized use.
Before we can build our chat app, we will need a signaling server. We will build our server using Node.js. Our server will be responsible for the following:
clientsNotifying connected clients when a new client connectsIceCandidate events between clientsCreate the following folder structure for our server:
signaling-server
├── README.md
├── .gitignore
└── index.js
Alternatively, this can be done through the terminal in the following way:
$ mkdir signaling-server
$ cd signaling-server
$ touch README.md index.js .gitignore
Note that we can add a description of what the project is all about to the README.md file. Also, we should ensure to add the node_modules folder to the .gitignore file, like so:
node_modules/
To generate the package.json file without prompts, run the following command:
$ npm init -y
The contents of the package.json file will look like this:
{
  "name": "signaling-server",
  "version": "1.0.0",
  "description": "",
  "main": "index.js",
  "scripts": {
    "test": "echo \"Error: no test specified\" && exit 1"
  },
  "keywords": [],
  "author": "",
  "license": "ISC"
}
The required dependencies include express for our server, ws for WebSocket client-server connection, and uuid for generating random identifiers. To install these dependencies, we can run the command below:
$ yarn add express uuid ws
Now, proceed to add the following code to the index.js file.
const express = require("express");
const WebSocket = require("ws");
const http = require("http");
const { v4: uuidv4 } = require('uuid');
const app = express();

const port = process.env.PORT || 9000;

//initialize a http server
const server = http.createServer(app);

//initialize the WebSocket server instance
const wss = new WebSocket.Server({ server });

wss.on("connection", ws => {
  ws.on("message", msg => {
    console.log("Received message: %s from client", msg);
  });
  //send immediate a feedback to the incoming connection
  ws.send(
    JSON.stringify({
      type: "connect",
      message: "Well hello there, I am a WebSocket server"
    })
  );
});

//start our server
server.listen(port, () => {
  console.log(`Signaling Server running on port: ${port}`);
});
Here, we first instantiate a simple http server using Express, then we add a WebSocket server on top of the Express app. Next, we add a connection event listener that handles all incoming connections from clients.
Once a client connects, we immediately send them a message indicating a successful connection. We also register a message event listener to handle incoming messages from clients. To do so, we can run:
$ node index.js
Note that we can add a start script to the scripts tag of the package.json file of our project. This will allow us to use the yarn start command to run our code.
We can also use the wscat utility or the Smart WebSocket Client chrome extension to test your server. If you have wscat installed, after starting the server, open a new terminal tab and run:
$ wscat -c ws://localhost:9000
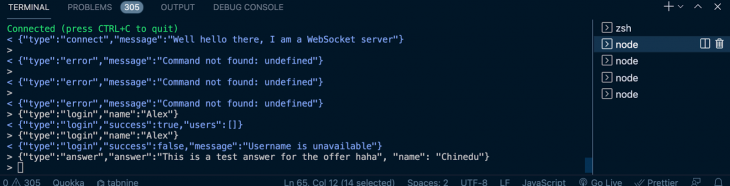
You should see the following:
retina@alexander chatapp % ls
signaling-server
retina@alexander chatapp % cd signaling-server
retina@alexander signaling-server % wscat -c ws://localhost:9000
Connected (press CTRL+C to quit)
< {"type":"connect","message":"Well hello there, I am a WebSocket server"} >
Because we will be handling different types of messages eventually, we will need to accept stringified JSON messages containing the type of message and other relevant data.
We will therefore need to make sure that the message is valid JSON before proceeding. Add the following code to the message handler below the console.log statement:
ws.on("message", msg => {
    let data;
    //accepting only JSON messages
    try {
      data = JSON.parse(msg);
    } catch (e) {
      console.log("Invalid JSON");
      data = {};
    }
}
When the user connects, we will need to assign them an id and ensure that their chosen username has not been taken. All connected users will also need to be stored. Note that we could use Redis for this.
Let’s expand on the message handler. We will also add two utility functions for sending messages to a single user and all other connected users except the user that triggered the message.
When a user logs in, we will use the first utility function to send back a success message showing all the users that are already connected. We will also notify all the connected users that a new user has logged in.
.....
//initialize the WebSocket server instance
const wss = new WebSocket.Server({ server });

// create an object to store users
let users = {};

// utility to send message to one user
const sendTo = (connection, message) => {
  connection.send(JSON.stringify(message));
};

// utility to send message to all users

const sendToAll = (clients, type, { id, name: userName }) => {
  Object.values(clients).forEach(client => {
    if (client.name !== userName) {
      client.send(
        JSON.stringify({
          type,
          user: { id, userName }
        })
      );
    }
  });
};

wss.on("connection", ws => {
  ws.on("message", msg => {
    let data;
    //accepting only JSON messages
    try {
      data = JSON.parse(msg);
    } catch (e) {
      console.log("Invalid JSON");
      data = {};
    }
    const { type, name } = data;
    //Handle message by type
    switch (type) {
      //when a user tries to login
      case "login":
        //Check if username is available
        if (users[name]) {
          sendTo(ws, {
            type: "login",
            success: false,
            message: "Username is unavailable"
          });
        } else {
          const id = uuidv4();
          const loggedIn = Object.values(
            users
          ).map(({ id, name: userName }) => ({ id, userName }));
          users[name] = ws;
          ws.name = name;
          ws.id = id;
          sendTo(ws, {
            type: "login",
            success: true,
            users: loggedIn
          });
          sendToAll(users, "updateUsers", ws);
        }
        break;
      default:
        sendTo(ws, {
          type: "error",
          message: "Command not found: " + type
        });
        break;
    }

  });
  //send immediate a feedback to the incoming connection
  ws.send(
    JSON.stringify({
      type: "connect",
      message: "Well hello there, I am a WebSocket server"
    })
  );
});
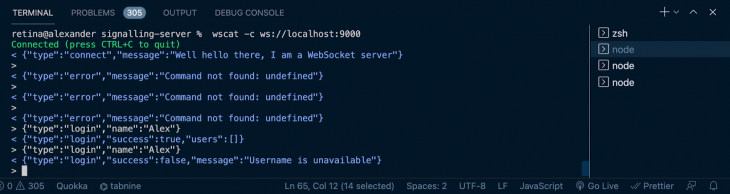
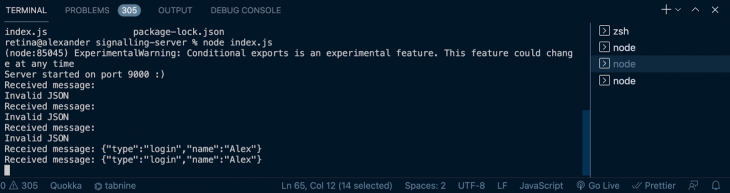
Let’s attempt to log in a new user, then try to login with the same username as well as provide an unknown message type and see what happens. Note that we need to start the server with the node index.js command and also the ws connection server instance with the wscat utility.
Once a user has successfully connected, we will want to establish a connection with another user. To do this, we need to send the other user an offer to connect.
Once the server receives the offer message, it needs to confirm if the user exists before sending the offer.
Let’s add a case for the offer message type:
ws.on("message", msg => {
  ....
  const { type, name, offer } = data;
  //Handle message by type
  switch (type) {
    ....
    case "offer":
      //Check if user to send offer to exists
      const offerRecipient = users[name];
      if (!!offerRecipient) {
        sendTo(offerRecipient, {
          type: "offer",
          offer,
          name: ws.name
        });
      } else {
        sendTo(ws, {
          type: "error",
          message: `User ${name} does not exist!`
        });
      }
      break;
    ...
  }
}
Once a client receives an offer to connect, they will send back an answer to the offer creator. The server ensures passes the answer along. When we build the frontend, the offer and answer process will become clearer. Now, let’s update the switch statement to include this type:
ws.on("message", msg => {
  ....
  const { type, name, offer, answer } = data;
  //Handle message by type
  switch (type) {
    ....
    case "answer":
      //Check if user to send answer to exists
      const answerRecipient = users[name];
      if (!!answerRecipient) {
        sendTo(answerRecipient, {
          type: "answer",
          answer,
        });
      } else {
        sendTo(ws, {
          type: "error",
          message: `User ${name} does not exist!`
        });
      }
      break;
    ...
  }
}
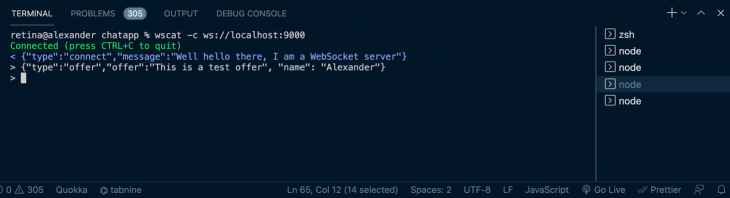
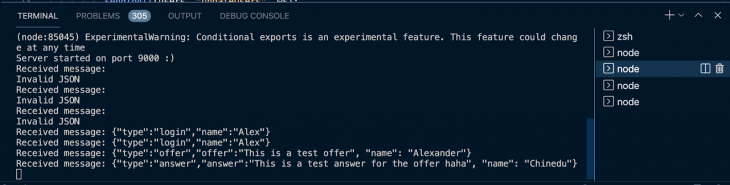
We can now test the offer and answer exchange using two connected users, like so:
IceCandidatesOnce the answer and offer process is done, the users will begin to send IceCandidates to each other until they agree on the best way to connect.
As with most of the other messages, the server will only act as an intermediary that passes messages between the users. Now, let’s update the switch statement to include this type.
ws.on("message", msg => {
  ....
  const { type, name, offer, answer, candidate} = data;
  //Handle message by type
  switch (type) {
    ....
    case "candidate":
      //Check if user to send candidate to exists
      const candidateRecipient = users[name];
      if (!!candidateRecipient) {
        sendTo(candidateRecipient, {
          type: "candidate",
          candidate
        });
      } else {
        sendTo(ws, {
          type: "error",
          message: `User ${name} does not exist!`
        });
      }
      break;
    ...
  }
}
When a user leaves, we should notify all the other connected users that the user has left.
ws.on("message", msg => {
  ....
  //Handle message by type
  switch (type) {
    ....
    case "leave":
      sendToAll(users, "leave", ws);
      break;
    ...
  }
}
We should also notify the other users when the connection drops.
wss.on("connection", ws => {
  ...
  ws.on("close", function() {
      delete users[ws.name];
      sendToAll(users, "leave", ws);
    }
  });
  ...
}
Here is the complete code for our completed signaling server:
const express = require("express");
const WebSocket = require("ws");
const http = require("http");
const uuidv4 = require("uuid/v4");

const app = express();

const port = process.env.PORT || 9000;

//initialize a http server
const server = http.createServer(app);

//initialize the WebSocket server instance
const wss = new WebSocket.Server({ server });

let users = {};

const sendTo = (connection, message) => {
  connection.send(JSON.stringify(message));
};

const sendToAll = (clients, type, { id, name: userName }) => {
  Object.values(clients).forEach(client => {
    if (client.name !== userName) {
      client.send(
        JSON.stringify({
          type,
          user: { id, userName }
        })
      );
    }
  });
};

wss.on("connection", ws => {
  ws.on("message", msg => {
    let data;
    //accept only JSON messages
    try {
      data = JSON.parse(msg);
    } catch (e) {
      console.log("Invalid JSON");
      data = {};
    }
    const { type, name, offer, answer, candidate } = data;
    switch (type) {
      //when a user tries to login
      case "login":
        //Check if username is available
        if (users[name]) {
          sendTo(ws, {
            type: "login",
            success: false,
            message: "Username is unavailable"
          });
        } else {
          const id = uuidv4();
          const loggedIn = Object.values(
            users
          ).map(({ id, name: userName }) => ({ id, userName }));
          users[name] = ws;
          ws.name = name;
          ws.id = id;
          sendTo(ws, {
            type: "login",
            success: true,
            users: loggedIn
          });
          sendToAll(users, "updateUsers", ws);
        }
        break;
      case "offer":
        //Check if user to send offer to exists
        const offerRecipient = users[name];
        if (!!offerRecipient) {
          sendTo(offerRecipient, {
            type: "offer",
            offer,
            name: ws.name
          });
        } else {
          sendTo(ws, {
            type: "error",
            message: `User ${name} does not exist!`
          });
        }
        break;
      case "answer":
        //Check if user to send answer to exists
        const answerRecipient = users[name];
        if (!!answerRecipient) {
          sendTo(answerRecipient, {
            type: "answer",
            answer,
          });
        } else {
          sendTo(ws, {
            type: "error",
            message: `User ${name} does not exist!`
          });
        }
        break;
      case "candidate":
        const candidateRecipient = users[name];
        if (!!candidateRecipient) {
          sendTo(candidateRecipient, {
            type: "candidate",
            candidate
          });
        }
        break;
      case "leave":
        sendToAll(users, "leave", ws);
        break;
      default:
        sendTo(ws, {
          type: "error",
          message: "Command not found: " + type
        });
        break;
    }
  });
  ws.on("close", function() {
    delete users[ws.name];
    sendToAll(users, "leave", ws);
  });
  //send immediately a feedback to the incoming connection
  ws.send(
    JSON.stringify({
      type: "connect",
      message: "Well hello there, I am a WebSocket server"
    })
  );
});
//start our server
server.listen(port, () => {
  console.log(`Signaling Server running on port: ${port}`);
});
With the signaling server in place, we can now start building the Chat app. For more details, we can refer to the index.js file located here.
Our folder structure for the app will look as follows:
simple-webrtc-chat-app
├── public
│   ├── index.html
│   ├── manifest.json
├── src
│   ├── App.js
│   ├── index.js
│   ├── Container.js
│   ├── Chat.js
│   ├── MessageBox.js
│   ├── UserList.js
├── .gitignore
├── README.md
└── package.json
Most of the files will be created when we bootstrap the app. You can bootstrap the project using any of the following commands:
npx:
$ npx create-react-app simple-webrtc-chat-app
npm *npm init <initializer>* is available in npm 6+) :
$ npm init react-app simple-webrtc-chat-app
yarn *yarn create <starter-kit-package>*is available in Yarn 0.25+) :
$ yarn create react-app simple-webrtc-chat-app
Once you have finished creating the project folder, you can open it and run it:
cd simple-webrtc-chat-app
npm start //or
yarn start
This will run the app in development mode. You can view it in the browser using the link http://localhost:3000/. Also, make sure to install the needed dependencies by running either npm install or yarn add.
We will require a couple of libraries to help us build our chat application: Semantic UI React for styling, date-fns for manipulating dates, and react-bootstrap-sweetalert to show success and error messages.
To install them, run the following command:
$ yarn add date-fns semantic-ui-react react-bootstrap-sweetalert
To theme the Semantic UI components, we will need semantic UI stylesheets. The quickest way to get started is by using a CDN. Just add this link to the <head> of your index.html file in the public folder:
<link rel="stylesheet" href="//cdn.jsdelivr.net/npm/[email protected]/dist/semantic.min.css" />
Our chat application will have five constituent components:
App component, which will be the main component of the applicationContainer component, which will subscribe to context changesChat component will create a WebSocket connection to the server and listen to and handle messages, as well as establish connections with other usersUserList component will list all the users that are currently online, i.e., connected to the signaling server and the user can attempt to connect withMessageBox component will show a thread of messages between connected peers# Navigate to source directory $ cd src/ #Create new files $ touch Container.js Chat.js UserList.js MessageBox.js
App componentWe will create contexts to hold the peer connection between users and the data channel for information exchange. Each context will have a function passed down to allow consumers to update the context.
We will render Provider React components for both the connection and the channel and pass them a value from state that will be null to start with.
Add the following code to your App.js file:
```
import React, { useState, createContext } from "react";
import Container from "./Container";
const ConnectionContext = createContext({
  connection: null,
  updateConnection: () => {}
});
const ChannelContext = createContext({
  channel: null,
  updateChannel: () => {}
});
const App = () => {
  const [connection, setconnection] = useState(null);
  const [channel, setChannel] = useState(null);
  const updateConnection = conn => {
    setconnection(conn);
  };
  const updateChannel = chn => {
    setChannel(chn);
  };
  return (
  );
};
export const ConnectionConsumer = ConnectionContext.Consumer
export const ChannelConsumer = ChannelContext.Consumer
export default App;

```
Container componentimport React from "react";
import Chat from "./Chat";
import { ConnectionConsumer, ChannelConsumer} from "./App";
const Container = () => {
return (
<ConnectionConsumer>
{({ connection, updateConnection }) => (
<ChannelConsumer>
{({ channel, updateChannel }) => (
<Chat
connection={connection}
updateConnection={updateConnection}
channel={channel}
updateChannel={updateChannel}
/>
)}
</ChannelConsumer>
)}
</ConnectionConsumer>
);
};
export default Container
To make the connection and channel available to nested components as props, we use Context.Consumer. This is a component that subscribes to context changes.
You will notice that we exported the Consumers for the connection and channel contexts in App.js. We will use those exports in the Container component.
We will also render the Chat component within this component.
Chat componentWhen the components render for the first time, we use useEffect to create a WebSocket connection and store it in a Ref. The connection is created using the server URL. Notice the ws at the beginning of the URL.
If you are using a secure URL, this will be wss. The connection will listen for messages and close events. The received messages will be added to the state to be processed.
The initial code for the component should look something like this:
import React, { Fragment, useState, useEffect, useRef } from "react";
import {
Header,
Loader
} from "semantic-ui-react";
const Chat = ({ connection, updateConnection, channel, updateChannel }) => {
const webSocket = useRef(null);
const [socketOpen, setSocketOpen] = useState(false);
const [socketMessages, setSocketMessages] = useState([]);
const [alert, setAlert] = useState(null);
useEffect(() => {
// add the websocket url to env in production environment
webSocket.current = new WebSocket("ws://localhost:9000");
webSocket.current.onmessage = message => {
const data = JSON.parse(message.data);
setSocketMessages(prev => [...prev, data]);
};
webSocket.current.onclose = () => {
webSocket.current.close();
};
return () => webSocket.current.close();
}, []);
return (
<div className="App">
{alert}
<Header as="h2" icon>
<Icon name="users" />
Simple WebRTC Chap App
</Header>
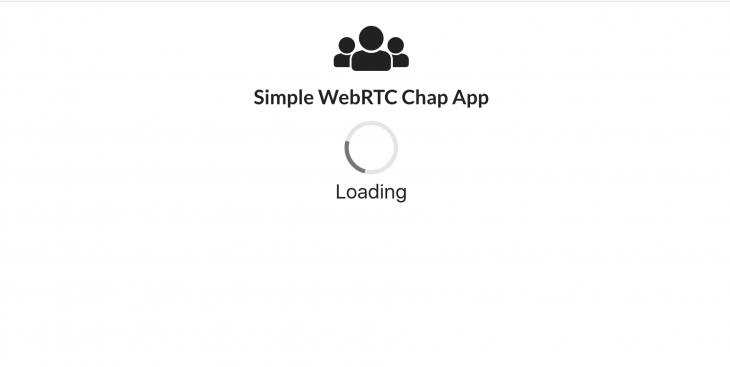
{(socketOpen && (
<Fragment>
</Fragment>
)) || (
<Loader size="massive" active inline="centered">
Loading
</Loader>
)}
</div>
);
};
export default Chat;
If a connection with the server has not been made yet, we show a loader.
A user should be able to send messages to the server. The following component function will enable them to do just that.
const send = data => {
  webSocket.current.send(JSON.stringify(data));
};
To handle messages we receive from the signaling server, we will use a useEffect that will fire whenever the socketMessages changes. It will take the last message and process it.
useEffect(() => {
    let data = socketMessages.pop();
    if (data) {
      switch (data.type) {
        case "connect":
          setSocketOpen(true);
          break;
        default:
          break;
      }
    }
  }, [socketMessages]);
When we receive a connect message from the server, we will update the socketOpen variable so we can render the other contents. Messages of type login, updateUsers, removeUser, offer, answer, and candidate will also be handled.
Each message will call the respective handler. We will define the handlers later. The complete useEffect should look like this:
useEffect(() => {
    let data = socketMessages.pop();
    if (data) {
      switch (data.type) {
        case "connect":
          setSocketOpen(true);
          break;
        case "login":
          onLogin(data);
          break;
        case "updateUsers":
          updateUsersList(data);
          break;
        case "removeUser":
          removeUser(data);
          break;
        case "offer":
          onOffer(data);
          break;
        case "answer":
          onAnswer(data);
          break;
        case "candidate":
          onCandidate(data);
          break;
        default:
          break;
      }
    }
  }, [socketMessages]);
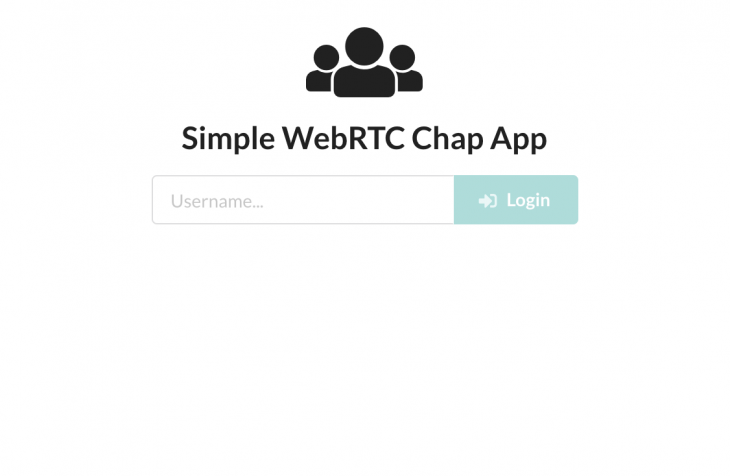
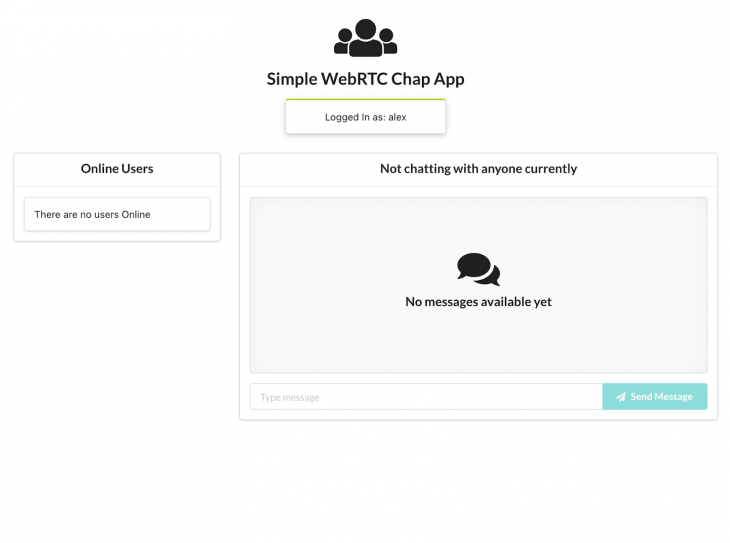
As soon as a connection has been established with the server, we will render an input with a button that will allow the user to enter their username and login.
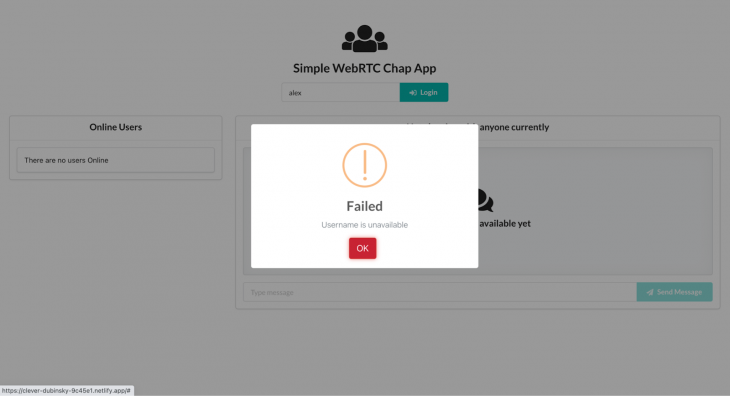
Clicking the handleLogin function will send a login message to the server with the username the user has chosen. Once a user has successfully logged in, we will show their logged-in state instead of the username input.
If their username is already taken, we will show them an alert indicating that. Now, we can add the following code to the Chat component:
...
import {
  ...
  Icon,
  Input,
  Grid,
  Segment,
  Button,
} from "semantic-ui-react";

const Chat = ({ connection, updateConnection, channel, updateChannel }) => {
  ....
  const [isLoggedIn, setIsLoggedIn] = useState(false);
  const [name, setName] = useState("");
  const [loggingIn, setLoggingIn] = useState(false);

  ...
  const handleLogin = () => {
    setLoggingIn(true);
    send({
      type: "login",
      name
    });
  };

  return (
    <div className="App">
      ....
      {(socketOpen && (
        <Fragment>
          <Grid centered columns={4}>
            <Grid.Column>
              {(!isLoggedIn && (
                <Input
                  fluid
                  disabled={loggingIn}
                  type="text"
                  onChange={e => setName(e.target.value)}
                  placeholder="Username..."
                  action
                >
                  <input />
                  <Button
                    color="teal"
                    disabled={!name || loggingIn}
                    onClick={handleLogin}
                  >
                    <Icon name="sign-in" />
                    Login
                  </Button>
                </Input>
              )) || (
                <Segment raised textAlign="center" color="olive">
                  Logged In as: {name}
                </Segment>
              )}
            </Grid.Column>
          </Grid>
        </Fragment>
      )) || (
        ...
      )}
    </div>
  );
};
export default Chat;
We also need to add a handler for the login message from the server.
const Chat = ({ connection, updateConnection, channel, updateChannel }) => {
...
const [users, setUsers] = useState([]);
...
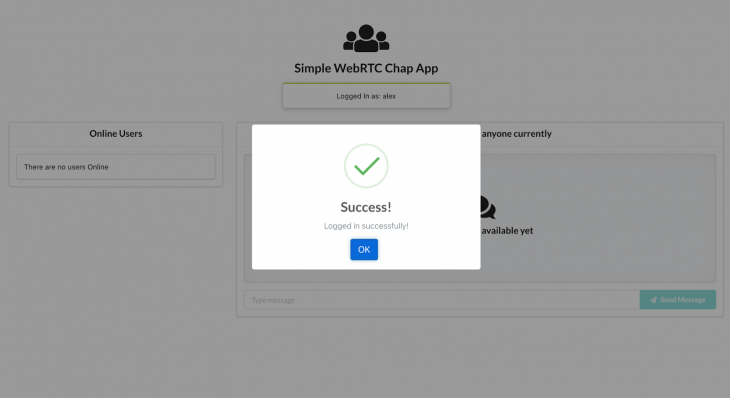
const onLogin = ({ success, message, users: loggedIn }) => {
setLoggingIn(false);
if (success) {
setAlert(
<SweetAlert
success
title="Success!"
onConfirm={closeAlert}
onCancel={closeAlert}
>
Logged in successfully!
</SweetAlert>
);
setIsLoggedIn(true);
setUsers(loggedIn);
} else {
setAlert(
<SweetAlert
warning
confirmBtnBsStyle="danger"
title="Failed"
onConfirm={closeAlert}
onCancel={closeAlert}
>
{message}
</SweetAlert>
);
}
};
...
}
As you can see, the login response has a field containing the currently logged-in users that we assign to the state users variable.
We will need to add a sidebar listing all the online users. Before we proceed with the rest of the Chat components, let’s look at the UsersList component.
UsersList componentThis component will list all the users that are currently online.
Each listing will show a connected user’s username and a button for our user to initiate the connection process with another user.
If the user is already connected to another user, the button text will change to Disconnect and all other buttons will be disabled to prevent the user from establishing another connection until they close the current connection.
The connect buttons for each user will also be disabled if the user is in the process of connecting to another peer. The component will receive users, toggleConnection, connectedTo, and connecting props from the Chat component.
Add the following code to src/UsersList.js:
import React from "react";
import {
  Grid,
  Segment,
  Card,
  List,
  Button,
  Image,
} from "semantic-ui-react";
import avatar from "./avatar.png";
const UsersList = ({ users, toggleConnection, connectedTo, connecting }) => {
  return (
    <Grid.Column width={5}>
      <Card fluid>
        <Card.Content header="Online Users" />
        <Card.Content textAlign="left">
          {(users.length && (
            <List divided verticalAlign="middle" size="large">
              {users.map(({ userName }) => (
                <List.Item key={userName}>
                  <List.Content floated="right">
                    <Button
                      onClick={() => {
                        toggleConnection(userName);
                      }}
                      disabled={!!connectedTo && connectedTo !== userName}
                      loading={connectedTo === userName && connecting}
                    >
                      {connectedTo === userName ? "Disconnect" : "Connect"}
                    </Button>
                  </List.Content>
                  <Image avatar src={avatar} />
                  <List.Content>
                    <List.Header>{userName}</List.Header>
                  </List.Content>
                </List.Item>
              ))}
            </List>
          )) || <Segment>There are no users Online</Segment>}
        </Card.Content>
      </Card>
    </Grid.Column>
  );
};
export default UsersList;
Now that we have the UsersList component, we need to import it into the Chat component and render it.
...
import UsersList from "./UsersList";

const Chat = ({ connection, updateConnection, channel, updateChannel }) => {
  ....
  const [connectedTo, setConnectedTo] = useState("");
  const connectedRef = useRef();
  const [connecting, setConnecting] = useState(false);

  ...
  const toggleConnection = userName => {
    if (connectedRef.current === userName) {
      setConnecting(true);
      setConnectedTo("");
      connectedRef.current = "";
      setConnecting(false);
    } else {
      setConnecting(true);
      setConnectedTo(userName);
      connectedRef.current = userName;
      // To be discussed later
      handleConnection(userName);
      setConnecting(false);
    }

  return (
    <div className="App">
      ....
      {(socketOpen && (
        <Fragment>
          ...
          <Grid>
            <UsersList
              users={users}
              toggleConnection={toggleConnection}
              connectedTo={connectedTo}
              connection={connecting}
            />
          </Grid>
        </Fragment>
      )) || (
        ...
      )}
    </div>
  );
};


After a successful login, we should create a new RTCPeerConnection to enable the user to connect with other users.
Let’s add some code to create the peer connection.
On login success, we will create a new RTCPeerConnection. The RTCPeerConnection constructor takes a configuration containing STUN and TURN servers.
In our example, we will only be using Google’s public STUN server. We will add an oniceCandidate handler which sends all found Icecandidates to the other user.
Another handler that has to be added is the ondatachannel handler. This will be triggered when a remote peer adds a data channel to the connection by calling createDataChannel() .
Once the connection is created, we will call the context prop method updateConnection to update the context with the created channel.
When the ondatachannel handler is fired, we add an onmessage handler and then store the channel in context using updateChannel.
This method is triggered by the remote peer that accepts the connection request.
The peer that initiates the connection creates their own dataChannel. Modify the onLogin method as indicated below:
const configuration = {
  iceServers: [{ url: "stun:stun.1.google.com:19302" }]
};

const Chat = ({ connection, updateConnection, channel, updateChannel }) => {
  ....
  const onLogin = ({ success, message, users: loggedIn }) => {
      setLoggingIn(false);
      if (success) {
        setAlert(
          <SweetAlert
            success
            title="Success!"
            onConfirm={closeAlert}
            onCancel={closeAlert}
          >
            Logged in successfully!
          </SweetAlert>
        );
        setIsLoggedIn(true);
        setUsers(loggedIn);
        let localConnection = new RTCPeerConnection(configuration);
        //when the browser finds an ice candidate we send it to another peer
        localConnection.onicecandidate = ({ candidate }) => {
          let connectedTo = connectedRef.current;
          if (candidate && !!connectedTo) {
            send({
              name: connectedTo,
              type: "candidate",
              candidate
            });
          }
        };
        localConnection.ondatachannel = event => {
          let receiveChannel = event.channel;
          receiveChannel.onopen = () => {
            console.log("Data channel is open and ready to be used.");
          };
          receiveChannel.onmessage = handleDataChannelMessageReceived;
          updateChannel(receiveChannel);
        };
        updateConnection(localConnection);
      } else {
        setAlert(
          <SweetAlert
            warning
            confirmBtnBsStyle="danger"
            title="Failed"
            onConfirm={closeAlert}
            onCancel={closeAlert}
          >
            {message}
          </SweetAlert>
        );
      }
  }
  ...
}
As soon as the data channel is open, peers can send each other messages.
These messages need to be handled when received.
Because we have already assigned a handler to the onmessage event (triggered when messages are received by peers), let’s look at what it will do:
const configuration = {
  iceServers: [{ url: "stun:stun.1.google.com:19302" }]
};

const Chat = ({ connection, updateConnection, channel, updateChannel }) => {
  ....
  const onLogin = ({ success, message, users: loggedIn }) => {
      setLoggingIn(false);
      if (success) {
        setAlert(
          <SweetAlert
            success
            title="Success!"
            onConfirm={closeAlert}
            onCancel={closeAlert}
          >
            Logged in successfully!
          </SweetAlert>
        );
        setIsLoggedIn(true);
        setUsers(loggedIn);
        let localConnection = new RTCPeerConnection(configuration);
        //when the browser finds an ice candidate we send it to another peer
        localConnection.onicecandidate = ({ candidate }) => {
          let connectedTo = connectedRef.current;
          if (candidate && !!connectedTo) {
            send({
              name: connectedTo,
              type: "candidate",
              candidate
            });
          }
        };
        localConnection.ondatachannel = event => {
          let receiveChannel = event.channel;
          receiveChannel.onopen = () => {
            console.log("Data channel is open and ready to be used.");
          };
          receiveChannel.onmessage = handleDataChannelMessageReceived;
          updateChannel(receiveChannel);
        };
        updateConnection(localConnection);
      } else {
        setAlert(
          <SweetAlert
            warning
            confirmBtnBsStyle="danger"
            title="Failed"
            onConfirm={closeAlert}
            onCancel={closeAlert}
          >
            {message}
          </SweetAlert>
        );
      }
  }
  ...
}
When a message is received, we first retrieve the existing messages before adding the new message.
We are using messagesRef and messages variables because of the way the component methods are created in functional components: constructors within these methods only have access to state values at the time they were created.
We use a Ref to ensure that we are retrieving the up-to-date messages. We then store the updated messages in messages and use that to render the message thread.
Each message contains the sender. We use the sender as the field name that will hold the messages between the local peer and the sender.
Earlier, when creating the UsersList component, we used the toggleConnection function to update state with the user that the local peer wanted to connect to.
We will take this a step further and call a handleConnection method when the user tries to connect with another user.
The handleConnection method will create a data channel on the local peer connection and then send an offer to the remote peer for connection.
First, we need to update the toggleConnection method to call the handleConnection method:
const toggleConnection = userName => {
  if (connectedRef.current === userName) {
    setConnecting(true);
    setConnectedTo("");
    connectedRef.current = "";
    setConnecting(false);
  } else {
    setConnecting(true);
    setConnectedTo(userName);
    connectedRef.current = userName;
    handleConnection(userName);
    setConnecting(false);
  }
};
To create a data channel you call the peer connection createDataChannel method with the name of the channel.
We add an onmessage handler like we did for a channel created by a remote peer. We then update context with the created channel.
const handleConnection = name => {
  let dataChannel = connection.createDataChannel("messenger");
  dataChannel.onerror = error => {
    setAlert(
      <SweetAlert
        warning
        confirmBtnBsStyle="danger"
        title="Failed"
        onConfirm={closeAlert}
        onCancel={closeAlert}
      >
        An error has occurred.
      </SweetAlert>
    );
  };
  dataChannel.onmessage = handleDataChannelMessageReceived;
  updateChannel(dataChannel);
};
After creating the channel, it is time to create an offer. This is done using the createOffer method of the RTCPeerConnection interface.
The createOffer method initiates the creation of an SDP(Session Description Protocol) offer for the purpose of starting a new WebRTC connection to a remote peer.
The offer includes information such as codec, options supported by the initiating browser, and any candidates already gathered by the ICE agent to be sent through the signaling server to a potential peer.
When the offer is created, we call the setLocalDescription of the RTCPeerConnection interface with the offer (session description). This method updates the local description of the connection, which defines the properties of the local end of the connection.
We then send the offer to the remote peer through the signaling server.
Add the following offer code to the handleConnection method:
const handleConnection = name => {
    ...
    connection
      .createOffer()
      .then(offer => connection.setLocalDescription(offer))
      .then(() =>
        send({ type: "offer", offer: connection.localDescription, name })
      )
      .catch(e =>
        setAlert(
          <SweetAlert
            warning
            confirmBtnBsStyle="danger"
            title="Failed"
            onConfirm={closeAlert}
            onCancel={closeAlert}
          >
            An error has occurred.
          </SweetAlert>
        )
      );
  };
When a peer receives an offer from a remote client, it will set its connectedTo value to the username of the remote peer.
We then call the setRemoteDescription method of the RTCPeerConnection interface with the session description received from the remote peer.
The setRemoteDescription method updates the remote description of the connection, which specifies the properties of the remote end of the connection.
After updating the remote description, we create a response.
This is done using the createAnswer method of the connection. The method creates an SDP answer to the offer from the remote peer.
We then call the setLocalDescription with the answer before sending it to the remote peer:
const onOffer = ({ offer, name }) => {
  setConnectedTo(name);
  connectedRef.current = name;
  connection
    .setRemoteDescription(new RTCSessionDescription(offer))
    .then(() => connection.createAnswer())
    .then(answer => connection.setLocalDescription(answer))
    .then(() =>
      send({ type: "answer", answer: connection.localDescription, name })
    )
    .catch(e => {
      console.log({ e });
      setAlert(
        <SweetAlert
          warning
          confirmBtnBsStyle="danger"
          title="Failed"
          onConfirm={closeAlert}
          onCancel={closeAlert}
        >
          An error has occurred.
        </SweetAlert>
      );
    });
};
On receipt of an answer from a remote peer, we update the remote description on the local connection with the answer we received.
const onAnswer = ({ answer }) => {
  connection.setRemoteDescription(new RTCSessionDescription(answer));
};
onCandidate handlerDuring the negotiation process, each peer will send ICE candidates to the other peer. When a peer receives a candidate message it calls the addIceCandidate method of the RTCPeerConnection.
This adds the candidate to the RTCPeerConnection’s remote description. The handler for candidates:
const onCandidate = ({ candidate }) => {
  connection.addIceCandidate(new RTCIceCandidate(candidate));
};
The send method of the data channel enables us to exchange data between peers. Our messages will contain the time the message was sent, who sent it, and the text.
As previously discussed, when handling received messages, we store messages using the name of the user we are texting. Let’s add the sendMsg method.
const Chat = ({ connection, updateConnection, channel, updateChannel }) => {
  ...

  const [message, setMessage] = useState("");

  ...
  const sendMsg = () => {
    const time = format(new Date(), "yyyy-MM-dd'T'HH:mm:ss.SSSxxx");
    let text = { time, message, name };
    let messages = messagesRef.current;
    let connectedTo = connectedRef.current;
    let userMessages = messages[connectedTo];
    if (messages[connectedTo]) {
      userMessages = [...userMessages, text];
      let newMessages = Object.assign({}, messages, {
        [connectedTo]: userMessages
      });
      messagesRef.current = newMessages;
      setMessages(newMessages);
    } else {
      userMessages = Object.assign({}, messages, { [connectedTo]: [text] });
      messagesRef.current = userMessages;
      setMessages(userMessages);
    }
    channel.send(JSON.stringify(text));
    setMessage("");
  };
  ...
}
//close alerts
const closeAlert = () => {
  setAlert(null);
};
//add new user to users
const updateUsersList = ({ user }) => {
  setUsers(prev => [...prev, user]);
};
//remove a user from users
const removeUser = ({ user }) => {
  setUsers(prev => prev.filter(u => u.userName !== user.userName));
}
MessageBox componentThe MessageBox container will display a thread of messages sent between peers. It will also have an input for a peer to type their message and a button to send the message.
If the local peer is not connected to anyone, a message will indicate this and the input will be disabled. Add the following code to src/MessageBox.js:
import React from "react";
import {
  Header,
  Icon,
  Input,
  Grid,
  Segment,
  Card,
  Sticky,
  Button,
  Comment
} from "semantic-ui-react";
import { formatRelative } from "date-fns";
import avatar from "./avatar.png";
const MessageBox = ({ messages, connectedTo, message, setMessage, sendMsg, name }) => {
  return (
    <Grid.Column width={11}>
      <Sticky>
        <Card fluid>
          <Card.Content
            header={
              !!connectedTo ? connectedTo : "Not chatting with anyone currently"
            }
          />
          <Card.Content>
            {!!connectedTo && messages[connectedTo] ? (
              <Comment.Group>
                {messages[connectedTo].map(({ name: sender, message: text, time }) => (
                  <Comment key={`msg-${name}-${time}`}>
                    <Comment.Avatar src={avatar} />
                    <Comment.Content>
                      <Comment.Author>{sender === name ? 'You' : sender}</Comment.Author>
                      <Comment.Metadata>
                        <span>
                          {formatRelative(new Date(time), new Date())}
                        </span>
                      </Comment.Metadata>
                      <Comment.Text>{text}</Comment.Text>
                    </Comment.Content>
                  </Comment>
                ))}
              </Comment.Group>
            ) : (
              <Segment placeholder>
                <Header icon>
                  <Icon name="discussions" />
                  No messages available yet
                </Header>
              </Segment>
            )}
            <Input
              fluid
              type="text"
              value={message}
              onChange={e => setMessage(e.target.value)}
              placeholder="Type message"
              action
            >
              <input />
              <Button color="teal" disabled={!message} onClick={sendMsg}>
                <Icon name="send" />
                Send Message
              </Button>
            </Input>
          </Card.Content>
        </Card>
      </Sticky>
    </Grid.Column>
  );
};
export default MessageBox;
After importing the MessageBox component in the Chat component, the latter should now contain the following final code:
import React, { Fragment, useState, useEffect, useRef } from "react";
import {
  Header,
  Icon,
  Input,
  Grid,
  Segment,
  Button,
  Loader
} from "semantic-ui-react";
import SweetAlert from "react-bootstrap-sweetalert";
import { format } from "date-fns";
import "./App.css";
import UsersList from "./UsersList";
import MessageBox from "./MessageBox";
// Use for remote connections
const configuration = {
  iceServers: [{ url: "stun:stun.1.google.com:19302" }]
};
// Use for local connections
// const configuration = null;
const Chat = ({ connection, updateConnection, channel, updateChannel }) => {
  const [socketOpen, setSocketOpen] = useState(false);
  const [socketMessages, setSocketMessages] = useState([]);
  const [isLoggedIn, setIsLoggedIn] = useState(false);
  const [name, setName] = useState("");
  const [loggingIn, setLoggingIn] = useState(false);
  const [users, setUsers] = useState([]);
  const [connectedTo, setConnectedTo] = useState("");
  const [connecting, setConnecting] = useState(false);
  const [alert, setAlert] = useState(null);
  const connectedRef = useRef();
  const webSocket = useRef(null);
  const [message, setMessage] = useState("");
  const messagesRef = useRef({});
  const [messages, setMessages] = useState({});
  useEffect(() => {
    webSocket.current = new WebSocket("ws://localhost:9000");
    webSocket.current.onmessage = message => {
      const data = JSON.parse(message.data);
      setSocketMessages(prev => [...prev, data]);
    };
    webSocket.current.onclose = () => {
      webSocket.current.close();
    };
    return () => webSocket.current.close();
  }, []);
  useEffect(() => {
    let data = socketMessages.pop();
    if (data) {
      switch (data.type) {
        case "connect":
          setSocketOpen(true);
          break;
        case "login":
          onLogin(data);
          break;
        case "updateUsers":
          updateUsersList(data);
          break;
        case "removeUser":
          removeUser(data);
          break;
        case "offer":
          onOffer(data);
          break;
        case "answer":
          onAnswer(data);
          break;
        case "candidate":
          onCandidate(data);
          break;
        default:
          break;
      }
    }
  }, [socketMessages]);
  const closeAlert = () => {
    setAlert(null);
  };
  const send = data => {
    webSocket.current.send(JSON.stringify(data));
  };
  const handleLogin = () => {
    setLoggingIn(true);
    send({
      type: "login",
      name
    });
  };
  const updateUsersList = ({ user }) => {
    setUsers(prev => [...prev, user]);
  };
  const removeUser = ({ user }) => {
    setUsers(prev => prev.filter(u => u.userName !== user.userName));
  }
  const handleDataChannelMessageReceived = ({ data }) => {
    const message = JSON.parse(data);
    const { name: user } = message;
    let messages = messagesRef.current;
    let userMessages = messages[user];
    if (userMessages) {
      userMessages = [...userMessages, message];
      let newMessages = Object.assign({}, messages, { [user]: userMessages });
      messagesRef.current = newMessages;
      setMessages(newMessages);
    } else {
      let newMessages = Object.assign({}, messages, { [user]: [message] });
      messagesRef.current = newMessages;
      setMessages(newMessages);
    }
  };
  const onLogin = ({ success, message, users: loggedIn }) => {
    setLoggingIn(false);
    if (success) {
      setAlert(
        <SweetAlert
          success
          title="Success!"
          onConfirm={closeAlert}
          onCancel={closeAlert}
        >
          Logged in successfully!
        </SweetAlert>
      );
      setIsLoggedIn(true);
      setUsers(loggedIn);
      let localConnection = new RTCPeerConnection(configuration);
      //when the browser finds an ice candidate we send it to another peer
      localConnection.onicecandidate = ({ candidate }) => {
        let connectedTo = connectedRef.current;
        if (candidate && !!connectedTo) {
          send({
            name: connectedTo,
            type: "candidate",
            candidate
          });
        }
      };
      localConnection.ondatachannel = event => {
        let receiveChannel = event.channel;
        receiveChannel.onopen = () => {
          console.log("Data channel is open and ready to be used.");
        };
        receiveChannel.onmessage = handleDataChannelMessageReceived;
        updateChannel(receiveChannel);
      };
      updateConnection(localConnection);
    } else {
      setAlert(
        <SweetAlert
          warning
          confirmBtnBsStyle="danger"
          title="Failed"
          onConfirm={closeAlert}
          onCancel={closeAlert}
        >
          {message}
        </SweetAlert>
      );
    }
  };
  //when somebody wants to message us
  const onOffer = ({ offer, name }) => {
    setConnectedTo(name);
    connectedRef.current = name;
    connection
      .setRemoteDescription(new RTCSessionDescription(offer))
      .then(() => connection.createAnswer())
      .then(answer => connection.setLocalDescription(answer))
      .then(() =>
        send({ type: "answer", answer: connection.localDescription, name })
      )
      .catch(e => {
        console.log({ e });
        setAlert(
          <SweetAlert
            warning
            confirmBtnBsStyle="danger"
            title="Failed"
            onConfirm={closeAlert}
            onCancel={closeAlert}
          >
            An error has occurred.
          </SweetAlert>
        );
      });
  };
  //when another user answers to our offer
  const onAnswer = ({ answer }) => {
    connection.setRemoteDescription(new RTCSessionDescription(answer));
  };
  //when we got ice candidate from another user
  const onCandidate = ({ candidate }) => {
    connection.addIceCandidate(new RTCIceCandidate(candidate));
  };
  //when a user clicks the send message button
  const sendMsg = () => {
    const time = format(new Date(), "yyyy-MM-dd'T'HH:mm:ss.SSSxxx");
    let text = { time, message, name };
    let messages = messagesRef.current;
    let connectedTo = connectedRef.current;
    let userMessages = messages[connectedTo];
    if (messages[connectedTo]) {
      userMessages = [...userMessages, text];
      let newMessages = Object.assign({}, messages, {
        [connectedTo]: userMessages
      });
      messagesRef.current = newMessages;
      setMessages(newMessages);
    } else {
      userMessages = Object.assign({}, messages, { [connectedTo]: [text] });
      messagesRef.current = userMessages;
      setMessages(userMessages);
    }
    channel.send(JSON.stringify(text));
    setMessage("");
  };
  const handleConnection = name => {
    let dataChannel = connection.createDataChannel("messenger");
    dataChannel.onerror = error => {
      setAlert(
        <SweetAlert
          warning
          confirmBtnBsStyle="danger"
          title="Failed"
          onConfirm={closeAlert}
          onCancel={closeAlert}
        >
          An error has occurred.
        </SweetAlert>
      );
    };
    dataChannel.onmessage = handleDataChannelMessageReceived;
    updateChannel(dataChannel);
    connection
      .createOffer()
      .then(offer => connection.setLocalDescription(offer))
      .then(() =>
        send({ type: "offer", offer: connection.localDescription, name })
      )
      .catch(e =>
        setAlert(
          <SweetAlert
            warning
            confirmBtnBsStyle="danger"
            title="Failed"
            onConfirm={closeAlert}
            onCancel={closeAlert}
          >
            An error has occurred.
          </SweetAlert>
        )
      );
  };
  const toggleConnection = userName => {
    if (connectedRef.current === userName) {
      setConnecting(true);
      setConnectedTo("");
      connectedRef.current = "";
      setConnecting(false);
    } else {
      setConnecting(true);
      setConnectedTo(userName);
      connectedRef.current = userName;
      handleConnection(userName);
      setConnecting(false);
    }
  };
  return (
    <div className="App">
      {alert}
      <Header as="h2" icon>
        <Icon name="users" />
        Simple WebRTC Chap App
      </Header>
      {(socketOpen && (
        <Fragment>
          <Grid centered columns={4}>
            <Grid.Column>
              {(!isLoggedIn && (
                <Input
                  fluid
                  disabled={loggingIn}
                  type="text"
                  onChange={e => setName(e.target.value)}
                  placeholder="Username..."
                  action
                >
                  <input />
                  <Button
                    color="teal"
                    disabled={!name || loggingIn}
                    onClick={handleLogin}
                  >
                    <Icon name="sign-in" />
                    Login
                  </Button>
                </Input>
              )) || (
                <Segment raised textAlign="center" color="olive">
                  Logged In as: {name}
                </Segment>
              )}
            </Grid.Column>
          </Grid>
          <Grid>
            <UsersList
              users={users}
              toggleConnection={toggleConnection}
              connectedTo={connectedTo}
              connection={connecting}
            />
            <MessageBox
              messages={messages}
              connectedTo={connectedTo}
              message={message}
              setMessage={setMessage}
              sendMsg={sendMsg}
              name={name}
            />
          </Grid>
        </Fragment>
      )) || (
        <Loader size="massive" active inline="centered">
          Loading
        </Loader>
      )}
    </div>
  );
};
export default Chat;
Our completed chat application should like this:
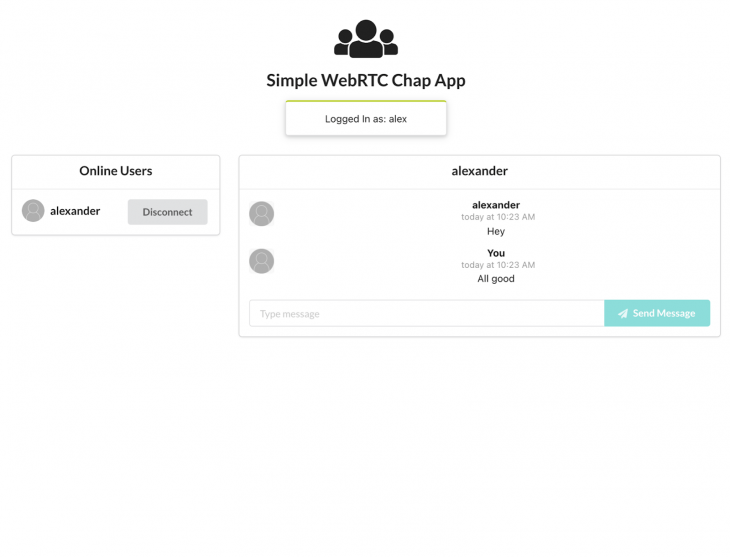
That’s it! We have built a WebRTC chat app from scratch. If you want to test out this implementation, you can check out the demo. Please note that the demo might not work on remote peers.
To get that working, you need to add a TURN server. You can open two tabs on your device and connect and you should be able to see the app in action.
The code for the signaling server and the chat app can be found on GitHub. This article is by no means exhaustive and we just touched on the basics of WebRTC. You can improve on it by adding handling RTCPeerConnection close as well data channel closure. In addition, a multi-user room would be a great next step.
WebRTC is still in development and changes quite often. It is important to keep updated on changes and modify your app accordingly.
Browser compatibility is also a significant issue. You can use the adapter to ensure your app works across different browsers. I hope you enjoyed the article and feel free to let me know your thoughts in the comments.
Install LogRocket via npm or script tag. LogRocket.init() must be called client-side, not
server-side
$ npm i --save logrocket

// Code:

import LogRocket from 'logrocket';
LogRocket.init('app/id');
// Add to your HTML:

<script src="https://cdn.lr-ingest.com/LogRocket.min.js"></script>
<script>window.LogRocket && window.LogRocket.init('app/id');</script>
Hey there, want to help make our blog better?
Join LogRocket’s Content Advisory Board. You’ll help inform the type of content we create and get access to exclusive meetups, social accreditation, and swag.
Sign up now
A breakdown of the wrapper and container CSS classes, how they’re used in real-world code, and when it makes sense to use one over the other.

This guide walks you through creating a web UI for an AI agent that browses, clicks, and extracts info from websites powered by Stagehand and Gemini.

This guide explores how to use Anthropic’s Claude 4 models, including Opus 4 and Sonnet 4, to build AI-powered applications.

Which AI frontend dev tool reigns supreme in July 2025? Check out our power rankings and use our interactive comparison tool to find out.


18 Replies to "Creating a chat application with WebRTC"
Hey !
Thanks for that nice article !
I got that project working well in localhost but a have troubles in production mode.
I configured a domain name and certificate for the app to be abble to call getUserMedia, but i can’t deal with the websocket. I instantiate a secure Websocket with my cert credentials and https module, but i can’t reach it. Do you have a clue how to configure WSS with that websocket and apache2 ?
Thank you !
ps : there’s some missing code in The App component section
What is the missing code? I cannot get this to work out of the box on get hub. Started signalling server, then started front-end server only to get error page “SyntaxError: Failed to construct ‘WebSocket’: The URL ‘undefined’ is invalid.” Chat.js: webSocket.current = new WebSocket (process.env.REACT_APP_WEBSOCKET_URL);
Hey Matthew, change process.env.REACT_APP_WEBSOCKET_URL in chat.js file to the URL of your signalling server. The example code is hosted on Netlify and gets the URL of the signalling server from Netlify environment configs.
So for this tutorial it would be –
“`
webSocket.current = new WebSocket(‘ws://localhost:9000’);
“`
Hey!
I’m glad you liked the article.
Unfortunately, I have not configured WSS with apache before. Do you have an error stack trace that could help identify what is preventing connection?
Anyone else getting
internal/modules/cjs/loader.js:491
throw new ERR_PACKAGE_PATH_NOT_EXPORTED(basePath, mappingKey);
^
Error [ERR_PACKAGE_PATH_NOT_EXPORTED]: Package subpath ‘./v4’ is not defined by “exports” in /Users/tom/pj/temp-signallingserver/node_modules/uuid/package.json
after running node index.js in the signalling server setup?
Sure, I think that may be a syntax issue. Instead of
const uuidv4 = require(“uuid/v4”);
as the tutorial notes, in the header can you write:
const {v4: uuidv4 } = require(“uuid”);
and see if this resolved it? Thanks
You said WEBRTC … but i Only See “WebSocket” code ??
exactyl @Bauerbaptiste i was wondering whether I wasn’t reading the title clearly. Had to go back to the top.
I was lead here on searching for chat app with webRTC and all I am seeing is webSocket. Am I missing something or is the title misleading?
where will i find the output for this i want that.
I can’t find { ConnectionConsumer ChannelConsumer } from “./App”
Hey Wang. It seems that some code was left out. You need to add the following to your App.js file:
“`
import React, { useState, createContext } from “react”;
import Container from “./Container”;
const ConnectionContext = createContext({
connection: null,
updateConnection: () => {}
});
const ChannelContext = createContext({
channel: null,
updateChannel: () => {}
});
const App = () => {
const [connection, setconnection] = useState(null);
const [channel, setChannel] = useState(null);
const updateConnection = conn => {
setconnection(conn);
};
const updateChannel = chn => {
setChannel(chn);
};
return (
);
};
export const ConnectionConsumer = ConnectionContext.Consumer
export const ChannelConsumer = ChannelContext.Consumer
export default App;
“`
You can also refer to the code here: https://github.com/jkithome/simple-webrtc-chat-app/blob/master/src/App.js
Thanks for writing this great tutorial.
Can I have a hand please with the “uuid” code section.
I have installed
$ yarn add express uuid ws
But then in the index.js file it tries to call
const uuidv4 = require(“uuid/v4”);
and fails.
What am I missing??
const uuidv4 = require(“uuid”).v4;
Try above solution
is it possible to combine rtc video with the same peer connection instance?
This only works when there’s two users, otherwise it won’t work well.
It works for me only being in the same network, for example, home WIFI, after building the application and hosting and using it from different networks, the webrtc channel does not open (readyState is not open), I assume that this is due to the incorrect operation of the STUN server, any ideas?
Something seems to be broken here. My singaling server and client comes up properly, when hitting the URL localhost:3000 all i see is the reloading icon… on browser I am seeing below error
WebSocket connection to ‘ws://localhost:9000/’ failed: WebSocket is closed before the connection is established.
Seems the client is not able to connect to the signaling server… any help in this will be well appreciated.