Editor’s note: This article was last updated by Piyush Sinha on 10 May 2023 to update code for readability and include information about handling async logic using redux-thunk.

Although Redux is a common preference for managing state in a React application, it’s important to acknowledge that configuring Redux with its boilerplate code can be a tedious and frustrating process.
The Redux team came up with Redux Toolkit as an attempt to make implementing Redux less intimidating. And this time, the team chose TypeScript to build the library instead of JavaScript. Why? Because TypeScript offers type safety, code readability, and improved scalability — all of which make Redux better to use in complex apps.
This article will focus on the setup and usage of TypeScript with Redux Toolkit. We’ll cover:
configureStore()The Replay is a weekly newsletter for dev and engineering leaders.
Delivered once a week, it's your curated guide to the most important conversations around frontend dev, emerging AI tools, and the state of modern software.
First, we’ll use Vite to set up our project:
npm create vite@latest ts-app -- --template react-ts
If you’re curious about why Vite was chosen over Create React App, read more here.
Next, install the packages needed for Redux Toolkit:
npm i react-redux @reduxjs/toolkit
N.B., starting from React Redux v8.0.0, the
react-reduxcodebase has been migrated to TypeScript and no longer requires@types/react-reduxas a dependency.
You should end up with a project structure that looks like this:
configureStore()RTK provides configureStore(), a user-friendly abstraction over the standard Redux createStore(). configureStore() simplifies the store setup process by including some useful default configurations:
redux-thunk for handling asynchronous actions, and redux-immutable-state-invariant for detecting accidental mutations of the statecombineReducers utility if an object of slice reducers is passed directlyRedux DevTools extension in the browserconfigureStore() takes in a single configuration object with the following options:
Let’s set up our store:
// app/store.ts
import { configureStore } from '@reduxjs/toolkit';
export const store = configureStore({
  reducer: {
    // our reducers goes here
  },
});
export type AppDispatch = typeof store.dispatch;
export type RootState = ReturnType<typeof store.getState>;
In the above code, configureStore() is being used to create and initialize the store with the provided reducer; we’ll add it later. To ensure type safety, AppDispatch and RootState typings are defined for the dispatch() and getState() of our store instance.
Now, we’ll create the typed versions of the useDispatch and useSelector Hooks:
// app/hooks.ts
import { TypedUseSelectorHook, useDispatch, useSelector } from 'react-redux';
import type { RootState, AppDispatch } from './store';
export const useAppDispatch = () => useDispatch<AppDispatch>();
export const useAppSelector: TypedUseSelectorHook<RootState> = useSelector;
Finally, provide the store to our app using Provider:
# src/main.tsx
import React from 'react'
import ReactDOM from 'react-dom/client'
import App from './App.tsx'
import { Provider } from 'react-redux/es/exports'
import { store } from './app/store.ts'
import './index.css'
ReactDOM.createRoot(document.getElementById('root') as HTMLElement).render(
  <React.StrictMode>
    <Provider store={store}>
      <App />
    </Provider>
  </React.StrictMode>,
)
Let’s start simple and create a reducer for adding a user to the store:
// src/features/users/userSlice.ts
import { createSlice, PayloadAction } from "@reduxjs/toolkit";
import { RootState } from "../../app/store";
export interface User {
  id: string;
  name: string;
  email: string;
}
const initialState: Array<User> = [
    {
        id: '1',
        name: 'John Doe',
        email: '[email protected]',
    }
]
export const userSlice = createSlice({
  name: "users",
  initialState,
  reducers: {
    addUser: (state, action: PayloadAction<User>) => {
      state.push(action.payload);
    },
  },
});
export const { addUser } =
  userSlice.actions;
export const userSelector = (state: RootState) => state.userReducer;
export default userSlice.reducer;
In the above code, we used createSlice(), a utility function from Redux Toolkit that takes in the following:
Each reducer function takes two arguments: the current state of the slice and the action object that was dispatched. The reducer function returns a new state object that represents the updated state of the slice.
createSlice() generates a set of actions, reducers, and action creators for a particular slice of the store. The selectors — in this case, userSelector — will enable us to get this slice of the store in any part of the component tree.
When the reducer is ready, pass it in configureStore():
// app/store.ts
import { configureStore } from '@reduxjs/toolkit';
import userReducer from '../features/users/userSlice';
export const store = configureStore({
  reducer: {
    userReducer
  },
});
export type AppDispatch = typeof store.dispatch;
export type RootState = ReturnType<typeof store.getState>;
We’re going to need the typed hooks we defined earlier in order to connect our components to the store:
// src/features/users/user.tsx
import { useEffect, useState } from "react";
import { useAppDispatch, useAppSelector } from "../../app/hooks";
import { User, addUser, userSelector } from "./userSlice";
import "./user.css";
function UserPage() {
  const [users, setUsers] = useState<Array<User>>([]);
  const [newUserName, setNewUserName] = useState<string>("");
  const [newUserEmail, setNewUserEmail] = useState<string>("");
  const selectedUsers = useAppSelector(userSelector);
  const dispatch = useAppDispatch();
  useEffect(() => {
    setUsers(selectedUsers);
    return () => {
      console.log("component unmounting...");
    };
  }, [selectedUsers]);
  function handleAddUser() {
    const newUser = {
      id: (users.length + 1).toString(),
      name: newUserName,
      email: newUserEmail,
    };
    dispatch(addUser(newUser));
  }
  return (
    <div>
      {users.map((user) => (
        <li key={user.id}>
          {user.id} | {user.name} | {user.email}
        </li>
      ))}
      <div>
        <input
          type="text"
          placeholder="Name"
          aria-label="name"
          value={newUserName}
          onChange={(e) => setNewUserName(e.target.value)}
        ></input>
        <input
          type="text"
          placeholder="Email"
          aria-label="email"
          value={newUserEmail}
          onChange={(e) => setNewUserEmail(e.target.value)}
        ></input>
        <button type="submit" className="btn" onClick={handleAddUser}>
          Add
        </button>
      </div>
    </div>
  );
}
export default UserPage;
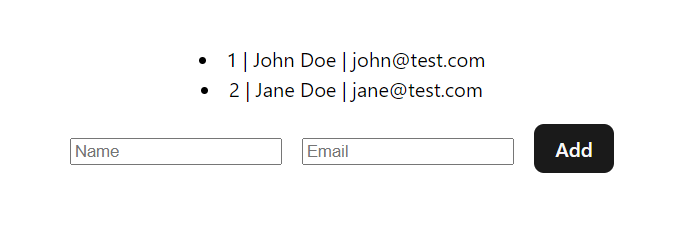
In the above code, we’re using useAppSelector to fetch the users slice from the store. And to dispatch an action, we’re using useAppDispatch. The rest of the code is more React-related to add a new user to the store, and render the list of users every time the users slice in the store is updated.
This is how it looks:
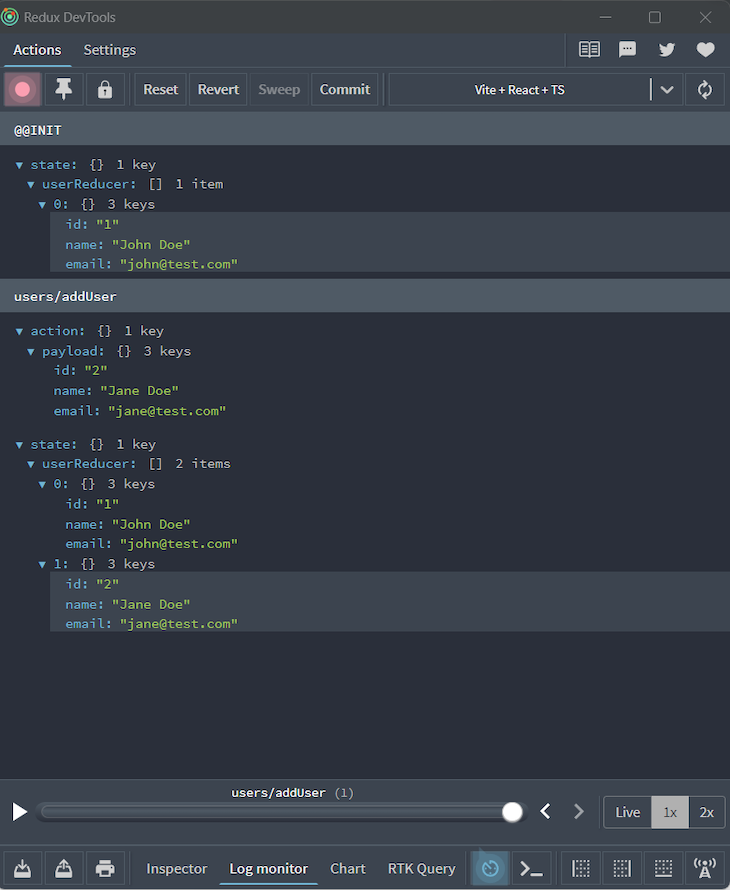
If we make use of the Redux DevTools extension in the browser, we can see a detailed logging from the initial state to the updated state:
So far, we have only dealt with synchronous actions to update the store. It’s time to learn how to handle asynchronous actions.
Under the hood, Redux Toolkit uses redux-thunk for handling async logic. But what exactly is redux-thunk?
Thunk is a programming concept that involves the usage of a function to delay the evaluation of an operation. In the context of Redux, thunk is a function returned by an action creator, which can be used to delay the dispatch of an action. With middleware like redux-thunk and redux-saga, we can implement this behavior.
It’s time to code this. Let’s handle some async operation, such as fetching a list of users from an endpoint:
// src/features/user/userSlice.ts
import { createAsyncThunk, createSlice, PayloadAction } from "@reduxjs/toolkit";
import { RootState } from "../../app/store";
interface User {
  id: string,
  name: string,
  email: string
}
export interface UserState {
  loading: boolean;
  users: Array<User>;
  error: string | undefined;
}
const initialState: UserState = {
  loading: false,
  users: [],
  error: undefined,
}
export const fetchUsers = createAsyncThunk(
  "users/fetchUsers",
  () => {
    const res = fetch('https://jsonplaceholder.typicode.com/users').then(data => data.json());
    return res;
  }
)
const userSlice = createSlice({
  name: 'users',
  initialState,
  extraReducers: (builder) => {
    builder.addCase(fetchUsers.pending, (state) => {
      state.loading = true;
    });
    builder.addCase(fetchUsers.fulfilled, (state, action: PayloadAction<Array<User>>) => {
      state.loading = false;
      state.users = action.payload;
    });
    builder.addCase(fetchUsers.rejected, (state, action) => {
      state.loading = false;
      state.users = [];
      state.error = action.error.message;
    });
  },
  reducers: {}
})
export const userSelector = (state: RootState) => state.userReducer;
export default userSlice.reducer;
In the above code, we’re using createAsyncThunk() — a function that takes in an action type string and a callback function that returns a promise. Once this promise is resolved, createAsyncThunk() automatically dispatches a pending action, followed by either a fulfilled or a rejected action, depending on whether the promise was resolved successfully or with an error.
Next, reducers need to handle the dispatched actions and update the store accordingly. One thing to point out here is a reducer defined by createSlice() can only handle the action types that were defined inside createSlice(). We use extraReducers to respond to such action types.
Using the addCase method of the builder object, extraReducers defines the actions that the users slice should take in response to the pending, fulfilled, and rejected actions that are triggered by the fetchUsers() async thunk.
Let’s connect our component:
// src/features/users/user.tsx
import { useEffect, useState } from "react";
import { useAppDispatch, useAppSelector } from "../../app/hooks";
import { User, fetchUsers, userSelector } from "./userSlice";
import "./user.css";
function UserPage() {
  const [users, setUsers] = useState<Array<User>>([]);
  const [loading, setLoading] = useState<boolean>(false);
  const [error, setError] = useState<string | undefined>(undefined);
  const selectedUsers = useAppSelector(userSelector);
  const dispatch = useAppDispatch();
  useEffect(() => {
    setLoading(selectedUsers.loading);
    setError(selectedUsers.error);
    setUsers(selectedUsers.users);
  }, [selectedUsers]);
  function handleFetchUser() {
    dispatch(fetchUsers());
  }
  return (
    <div>
      {loading && <div>Loading...</div>}
      {error && <div>Error: {error}</div>}
      {users?.map((user) => (
        <li key={user.id}>
          {user.id} | {user.name} | {user.email}
        </li>
      ))}
      <button className="btn" onClick={handleFetchUser}>Fetch</button>
    </div>
  );
}
export default UserPage;
In the above code, our thunk fetchUsers() is triggered when clicking the button to fetch the list of users from an endpoint and dispatch actions along the way. extraReducers updates the store as per the action types.
As the component is connected to the store, it is notified of changes in the store and that’s when the useEffect() Hook is triggered to update the component state and render accordingly:

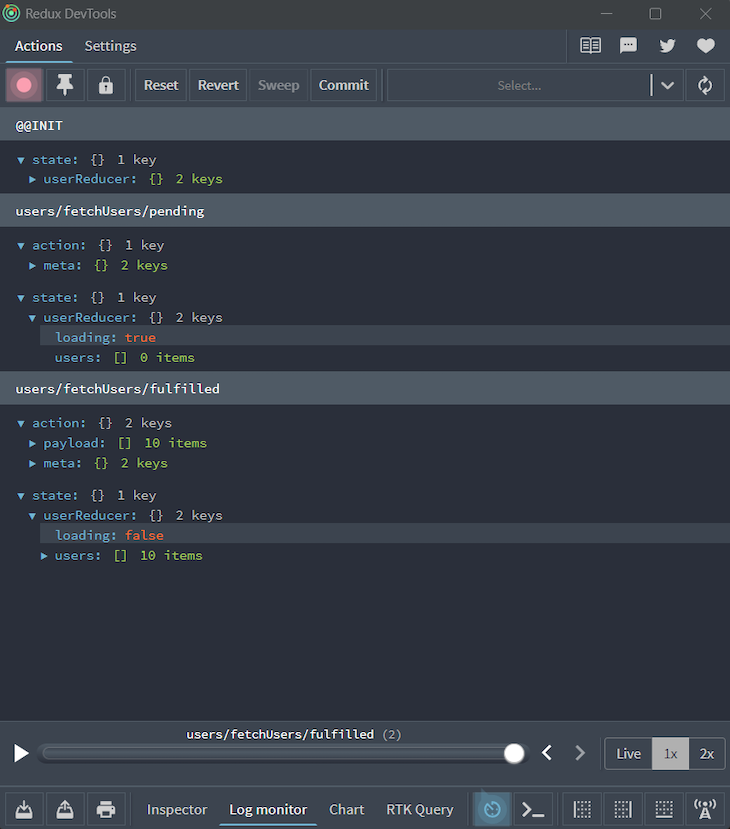
And here’s the detailed logging:
TypeScript and Redux Toolkit make a great combination for developing efficient and reliable web applications. TypeScript helps us catch type-related errors during the development process, which can save a lot of time and effort in debugging.
Redux Toolkit, on the other hand, provides a simplified and opinionated approach to managing state with Redux. With its built-in support for features like Immer and async thunks, Redux Toolkit makes it easier to write and maintain Redux code.

LogRocket lets you replay user sessions, eliminating guesswork by showing exactly what users experienced. It captures console logs, errors, network requests, and pixel-perfect DOM recordings — compatible with all frameworks, and with plugins to log additional context from Redux, Vuex, and @ngrx/store.
With Galileo AI, you can instantly identify and explain user struggles with automated monitoring of your entire product experience.
Modernize how you understand your web and mobile apps — start monitoring for free.

A side-by-side look at Astro and Next.js for content-heavy sites, breaking down performance, JavaScript payload, and when each framework actually makes sense.

AI-generated tests can speed up React testing, but they also create hidden risks. Here’s what broke in a real app.re

Why the future of DX might come from the web platform itself, not more tools or frameworks.

A hands-on test of Claude Code Review across real PRs, breaking down what it flagged, what slipped through, and how the pipeline actually performs in practice.
Would you be interested in joining LogRocket's developer community?
Join LogRocket’s Content Advisory Board. You’ll help inform the type of content we create and get access to exclusive meetups, social accreditation, and swag.
Sign up now

