The focus of this article is to demonstrate how to automate releases and release notes with semantic-release in GitLab. semantic-release is a Node CLI application, but it can be used to publish any type of package. This article will explore how to publish npm packages in a private GitLab registry.
It is not a trivial task to decide when and how to increase version numbers and sync them with release notes. The goal of semantic-release is to take over this job based on established software engineering patterns:
semantic-release parses the commit messages and extracts certain information, such as the release type and scope. Based on this, the Git history, and the used and configured semantic-release plugins, a new version is calculated, a release is created — which might be published to some registry — and release notes are updated.
In the next section, we’ll set up semantic-release with GitLab. After that, I’ll provide a detailed use case of various commit messages on different branches leading to different versions and release notes.
This article is based on a Node project that represents a simplified addition and subtraction CLI tool. Although the actual application code is not important, I decided to use a somewhat realistic example so the commit messages, release types, changelogs, and version changes are understandable.
You can follow along with this GitLab project in parallel while reading the article.
The goal of this article is to execute the semantic-release bot in a pipeline step whenever a new commit is pushed to a branch, which is configured in semantic-release’s release.config.cjs config file.
In this simplified project, the .gitlab-ci.yml looks like this:
# .gitlab-ci.yml

image: node:latest
stages:
  - lint
  - release
lint:
  stage: lint
  script:
    - npm run lint
release:
  stage: release
  only:
    - main
    - next
  script:
    - echo "@doppelmutzi:registry=https://${CI_SERVER_HOST}/api/v4/projects/${CI_PROJECT_ID}/packages/npm/" > .npmrc
    - echo "//${CI_SERVER_HOST}/api/v4/projects/${CI_PROJECT_ID}/packages/npm/:_authToken=${NPM_TOKEN}" >> .npmrc
    - npm i -g semantic-release @semantic-release/gitlab @semantic-release/changelog @semantic-release/git @semantic-release/npm @semantic-release/commit-analyzer conventional-changelog-conventionalcommits
    - npx semantic-release --debug
With that config in place, the release pipeline step runs for the main or next branches if the lint step is successful. Let’s look at the release job in more detail:
release:
  stage: release
  only:
    - main
    - next
  script:
    # ...
    - npm i -g semantic-release @semantic-release/gitlab @semantic-release/changelog @semantic-release/git @semantic-release/npm @semantic-release/commit-analyzer @semantic-release/release-notes-generator conventional-changelog-conventionalcommits
    - npx semantic-release --debug
There are two variants to install semantic-release: local or global installation. We’ll opt for installing all npm packages globally with the global flag -g. semantic-release constitutes the actual tool, whereas the packages with scope @semantic-release are optional plugins.
conventional-changelog-conventionalcommits is a package used for creating conventional commits and has a bit more configuration possibilities with changelogs in contrast to the default Angular commit scheme.
Here is a brief overview of the plugins used in this article:
@semantic-release/gitlab to publish GitLab releases@semantic-release/changelog to create or update changelog files@semantic-release/git to commit changes to the Git repository, e.g., an updated package.json version or updates to changelog files@semantic-release/npm to publish npm packages in a public or private registry@semantic-release/commit-analyzer to analyze commit messages with respect to conventional commit conventions@semantic-release/release-notes-generator to generate content for the changelog fileAnother approach to set up semantic-release for GitLab is to just install the package semantic-release/gitlab-config, which represents a shareable config that comes with the following:
@semantic-release/commit-analyzer@semantic-release/release-notes-generator@semantic-release/npm@semantic-release/gitlabIt isn’t required to install all the plugins because some are shipped with the semantic-release package.
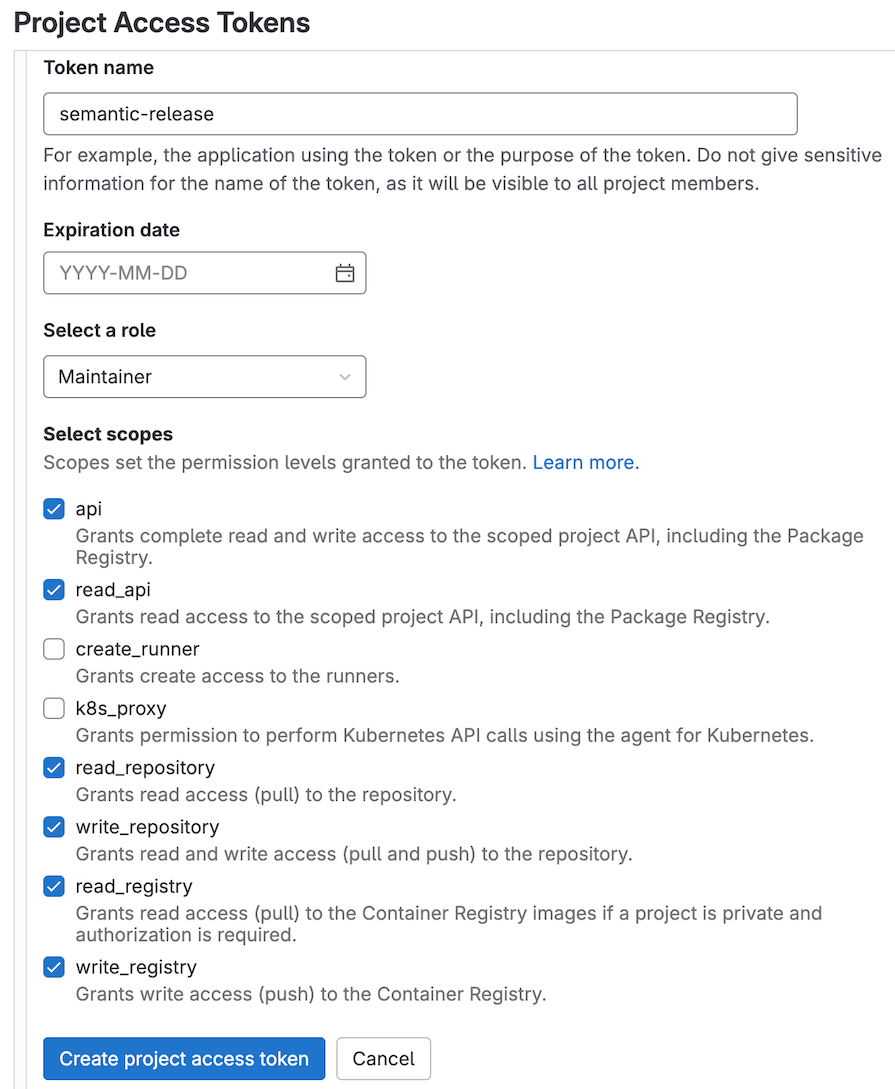
The plugins @semantic-release/gitlab, @semantic-release/npm, and @semantic-release/git require authentication to push commits, create GitLab releases, and publish to GitLab’s private registry. Therefore, we need to create a project access token (PAT)( Settings > Access Tokens) with the following scopes:
Next, copy the token and create an environment variable (Settings > CI/CD > Expand > Add variable):
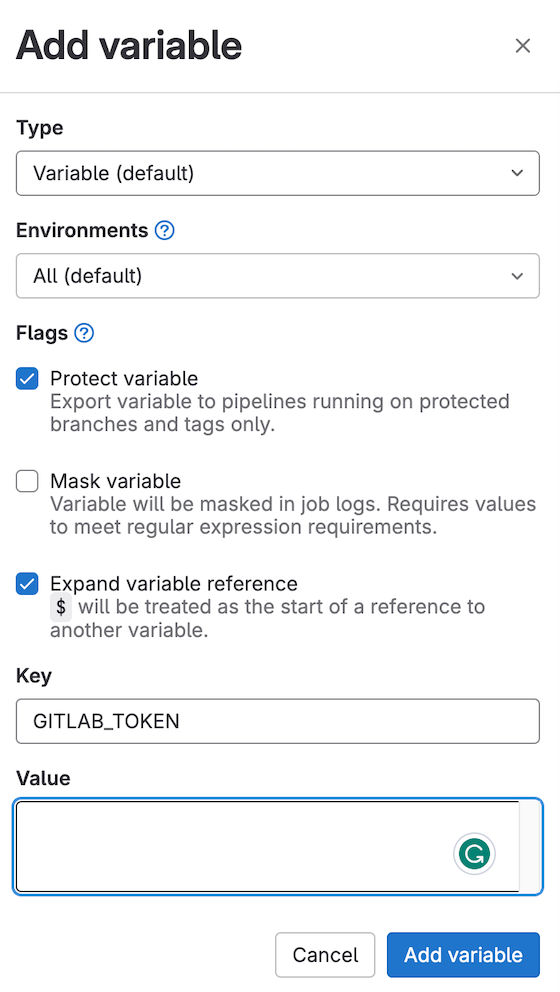
According to the semantic-release documentation, you need a variable name of GITLAB_TOKEN or GL_TOKEN to authenticate semantic-release for GitLab.
We need one more token to enable semantic-release to publish into GitLab’s private npm registry. Create a deploy token (Settings > Repository > Deploy tokens > Expand > Add token) with the following scopes:
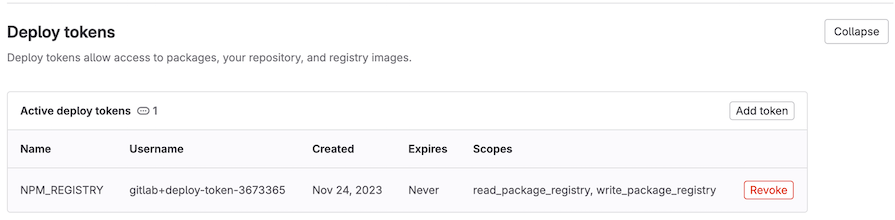
Copy the created deploy token and create another environment variable as described above. This time, the name needs to be NPM_TOKEN.
Now, let’s look at the .gitlab-ci.yml again:
# required authentication https://semantic-release.gitbook.io/semantic-release/usage/ci-configuration#authentication-for-plugins
# NPM_TOKEN and GL_TOKEN provided as Gitlab environment variable
# ...
release:
  stage: release
  only:
    - main
    - next
  script:
    - echo "@doppelmutzi:registry=https://${CI_SERVER_HOST}/api/v4/projects/${CI_PROJECT_ID}/packages/npm/" > .npmrc
    - echo "//${CI_SERVER_HOST}/api/v4/projects/${CI_PROJECT_ID}/packages/npm/:_authToken=${NPM_TOKEN}" >> .npmrc
    - npm i -g semantic-release @semantic-release/gitlab @semantic-release/changelog @semantic-release/git @semantic-release/npm @semantic-release/commit-analyzer conventional-changelog-conventionalcommits
    - npx semantic-release --debug
The two echo commands in the script section of the release step are important to dynamically create the contents for a .npmrc file. With this file, @semantic-release/npm can publish releases into the GitLab registry.
The code above makes use of the previously created environment variable NPM_TOKEN to store the authentication token in .npmrc. It is considered best practice to use environment variables instead of exposing credentials in plain text.
If you want to learn more about publishing packages to private registries with different package managers, you can consult this article.
In the previous section, we configured the GitLab pipeline and made sure that the semantic-release script was able to make changes in the GitLab project. This section highlights how to provide a semantic–release configuration to tweak the provided semantic-release plugins and their interplay.
In this project, we opt for a JavaScript config file (release.config.cjs):
/**
 * @type {import('semantic-release').GlobalConfig}
 */
module.exports = {
  branches: ["main", "next"],
  plugins: [
    [
      "@semantic-release/commit-analyzer",
      {
        preset: "angular",
        releaseRules: [
          {
            breaking: true,
            release: "major",
          },
          {
            type: "feat",
            release: "minor",
          },
          {
            type: "fix",
            release: "patch",
          },
          {
            type: "docs",
            scope: "README",
            release: "patch",
          },
          {
            type: "chore",
            release: "patch",
          }
        ],
        parserOpts: {
          noteKeywords: ["BREAKING CHANGE", "BREAKING CHANGES", "BREAKING"],
        },
      },
    ],
    [
      "@semantic-release/release-notes-generator",
      {
        /*
            use conventionalcommits instead of conventional-changelog-angular (default)
            to introduce new sections in changelog
        */
        preset: "conventionalcommits",
        presetConfig: {
          types: [
            { type: "feat", section: "Features", hidden: false },
            { type: "fix", section: "Bug Fixes", hidden: false },
            { type: "docs", section: "Miscellaneous Chores", hidden: false },
            { type: "chore", section: "Miscellaneous Chores", hidden: false },
          ],
        },
        parserOpts: {
          noteKeywords: ["BREAKING CHANGE", "BREAKING CHANGES", "BREAKING"],
        },
      },
    ],
    ["@semantic-release/npm"],
    [
      "@semantic-release/changelog",
      {
        changelogFile: "CHANGELOG.md",
      },
    ],
    [
      "@semantic-release/git",
      {
        assets: ["package.json", "CHANGELOG.md"],
      },
    ],
    "@semantic-release/gitlab",
  ],
};
Let’s break this config down. The branches array defines which branches the tool should be active for. semantic-release works with some conventions — the main and next branches have special meanings.
Later, will see that the main branch releases are published on the latest distribution channel and the next branch on the next distribution channel. Therefore, it uses npm distribution tags.
In the plugins array, every plugin needs to be listed with an optional configuration in case we want to differ from the shipped default. The order of the plugins is important.
With the plugin @semantic-release/commit-analyzer, we define which conventional commit convention to use. We’ll use the default Angular convention, but there are more options, such as ESLint:
[
  "@semantic-release/commit-analyzer",
  {
    preset: "angular",
    releaseRules: [
      {
        breaking: true,
        release: "major",
      },
      {
        type: "feat",
        release: "minor",
      },
      {
        type: "fix",
        release: "patch",
      },
      {
        type: "docs",
        scope: "README",
        release: "patch",
      },
      {
        type: "chore",
        release: "patch",
      }
    ],
    parserOpts: {
      noteKeywords: ["BREAKING CHANGE", "BREAKING CHANGES", "BREAKING"],
    },
  },
],
We can skip releaseRules if we are satisfied with the default release rules. In this example, we want to extend the list of release types to use chore and docs with scope README for patch releases. In addition, we want to create major releases for breaking changes.
We can specify parseOpts to create breaking changes whenever one of the listed variants is part of the body of the commit message. We’ll look at what that means in the next section.
With the plugin @semantic-release/release-notes-generator, we have the chance to tweak the changelog contents. This example shows how to create three sections: Features, Bug Fixes, and Miscellaneous. The hidden property controls whether certain release types are listed in the changelog or not:
[
  "@semantic-release/release-notes-generator",
  {
    /*
        use conventionalcommits instead of conventional-changelog-angular (default)
        to introduce new sections in changelog
    */
    preset: "conventionalcommits",
    presetConfig: {
      types: [
        { type: "feat", section: "Features", hidden: false },
        { type: "fix", section: "Bug Fixes", hidden: false },
        { type: "docs", section: "Miscellaneous Chores", hidden: false },
        { type: "chore", section: "Miscellaneous Chores", hidden: false },
      ],
    },
    parserOpts: {
      noteKeywords: ["BREAKING CHANGE", "BREAKING CHANGES", "BREAKING"],
    },
  },
],
If we are satisfied with the default configurations of @semantic-release/npm and @semantic-release/gitlab, we just need to list them in the plugins array.
With the @semantic-release/changelog config, changelogs are stored in the CHANGELOG.md file. The @semantic-release/git config tells the plugin to pick up CHANGELOG.md and package.json and commit changes as we see in the next section:
[
    "@semantic-release/changelog",
    {
      changelogFile: "CHANGELOG.md",
    },
  ],
  [
    "@semantic-release/git",
    {
      assets: ["package.json", "CHANGELOG.md"],
    },
  ],
Let’s shift the focus to the last line of .gitlab-ci.yml, which executes the semantic-release script:
- npx semantic-release --debug --dry-run
It is a good approach to add the --dry-run flag while working on the project setup. This flag doesn’t create any releases, but potential version changes or setup issues can be seen in the pipeline’s output, especially with the verbose --debug flag.
Let’s create a conventional commit:
$ git commit -m "feat: initial CLI tool with addition functionality"
This tutorial works with the Angular commit conventions. Each commit message consists of a header, body, and footer. The most important part is the header that includes the release type (here, feat for feature), an optional scope, and a subject:
<type>(<scope>): <subject>
<BLANK LINE>
<body>
<BLANK LINE>
<footer>
Later we will see an example of using a scope (docs(RELEASE)) and the footer (for breaking changes).
After we pushed the commit to remote, the log of the release step didn’t reveal any problems. It just states which release version would have been created without the dry-run flag:
We are now ready to work with our semantic-release workflow.
The previous sections highlight how to set up a GitLab project to make use of semantic-release. The following section will describe how different releases on different distribution channels can be created with this setup.
After a dry run didn’t reveal any problems, we can make another local commit to enable semantic-release by removing the --dry-run flag in .gitlab-ci.yml:
$ git commit -m "chore: enable semantic release by removing --dry-run option"
This constitutes our very first “working” commit that triggers a release.
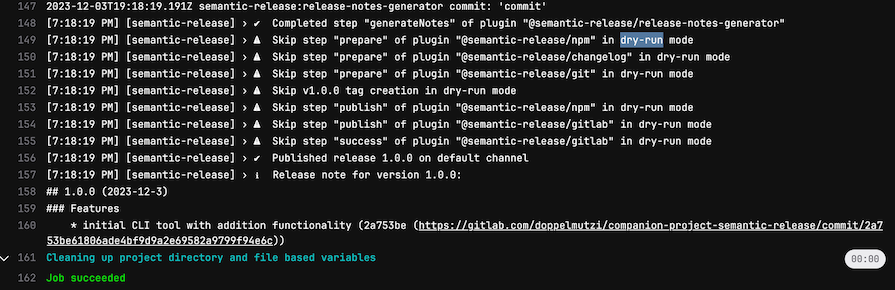
After pushing this commit to remote, the pipeline is triggered. Because we made a commit to the main branch, which is referenced in release.config.cjs as a trackable branch, a pipeline is triggered with a release step.
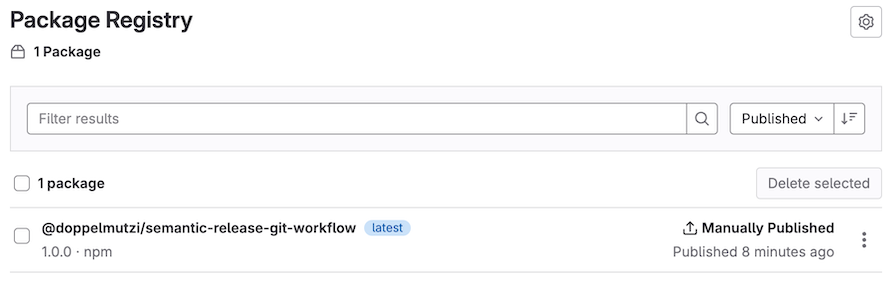
After the pipeline has succeeded, the commit graph reveals that the technical user semantic-release-bot has created another commit: chore(release): 1.0.0 [skip ci]. The part in the brackets is GitLab’s mechanism to prevent another pipeline run:

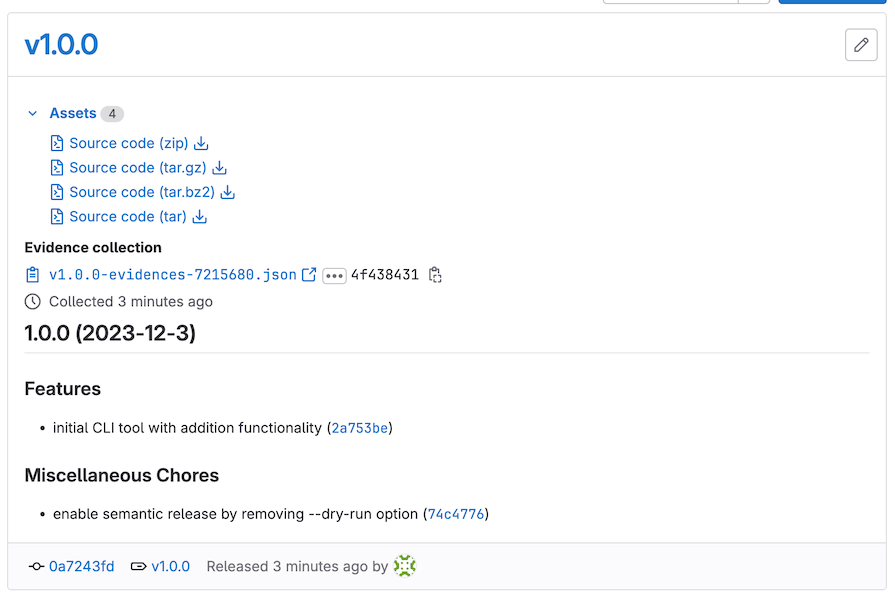
This first release (v1.0.0) includes two conventional commits (feat and chore) that lead to two entries in the created changelog file (CHANGELOG.md) by the plugin @semantic-release/release-notes-generator.
In addition, the version number of package.json was updated by the plugin @semantic-release/npm:
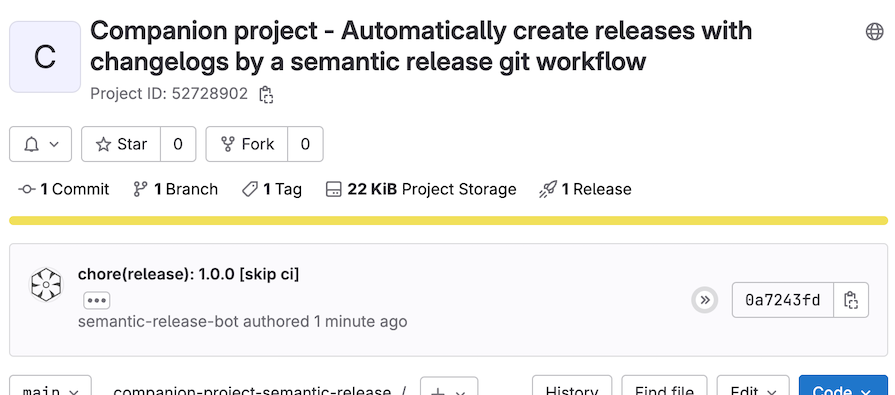
When you click on 1 Release, you see how these conventional commits were transferred to release notes by the @semantic-release/release-notes-generator plugin:
The technical commit chore(release): 1.0.0 [skip ci] reveals what was changed by @semantic-release/git in conjunction with @semantic-release/npm :
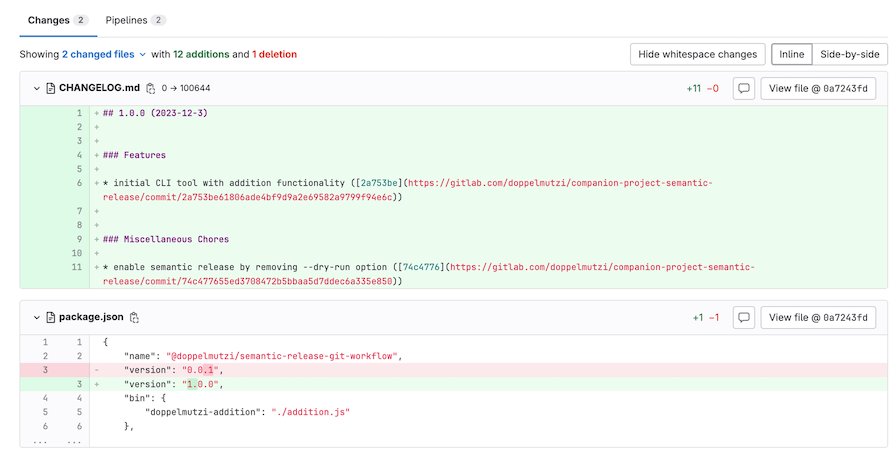
Because we want to publish an npm package in GitLab’s registry, a technical commit with an updated package.json represents the desired behavior.
If you have a project where you don’t publish an npm package, you can also prevent publishing to an npm registry.
As we see in the next image, the @semantic-release/npm plugin published v1.0.0 with the latest dist-tag:
Let’s take a short excursion to use the released package. We need to provide an npm registry config to get access to GitLab’s package registry. One approach is to store a .npmrc file in your home folder like this:
# ~/.npmrc
@doppelmutzi:registry=https://gitlab.com/api/v4/projects/<project-id>/packages/npm/
//gitlab.com/api/v4/projects/<project-id>/packages/npm/:_authToken=<NPM_TOKEN>
The NPM_TOKEN is the value of the deploy token we stored in GitLab’s environment variable. The project ID can be retrieved from the project’s home screen:

Then, the following Shell command is all it needs to execute the executable doppelmutzi-addition of the latest version of the package @doppelmutzi/semantic-release-git-workflow stored in the private registry:
$ npx @doppelmutzi/semantic-release-git-workflow@latest doppelmutzi-addition
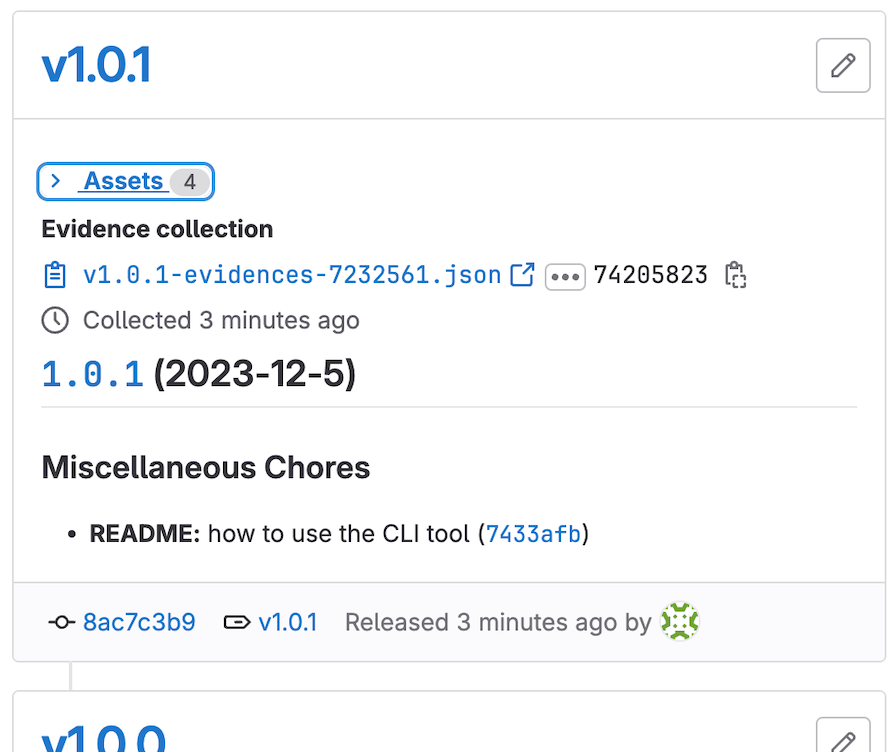
Next, we’ll update the README.md with some information on how to use the CLI tool and create the following commit:
$ git commit -m "docs(README): how to use the CLI tool"
It uses the type docs with the single scope we configured to trigger a patch release. Here is the important part of the configuration of @semantic-release/commit-analyzer in release.config.cjs:
// ...
[
  "@semantic-release/commit-analyzer",
  {
    preset: "angular",
    releaseRules: [
      // ...
      {
        type: "docs",
        scope: "README",
        release: "patch",
      },
      // ...
    ],
    // ...
  },
],
// ...
Due to this setup, the previous commit triggers a release with version 1.0.1:
The Git history should look like this:

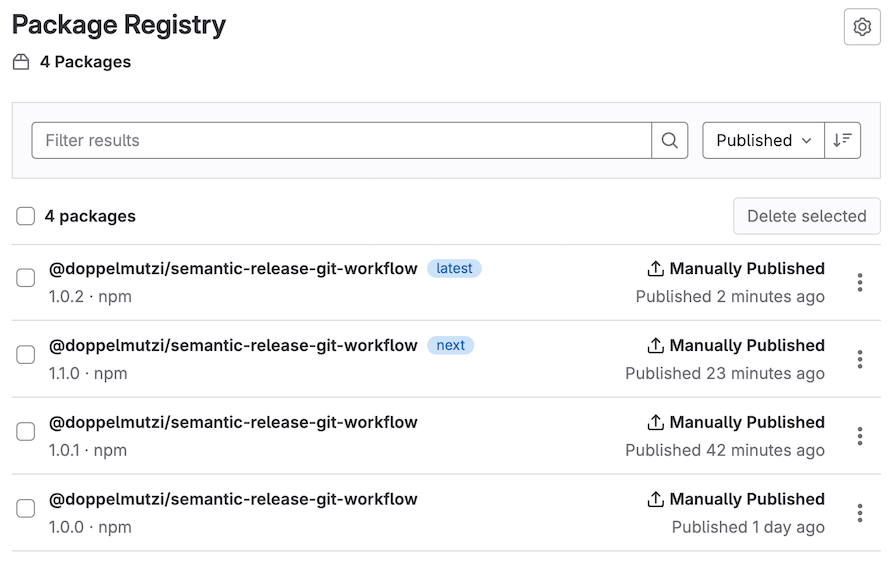
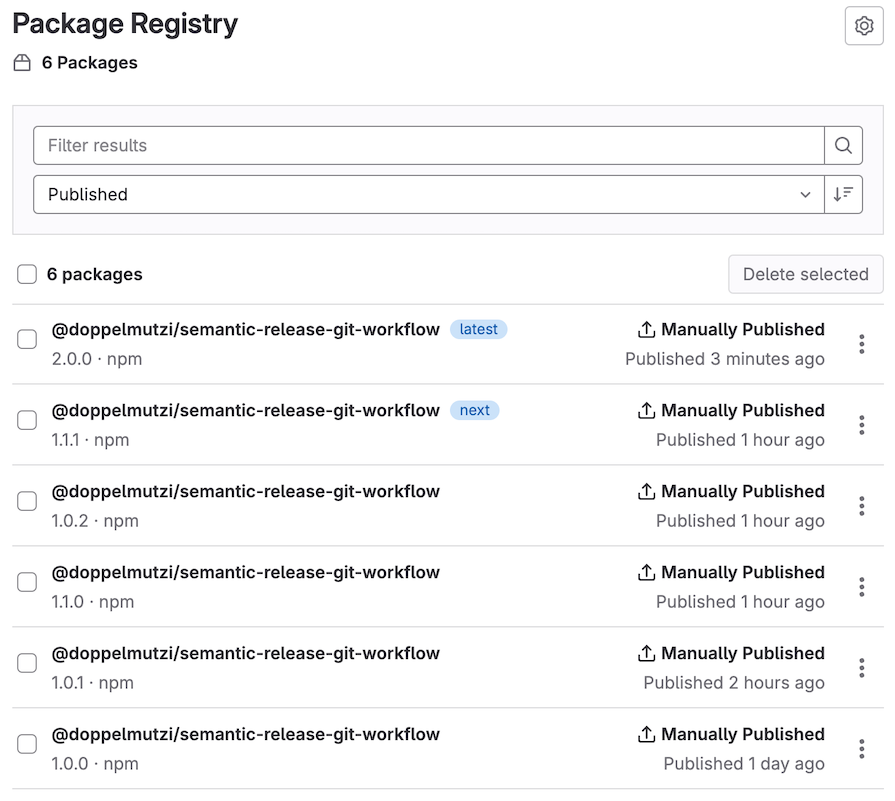
In the package registry, there is a new package with version 1.0.1, which has the latest dist-tag. Executing the previous npx Shell command will now execute this package version:
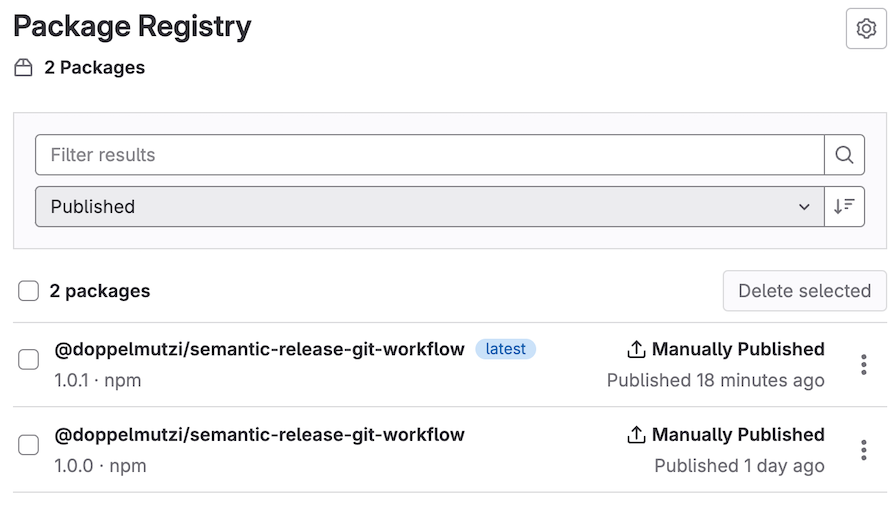
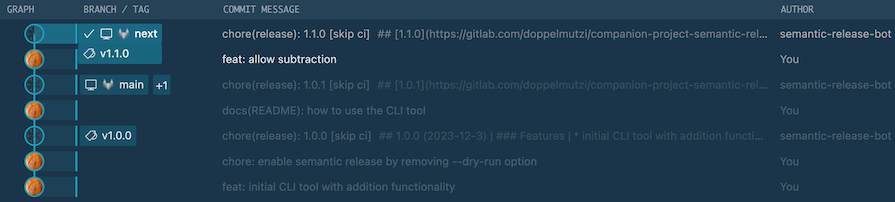
@next distribution tagLet’s work on a new feature that allows us to perform subtractions. We want to test this with a smaller group of users so we’ll develop this in the next branch.
With the following commit, a package with version 1.1.0 and a @next distribution tag is published:
$ git commit -m "feat: allow subtraction"
This works because the next branch is configured as a trackable branch in release.config.cjs:
module.exports = {
  branches: ["main", "next"],
  // ...
}
Now, this is what the Git history looks like:
Users can use this package like this:
$ npx @doppelmutzi/semantic-release-git-workflow@next doppelmutzi-calculator
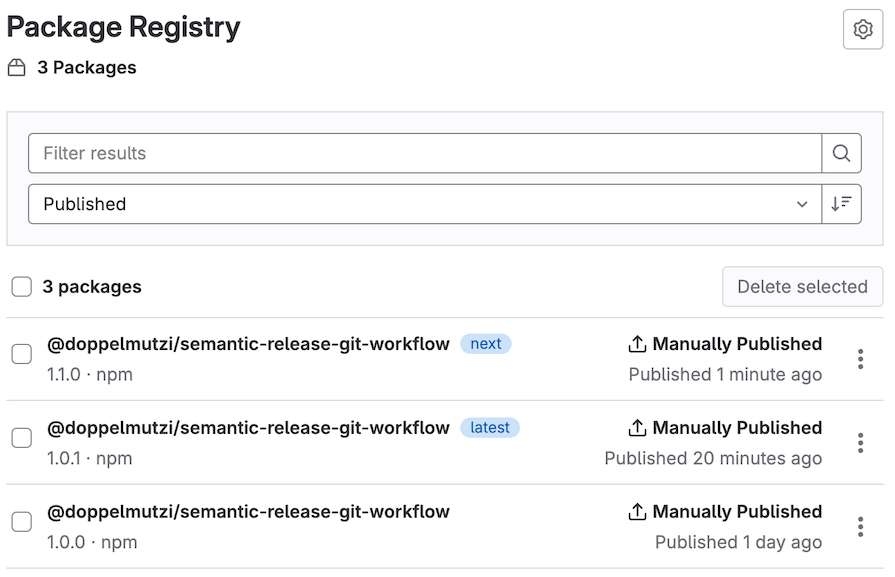
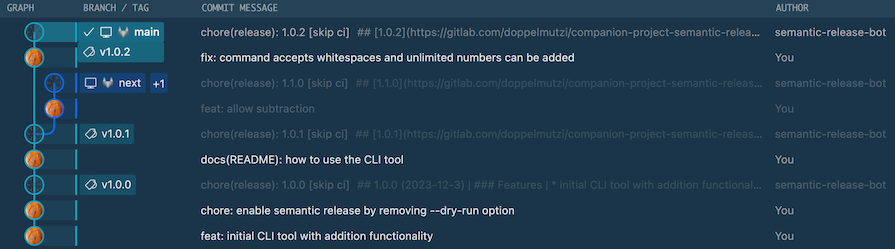
While users are testing the new feature on the next branch, we’ll find a general problem with the calculator. The command cannot handle empty spaces and multiple operands. We can fix this on the main branch and create a commit with type fix:
$ git commit -m "fix: command accepts whitespaces and unlimited numbers can be added"
This leads to version 1.0.2 with a latest tag:
The Git history reveals two branches with v1.0.2 on main and v1.1.0 on next:
Let’s port this bugfix to the next branch by merging the main branch into the next branch. After resolving the merge conflicts, we get the version 1.1.1 with the next distribution tag:
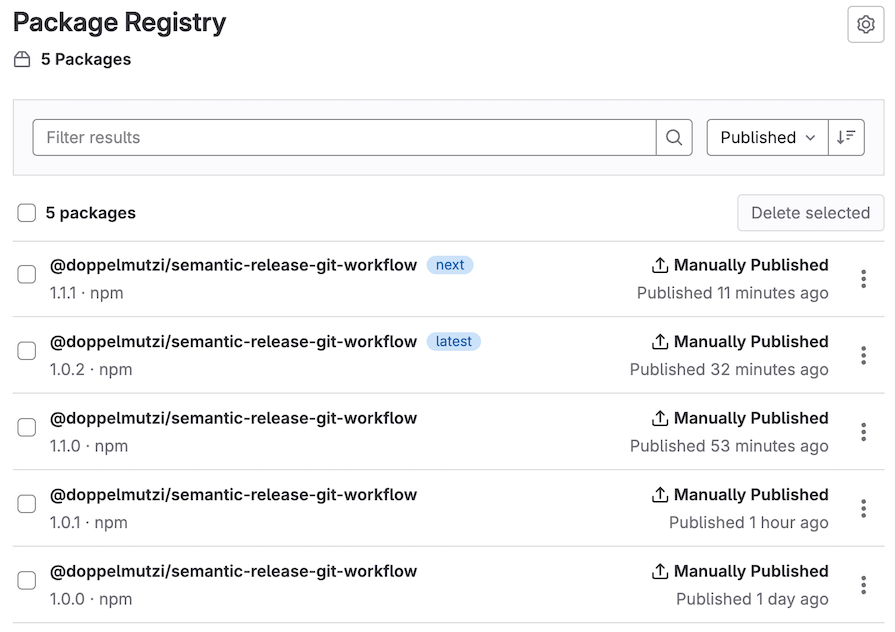
A Git tag v1.1.1 is created on the next branch after merging the main branch into it:
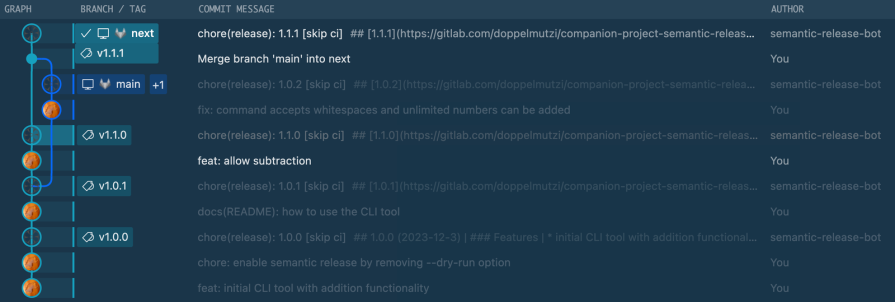
We are satisfied with our next version and want to port it back to latest. Therefore, we’ll merge the next branch into main.
During development, it became clear that our application requires a newer Node version as a minimum requirement. This is a breaking change as the application no longer works with Node <18.19.0:
$ git commit -m "chore: upgrade engines field \n\n BREAKING CHANGE: the CLI tool only works with Node 18.19.0 or greater"
According to the Angular conventions, it’s important for this type of commit that BREAKING CHANGE be in the body of the commit, so the two line breaks are crucial. This commit leads to a major version bump (2.0.0):
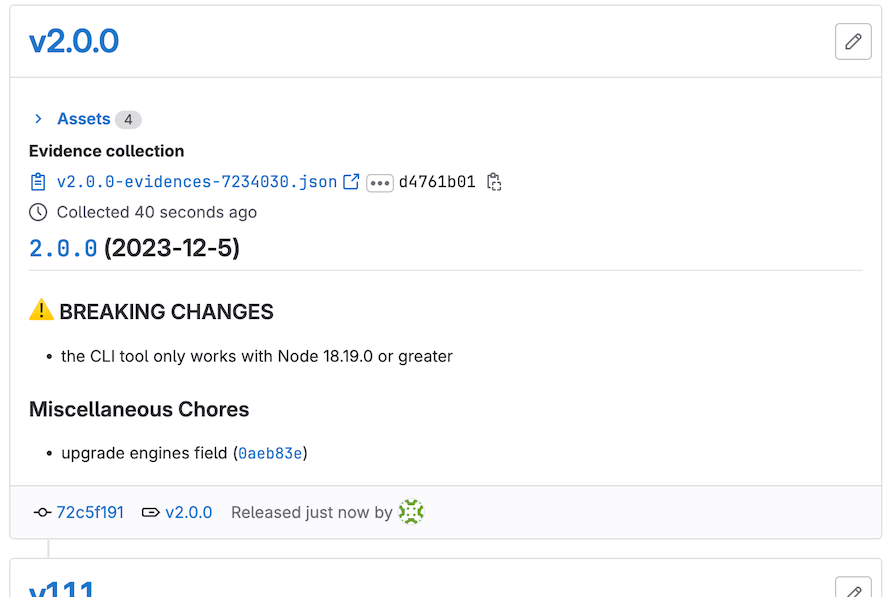
The newest version on the latest distribution tag is now 2.0.0:
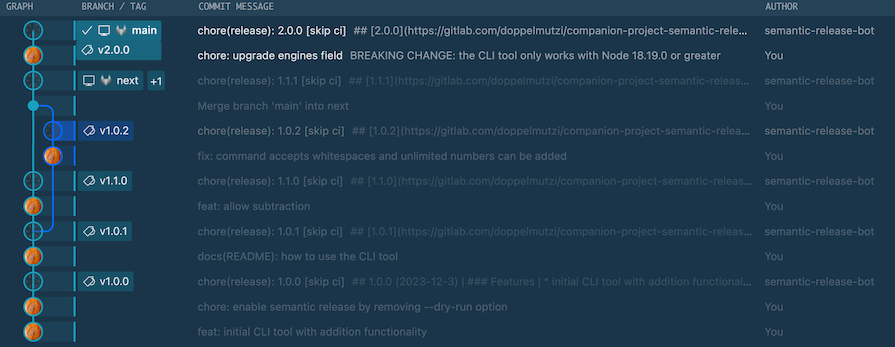
This is how the Git history looks after the breaking change:
Let’s use another approach to develop a new release. We want to develop a complex feature containing many commits, so we’ll provide a CLI option to our script.
We’ll branch off a new branch from main named feature/cli-option. The advantage of this approach is that we can build the feature with multiple commits that do not have to use the conventional commit convention.
After we’re done developing, we’ll create a merge request with the squash commits and edit commit message options to provide custom messages. In the squash commit message, we again have the chance to use the Angular convention to make sure that we create one commit of type feat:
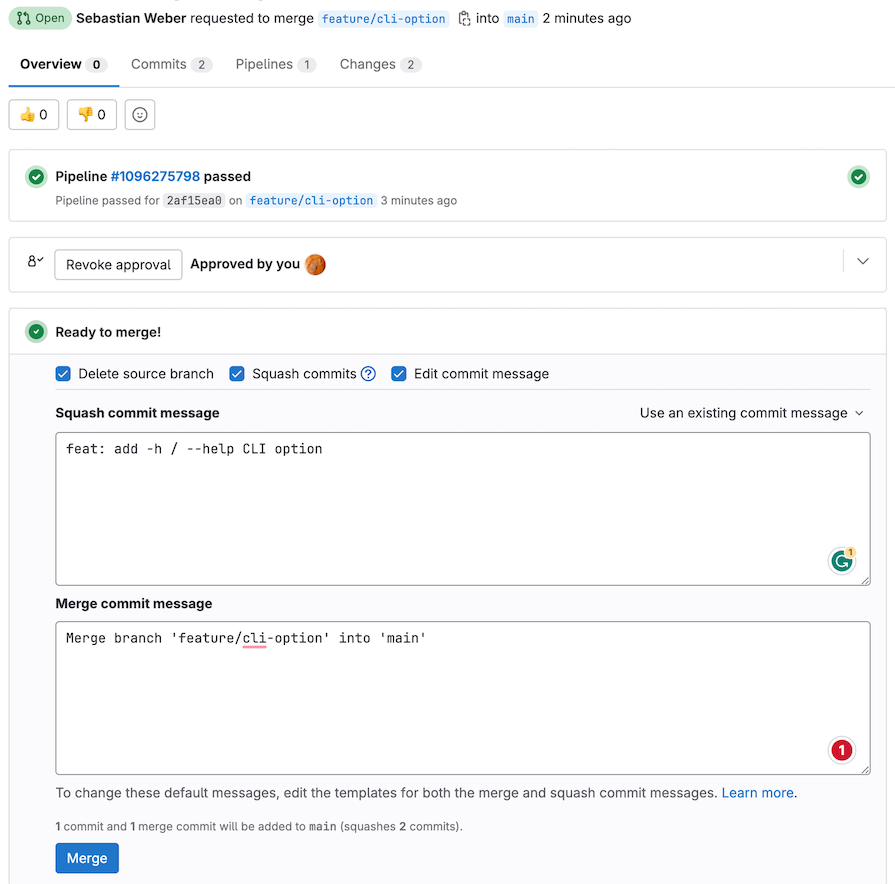
After merging the merge request, a new release v2.1.0 is created with the latest distribution tag:
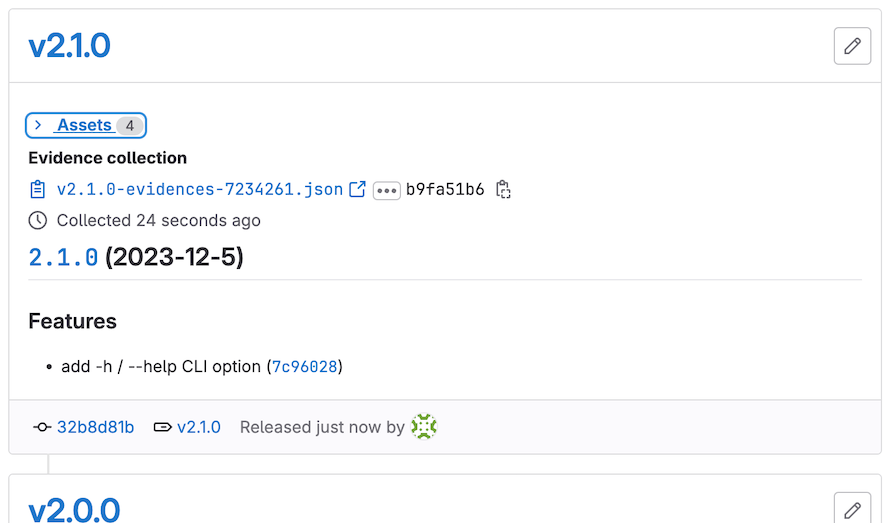
The final Git history also shows that the final commit leads to a Git tag of v2.1.0:

The focus of this article is to demonstrate how to achieve a semantic-release workflow with GitLab to automate releases and changelog generation. Of course, semantic-release can be used with other popular CI services, such as GitHub Actions. Most of the shown configurations will be the same — the only difference is to set up authentication for the respective service.
The semantic-release workflow is very flexible, e.g., you can choose a conventional commit convention other than Angular, such as Atom or ESLint.
If you want to have a more rigorous workflow that allows only conventional commits, you can think about using Git pre-commit hooks with commitlint. A setup with lint-staged, husky, and commitlint would also minimize the chance that developers push inadequate commit messages to remote, which would lead to undesirable results.
 Monitor failed and slow network requests in production
Deploying a Node-based web app or website is the easy part. Making sure your Node instance continues to serve resources to your app is where things get tougher. If you’re interested in ensuring requests to the backend or third-party services are successful, try LogRocket.

LogRocket lets you replay user sessions, eliminating guesswork around why bugs happen by showing exactly what users experienced. It captures console logs, errors, network requests, and pixel-perfect DOM recordings — compatible with all frameworks.
LogRocket's Galileo AI watches sessions for you, instantly identifying and explaining user struggles with automated monitoring of your entire product experience.
LogRocket instruments your app to record baseline performance timings such as page load time, time to first byte, slow network requests, and also logs Redux, NgRx, and Vuex actions/state. Start monitoring for free.

A guide for using JWT authentication to prevent basic security issues while understanding the shortcomings of JWTs.

Discover how to build, render, and automate product demo videos with Remotion, replacing traditional screen recordings with reusable React code.

Chrome’s Modern Web Guidance embeds modern web platform skills into AI coding agents, helping them choose native HTML, CSS, and browser APIs over legacy patterns.

Learn how to use Fallow to analyze AI-generated code, detect dead code, duplicate logic, and complexity issues, and integrate automated code quality checks into your AI-assisted development workflow.
Would you be interested in joining LogRocket's developer community?
Join LogRocket’s Content Advisory Board. You’ll help inform the type of content we create and get access to exclusive meetups, social accreditation, and swag.
Sign up now

