Security headers let your application send browser-enforced rules with each HTTP response. In a Next.js app, they can help reduce risk from cross-site scripting (XSS), clickjacking, MIME sniffing, referrer leakage, and unsafe cross-origin behavior.
These risks are not theoretical. In 2018, British Airways suffered a Magecart-style attack that affected more than 400,000 customers. Attackers modified JavaScript running in the airline’s payment flow so sensitive customer data could be sent to an attacker-controlled domain. The incident is a useful reminder that client-side security depends not only on application code, but also on the browser rules that control what scripts, frames, resources, and origins your pages are allowed to trust.
In this article, we’ll look at the main HTTP security headers developers should understand, how they apply to Next.js applications, and when to configure them in next.config.js versus proxy.js.
Every time a browser communicates with a web server, it sends and receives metadata through HTTP headers. Request headers tell the server about the browser’s request, while response headers tell the browser how to handle the returned content.
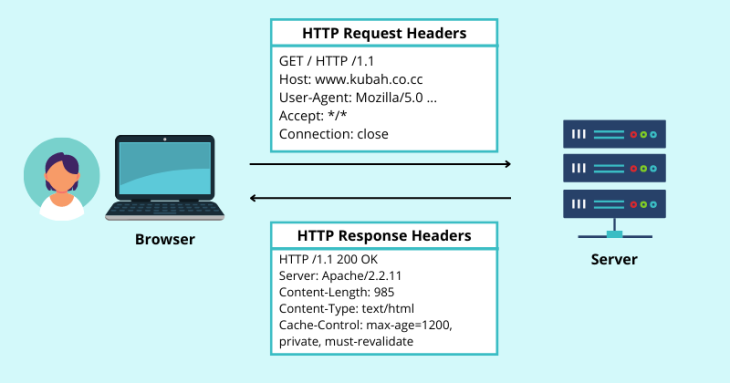
Security headers are response headers that define browser-enforced security policies. Instead of relying only on application logic, they instruct the browser to block or restrict certain behaviors, such as loading an untrusted script, embedding the page in a frame, exposing full referrer URLs, or allowing access to sensitive browser APIs.
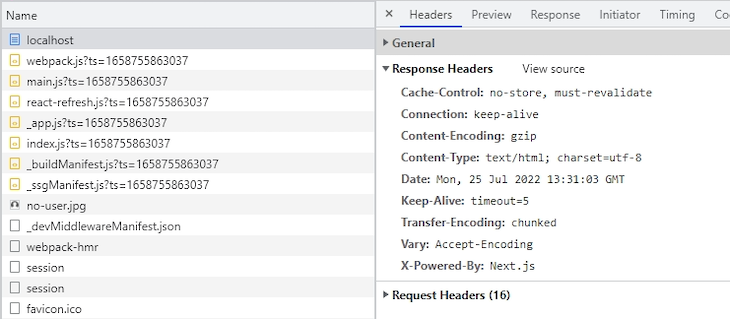
For this demonstration, I created a new Next.js app using the default setup and started it locally at http://localhost:3000 with npm run dev.
When you inspect the HTTP response headers in the Network tab of the browser’s developer console, the starter app does not include most of the application-specific security headers discussed in this article. That means you need to configure them yourself based on your app’s routes, third-party dependencies, rendering model, and security requirements.
Not every security header should be treated the same way. Some are low-risk defaults for most production apps. Others, especially CSP and cross-origin isolation headers, require more testing because they can block scripts, images, fonts, popups, payment flows, analytics, or embedded content.
| Header | Recommended baseline | What it helps protect against | Main caveat |
|---|---|---|---|
Content-Security-Policy |
Start with default-src 'self', then add explicit directives for scripts, styles, images, fonts, frames, and connections |
XSS, code injection, clickjacking when using frame-ancestors |
Too strict a policy can block Next.js scripts, third-party scripts, analytics, fonts, images, and inline styles |
X-Content-Type-Options |
nosniff |
MIME sniffing attacks | Low-risk default for most apps |
Strict-Transport-Security |
max-age=31536000; includeSubDomains once HTTPS is stable |
HTTPS downgrade and SSL stripping attacks | Only use includeSubDomains and preload when all subdomains support HTTPS |
Referrer-Policy |
strict-origin-when-cross-origin or origin-when-cross-origin |
Excessive referrer leakage | Stricter policies can reduce analytics detail |
Permissions-Policy |
Disable unused powerful APIs, such as camera, microphone, and geolocation | Abuse of browser features and device APIs | Syntax is easy to get wrong; test feature behavior after deployment |
X-Frame-Options |
DENY or SAMEORIGIN for legacy support |
Clickjacking | Modern CSP uses frame-ancestors, which is more flexible |
Cross-Origin-Opener-Policy |
Use only when you need stronger browsing context isolation | Cross-origin window access and opener-based attacks | Can break OAuth, payment, and social-login popup flows |
Cross-Origin-Embedder-Policy |
Use only when you need cross-origin isolation | Enables APIs such as SharedArrayBuffer when paired with COOP |
Can block third-party resources that do not opt in through CORS or CORP |
Cross-Origin-Resource-Policy |
Use same-origin for private resources and cross-origin for public assets that must be embeddable |
Cross-origin loading of protected resources | A restrictive value can break legitimate CDN or cross-site asset use |
This table is a starting point, not a universal production policy. A static documentation site, a SaaS dashboard, an ecommerce checkout flow, and an app that needs SharedArrayBuffer may all require different header choices.
The following sections cover the most common security headers for Next.js applications and the tradeoffs developers should consider before applying them globally.
X-Content-Type-Options headerThe X-Content-Type-Options header disables MIME type sniffing. MIME sniffing is a browser behavior where the browser tries to infer a resource’s type from its content rather than trusting the declared Content-Type header.
That behavior can be useful when a server mislabels a file, but it also creates security risk. If an attacker can upload or serve content with a misleading MIME type, the browser may interpret it as executable code.
To prevent that, use the nosniff directive:
X-Content-Type-Options: nosniff
This is a safe default for most Next.js apps. It tells the browser to respect the declared Content-Type instead of guessing.
Content-Security-Policy headerThe Content-Security-Policy header, commonly shortened to CSP, tells the browser which sources are allowed to provide scripts, styles, images, fonts, frames, and other resources. A well-designed CSP can significantly reduce the impact of XSS and script-injection attacks.
At its simplest, a CSP can restrict all resources to the application’s own origin:
Content-Security-Policy: default-src 'self'
The default-src directive acts as a fallback for other resource types unless a more specific directive overrides it. You can then add narrower rules for different types of content:
Content-Security-Policy: default-src 'self'; img-src 'self' https://images.example.com; script-src 'self' https://www.google-analytics.com; font-src 'self' https://fonts.googleapis.com
This policy allows images from the app’s own origin and https://images.example.com, scripts from the app’s own origin and Google Analytics, and fonts from the app’s own origin and Google Fonts.
For a more defensive baseline, you can also add directives such as:
object-src 'none'; base-uri 'self'; form-action 'self'; frame-ancestors 'none'; upgrade-insecure-requests
These directives block legacy plugin content, restrict the document’s base URL, limit where forms can submit, prevent framing, and ask the browser to upgrade insecure HTTP requests where possible.
CSP becomes more complicated in modern Next.js apps because the framework may generate inline scripts and styles during rendering. A static script-src 'self' policy can therefore block scripts that your app actually needs.
A common workaround is to add 'unsafe-inline' to script-src, but that weakens the policy because it allows inline scripts broadly. For apps with stricter security requirements, a safer option is nonce-based CSP.
A nonce is a random, single-use token generated for each request. You attach the nonce to the CSP header and to the trusted scripts or styles that are allowed to run. The browser blocks inline code unless it carries the matching nonce.
In current Next.js apps, this request-time logic belongs in proxy.js. Proxy can generate a fresh nonce before the page renders and attach it to both the response header and the request headers.
import { NextResponse } from "next/server";

export function proxy(request) {
  const nonce = Buffer.from(crypto.randomUUID()).toString("base64");
  const isDev = process.env.NODE_ENV === "development";

  const cspHeader = `
    default-src 'self';
    script-src 'self' 'nonce-${nonce}' 'strict-dynamic'${isDev ? " 'unsafe-eval'" : ""};
    style-src 'self' 'nonce-${nonce}';
    img-src 'self' blob: data:;
    font-src 'self';
    object-src 'none';
    base-uri 'self';
    form-action 'self';
    frame-ancestors 'none';
    upgrade-insecure-requests;
  `;

  const contentSecurityPolicyHeaderValue = cspHeader
    .replace(/\s{2,}/g, " ")
    .trim();

  const requestHeaders = new Headers(request.headers);
  requestHeaders.set("x-nonce", nonce);
  requestHeaders.set(
    "Content-Security-Policy",
    contentSecurityPolicyHeaderValue
  );

  const response = NextResponse.next({
    request: {
      headers: requestHeaders,
    },
  });

  response.headers.set(
    "Content-Security-Policy",
    contentSecurityPolicyHeaderValue
  );

  return response;
}
The development-only 'unsafe-eval' is included because React uses eval in development for debugging. It should not be included in production unless you have a specific dependency that requires it.
You can also prevent Proxy from running on static assets and prefetch requests that do not need the CSP header:
export const config = {
  matcher: [
    {
      source: "/((?!api|_next/static|_next/image|favicon.ico).*)",
      missing: [
        { type: "header", key: "next-router-prefetch" },
        { type: "header", key: "purpose", value: "prefetch" },
      ],
    },
  ],
};
Then, in your root layout or another Server Component, read the nonce from the request headers and pass it to trusted scripts:
import { headers } from "next/headers";
import Script from "next/script";

export default async function RootLayout({ children }) {
  const nonce = (await headers()).get("x-nonce");

  return (
    <html lang="en">
      <body>
        {children}
        <Script
          src="https://www.googletagmanager.com/gtag/js"
          nonce={nonce}
          strategy="afterInteractive"
        />
      </body>
    </html>
  );
}
The headers() function is asynchronous in current Next.js versions, so this example uses await headers(). Older synchronous examples may still appear in existing articles or codebases, but the async form is the forward-compatible pattern.
The nonce flows from Proxy to the response header, then into the request headers, then down to Server Components through headers(). Next.js can also apply the nonce to framework scripts and page-specific bundles when it parses the nonce from the CSP header during rendering.
Nonce-based CSP has one major tradeoff: it requires dynamic rendering. Static pages, Incremental Static Regeneration (ISR), and Partial Prerendering cannot reliably receive a fresh nonce because those pages are generated before request-specific headers exist. If your app relies heavily on static generation or CDN caching, decide whether a static CSP, an experimental SRI-based approach, or a less strict policy is a better fit.
X-Frame-Options headerThe X-Frame-Options header helps prevent clickjacking by controlling whether your page can be embedded inside a frame.
To block all framing, use DENY:
X-Frame-Options: DENY
To allow framing only from the same origin, use SAMEORIGIN:
X-Frame-Options: SAMEORIGIN
For modern browsers, the CSP frame-ancestors directive is more flexible and should generally be preferred for new projects:
Content-Security-Policy: frame-ancestors 'none'
The equivalent of SAMEORIGIN is:
Content-Security-Policy: frame-ancestors 'self'
Many apps still include X-Frame-Options for legacy compatibility, but frame-ancestors is the better long-term control because it can express more specific embedding policies.
Strict-Transport-Security headerThe Strict-Transport-Security header, also called HSTS, tells browsers to access your site only over HTTPS for a specified period of time. This helps protect against HTTPS downgrade attacks and SSL stripping.
A common production value is:
Strict-Transport-Security: max-age=31536000; includeSubDomains; preload
The max-age directive is required and defines how long the browser should remember the HTTPS-only rule. The value 31536000 equals one year.
Use includeSubDomains only when every subdomain can reliably serve HTTPS. Use preload only when you are ready to submit the domain to the HSTS preload list and keep HTTPS enforced across the entire domain. These directives are powerful, but they can also lock users out of parts of your site if any subdomain still depends on HTTP.
Permissions-Policy headerThe Permissions-Policy header, formerly known as Feature-Policy, lets you control which browser features and device APIs a page may use. For example, an app that does not need camera, microphone, geolocation, or payment access can explicitly disable them.
A basic policy might look like this:
Permissions-Policy: camera=(), microphone=(), geolocation=(), payment=(), browsing-topics=()
You can also allow a feature for the current origin and a specific trusted origin:
Permissions-Policy: geolocation=(self "https://maps.example.com")
When setting multiple policies in one header, separate them with commas. This differs from an iframe’s allow attribute, which uses semicolons between directives.
Permissions Policy is most useful when it reflects the app’s actual feature needs. A marketing page likely does not need camera or microphone access. A video-conferencing app does. Disable what you do not use, but test any feature that depends on browser APIs after changing the policy.
Referrer-Policy headerWhen a user navigates from one page to another, the browser may send a Referer header to the destination. Without a policy, that header can expose more URL information than you intend, including paths or query strings.
The Referrer-Policy header controls how much referrer information the browser sends.
A balanced default is:
Referrer-Policy: strict-origin-when-cross-origin
With this policy, same-origin requests can include the full URL, while cross-origin HTTPS requests receive only the origin. The browser sends no referrer when navigating from HTTPS to HTTP.
Another common option is:
Referrer-Policy: origin-when-cross-origin
This sends the full URL for same-origin requests and only the origin for cross-origin requests. Choose the stricter or looser value based on your analytics needs and privacy requirements.
Cross-Origin-Opener-Policy headerThe Cross-Origin-Opener-Policy header, or COOP, controls whether your page shares a browsing context group with cross-origin pages. In practical terms, it affects whether a cross-origin page opened through window.open() can retain a reference back to your page through window.opener.
To isolate your page from cross-origin documents, use:
Cross-Origin-Opener-Policy: same-origin
If your app needs to support cross-origin popups, such as OAuth or payment flows, you may need the more permissive value:
Cross-Origin-Opener-Policy: same-origin-allow-popups
COOP is useful for stronger isolation, but it should not be added globally without testing login, checkout, support chat, and embedded third-party flows.
Cross-Origin-Embedder-Policy headerThe Cross-Origin-Embedder-Policy header, or COEP, controls whether your document can load cross-origin resources that have not explicitly opted in through CORS or Cross-Origin-Resource-Policy.
To require cross-origin resources to opt in, use:
Cross-Origin-Embedder-Policy: require-corp
COEP is especially relevant for apps that need cross-origin isolation to use APIs such as SharedArrayBuffer or performance.measureUserAgentSpecificMemory(). Cross-origin isolation generally requires COOP and COEP together:
Cross-Origin-Opener-Policy: same-origin
Cross-Origin-Embedder-Policy: require-corp
Do not enable COEP globally just to improve a security-header scan score. It can block third-party images, scripts, iframes, workers, analytics, and other resources unless those resources are loaded with CORS or served with compatible CORP headers.
Cross-Origin-Resource-Policy headerThe Cross-Origin-Resource-Policy header, or CORP, tells the browser whether a resource can be loaded by other origins. It protects resources by declaring who is allowed to embed or load them.
To restrict a resource to the same origin, use:
Cross-Origin-Resource-Policy: same-origin
To allow the same site, including subdomains, use:
Cross-Origin-Resource-Policy: same-site
To allow any origin to load the resource, use:
Cross-Origin-Resource-Policy: cross-origin
Use stricter CORP values for private resources. Use cross-origin only for public assets that are intentionally designed to be embedded elsewhere, such as public images, fonts, or CDN files.
In Next.js, there are two common places to configure security headers: next.config.js and proxy.js. The right choice depends on whether the header value is static or needs to be generated per request.
next.config.js for static security headersUse next.config.js for headers that should be the same on every request. This is usually the right place for X-Content-Type-Options, Referrer-Policy, Permissions-Policy, HSTS, and simple static CSP policies.
The headers function in next.config.js returns an array of route-matching objects. Each object defines a source path pattern and a list of response headers to apply.
/** @type {import('next').NextConfig} */
const nextConfig = {
  async headers() {
    return [
      {
        source: "/:path*",
        headers: [
          {
            key: "X-Content-Type-Options",
            value: "nosniff",
          },
          {
            key: "Strict-Transport-Security",
            value: "max-age=31536000; includeSubDomains",
          },
          {
            key: "Permissions-Policy",
            value: "camera=(), microphone=(), geolocation=(), payment=(), browsing-topics=()",
          },
          {
            key: "Referrer-Policy",
            value: "strict-origin-when-cross-origin",
          },
          {
            key: "Content-Security-Policy",
            value: "default-src 'self'; script-src 'self'; style-src 'self'; img-src 'self' blob: data:; font-src 'self'; object-src 'none'; base-uri 'self'; form-action 'self'; frame-ancestors 'none'; upgrade-insecure-requests",
          },
        ],
      },
    ];
  },
};

export default nextConfig;
This example applies the same headers to every route with source: "/:path*". Treat the CSP value as a starting point. Depending on your app, you may need to add connect-src, frame-src, analytics domains, image hosts, font hosts, or other trusted sources.
If a static CSP blocks required framework behavior or third-party scripts, avoid weakening it casually with broad directives. Test the violations, identify the specific blocked source, and decide whether to allow that source, move to nonce-based CSP, or restructure the dependency.
next.config.jsYou can also apply different headers to different route groups. For example, a public marketing page, an authenticated dashboard, and an account settings page may not need identical CSP rules.
/** @type {import('next').NextConfig} */
const nextConfig = {
  async headers() {
    return [
      {
        source: "/account/:path*",
        headers: [
          {
            key: "Content-Security-Policy",
            value: "default-src 'self'; script-src 'self'; style-src 'self'; img-src 'self' data:; font-src 'self'; object-src 'none'; base-uri 'self'; form-action 'self'; frame-ancestors 'none'",
          },
        ],
      },
      {
        source: "/docs/:path*",
        headers: [
          {
            key: "Referrer-Policy",
            value: "strict-origin-when-cross-origin",
          },
        ],
      },
    ];
  },
};

export default nextConfig;
Route-specific headers are useful when one part of your app has stricter requirements than another. For example, you may want tighter policies on account, billing, or admin routes while allowing more third-party embeds on documentation or marketing pages.
proxy.js for nonce-based CSPUse proxy.js when a header value must be generated at request time. Nonce-based CSP is the most common example because every page view needs a fresh nonce.
next.config.js cannot generate that nonce because its headers are static. They are evaluated as configuration, not per-request logic. Proxy runs during the request lifecycle, so it can create a new nonce, attach it to the CSP header, and pass it into Server Components through request headers.
A practical setup for many apps is hybrid:
Use next.config.js for |
Use proxy.js for |
|---|---|
| Static headers shared across routes | Per-request CSP nonces |
HSTS, nosniff, referrer policy, and permissions policy |
Request-specific security logic |
| Basic CSP rules that do not need nonces | Strict CSP for routes that render trusted inline scripts |
| Route-based static header differences | Conditional policies based on request context |
Use the simplest configuration that meets your security requirements. A nonce-based CSP can be more secure, but it also changes the rendering and caching model of the app.
Security headers are easy to add but easy to misconfigure. Before shipping them, test both the presence of the headers and the behavior of the app.
First, start your local Next.js development server:
npm run dev
Then open your app in the browser, go to the Network tab in DevTools, select the document request, and inspect the response headers. Make sure the headers appear on the actual page response, not only on static assets.

For CSP, consider starting with Content-Security-Policy-Report-Only before enforcing the policy. Report-only mode lets the browser report violations without blocking the resource, which helps you find missing directives before the policy breaks production behavior.
Before deploying, test:
connect-src dependenciesAfter deployment, run the production URL through securityheaders.com to check for missing or misconfigured headers. For CSP specifically, use Google’s CSP Evaluator to identify risky directives such as overly broad script-src values, missing fallbacks, or unsafe source expressions.
Security headers are one of the most practical ways to harden a Next.js application at the browser level. Headers like X-Content-Type-Options, Referrer-Policy, Permissions-Policy, and HSTS are strong defaults for many production apps, while CSP and cross-origin isolation headers require more deliberate configuration.
For most Next.js projects, start with static headers in next.config.js, then move to proxy.js only when you need request-specific behavior such as nonce-based CSP. Be especially careful with COOP and COEP, which can improve isolation but also break legitimate cross-origin flows if they are enabled globally without testing.
The safest approach is incremental: add low-risk defaults first, test your app’s real routes and third-party dependencies, use report-only mode for CSP, and tighten the policy once you know what your production app actually needs to load.
Debugging Next applications can be difficult, especially when users experience issues that are difficult to reproduce. If you’re interested in monitoring and tracking state, automatically surfacing JavaScript errors, and tracking slow network requests and component load time, try LogRocket.
LogRocket captures console logs, errors, network requests, and pixel-perfect DOM recordings from user sessions and lets you replay them as users saw it, eliminating guesswork around why bugs happen — compatible with all frameworks.
LogRocket's Galileo AI watches sessions for you, instantly identifying and explaining user struggles with automated monitoring of your entire product experience.
The LogRocket Redux middleware package adds an extra layer of visibility into your user sessions. LogRocket logs all actions and state from your Redux stores.


Modernize how you debug your Next.js apps — start monitoring for free.

A guide for using JWT authentication to prevent basic security issues while understanding the shortcomings of JWTs.

Discover how to build, render, and automate product demo videos with Remotion, replacing traditional screen recordings with reusable React code.

Chrome’s Modern Web Guidance embeds modern web platform skills into AI coding agents, helping them choose native HTML, CSS, and browser APIs over legacy patterns.

Learn how to use Fallow to analyze AI-generated code, detect dead code, duplicate logic, and complexity issues, and integrate automated code quality checks into your AI-assisted development workflow.
Hey there, want to help make our blog better?
Join LogRocket’s Content Advisory Board. You’ll help inform the type of content we create and get access to exclusive meetups, social accreditation, and swag.
Sign up now