Deno is a simple, modern, and secure runtime for JavaScript and TypeScript that uses V8 and is built in Rust. Unlike Node.js, Deno has built-in support for TypeScript that’s secure by default. Deno uses third-party packages with browser compatible URLs to manage modules as opposed to being imported into and cached in our local machine.

JSON Web Token (JWT) is an internet standard for creating data with optional signature and/or optional encryption whose payload holds JSON that asserts some number of claims. In short, it’s basically used for authentication. When a user logs into an application, the application will create a JWT and send it back to the user.
Most use cases of JWT in Deno is when developers implement authentication systems so that users have to login to gain access to specific data.
In this article, we’ll integrate JWT into our Deno application using Deno’s djwt package for integrations.
In order to use JWT in our Deno application, we have to use the djwt Deno library for this. Note that djwt does not handle any form of authentication or authorization — its role is to generate and validate valid JSON web tokens.
To get started, let’s create a new directory in our home directory for our application. Inside this directory, we will create an index.ts file, where we will write our codes:
cd desktop && mkdir denojwt && cd denojwt
touch index.ts
code .
This will create the directory and the index.ts file. The code . command will open up our application in VS Code. Feel free to use any text editor of your choice.
To use the djwt library, we have to import this method into our application:
import { validateJwt } from "https://deno.land/x/djwt/validate.ts";
import { makeJwt, setExpiration,Jose,Payload } from "https://deno.land/x/djwt/create.ts";
Here, the validateJwt method will check if the token is valid or not. The makeJwt method will generate a valid JWT, and setExpiration method will set an expiration time for the token. Payload is a TypeScript interface for the JWT payload or data. Jose indicates the algorithm and type of the token.
To define routes and set up of our server, we will make use of the oak library. Let’s set up a simple server and route using Oak:
import { Application, Router } from "https://deno.land/x/oak/mod.ts";
const app = new Application();
const PORT:number = 8080
//create a new instance of router
const router = new Router();
router
  .get("/test", (context) => {
    context.response.body = "Hello world!";
  })
  .get("/user", (context) => {
    context.response.body = "My name is Wisdom Ekpot";
  })
  app.use(router.routes());
app.use(router.allowedMethods());
await app.listen({ port: PORT });
When working with JWT, we have to set a secret key, a payload, and a header. This is a basic JWT configuration. It’s a good idea to store this configs in a variable:
const key = "mynameisxyzekpot";

const header: Jose = {
    alg: "HS256",
    typ: "JWT",
}

let payloader = (name:string) => {
  let payload:Payload = {
    iss: name,
    exp: setExpiration(new Date("2021-01-01"))
  }
  return payload
}
The payloader method will get the payload as a parameter and the set the expiration data duration to 2021-01-01. We will have to return the payload object so that we can use it in the makeJwt method.
With this defined, we can now write a simple method that will return a valid token using the defined config. To generate a token, we will use the makeJwt method in this manner:
const generateJWT = (name:string) => {
  return makeJwt({ key:secret_key, header, payload:payloader(name) })
}
Here we will pass the users inputted name as a parameter and then use the payloader function as the payload.
We can now set up a simple route that will call this method and send the valid token as a response.
Because we are using Oak for our server and routing, we can create a simple post route that will be used to generate a valid token for us:
.post("/generate", async (context) => {
     let body: any = await context.request.body();
    const { name } = await body.value;
    let token = await generateJWT(name)
    context.response.body = { status: true, data: name,token:token };
  });
Next, we’ll add a new /generate post request route that will use the generateJWT method to generate a token for the user based on the inputted name.
context.request.body() gets the body of the request from which we can acquire the users inputted name from. Now let’s test our endpoint using POSTMAN.

Sending a post request to the /generate route and passing a name as a body will generate a token for that user.
We can use the imported validateJwt to check whether a token is valid or not. This method takes in the token , the key, and the algorithm as a parameter. We will use the token received from the makeJwt method for testing.
Let’s start by creating a method for the validation:
const validateToken = (token:string) => {
    return validateJwt({jwt:token, key:secret_key,algorithm:header.alg});
}
Notice that we used the algorithm that we defined in the header object and also used the same secret_key.
We can now create a new post route for the validation:
.post("/validate", async (context) => {
    let body: any = await context.request.body();
    const { token } = await body.value;
    let validator =  await validateToken(token)
   context.response.body = {validator};
  });
Next, let’s use the validator method to check if the token is valid or not. If the token is valid, it will return the same payload that we used on creation. But if the token is invalid, we will get this as the response:
"validator": {
        "jwt": "yJhbGciOiJIUzI1NiIsInR5cCI6IkpXVCJ9.eyJpc3MiOiJXaXNkb20gRWtwb3QiLCJleHAiOjE2MDk0NTkyMDB9.-uucC6ORuOGNWAkj2d7CTRYzBJTnIn7rcaZXslrSxlg",
        "error": {
            "name": "JwtError",
            "date": "2020-10-23T19:40:29.472Z"
        },
        "isValid": false,
        "isExpired": false
    }
This is an example response of an invalid token:
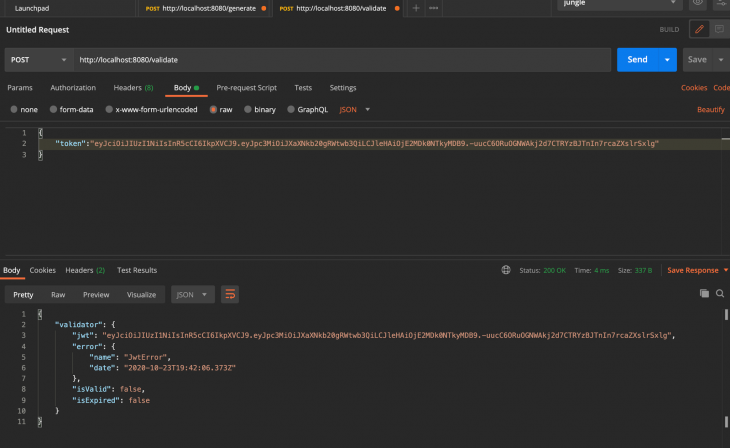
Here, the isValid parameter is returned as false and also an error object is returned.
Here’s what a valid JWT looks like:

Adding any form of authentication into Deno applications can be crucial for application security. JWT is widely used across different technologies, making it a great choice to consider when implementing authorization and authentication into our application.
For the source code of this project, check out my GitHub repo.
Install LogRocket via npm or script tag. LogRocket.init() must be called client-side, not
server-side
$ npm i --save logrocket

// Code:

import LogRocket from 'logrocket';
LogRocket.init('app/id');
// Add to your HTML:

<script src="https://cdn.lr-ingest.com/LogRocket.min.js"></script>
<script>window.LogRocket && window.LogRocket.init('app/id');</script>
Hey there, want to help make our blog better?
Join LogRocket’s Content Advisory Board. You’ll help inform the type of content we create and get access to exclusive meetups, social accreditation, and swag.
Sign up now
Discover how the Interface Segregation Principle (ISP) keeps your code lean, modular, and maintainable using real-world analogies and practical examples.

<selectedcontent> element improves dropdowns

Learn how to implement an advanced caching layer in a Node.js app using Valkey, a high-performance, Redis-compatible in-memory datastore.

Learn how to properly handle rejected promises in TypeScript using Angular, with tips for retry logic, typed results, and avoiding unhandled exceptions.


