.at() methodThe Replay is a weekly newsletter for dev and engineering leaders.
Delivered once a week, it's your curated guide to the most important conversations around frontend dev, emerging AI tools, and the state of modern software.
.at() method?The JavaScript .at() method allows developers to seamlessly grab elements based on their indexes.

Selecting elements in JavaScript is a common occurrence in development, but, before the .at() method, JavaScript had existing methods and techniques to select elements or characters from the start or end of lists or within a string.
The bracket notation, [], is commonly used to get an element at a specific index. But this has its drawbacks. For instance, we cannot use a negative index syntax like arr[-1] to access the last item in a list, which has become popular in Python.
Developers must then resort to using the slice() method and the length property to grab items from the end of a list, but these methods also have their respective drawbacks.
In this tutorial, we’ll look at the JavaScript .at() method, its use cases, and how it can improve developers’ experiences compared to preexisting methods.
Indexable objects are objects that can create index entries. In JavaScript, they include classes like Array, String, and TypedArray.
The .at() method, which is located on the prototype of these indexable objects, is represented like so: Array.prototype.at(), String.prototype.at(), and %TypedArray%.prototype.at(). Hence, we can call it directly on the object instance. For example, we will have the following syntax for arrays:
array.at(index)
.at()To see the benefits of the .at() method, we will quickly walk through some of the existing methods for comparison. This will also serve as a refresher for beginners.
Let’s consider an array of elements called arr:
const arr = [1, 2, "three", 4, 5, true, false];
By using the bracket notation, [], on the arr array, we can get an element at a specific index. For instance, arr[0] returns the first element, 1, and so on. But, to get an item from the end of an unknown length, we use the length property or the slice() method.
length propertyThe length property’s syntax is written:
arr[arr.length - N];
Here, N equals the nth element from the end of a list, and by using the syntax, we can grab any element from the end of that list.
In the following code, we use the syntax to grab the last element of the arr array:
const arr = [1, 2, "three", 4, 5, true, false];
const lastItem = arr[arr.length - 1];
console.log(lastItem);  // Expected Output: false
This works fine, but the syntax can be inconvenient and tedious for a simple task. Besides, one of its drawbacks when working with the returned value of a function compels us to first store the returned value in a variable before applying the syntax:
function appendNumber(arr, N) {
  arr.push(N);
  return arr;
}

const tempArr = appendNumber([1, 2, "three", 4, 5, true, false], 6);
console.log(tempArr[tempArr.length - 1]); // Expected Output: 6
In the code above, the returned value of the appendNumber() function is first stored in the tempArr variable before the length property is applied.
slice() methodDevelopers can also employ the slice() method to grab the last item of a list using the following syntax:
arr.slice(-1)[0]
This syntax allows a negative index, something you’ll see in the .at() method later in this tutorial.
The negative index here indicates an offset from the end of the array. For instance, slice(-1) removes the last item from the back and returns a new array; slice(-2) removes the last two, and so on.
But here, the focus is on the last item, hence slice(-1) in the syntax. Then, the [0] notation selects the item at that index.
Using the syntax, we can grab the last item of the arr array like so:
const arr = [1, 2, "three", 4, 5, true, false];

console.log(arr.slice(-1)[0]); // Expected Output: false
Unlike the length property above, this method does not force us to store the returned value of a function before using the syntax. Hence making it more flexible:
function appendNumber(arr, N) {
  arr.push(N);
  return arr;
}

console.log(appendNumber([1, 2, "three", 4, 5, true, false], 6).slice(-1)[0]); // 6
The syntax looks odd and doesn’t portray its intention. And, of course, it can be inconvenient as well.
arr[-1]?This question often comes up from JavaScript beginners, especially if they come from a programming language like Python.
The arr[-1] notation in JavaScript is a valid object property. Remember everything in JavaScript, including arrays, are objects. So anytime we use the bracket notation, for instance, arr[0], we reference the property of the object with the key 0.
By rewriting the arr array in the object notation, we have something like this:
const arr = {
  0: 1,
  1: 2,
  2: "three",
  // ...
};

console.log(arr[0]); // Expected Output: 1
In the above code, we don’t have a key -1. So, arr[-1] returns a value of undefined. If the object property has a key -1, as seen in the code below, arr[-1] returns its corresponding value:
const arr = {
  "-1": "valid"
};

console.log(arr[-1]); // Expected Output: valid
This means we can’t use the arr[-1] to grab the last element because it’s a valid syntax already. To use the negative index syntax to return an element from the end of a list, we will use the .at() method.
.at() syntaxWhen using the .at() syntax, it receives an index of an item to return. When passing a negative index, it counts from the end of the list or string and returns the item or character found. Else, it returns undefined:
at(index)
.at() method in practiceThe .at() method receives an index of the item to return. In this section, we will cover its use cases.
Let’s revisit the arr array and see how the .at() method allows us to seamlessly return an index element:
const arr = [1, 2, "three", 4, 5, true, false];

console.log(arr.at(0)); // Expected Output: 1
console.log(arr.at(2)); // Expected Output: "three"
console.log(arr.at(-1)); // Expected Output: false
console.log(arr.at(-3)); // Expected Output: 5
console.log(arr.at(7)); // Expected Output: undefined
When a positive index passes to the .at() method, it returns the element at that index. For a negative index, it counts back from the last element in the list and returns the element.
In the above code, at(-1) counts one from the end of the array and returns false, which is the element found. In the same way, at(-3) counts three from the end and returns 5. However, if the .at() index cannot be found, it returns a value of undefined.
Like arrays, we can do the same for strings:
const str = "The last alphabet is z";

console.log(str.at(0)); // Expected Output: T
console.log(str.at(-1)); // Expected Output: z
As we can see, this method is pleasant to use. With just .at(-1), we get the last character of the str string. If we did the same task with the length property, we would have a longer syntax, like so:
console.log(str[str.length - 1]); // Expected Output: z
The .at() method, unlike the length property, does not compel us to store the returned value of a function in a variable before we can use it.
The following code outputs the last element pushed to an array:
function appendNumber(arr, N) {
  arr.push(N);
  return arr;
}

console.log(appendNumber([1, 2, "three", 4, 5, true, false], 6).at(-1));
// Expected Output: 6
In the code, the .at() method applies directly to the returned value without first storing the value in a variable.
.at() method accepts numbers with a decimalWhen a number with a decimal passes to the .at() method, it considers the value before the decimal point and returns the item at that index.
Let’s take a look at the following code:
const arr = [1, 2, "three", 4, 5, true, false];
console.log(arr.at(0.6)); // Expected Output: 1
console.log(arr.at(-3.6)); // Expected Output: 5
In the code above, the first console outputs the item at the 0 index while the second console counts three from the end of the array and outputs the found item.
This is beneficial when we want to randomly select an index element. This can be demonstrated with a rock-paper-scissors game project. We can use the .at() method syntax to determine a random selection for the computer.
The following code illustrates how we can apply the .at() method to randomly select the computer’s choice:
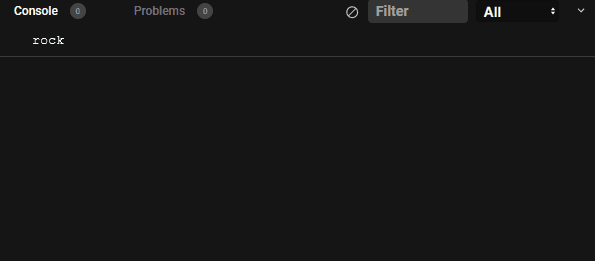
const computerOptions = ["rock", "paper", "scissors"];
const randomIndex = Math.random() * computerOptions.length;

console.log(computerOptions.at(randomIndex));
Try it yourself on CodeSandbox.
With Math.random(), we get a floating-point number between 0 (inclusive) and the array length. Then, when the .at() method receives this floating-point number as an index, it considers the value before the decimal point and returns the element at that index.
Using the square bracket notation for the same task is not possible unless we first floor the random number (that is, round the number down to the nearest integer), as seen in the code below:
const randomIndex = Math.floor(Math.random() * computerOptions.length);

console.log(computerOptions[randomIndex]);
This is because the bracket notation returns an undefined value for numbers with decimals:
const arr = [1, 2, "three", 4, 5, true, false];
console.log(arr[0.6]); // Expected Output: undefined
The .at() method saves us the extra steps of using Math.floor to floor a random number.
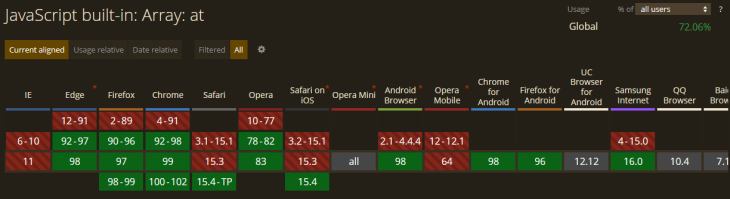
.at() methodThe .at() method is widely supported by modern browsers. See browser support here.
The .at() method, as we have seen in this tutorial, is pleasant when grabbing items based on their index. It is also concise to use compared to the preexisting methods.
If you have any questions or contributions, please share them in the comment section. And if you like this tutorial, endeavor to share it around the web.
Debugging code is always a tedious task. But the more you understand your errors, the easier it is to fix them.
LogRocket allows you to understand these errors in new and unique ways. Our frontend monitoring solution tracks user engagement with your JavaScript frontends to give you the ability to see exactly what the user did that led to an error.

LogRocket records console logs, page load times, stack traces, slow network requests/responses with headers + bodies, browser metadata, and custom logs. Understanding the impact of your JavaScript code will never be easier!

AI tools generate working React code fast, but miss race conditions, empty states, debouncing, and accessibility. Here’s how to catch bugs before production.

Learn how to use Gemini CLI subagents to delegate frontend, backend, testing, and docs tasks to specialized agents with guardrails and clear ownership.

Learn how next-browser gives AI agents runtime context for debugging Next.js apps, including React props, hydration, PPR, forms, and performance.

Build dynamic LLM routing in Next.js with OpenRouter, TanStack AI, task classification, model fallbacks, and cost-aware routing.
Hey there, want to help make our blog better?
Join LogRocket’s Content Advisory Board. You’ll help inform the type of content we create and get access to exclusive meetups, social accreditation, and swag.
Sign up now

