useState vs. useRef: Similarities, differences, and use casesThis article explains the React Hooks useState and useRef. You’ll learn their basic usage and get to know the different use cases for both Hooks.

You can find the examples as part of a CodeSandbox. To see the different examples in action, just adapt the following line in App.js:
export default AppDemo6; // change to AppDemo<Nr>
useState HookThe useState Hook enables the development of component state for functional components. Before React 16.8, state local to a component was only possible with class-based components.
Take a look at the following code.
import { useState } from "react";
function AppDemo1() {
  const stateWithUpdater = useState(true);
  const darkMode = stateWithUpdater[0];
  const darkModeUpdater = stateWithUpdater[1];
  return (
    <div>
      <p>{darkMode ? "dark mode on" : "dark mode off"}</p>
      <button onClick={() => darkModeUpdater(!darkMode)}>
        toggle dark mode
      </button>
    </div>
  );
}
The useState Hook returns an array with two items. In the example, we implement a Boolean component state, and we initialize our Hook with true.
This single argument of useState is considered only during the initial render cycle. If you need an initial value that is complex to calculate, however, then you can pass a callback function for performance optimization purposes.
The first array item represents the actual state, and the second item constitutes the state updater function. The onClick handler demonstrates how to use the updater function (darkModeUpdate) to change the state variable (darkMode). It is important to update your state exactly like this. The following code is illegal:
darkMode = true;
If you have some experience with the useState Hook, you may wonder about the syntax of my example. The default usage is to utilize the returned array items with the help of array destructuring.
const [darkMode, setDarkMode] = useState(true);
As a reminder, it’s crucial to follow the rules of Hooks when using any Hook, not just useState or useRef:
Now that we’ve covered the basics, let’s look at all aspects of the Hook with the following example code.
import { useState } from "react";
import "./styles.css";
function AppDemo2() {
  console.log("render App");
  const [darkMode, setDarkMode] = useState(false);
  return (
    <div className={`App ${darkMode && "dark-mode"}`}>
      <h1>The useState hook</h1>
      <h2>Click the button to toggle the state</h2>
      <button
        onClick={() => {
          setDarkMode(!darkMode);
        }}
      >
        toggle dark mode
      </button>
    </div>
  );
}
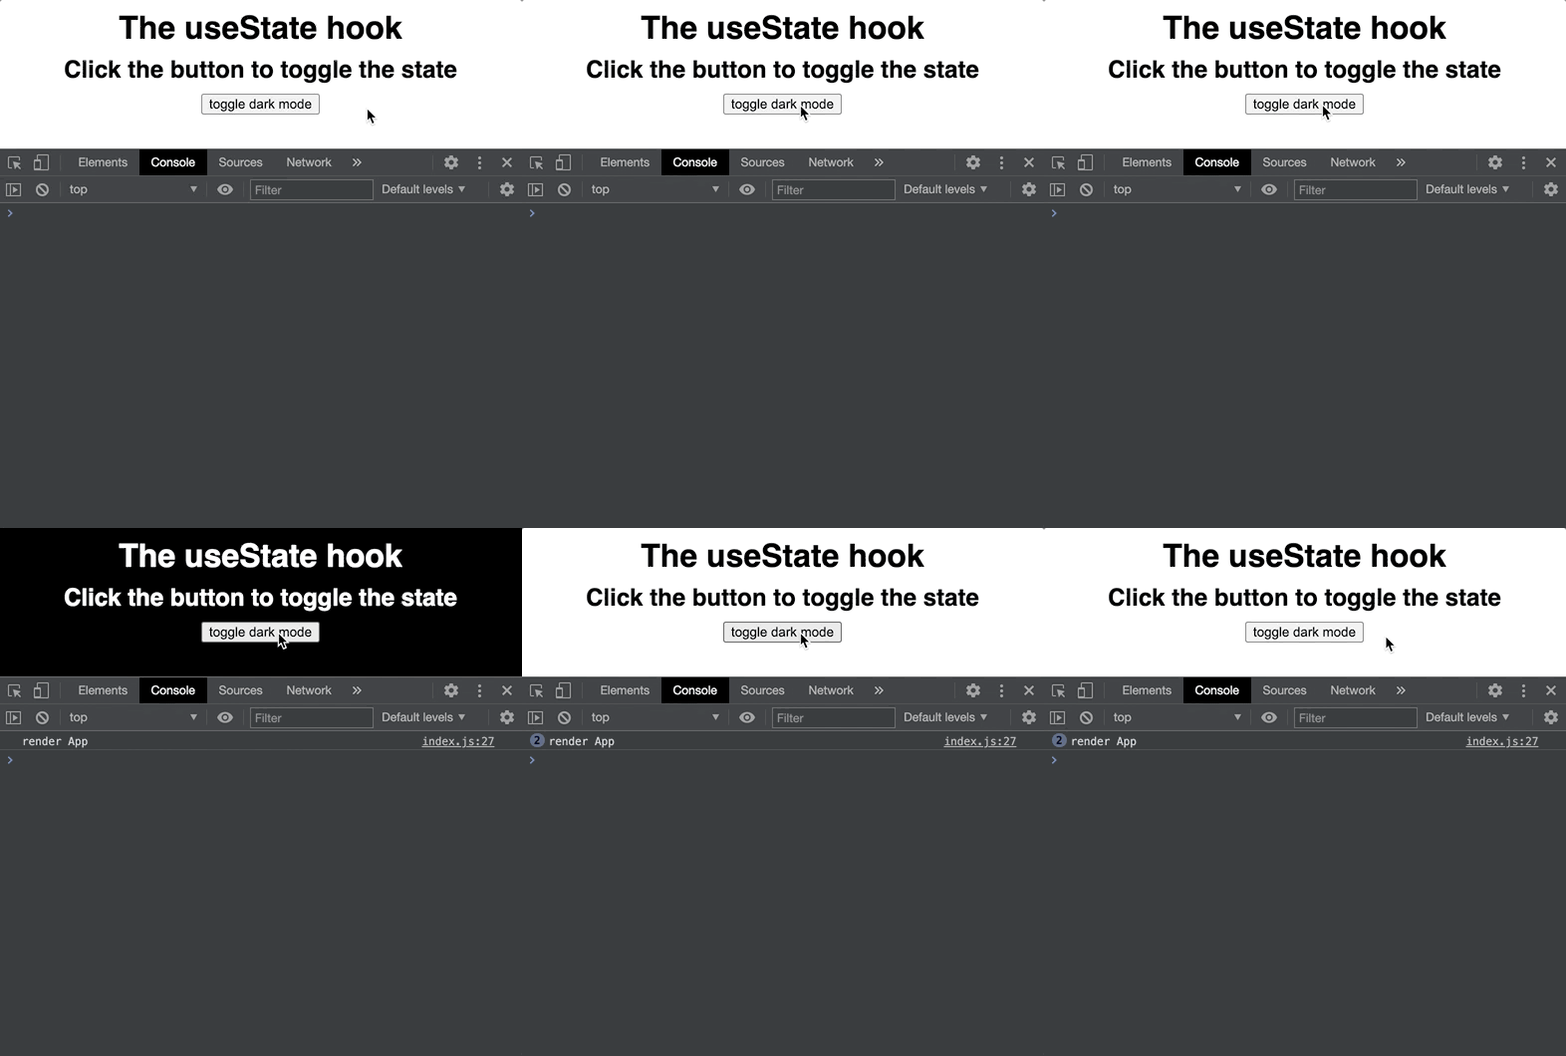
If darkMode is set to true, then an additional CSS class (dark-mode) is added to className, and the colors of the background and the text are inverted. As you can see from the console output in the recording, every time the state changes, the corresponding component gets re-rendered.
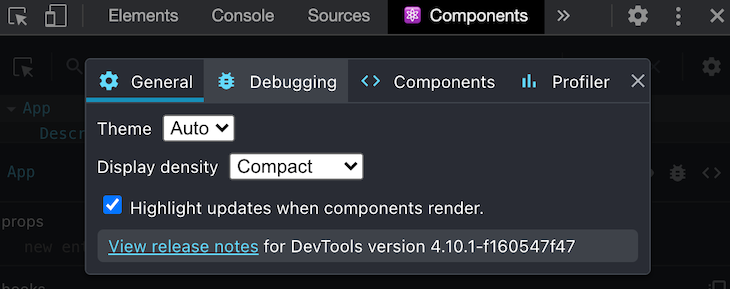
App component.React DevTools is especially helpful here to visually highlight updates when components render. In the last recording, you can see the flashing border around the component that notifies you of another component rendering cycle.
In the next example, the headings are extracted into a separate React component (Description).
import { useState } from "react";
import "./styles.css";
function AppDemo3() {
  console.log("render App");
  const [darkMode, setDarkMode] = useState(false);
  return (
    <div className={`App ${darkMode && "dark-mode"}`}>
      <Description />
      <button
        onClick={() => {
          setDarkMode(!darkMode);
        }}
      >
        toggle dark mode
      </button>
    </div>
  );
}
const Description = () => {
  console.log("render Description");
  return (
    <>
      <h1>The useState hook</h1>
      <h2>Click the button to toggle the state</h2>
    </>
  );
};
The App component gets rendered whenever the user clicks on the button because the corresponding click handler updates the darkMode state variable. Additionally, the child component Description gets rendered, too.
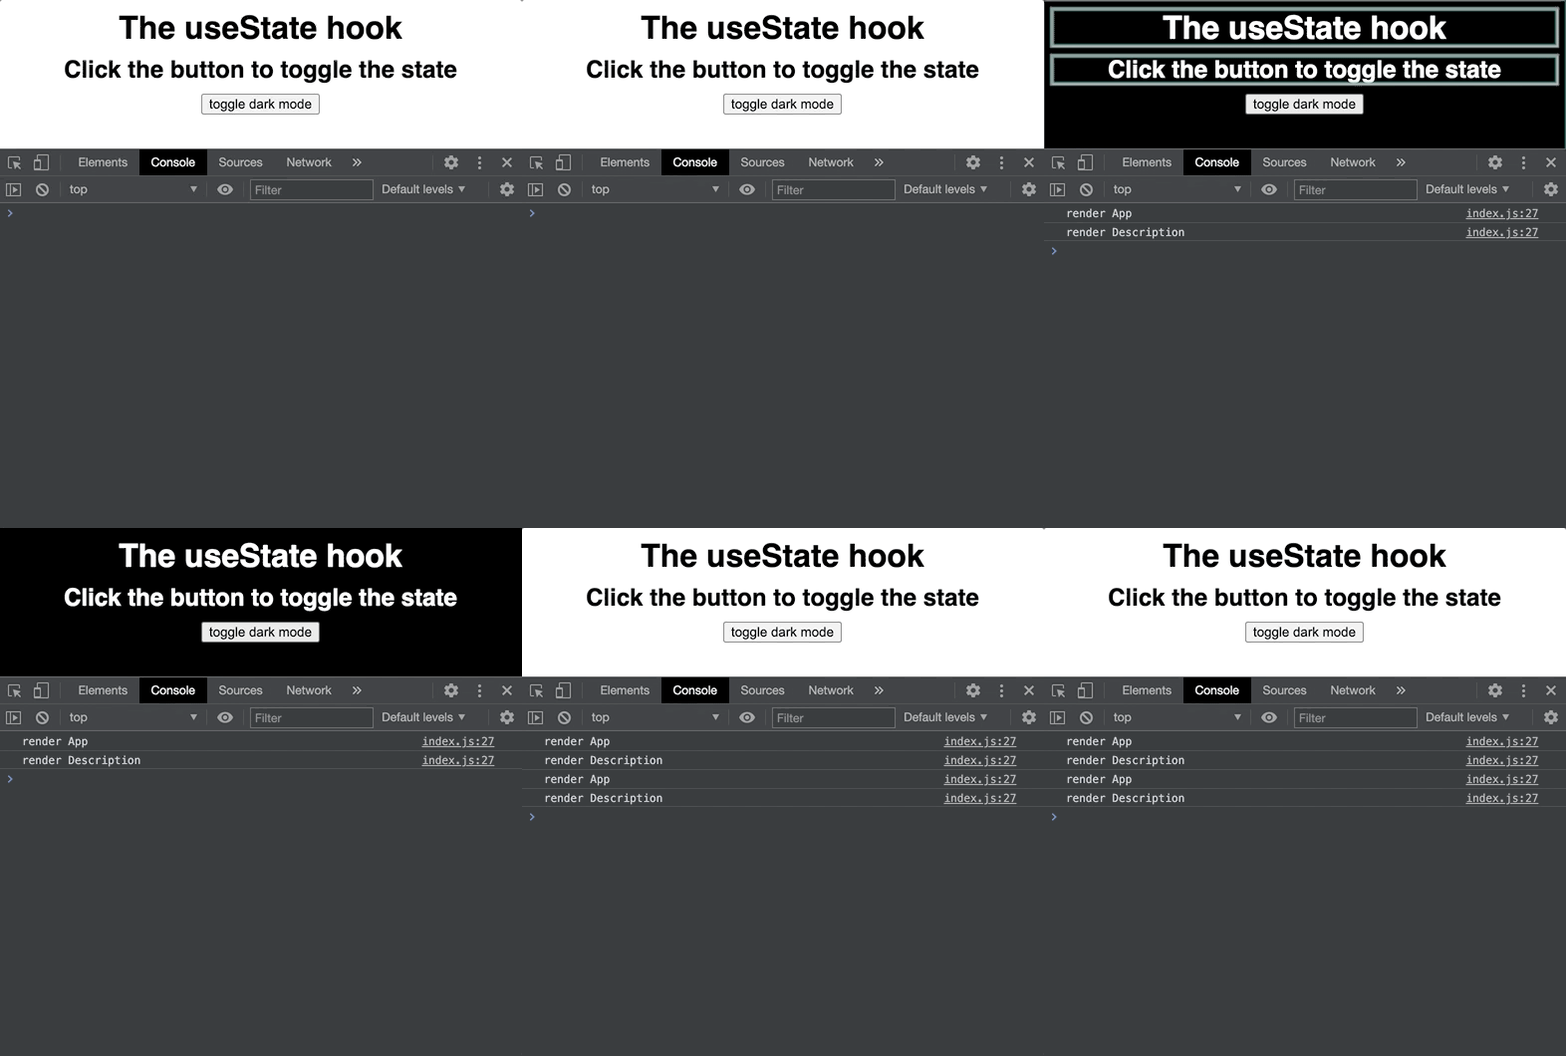
App and child components.The following diagram illustrates that a state change causes a render cycle.
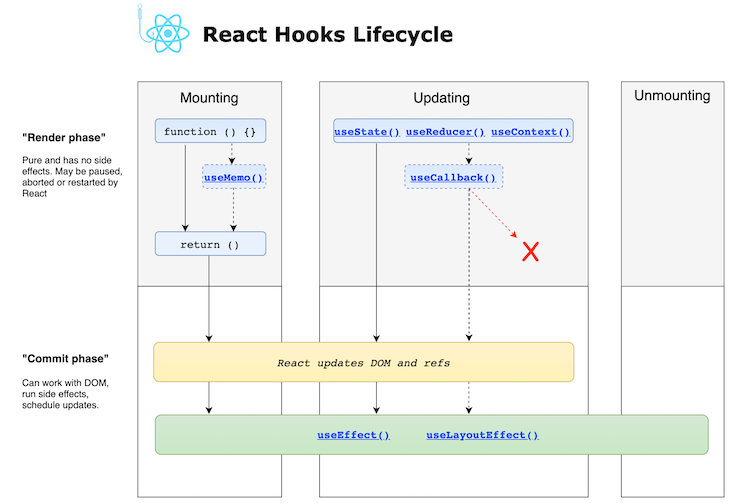
Why is it important to understand the React Hooks lifecycle? On the one hand, state is preserved over render as long as you do not update the state via the updater function, which in itself triggers a renewed render cycle.
useState Hook with useEffectAnother important concept to understand is the useEffect Hook, which you most likely have to use in your application to invoke asynchronous code (e.g., to fetch data). As you can see in the previous diagram, the useState and useEffect Hooks are tightly coupled because state changes might invoke effects.
Let’s take a look at the following example. We introduce two additional state variables: loading and lang. The effect is invoked whenever the url prop changes. It fetches a language string (either en or de) and updates the state with the setLang updater function.
Depending on the language, an English or German string inside of the heading gets rendered. In addition, during the process of fetching, a loading state is set, and depending on the value (true or false), a loading indicator is rendered instead of the heading.
import { useEffect, useState } from "react";
import "./styles.css";
  function App4({ url }) {
  console.log("render App");
  const [loading, setLoading] = useState(true);
  const [lang, setLang] = useState("de");
  const [darkMode, setDarkMode] = useState(false);
  useEffect(() => {
    console.log("useEffect");
    const fetchData = async function () {
      try {
        setLoading(true);
        const response = await axios.get(url);
        if (response.status === 200) {
          const { language } = response.data;
          setLang(language);
        }
      } catch (error) {
        throw error;
      } finally {
        setLoading(false);
      }
    };
    fetchData();
  }, [url]);
  return (
    <div className={`App ${darkMode && "dark-mode"}`}>
      {loading ? (
        <div>Loading...</div>
      ) : (
        <>
          <h1>
            {lang === "en"
              ? "The useState hook is awesome"
              : "Der useState Hook ist toll"}
          </h1>
          <button
            onClick={() => {
              setDarkMode(!darkMode);
            }}
          >
            toggle dark mode
          </button>
        </>
      )}
    </div>
  );
}
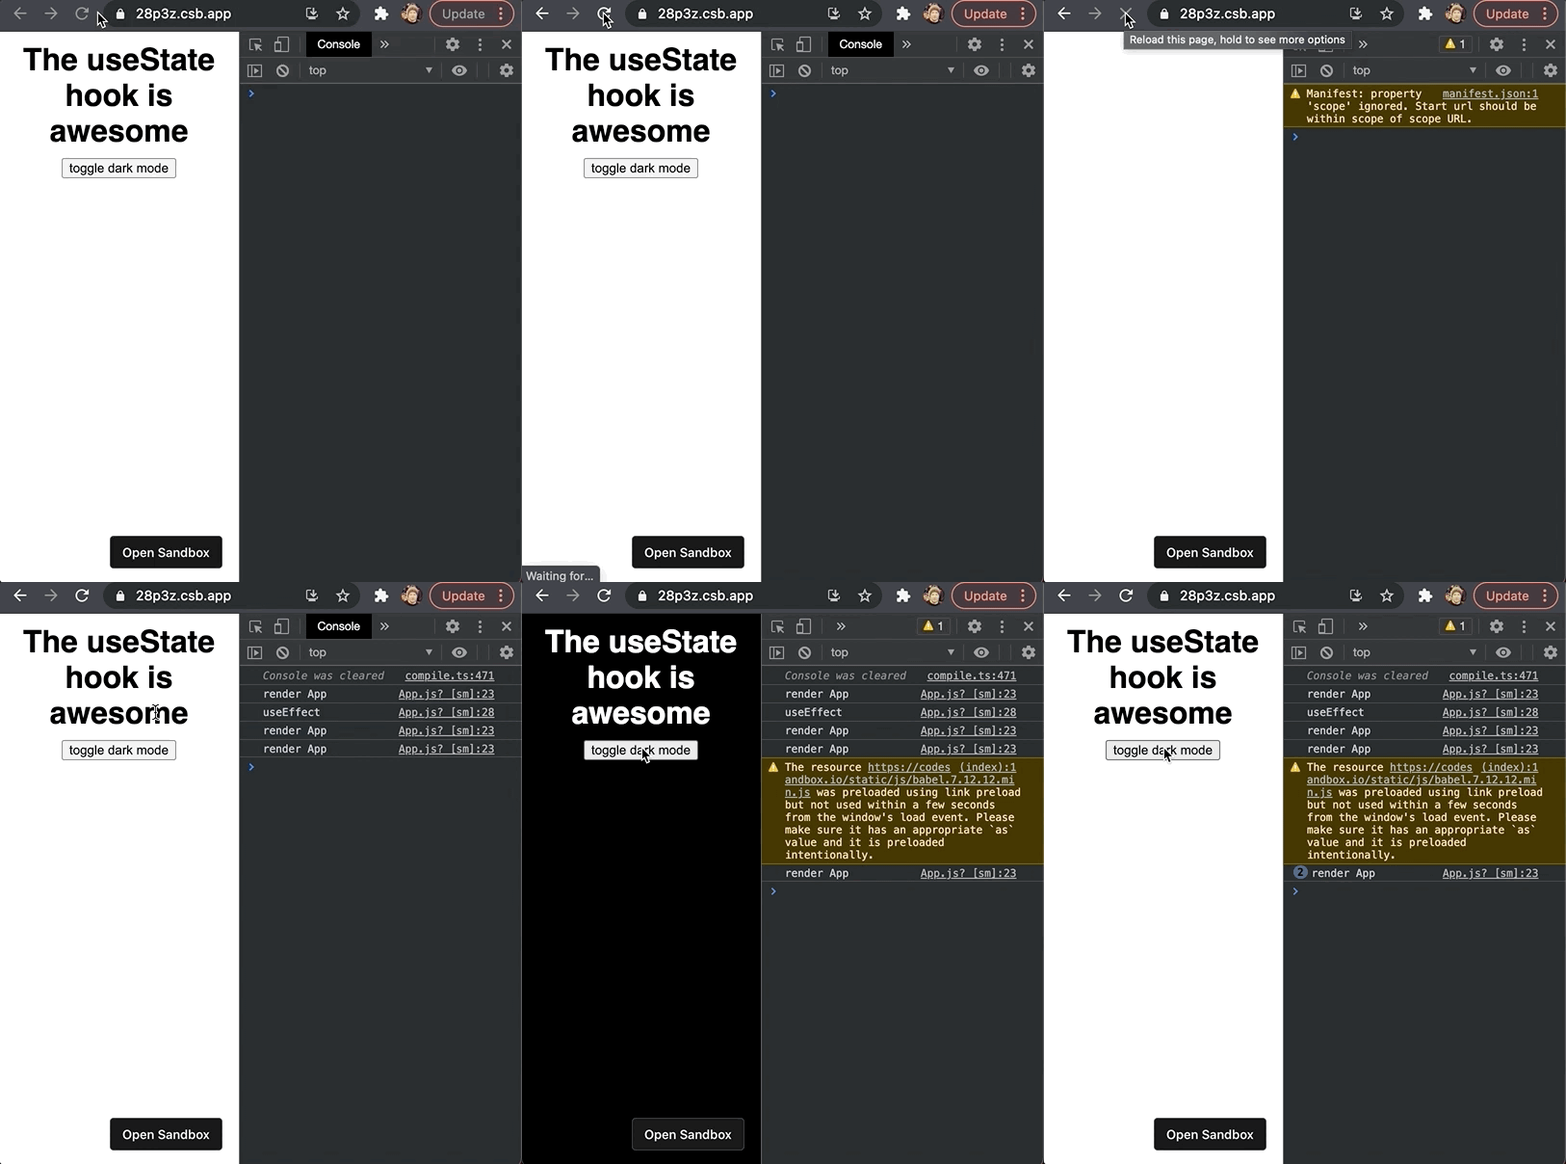
useEffect.Let’s pretend we want to toggle the dark mode whenever we’ve fetched the current language. We add a call to the setDarkMode updater after we’ve updated the language. In addition, we need to add the darkMode state as a dependency to the effect’s dependency array.
Why this must be done goes beyond the scope of this article, but you can read about the
useEffectHook in great detail in my previous post.
import { useEffect, useState } from "react";
import "./styles.css";
function AppDemo5({ url }) {
  console.log("render App");
  const [loading, setLoading] = useState(true);
  const [lang, setLang] = useState("de");
  const [darkMode, setDarkMode] = useState(false);
  useEffect(() => {
    console.log("useEffect");
    const fetchData = async function () {
      try {
        setLoading(true);
        const response = await axios.get(url);
        if (response.status === 200) {
          const { language } = response.data;
          setLang(language);
          setDarkMode(!darkMode);
        }
      } catch (error) {
        throw error;
      } finally {
        setLoading(false);
      }
    };
    fetchData();
  }, [url, darkMode]);
  return (
    <div className={`App ${darkMode && "dark-mode"}`}>
      {loading ? (
        <div>Loading...</div>
      ) : (
        <>
          <h1>
            {lang === "en"
              ? "The useState hook is awesome"
              : "Der useState Hook ist toll"}
          </h1>
          <button
            onClick={() => {
              setDarkMode(!darkMode);
            }}
          >
            toggle dark mode
          </button>
        </>
      )}
    </div>
  );
}
Unfortunately, we have caused an infinite loop.
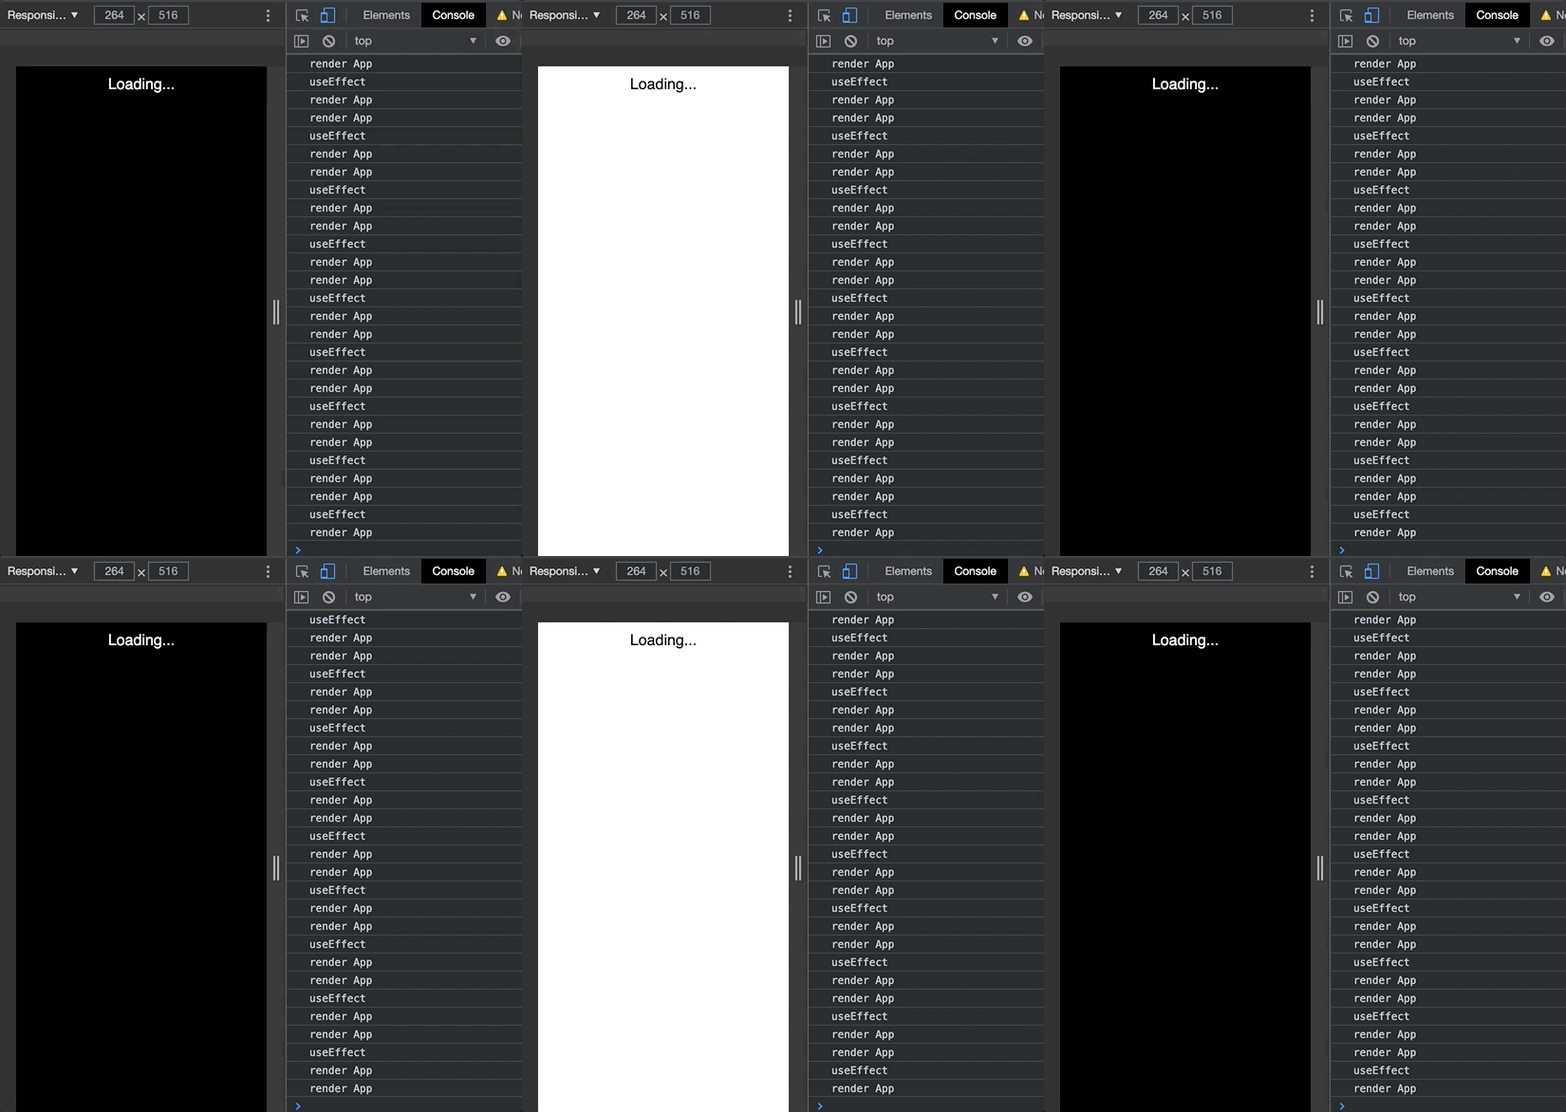
useEffect causes an infinite loop.Why is that? Because we have added darkMode to the dependency array of the effect, and we updated this exact state inside of the effect, the effect gets invoked again, updates the state again, and this goes on and on.
But there is a way out! We can avoid the darkMode as the effect’s dependency by calculating the new state from the previous state. We call the setDarkMode updater differently by passing a function that has the previous state as an argument.
The revised useEffect implementation looks like this:
  useEffect(() => {
    console.log("useEffect");
    const fetchData = async function () {
      try {
        setLoading(true);
        const response = await axios.get(url);
        if (response.status === 200) {
          const { language } = response.data;
          setLang(language);
          setDarkMode((previous) => !previous); // no access of darkMode state
        }
      } catch (error) {
        throw error;
      } finally {
        setLoading(false);
      }
    };
    fetchData();
  }, [url]); // no darkMode dependency
If you’ve been using React for a long time or you’re currently working on legacy code, you know class-based components. With class-based components, you have one single object representing the component state. To update one slice of the overall state, you can leverage the generic [setState](https://reactjs.org/docs/state-and-lifecycle.html) method.
Imagine we only want to update the darkMode state variable. Then you can just put the updated property into the object; the rest of the state remains unaffected.
this.setState({darkMode: false});
With functional components, however, the preferred way is to use atomic state variables that can be updated individually. Otherwise, you can quickly find yourself in the valley of tears.
Compared to AppDemo6, the following component (AppDemo7) has only been refactored with regard to state management. Instead of three atomic state variables with primitive data types, we use one state object (state).
import { useEffect, useState } from "react";
import "./styles.css";
function AppDemo7({ url }) {
  const initialState = {
    loading: true,
    lang: "de",
    darkMode: true
  };
  const [state, setState] = useState(initialState);
  console.log("render App", state);
  useEffect(() => {
    console.log("useEffect");
    const fetchData = async function () {
      try {
        setState((prev) => ({
          loading: true,
          lang: prev.lang,
          darkMode: prev.darkMode
        }));
        const response = await axios.get(url);
        if (response.status === 200) {
          const { language } = response.data;
          setState((prev) => ({
            lang: language,
            darkMode: !prev.darkMode,
            loading: prev.loading
          }));
        }
      } catch (error) {
        throw error;
      } finally {
        setState((prev) => ({
          loading: false,
          lang: prev.lang,
          darkMode: prev.darkMode
        }));
      }
    };
    fetchData();
  }, [url]);
  return (
    <div className={`App ${state.darkMode && "dark-mode"}`}>
      {state.loading ? (
        <div>Loading...</div>
      ) : (
        <>
          <h1>
            {state.lang === "en"
              ? "The useState hook is awesome"
              : "Der useState Hook ist toll"}
          </h1>
          <button
            onClick={() => {
              setState((prev) => ({
                darkMode: !prev.darkMode,
                // lang: prev.lang,
                loading: prev.loading
              }));
            }}
          >
            toggle dark mode
          </button>
        </>
      )}
    </div>
  );
}
As you can see, the the code is messy and hard to maintain. It also includes a bug illustrated with a commented-out property in the onClick handler. When the user clicks the button, the overall state is not calculated correctly.
In this case, the lang property is not present. This leads to a bug that causes the text to be rendered in German since state.lang is undefined. I hope that I have definitively shown that this is a bad idea. By the way, the React team doesn’t recommend that either.
useRef HookThe useRef Hook is similar to useState, but different 😀. Before I clear that up, I’ll explain its basic usage.
import { useRef } from 'react';
const AppDemo8 = () => {
  const ref1 = useRef();
  const ref2 = useRef(2021);
  console.log("render");
  console.log(ref1, ref2);
  return (
    <div>
      <h2>{ref1.current}</h2>
      <h2>{ref2.current}</h2>
    </div>
  );
};
The result is unspectacular but shows the crux.

current property.We initialized two references (aka refs) by calling. The Hook call returns an object that has a property current, which stores the actual value. If you pass an argument initialValue to useRef(initialValue), then this value is stored in current.
That’s the reason why the first console.log output stores undefined: because we invoked the Hook without any argument. Don’t worry, we can assign values later.
To access a ref’s value, you need to access its current property, as we did in the JSX part. refs are directly available in the initial render right after they have been defined.
But why do we need useRef at all? Why not use ordinary let variables instead? Hold your horses — we’ll come back to that.
useRefLet’s take a look at the following example.
import { useRef } from "react";
import "./styles.css";
const AppDemo9 = () => {
  const countRef = useRef(0);
  console.log("render");
  return (
    <div className="App">
      <h2>count: {countRef.current}</h2>
      <button
        onClick={() => {
          countRef.current = countRef.current + 1;
          console.log(countRef.current);
        }}
      >
        increase count
      </button>
    </div>
  );
};
Our goal is to define a ref called countRef, initialize the value with 0, and increase this counter variable on every button click. The rendered count value should update. Unfortunately, it does not work — even the console output proves that the current property holds the correct updates.
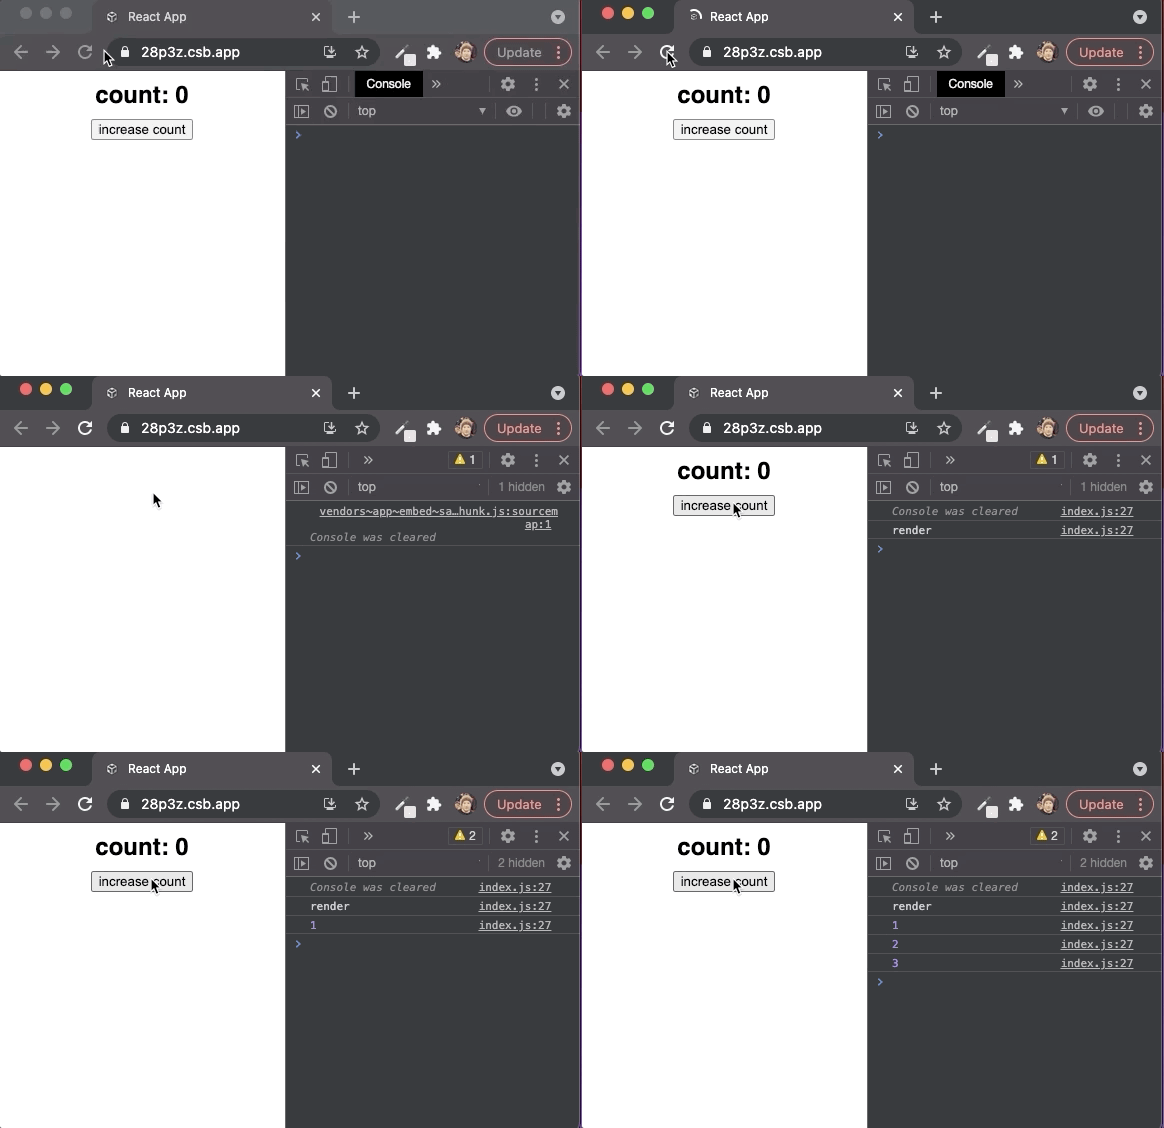
As you see from our other console output render, our component does not re-render. We could utilize useState instead to have this behavior.
What? So useRef is pretty useless? Not so fast — it’s handy in combination with other Hooks triggering re-renders, such as useState, useReducer, and useContext.
You have to think of useRef as another tool in your toolbox, and you have to understand when to use it. Remember the component lifecycle diagram from above? The values of refs persist (specifically the current property) throughout render cycles. It’s not a bug; it’s a feature.
Consider situations where you want to update a component’s data (i.e., its state variables) to trigger a render in order to update the UI. You could also have situations where you want the same behavior with one exception: you do not want to trigger a render cycle because this could lead to bugs, awkward user experience (e.g., flickers), or performance problems.
You can think of refs as instance variables of class-based components. A ref is a generic container to store any kind of data, such as primitive data or objects.
Fine, we’ll show a useful example.
import { useState } from "react";
import "./styles.css";
const AppDemo10 = () => {
  const [value, setValue] = useState("");
  console.log("render");
  const handleInputChange = (e) => {
    setValue(e.target.value);
  };
  return (
    <div className="App">
      <input value={value} onChange={handleInputChange} />
    </div>
  );
};
As you can see from the recording below, this component just renders an input field and stores its value in the value state variable. The console output reveals that the AppDemo10 component gets re-rendered on every keystroke.
This might be the behavior you want, e.g., to perform an operation such as a search on every character. This is called a controlled component. However, it could be just the opposite, and the renderings become problematic. Then you need an uncontrolled component.
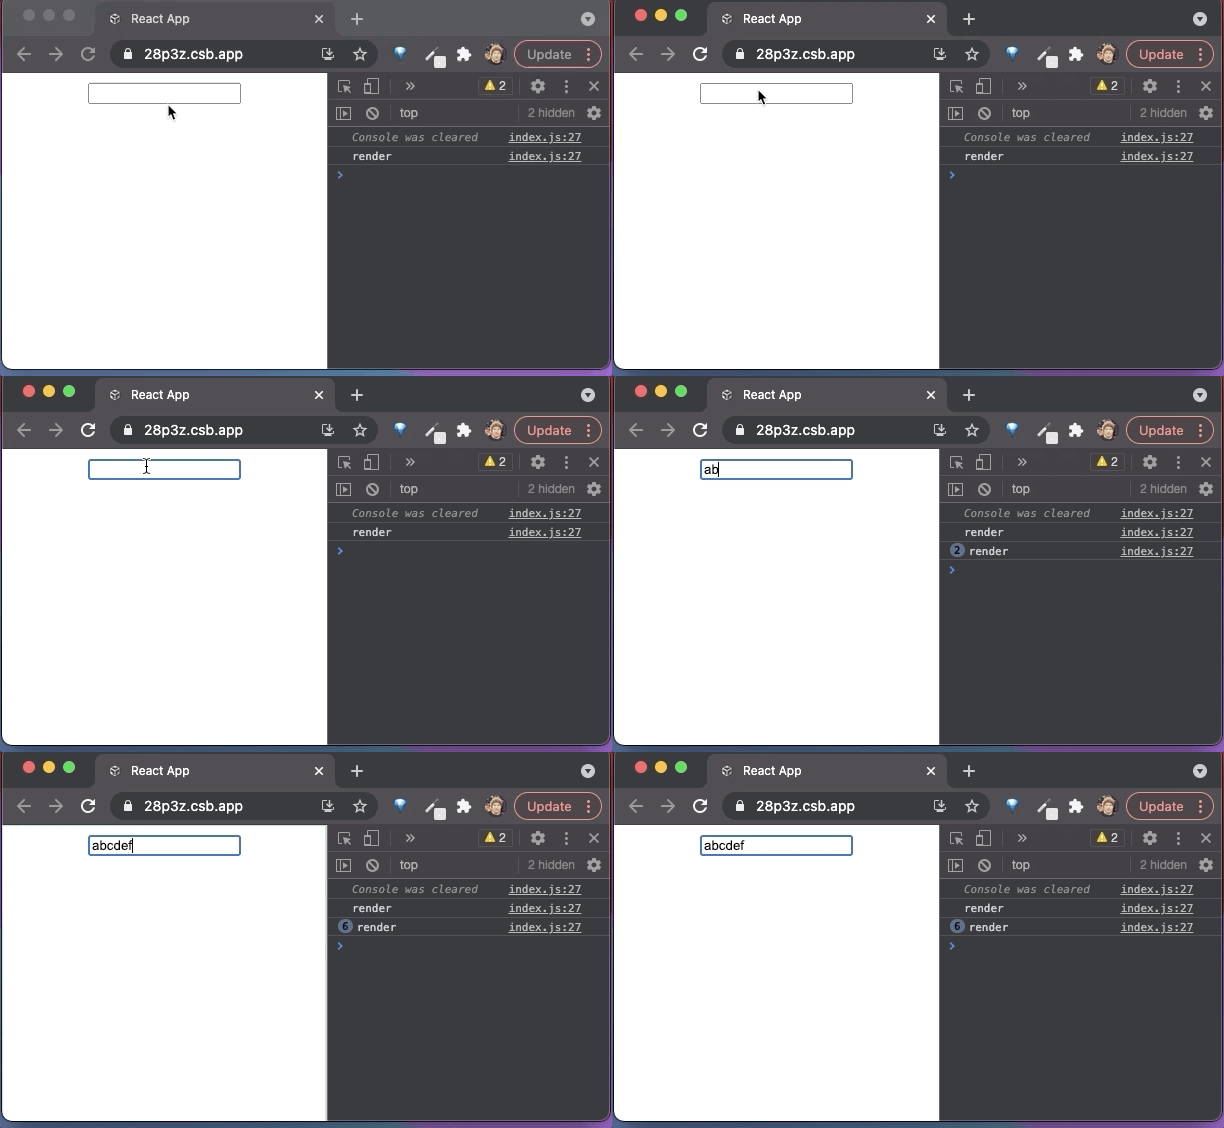
Let’s rewrite the example to use an uncontrolled component with useRef. As a consequence, we need a button to update the component’s state and store the completely filled input field.
import { useState, useRef } from "react";
import "./styles.css";
const AppDemo11 = () => {
  const [value, setValue] = useState("");
  const valueRef = useRef();
  console.log("render");
  const handleClick = () => {
    console.log(valueRef);
    setValue(valueRef.current.value);
  };
  return (
    <div className="App">
      <h4>Value: {value}</h4>
      <input ref={valueRef} />
      <button onClick={handleClick}>click</button>
    </div>
  );
};
With this solution, we do not cause render cycles on every keystroke. On the other side, we need to “submit” the input with a button to update the state variable value. As you can see from the console output, the second render first occurs on button click.
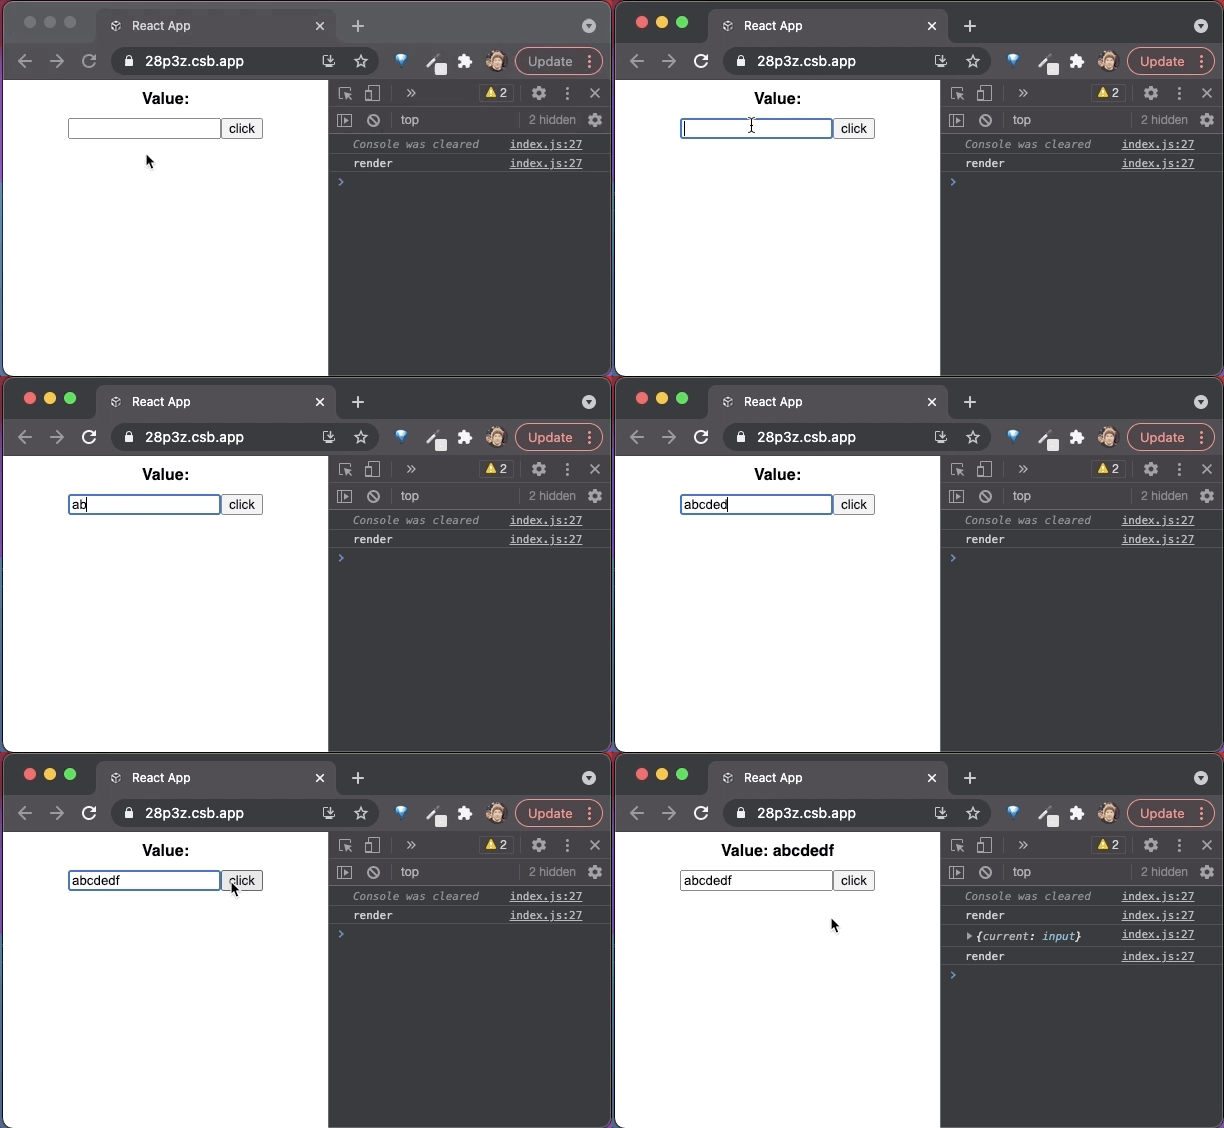
By the way, the example above shows the second use case for refs.
<input ref={valueRef} />
With the ref property, React provides direct access to React components or HTML elements. The console output reveals that we indeed have access to the input element. The reference is stored in the current property.
This constitutes the second use case of useRef besides utilizing it as a generic container persisting data throughout the component lifecycle. If you need direct access to a DOM element, you can leverage the ref prop. The next example shows how to focus the input field after the component was initialized.
import { useEffect, useRef } from "react";
import "./styles.css";
const AppDemo12 = () => {
  const inputRef = useRef();
  console.log("render");
  useEffect(() => {
    console.log("useEffect");
    inputRef.current.focus();
  }, []);
  return (
    <div className="App">
      <input ref={inputRef} placeholder="input" />
    </div>
  );
};
Inside the useEffect callback, we call the native focus method.
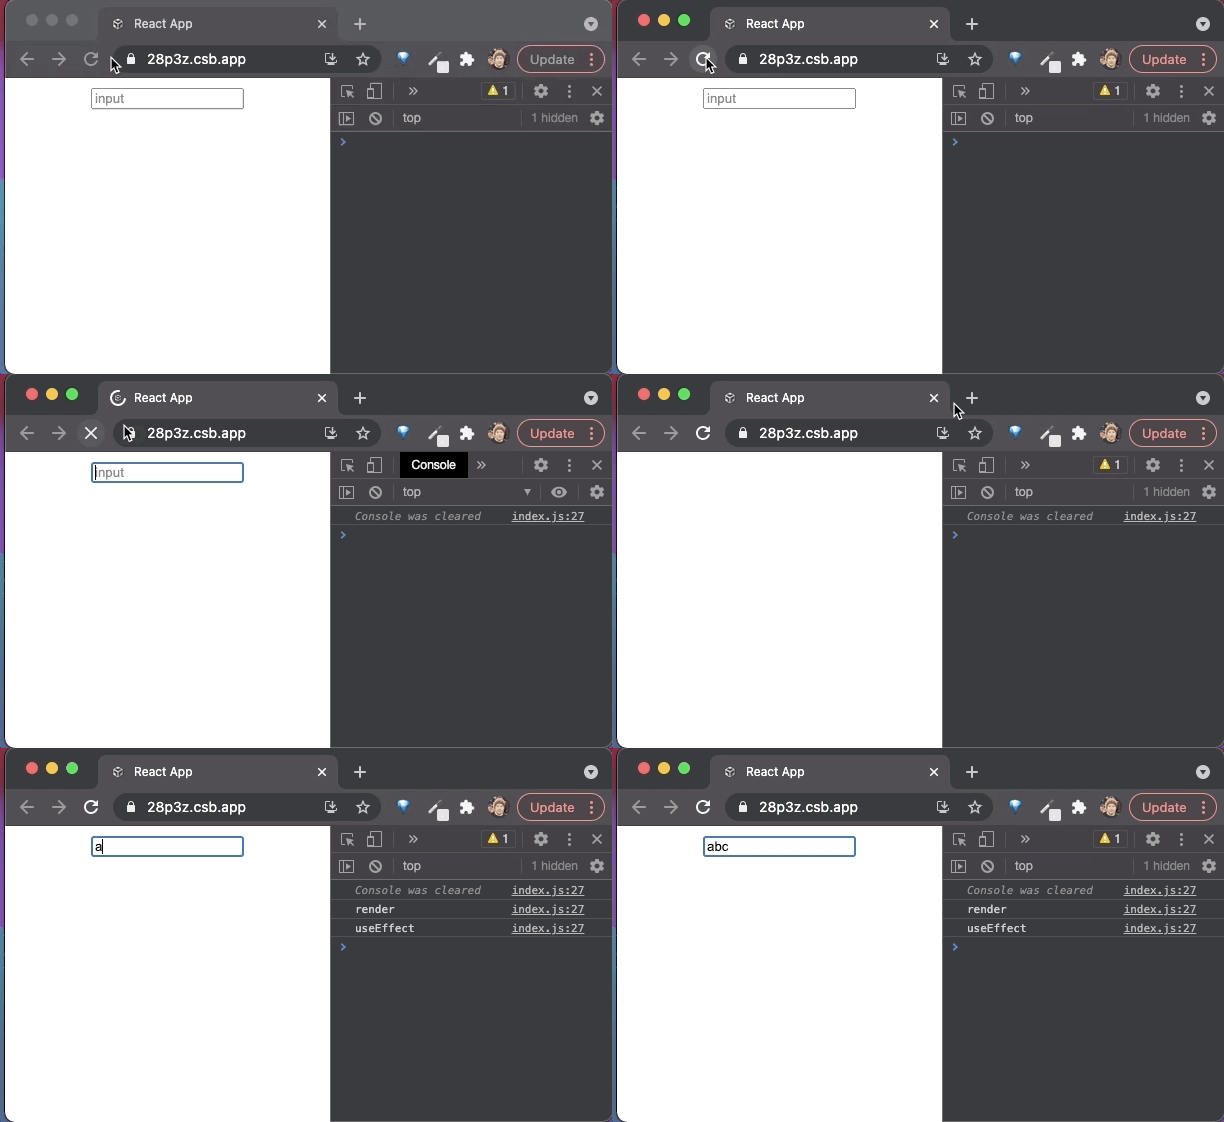
This technique is also widely used in React projects in combination with third-party (non-React) components when you need direct access to DOM elements.
Another common use case is when you need the state value of the previous render cycle. The following example shows how to do this. Of course, you could also extract the logic into a custom usePrevious Hook.
import { useEffect, useState, useRef } from "react";
import "./styles.css";
const AppDemo13 = () => {
  console.log("render");
  const [count, setCount] = useState(0);
  // Get the previous value (was passed into hook on last render)
  const ref = useRef();
  // Store current value in ref
  useEffect(() => {
    console.log("useEffect");
    ref.current = count;
  }, [count]); // Only re-run if value changes
  return (
    <div className="App">
      <h1>
        Now: {count}, before: {ref.current}
      </h1>
      <button onClick={() => setCount(count + 1)}>Increment</button>
    </div>
  );
};
After the initial render, an effect is executed that assigns the state variable count to the ref.current. Because no additional render occurs, the rendered value is undefined. A click on the button triggers a state update because of a call to setCount.
Next, the UI gets re-rendered, and the before label shows the correct value (0). After rendering, another effect is invoked. Now 1 gets assigned to our ref, and so on.
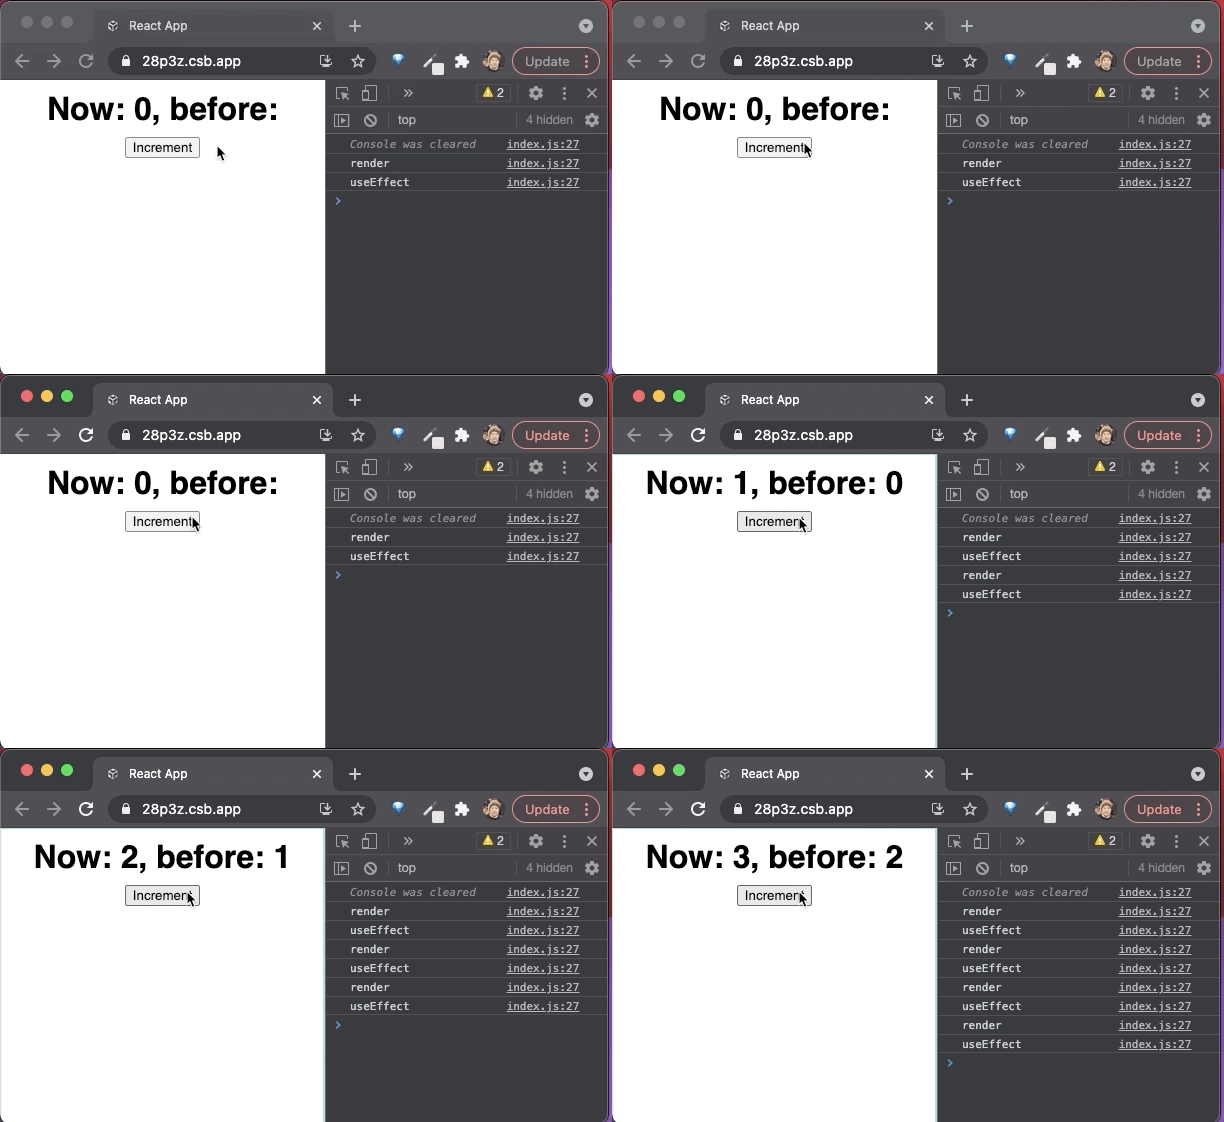
useRef.It’s important to note that all refs need to get updated either inside a useEffect callback or inside handlers. Mutating the ref during rendering, i.e., from places other than those just mentioned, might introduce bugs. The same applies to useState, too.
let can’t replace useRefNow I still owe you a resolution for why a let variable does not replace the concept of a ref. The next example replaces the use of useRef with a vanilla JavaScript variable assignment from inside the useEffect Hook.
import { useEffect, useState } from "react";
import "./styles.css";
const AppDemo14 = () => {
  console.log("render");
  const [count, setCount] = useState(0);
  let prevCount;
  useEffect(() => {
    console.log("useEffect", prevCount);
    prevCount = count;
  }, [count]);
  return (
    <div className="App">
      <h1>
        Now: {count}, before: {prevCount}
      </h1>
      <button onClick={() => setCount(count + 1)}>Increment</button>
    </div>
  );
};
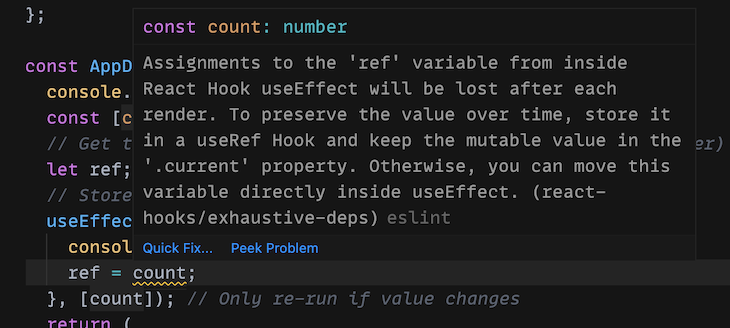
However, the following recording will reveal that this does not work. The console output reinforces the problem because the assignment inside of useEffect gets overridden on every new render cycle. undefined is implicitly assigned because of let prevCount;.
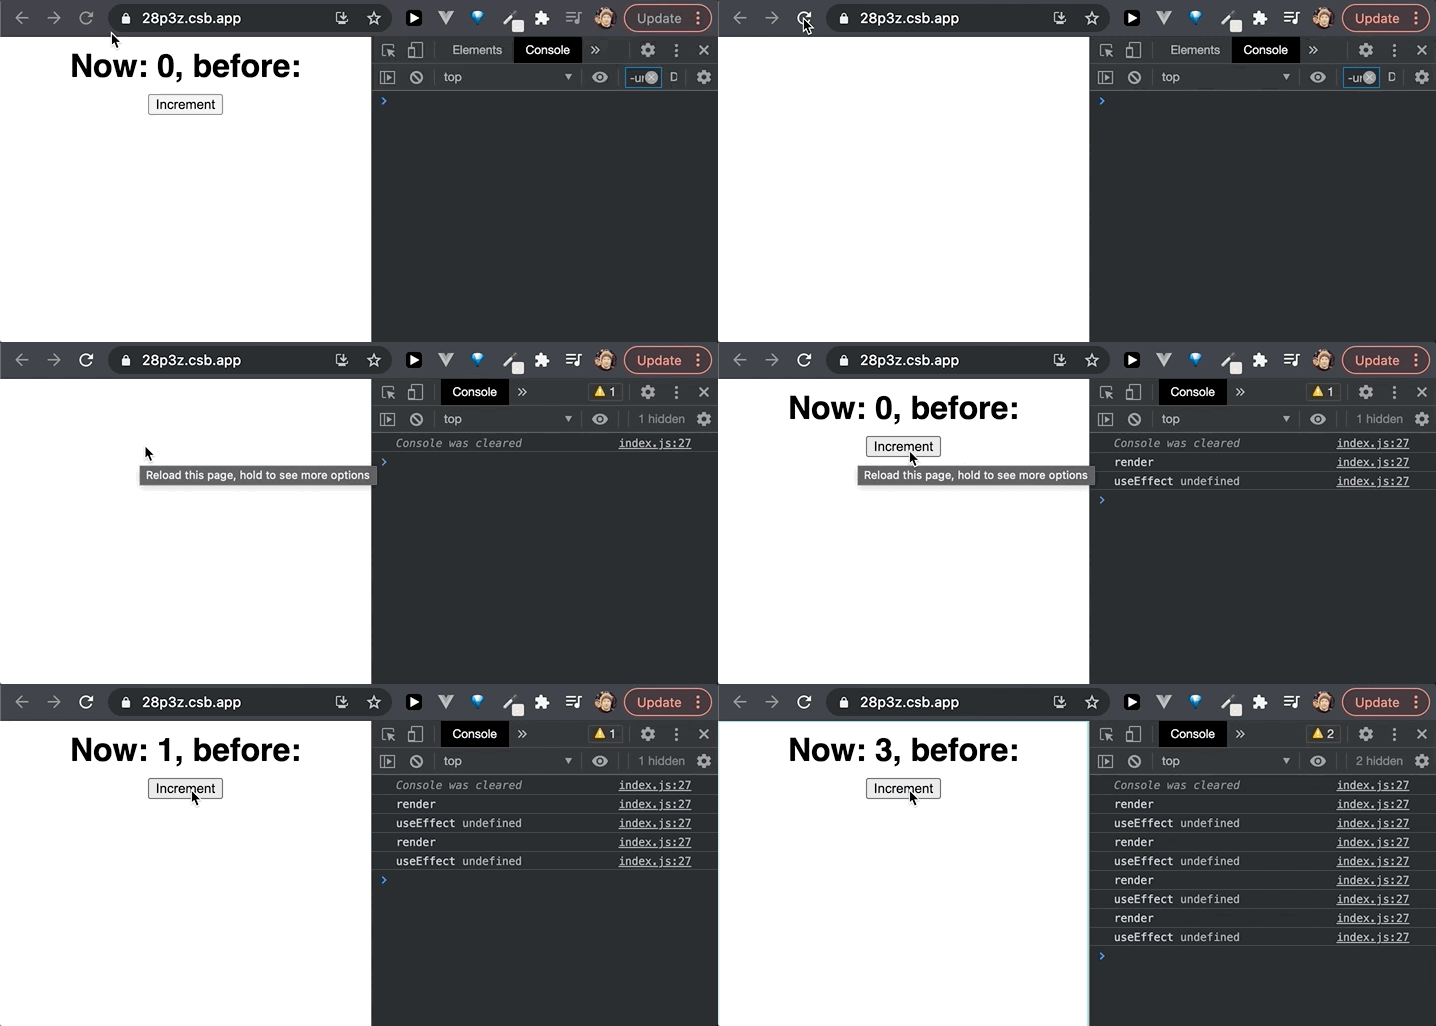
Even the mighty ESLint Rules of Hooks plugin tells you that we should utilize useRef instead.
useRef and useState at a glanceThe following differences have already been discussed in detail but are presented here again in a succinctly summarized form:
useState Hook with its updater function causes re-rendersuseRef returns an object with a current property holding the actual value. In contrast, useState returns an array with two elements: the first item constitutes the state, and the second item represents the state updater functionuseRef‘s current property is mutable, but useState‘s state variable not. In contrast to the current property of useRef, you should not directly assign values to the state variable of useState. Instead, always use the updater function (i.e., the second array item). As the React team recommends in the documentation for setState in class-based components (but still true for function components), treat state like an immutable variableuseState and useRef can be considered data Hooks, but only useRef can be used in yet another field of application: to gain direct access to React components or DOM elementsThis article addresses the useState and useRef Hooks. It should be clear at this point that there is no such thing as a good or a bad Hook. You need both Hooks for your React applications because they are designed for different applications.
If you want to update data and cause a UI update, useState is your Hook. If you need some kind of data container throughout the component’s lifecycle without causing render cycles on mutating your variable, then useRef is your solution.
Install LogRocket via npm or script tag. LogRocket.init() must be called client-side, not
server-side
$ npm i --save logrocket

// Code:

import LogRocket from 'logrocket';
LogRocket.init('app/id');
// Add to your HTML:

<script src="https://cdn.lr-ingest.com/LogRocket.min.js"></script>
<script>window.LogRocket && window.LogRocket.init('app/id');</script>
Would you be interested in joining LogRocket's developer community?
Join LogRocket’s Content Advisory Board. You’ll help inform the type of content we create and get access to exclusive meetups, social accreditation, and swag.
Sign up now
This guide walks you through creating a web UI for an AI agent that browses, clicks, and extracts info from websites powered by Stagehand and Gemini.

This guide explores how to use Anthropic’s Claude 4 models, including Opus 4 and Sonnet 4, to build AI-powered applications.

Which AI frontend dev tool reigns supreme in July 2025? Check out our power rankings and use our interactive comparison tool to find out.

Learn how OpenAPI can automate API client generation to save time, reduce bugs, and streamline how your frontend app talks to backend APIs.
One Reply to "<code>useState</code> vs. <code>useRef</code>: Similarities, differences, and use cases"
Don’t use:
`App ${darkMode && “dark-mode”}`
As it will result with an “App false” class, if dark mode is disabled.
Instead, use:
`App ${darkMode && “dark-mode” || “”}`
or
`App ${darkMode ? “dark-mode” : “”}`
to generate “App ” as the class when dark mode is disabled.