Editor’s note: This article was last updated by Carlos Mucuho on 9 February 2024 to update code blocks according to the most recent Axios version release. This update also expands on the use of Axios interceptors for modifying requests and responses, explores the axios-retry package for error handling, and delves into advanced techniques for managing Axios GET requests.

As a developer, you will be required to work with APIs, whether internal or third-party. Mastering API communication is necessary for bringing different applications and services together to build a well-defined application.
Communicating with APIs effectively is an essential factor in your application’s performance, scalability, and reliability. Over the years, Axios has become the most common and popular HTTP client, and it has a massive developer community behind it.
In this article, we will learn how to make GET requests in Axios. I will demonstrate how you can use Axios GET to make requests to public APIs like The Rick and Morty API and the Final Space API, and how you can make concurrent GET requests and handle errors.
If you want to jump right into the code, check out the GitHub repository here.
The Replay is a weekly newsletter for dev and engineering leaders.
Delivered once a week, it's your curated guide to the most important conversations around frontend dev, emerging AI tools, and the state of modern software.
Axios is a Promise-based HTTP client for the browser and Node. Let’s break down this definition to understand what Axios does.
First, HTTP stands for Hypertext Transfer Protocol. It is a client-server protocol for fetching resources such as HTML documents.
The client is the user-agent that acts on behalf of the user and initiates the requests for resources. Web browsers such as Google Chrome are a popular example of a client. A Promise-based client returns Promises.
Axios is isomorphic, which means it can run in the browser and Node.js with the same code. When used on the server side, it uses Node’s native http module, whereas on the client side, it uses XMLHttpRequest objects. On the client side, Axios also supports protection against XSRF.
axios.get() method?An HTTP GET request is used to request a specified resource from a server. These requests do not contain any payload with them, i.e., the request doesn’t have any content. axios.get() is the method to make HTTP GET requests using the Axios library.
In this section, we will create the sample app that uses Axios to fetch data using the GET request.
To begin, run the following command in the terminal:
mkdir axios-get-examples
cd axios-get-examples
npm init -y
npm install axios
The command npm init -y creates a package.json similar to the one below in your project’s folder:
{
  "name": "axios-get-examples",
  "version": "1.0.0",
  "description": "",
  "main": "index.js",
  "scripts": {
    "test": "echo \"Error: no test specified\" && exit 1"
  },
  "keywords": [],
  "author": "",
  "license": "ISC"
}
The last command, npm install axios, installs the axios package as a dependency in your project. There will be a new package-lock.json file and a node_modules folder in the project folder.
The package.json file will also update and will look similar to this:
{
  "name": "axios-get-examples",
  "version": "1.0.0",
  "description": "",
  "main": "index.js",
  "scripts": {
    "test": "echo \"Error: no test specified\" && exit 1"
  },
  "keywords": [],
  "author": "",
  "license": "ISC",
  "dependencies": {
    "axios": "^1.6.7"
  }
}
You can also install Axios using yarn or bower, like so:
// Yarn
yarn add axios
// Bower
bower install axios
Next, create a file named index.js where you will write the code to fetch resources using the GET requests. Run the following command in the project’s root to create the index.js file:
touch index.js
Run the following command in your project’s root directory to install nodemon as a dev dependency. Nodemon is an excellent local development tool that automatically restarts the Node application whenever it detects a file change in the directory:
npm install -D nodemon
Modify "scripts" in your package.json, like this:
"scripts": {
    "start": "node index.js",
    "dev": "nodemon index.js"
  },
Your package.json should look like this:
{
  "name": "axios-get-examples",
  "version": "1.0.0",
  "description": "",
  "main": "index.js",
  "scripts": {
    "start": "node index.js",
    "dev": "nodemon index.js"
  },
  "keywords": [],
  "author": "",
  "license": "ISC",
  "dependencies": {
    "axios": "^1.6.7"
  },
  "devDependencies": {
    "nodemon": "^3.0.3"
  }
}
Run the following command to start your Node application:
npm run dev
You’ll see the following message in your terminal once it has started:
> [email protected] dev
> nodemon index.js

[nodemon] 3.0.3
[nodemon] to restart at any time, enter `rs`
[nodemon] watching path(s): *.*
[nodemon] watching extensions: js,mjs,cjs,json
[nodemon] starting `node index.js`
[nodemon] clean exit - waiting for changes before restart
Update the index.js file to include the following code:
// index.js
console.log('Hello World!');
You will notice that nodemon detects the file change, restarts the application, and shows the following message in the terminal:
Hello World!
[nodemon] clean exit - waiting for changes before restart
Finally, you can remove the console.log() code from the index.js file.
GET requests using AxiosIn this section, we will see how to import and use Axios to make GET requests to the Final Space API to fetch data.
Update the index.js file to import the axios package using the require function. Node follows the CommonJS module system, and you can use modules present in separate files using the inbuilt require function:
const axios = require('axios').default;
Now, you can use the axios.<method> to initiate any request, such as a GET request. Add the following code to the index.file. The following code fetched two characters from the Final Space API Characters endpoint:
// Axios GET Default
axios
  .get("https://finalspaceapi.com/api/v0/character/?limit=2")
  .then(function (response) {
    console.log(response);
  });
You will see a lengthy response in the terminal similar to this (the following response is truncated):
 {
  "status": 200,
  "statusText": "OK",
  "headers": {
    "server": 'nginx/1.18.0 (Ubuntu)',
    "date": 'Mon, 12 Feb 2024 20:04:49 GMT',
    "content-type": 'application/json; charset=utf-8',
    "content-length": '1452',
  },
  "config": {
    "transitional": {
      "silentJSONParsing": true,
      "forcedJSONParsing": true,
      "clarifyTimeoutError": false
    },
    "headers": {
      "Accept": "application/json, text/plain, */*",
      "User-Agent": "axios/0.25.0"
    },
    "method": "get",
    "url": "https://finalspaceapi.com/api/v0/character/?limit=2",
    "data": undefined
  },
  "data": [
    {
      "id": 1,
      "name": "Gary Goodspeed",
      "status": "Alive",
      "species": "Human",
      "gender": "Male",
      "hair": "Blonde",
      "alias": [
        "The Gary (by Lord Commander and Invictus)",
        "Thunder Bandit(code name)"
      ],
      "origin": "Earth",
      "abilities": [
        "Piloting",
        "Marksmanship",
        "Hand-to-hand combat",
        "Weapons: Blasters"
      ],
      "img_url": "https://finalspaceapi.com/api/character/avatar/gary_goodspeed.png"
    },
    {
      "id": 2,
      "name": "Mooncake",
      "status": "Unknown",
      "species": "Mooncake's Species",
      "gender": "None (referred to as male)",
      "hair": "None",
      "alias": ["Specimen E - 351", "Little Buddy"],
      "origin": "Outer space",
      "abilities": ["Hovering", "Firing Laser Beams", "Planetary Destruction"],
      "img_url": "https://finalspaceapi.com/api/character/avatar/mooncake.jpg"
    }
  ]
}
The above implementation of axios.get() is the default and most popular way to make a GET request in the codebase.
Axios also provides shorthand methods for performing different requests, like so:
axios.request(config)
axios(config)
axios.get(url,config)
Here, you pass a request config object with the necessary configuration of the request as the argument to the axios.get() method. While there are several options that you can pass to this request config object, here are the most common and popular ones:
URL: The server URL that will be used for the requestbaseUrl: When specified, this baseUrl is prepended to url unless the url is absolutemethod: Is the request method to be used when making the requestheaders: An object with custom headers to be sent with the requestor, like headers: {'X-Requested-With': 'XMLHttpRequest'}params: An object whose key/value pairs are appended to the url as query stringsauth: An object with a username and password to authenticate an HTTP Basic auth requestThe above Axios request can be rewritten as the following:
// Using the Request Config
axios({
  method: "get",
  url: "https://finalspaceapi.com/api/v0/character/?",
  params: {
    limit: 2
  }
}).then(function (response) {
  console.log(response.data);
});
This object must include the url property to fetch the data. Requests default to the GET request when the method property is not specified.
When working with Axios, you may need to create custom instances with specific configurations. To create a custom Axios instance, use the axios.create method and pass a configuration object:
const customAxios = axios.create({
  baseURL: 'https://finalspaceapi.com/api/v0/',
  timeout: 5000,
});
In this example, a custom Axios instance was created called customAxios with a base URL, and a timeout of five seconds.
You can now use the customAxios instance to make requests:
customAxios.get('character/?limit=2')
  .then(response => {
    console.log(response.data);
  })
Requests made with customAxios will inherit its base URL, timeout, headers, and other configurations. This allows you to encapsulate common settings and reuse them across your application.
You can also pass a responseType option, which indicates the type of data that will be returned by the server to the request config object (set to json by default). For example, you can rewrite the above code like so:
// Using the Request Config
axios
  .get("https://finalspaceapi.com/api/v0/character/?limit=2", {
    responseType: "json",
  })
  .then(function (response) {
    console.log(response.data);
  });
The responseType option can be set to arraybuffer, document, blob, text, or stream. It is essential to set the responseType option when the returned response or data is not in JSON format.
For example, the following code fetches a nature image from Unsplash as a Node stream. You can then use the createWriteStream() of the inbuilt fs module and write the fetched stream in a file.
The following code creates a file named nature.jpg in your project folder:
// Axios with responseType - stream
// GET request for remote image in node.js
const fs = require('fs');
axios({
    method: 'get',
    url: 'https://images.unsplash.com/photo-1642291555390-6a149527b1fa',
    responseType: 'stream'
  })
    .then(function (response) {
        // console.log(response.data.pipe);
      response.data.pipe(fs.createWriteStream('nature.jpg'))
    });
You can also use the popular async/await instead of promises. For example, you can rewrite the above code by placing it inside an async function:
// Using Asyc/Await
async function getCharacters() {
  const response = await axios.get(
    "https://finalspaceapi.com/api/v0/character/?limit=2"
  );
  console.log(response.data);
}
getCharacters();
Finally, you can get the data from the response body using destructuring assignments:
async function getCharacters() {
  const { data } = await axios.get(
    "https://finalspaceapi.com/api/v0/character/?limit=2"
  );
  console.log(data);
}
getCharacters();
GET requests with query parametersIn this section, we will learn how to make Axios GET requests with query parameters.
First, add the following code to the index.js file:
// Axios GET Query Parameters
const url = require("url");
const queryParams = {
  limit: 1,
  sort: "desc",
};
const params = new url.URLSearchParams(queryParams);
console.log(params);
axios
  .get(`https://finalspaceapi.com/api/v0/character/?${params}`)
  .then(function (response) {
    console.log(response.data);
  });
In the code above, we use the URLSearchParams method from the url module to convert an object with query parameters as key/value pairs in the required URL query format.
Here is what the params will look like:
URLSearchParams { 'limit' => '1', 'sort' => 'desc' }
And here is what the returned data looks like:
[
  {
    id: 47,
    name: 'Zargon Tukalishi',
    status: 'Deceased',
    species: 'Unknown',
    gender: 'Male',
    hair: 'None',
    alias: [],
    origin: 'Yarno',
    abilities: [],
    img_url: 'https://finalspaceapi.com/api/character/avatar/zargon_tukalishi.jpg'
  }
]
GET requests with an API keyIt is often necessary to authenticate requests by passing an API key along with the request. In this section, we will learn how to use an API key with Axios to make requests. We will use the NASA API as an example.
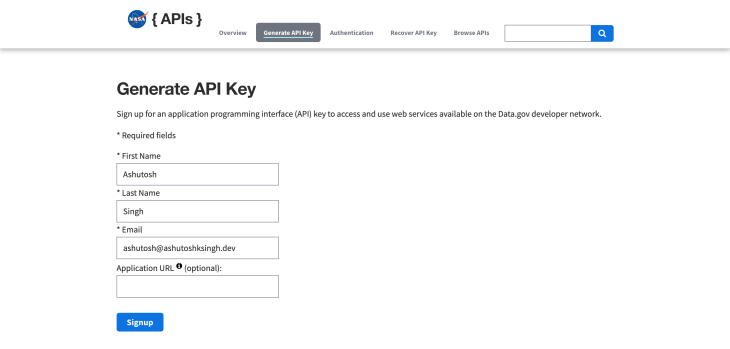
First, navigate to https://api.nasa.gov/ in the browser and fill in the required fields to generate an API key:
Click on the Signup button. On the next page, your API key will be shown to you:
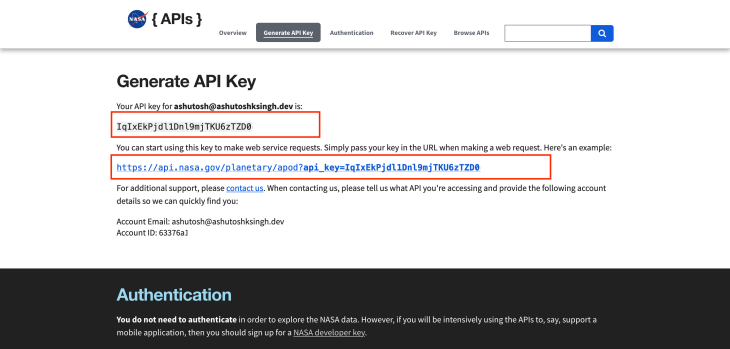
The API keys should be kept hidden from the public and stored as environment variables inside a .env file. dotenv is a popular npm library used to load environment variables from the .env file.
Run the following command to install the dotenv package:
npm install dotenv
Next, create a new file named .env by running the following command:
touch .env
Paste the NASA API key into the .env file as shown below:
NASA_API_KEY = IqIxEkPjdl1Dnl9mjTKU6zTZD0
Now, add the following code to the index.js file to fetch data from the NASA API:
// Using with API Key
require("dotenv").config();
axios
  .get(
    `https://api.nasa.gov/planetary/apod?api_key=${process.env.NASA_API_KEY}`
  )
  .then((response) => {
    console.log(response.data);
  });
In the above code, we import the dotenv package and use the API key in the URL as a query parameter.
You will need to restart your application, so hit CTRL+C in the terminal and run the command npm run dev to start the Node application.
You will see a response similar to this from the NASA API:
{
  copyright: 'Steve Crouch',
  date: '2024-02-15',
  explanation: "Shiny NGC 253 is one of the brightest spiral galaxies visible, and also one of the dustiest.  Some call it the Silver Coin Galaxy for its appearance in small telescopes, or just the Sculptor Galaxy for its location within the boundaries of the southern constellation Sculptor.  Discovered in 1783 by mathematician and astronomer Caroline Herschel, the dusty island universe lies a mere 10 million light-years away. About 70 thousand light-years across, NGC 253 is the largest member of the Sculptor Group of Galaxies, the nearest to our own Local Group of Galaxies.  In addition to its spiral dust lanes, tendrils of dust seem to be rising from its galactic disk laced with young star clusters and star forming regions in this colorful galaxy portrait. The high dust content accompanies frantic star formation, earning NGC 253 the designation of a starburst galaxy. NGC 253 is also known to be a strong source of high-energy x-rays and gamma rays, likely due to massive black holes near the galaxy's center.",
  hdurl: 'https://apod.nasa.gov/apod/image/2402/ngc253_STXL6303_RC14_LHaRGB_2023.jpg',
  media_type: 'image',
  service_version: 'v1',
  title: 'NGC 253: Dusty Island Universe',
  url: 'https://apod.nasa.gov/apod/image/2402/ngc253_STXL6303_RC14_LHaRGB_2023_1024.jpg'
}
You can also use the params option of the request config to make the same request:
// With API Key and params option
require("dotenv").config();
axios({
  method: "get",
  url: `https://api.nasa.gov/planetary/apod`,
  params: {
    api_key: process.env.NASA_API_KEY,
  },
}).then((response) => {
  console.log(response.data);
});
You can also authenticate requests with other HTTP authentication methods like Bearer authentication by passing the Bearer Token in the Authorization header. For example:
// Using Authorization Header
axios({
  method: "get",
  url: "<ENDPOINT>",
  headers: {
    Authorization: `Bearer ${process.env.TOKEN}`,
  },
}).then((response) => {
  console.log(response.data);
});
You may need to make concurrent requests to multiple endpoints. In this section, we will learn how you can use the axios.all() method to make multiple requests.
To begin, add the following code to the index.js file:
// Axios.all()
const endpoints = [
  "https://rickandmortyapi.com/api/character",
  "https://www.breakingbadapi.com/api/characters",
  "https://www.breakingbadapi.com/api/episodes",
  "https://www.breakingbadapi.com/api/quotes",
];
axios.all(endpoints.map((endpoint) => axios.get(endpoint))).then((allResponses) => {
    allResponses.forEach((response) => {
    console.log(response.data);
  });
});
Here, we pass an array of axios.get() requests in the axios.all() method, then map over the endpoints array to create an array of axios.get() requests, which are then resolved by the axios.all() method.
The response order is the same as the order of the requests in the axios.all() method:
{info: Object, results: Array(20)}
(62) [Object, Object, Object, Object, Object, Object, Object, Object, Object, Object, …]
 (102) [Object, Object, Object, Object, Object, Object, Object, Object, Object, Object, …]
[Object, Object, Object, Object, Object, Object, Object, Object, Object, Object, …]
Axios interceptors are functions that Axios allows you to define globally or on a per-request basis to manipulate requests or responses before they are handled by then or catch. This is useful for various purposes, such as adding authentication headers, logging requests, or transforming responses.
Request interceptors can be used to modify requests before they are sent. This is often used for tasks like adding authentication tokens to requests.
Here’s an example of a request interceptor:
axios.interceptors.request.use(
  (config) => {
    config.params = {
      limit: 1,
      sort: "desc"
    }
    return config;
  },
  (error) => {
    return Promise.reject(error);
  }
);

axios({
  method: "get",
  url: "https://finalspaceapi.com/api/v0/character/?",
  params: {
    limit: 3,
    sort: "desc"
  }
}).then(function (response) {
  console.log(response.data);
});
In this example, the request interceptor modifies the params object’s limit property to set the limit of the number of results to be returned to 1 before the GET request is sent.
Despite explicitly setting limit: 3 in the request’s params, the interceptor ensures that only limit: 1 is sent to the server. As a result, only 1 character will be returned:
[
  {
    id: 47,
    name: 'Zargon Tukalishi',
    status: 'Deceased',
    species: 'Unknown',
    gender: 'Male',
    hair: 'None',
    alias: [],
    origin: 'Yarno',
    abilities: [],
    img_url: 'https://finalspaceapi.com/api/character/avatar/zargon_tukalishi.jpg'
  }
]
Here’s an example of adding a Bearer Token to every request using a request interceptor for authentication purposes:
axios.interceptors.request.use(
  (config) => {
    config.headers.Authorization = `Bearer ${Token}`;
    return config;
  },
  (error) => {
    return Promise.reject(error);
  }
);
In this example, the request interceptor modifies the config object to include the Bearer Token in the Authorization header before the request is sent.
Response interceptors allow you to modify responses before they are passed to the then or catch callbacks. This can be useful for tasks like transforming responses into a standardized format.
Here’s an example of destructuring response bodies using a response interceptor:
axios.interceptors.response.use(
  (response) => {
    const { data } = response
    const { name } = data[0]
    return name;
  },
  (error) => {
    return Promise.reject(error);
  }
);
async function getCharacters() {
  axios({
    method: "get",
    url: "https://finalspaceapi.com/api/v0/character/?",
    params: {
      limit: 3,
    }
  }).then(function (response) {
    console.log('First character name: ', response);
    return response;
  })
}
getCharacters();
In this example, the response interceptor uses destructuring to extract the name of the first character stored in the response body.
After running the code, you should see the following output in the terminal:
First character name: Gary Goodspeed
To remove a request or response interceptor, you need to store the interceptor number and then call the request.eject() or response.eject() method.
Here’s how to remove a request interceptor:
const myInterceptor = axios.interceptors.request.use(function () {/*...*/});
axios.interceptors.request.eject(myInterceptor);
Here’s how to remove a response interceptor:
const myInterceptor = axios.interceptors.response.use(function () {/*...*/});
axios.interceptors.response.eject(myInterceptor)
In this section, we will discuss how to handle errors with Axios, which includes catching errors and retrying requests.
The most common way to catch errors is to chain a .catch() method with the axios.get() to catch any errors that may occur.
Add the following code to the index.js file:
axios
  .get("https://rickandmortyapi.com/api/character/-1")
  .then((response) => {
    console.log(response.data);
  })
  .catch((error) => {
    console.error(error);
  });
In the code above, we are trying to fetch a character from The Rick and Morty API whose id is -1, and because there is no such character with a negative id, this request will result in an error.
The above catch block consoles any error that may occur. This error object is quite large, and you may not always display everything, so you can be selective about what to log to the error message.
You can also handle errors based on their types. Add the following code to the index.js file:
// Error Handling - Error Specific
axios
  .get("https://rickandmortyapi.com/api/character/-1")
  .then((response) => {
    console.log(response.data);
  })
  .catch((error) => {
    if (error.response) {
      console.error(error.response.data);
      console.error(error.response.status);
      console.error(error.response.headers);
    } else if (error.request) {
      console.error(error.request);
    } else {
      console.error("Error", error.message);
    }
  });
If the error occurred on the server side, then the error object will contain a response property that can be used to access the error’s status, headers, and other details.
If the request was made and no response was received, then the error object will contain the request property XMLHttpRequest in the browser, and an instance of http.ClientRequest in Node.
If an error occurred while making the request, then error.message will indicate such errors.
Because the error in the above code occurred on the server side, the error object will have a response property, and the following message will be seen in the terminal:
{ error: 'Character not found' }
404
Object [AxiosHeaders] {
  'access-control-allow-origin': '*',
  age: '0',
  'cache-status': '"Netlify Edge"; fwd=miss',
  'content-length': '31',
  'content-type': 'application/json; charset=utf-8',
  date: 'Thu, 15 Feb 2024 16:52:23 GMT',
  etag: 'W/"1f-t9l5xVmJZaPHJIukjZQ7Mw4gpG8"',
  'netlify-vary': 'query',
  server: 'Netlify',
  'strict-transport-security': 'max-age=31536000',
  'x-nf-request-id': '01HPPTXZK9TK016KN52NQ2XNNX',
  'x-powered-by': 'Express',
  connection: 'close'
}
You can also throw an error by using the validateStatus request config option. For example:
// Error Handling with validateStatus option
axios
  .get("https://rickandmortyapi.com/api/character/-1", {
    validateStatus: function (status) {
      return status < 500; // Reject only if the status code is less than 500
    },
  })
  .then((response) => {
    console.log(response.data);
  });
This option will throw an error when the response’s status satisfies the condition in it. You will see a message similar to this in the terminal:
{ error: 'Character not found' }
axios-retry pluginIn some cases, it’s useful to automatically retry failed requests. The axios-retry plugin provides an easy way to do this with Axios. Here’s how you can use it:
First, install the axios-retry package from npm:
npm install axios-retry
Restart your application, press CTRL+C in the terminal to stop the current process, and then run the command npm run dev to start the Node application.
Next, import Axios and axios-retry in your file:
const axios = require('axios').default;
const axiosRetry = require('axios-retry').default;
Then, you can configure Axios to use the retry plugin:
axiosRetry(axios, { retries: 3, onRetry: onRetry });
Here, you pass an Axios instance as the first parameter and an Axios retry config options object as the second. The retries property in the config object sets the number of retries to three and the onRetry property sets a callback function to be called when a retry occurs.
Now, when you make a request with Axios, it will automatically retry the request if it fails. For example:
axios.get('https://api.example.com/data')
  .then(response => {
    console.log(response.data);
  })
  .catch(error => {
    console.error('Request failed:', error.message);
  });

function onRetry(retryCount, error, requestConfig) {
  console.error(retryCount,error.message)
}
If the request fails, axios-retry will automatically retry it up to the specified number of times (three, in this case), and each time, it will print the retry count and the error message to the console.
After running the code above, you should see the following output:
1 getaddrinfo ENOTFOUND api.example.com
2 getaddrinfo ENOTFOUND api.example.com
3 getaddrinfo ENOTFOUND api.example.com
Request failed: getaddrinfo ENOTFOUND api.example.com
You can also define a custom retry strategy. For example, to retry only on specific status codes:
axiosRetry(axios, {
  retryCondition: (error) => {
    return axiosRetry.isNetworkError(error) || axiosRetry.isRetryableError(error) || (error.response && error.response.status === 429);
  }
});
In this example, the request will be retried if there is a network error, a retryable error, or if the response status code is 429 (Too Many Requests).
axios-retry also supports exponential backoff, which means it will wait longer between retries. To enable exponential backoff, simply set the retryDelay config option:
axiosRetry(axios, {
  retryDelay: axiosRetry.exponentialDelay
});
This will use an exponential backoff strategy with a default factor of two (each retry will wait twice as long as the previous one).
signalAxios provides a convenient feature called signal for canceling requests. This functionality proves invaluable in scenarios where a user navigates away from a page, a component is unmounted before a request completes, or the network connection becomes unavailable.
To use Axios signal for canceling requests, you first need to create an instance of the AbortController interface. This controller enables you to signal that an operation should be aborted. Here’s how you can integrate it with Axios:
function newAbortSignal(timeoutMs) {
  const abortController = new AbortController();
  setTimeout(() => {
    abortController.abort()
    console.log('request cancelled')
  }, timeoutMs || 0);
  return abortController.signal;
}

axios.get('https://finalspaceapi.com/api/v0/character/?limit=2', {
  signal: newAbortSignal(100)
}).then((response) => {
  console.log('response', response.status)
}).catch((err) => {
  console.error(err.message)
})
In the example above, a function named newAbortSignal() was defined. Inside this function, an AbortController is created to manage the cancellation of the request. A setTimeout() function is used to call abort on the AbortController after the specified timeout. The function then returns the signal from the AbortController, which will be used to cancel the request.
Next, an Axios GET request is made to the Final Space API endpoint, and the custom abort signal created by newAbortSignal(100) is passed to the request configuration using the signal option. As a result, if the Final Space API server takes longer than 100 milliseconds to send a response, the request will be canceled and an error message will be logged to the console.
You should see an output similar to the following on your console after running this code:
request cancelled
canceled
HEAD requests with AxiosA HEAD request is a GET request without a message body. You can create a HEAD request with the axios.head method. The data property in the response object will be empty with such requests.
For example:
// Axios Head Request
axios.head("https://rickandmortyapi.com/api/character/1").then((response) => {
  console.log(
    `Status: ${response.status} - Server: ${response.headers.server} - Data: ${response.data}`
  );
});
Here is the message you will see in the terminal:
Status: 200 - Server: Netlify - Data:
In this article, we discussed what Axios is and how can you use it to make GET requests, exploring how to efficiently fetch data, handle errors, and enhance request performance. Axio’s flexibility and strength in handling API communication make it an extremely important tool in modern web development.
I hope you’re able to use this guide as your first step toward becoming proficient in API integration.
There’s no doubt that frontends are getting more complex. As you add new JavaScript libraries and other dependencies to your app, you’ll need more visibility to ensure your users don’t run into unknown issues.
LogRocket is a frontend application monitoring solution that lets you replay JavaScript errors as if they happened in your own browser so you can react to bugs more effectively.

LogRocket works perfectly with any app, regardless of framework, and has plugins to log additional context from Redux, Vuex, and @ngrx/store. Instead of guessing why problems happen, you can aggregate and report on what state your application was in when an issue occurred. LogRocket also monitors your app’s performance, reporting metrics like client CPU load, client memory usage, and more.
Build confidently — start monitoring for free.

AI companies are buying developer tools as coding agents turn runtimes, package managers, and linters into strategic infrastructure.

Learn how AI-assisted development governance uses rules, agents, hooks, and protocols to help AI coding tools produce safer, more consistent code.

A step-by-step guide to building your first MCP server using Node.js, covering core concepts, tool design, and upgrading from file storage to MySQL.

Using security headers in your Next.js apps is a highly effective way to secure websites from common security threats.
Hey there, want to help make our blog better?
Join LogRocket’s Content Advisory Board. You’ll help inform the type of content we create and get access to exclusive meetups, social accreditation, and swag.
Sign up now

