Editor’s note: This article was last updated by David Omotayo on 26 June 2024 to highlight other tools for identifying and removing unused CSS, such as cssnano and Stylelint. It also now discusses code architecture and strategies, like BEM and Atomic CSS, to reduce code redundancy from the start of development.

Creating visually appealing and interactive websites is a fundamental aspect of web development. The cornerstone of web design is CSS, which lets you create a website’s layout, typography, and design. CSS is intended to separate a website’s style from its contents.
As development requirements change and websites become complex, this complexity also shows up in your CSS files, making them difficult to manage. At this point, your code can start looking cluttered, dirty, unprofessional, and difficult to read. The benefit of having clean and decluttered CSS cannot be overemphasized, as it reduces load time, improves user experience, improves search engine optimization (SEO), and demonstrates a developer’s skill and understanding of system design.
However, trying to clean up a large CSS codebase manually is time-consuming and tedious, and it can delay development. In this article, we will look at how to avoid code redundancy and review the most popular tools for cleaning up your CSS. But before that, we’ll consider practices that result in cluttered or unused CSS.
Throughout the course of development, you have to use external libraries and frameworks. There are countless CSS frameworks available, with different functionalities. Although these frameworks are beneficial for development, offering many patterns and components, they increase file size.
Some of these frameworks and libraries come as a bundle of predefined styles and CSS classes. In most cases, not all the classes and styles are used in development. Installing bundled frameworks without removing the unused styles and classes results in unnecessary code and increased file size.
When many changes and iterations are happening in development, developers may forget to clean up specific CSS code that may have become obsolete and gone unused. This, too, can result in unused CSS.
Manually removing CSS for a large website with many pages can be time-consuming, resulting in delayed development. In the next few steps, we’ll illustrate how to remove unused CSS using Chrome DevTools. We’ll assume that you’re using the Google Chrome browser. Let’s dive in!
On your webpage, right-click on Inspect. Run the ctrl + shift + P command, and you’ll be presented with the command interface shown below. From there, search for the Show Coverage option:
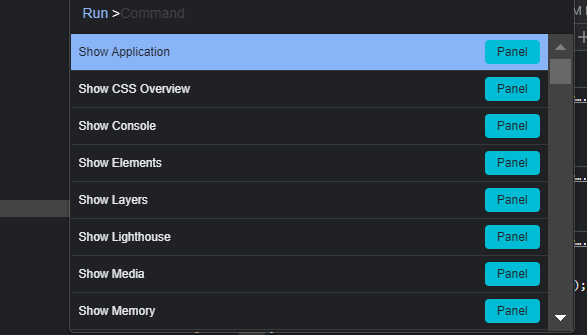

From the Show Coverage option, select a CSS file. A solid red line next to a CSS file means it didn’t execute, while those next to a solid green line did execute. Both red and green lines mean that some CSS code was executed. This test is page-specific, meaning you have to run this test across all pages to determine how many unused CSS files are in your project.
Let’s check out another method to spot unused CSS declarations. First, on your webpage, right-click on Inspect. Then, click on the arrow, like in the image below:

Then, click on CSS Overview:
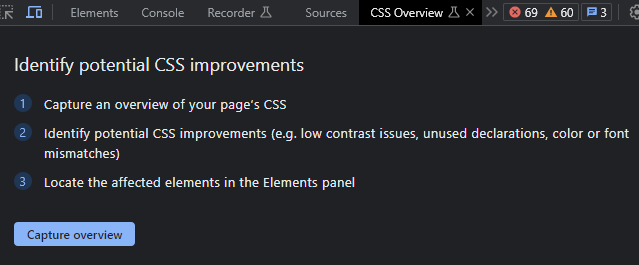
If you can’t find the CSS Overview tab in your dev tools, click on the ⋮ menu icon > More Tools and select CSS Overview from the list.
Next, click on Capture Overview, and you’ll be presented with the CSS overview page, as shown below:
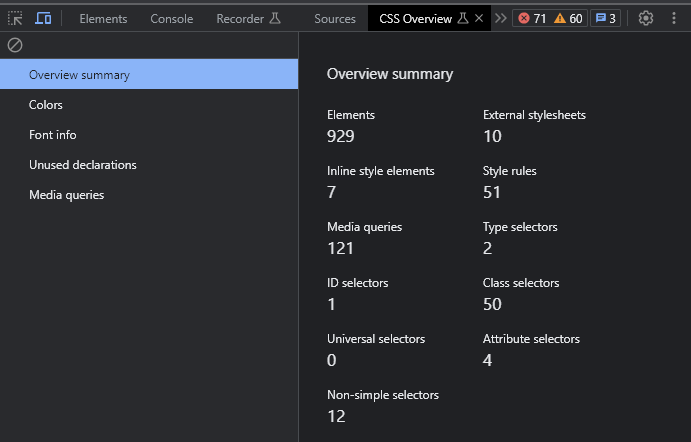
On this page, navigate to the Unused declarations option, and you’ll be shown the page in the image below:
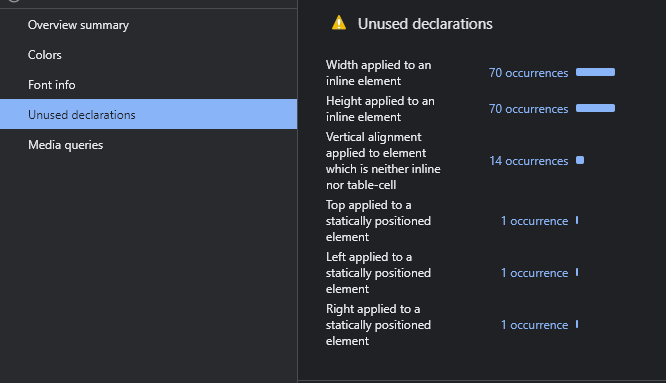
Removing unused CSS following the methods outlined above can be difficult when working on a large website. These methods aren’t the best option for large projects because they aren’t efficient and scalable. Now, let’s explore some tools that can help us efficiently remove and clean CSS in our projects.
PurifyCSS removes unused CSS code from our project. It can be used in the development environment with the support of build tools like Grunt, Gulp.js, or webpack to remove unused CSS classes before the project goes live.
However, it can also be used online to remove unused CSS from websites developed with CMS, like WordPress, using this PurifyCSS Online tool. Check out the PurifyCSS GitHub repository to learn how to use it.
The following steps illustrate how to use PurifyCSS with code snippets. Before you start, you need to have Node.js installed:
index.html and style.css)npm install purify-css
In your index.html file, write the following basic code:
<!DOCTYPE html>
<html lang="en">
  <head>
      <meta charset="UTF-8">
      <meta name="viewport" content="width=device-width, initial-scale=1.0">
      <link rel="stylesheet" href="style.css">
      <title>Document</title>
  </head>
  <body>
      <h1>Hello, LogRocket!</h1>
      <p>This is a basic purify-css illustration.</p>
  </body>

</html>
This gives us web content to work with. Next, write the following simple style in your style.css:
body {
    font-family: Arial, Helvetica, sans-serif;
    background-color: aliceblue;
}

h1 {
    color: blueviolet;
}

#div{
    margin: auto;
}
.header{
    background-color: blue;
    color: white;
    padding: 10px;
    text-align: center;
}

.btn {
    background-color: blue;
    color: white;
}
When you run this, you should have a browser output as shown in the attached image:

The next step is to implement the purify-css functionality. To do that, create a cssPurifier.js file in the root directory of your project and add the code below:
const purify = require('purify-css');

const content = ['*.html'];
const css = ['*.css'];

const options = {
    output: 'purifyAndMinified.css',
    minify: true,
    info: true
};

purify(content, css, options, function (purifiedAndMinifiedResult){
    console.log(purifiedAndMinifiedResult);
});
In the code above, we implemented the purify-css functionality and specified the output file as purifyAndMinified.css. To execute this script, run the command below on your terminal:
node cssPurifier
This file will contain the minified and purified CSS when we execute the cssPurifier.js script.
UnCSS is a powerful tool designed to remove unused CSS from your project. It effectively analyzes your CSS codebase and identifies styles not used on your webpages. However, there are some considerations and limitations to keep in mind when using UnCSS. For example, this tool is unable to directly process non-HTML pages, like templates and PHP scripts.
To use UnCSS on these pages, you need to create example HTML pages that represent the output of your templates or scripts. These generated HTML files can then be used as input for UnCSS.
Alternatively, you can set up a local development server and direct UnCSS to that server to analyze the live website. It’s important to note that UnCSS can only process the CSS that JavaScript injects during page load. It does not handle JavaScript that relies on user input or interactions, like button presses.
If your JavaScript dynamically adds classes or modifies styles based on user actions, you will need to use the ignore option in UnCSS to retain those specific classes or styles. Furthermore, you can integrate UnCSS with other JavaScript build tools, like Grunt, Broccoli, or Gulp. This allows you to incorporate UnCSS into your existing development workflow and automate removing unused CSS.
It’s worth mentioning that UnCSS supports both local file paths and URLs. This means you can provide file paths using glob patterns to process local CSS files. Additionally, you have the flexibility to supply URLs, enabling UnCSS to analyze live websites or remote CSS resources.
To get started with UnCSS, run the following command in your project’s directory using npm or yarn:
npm install uncss --save-dev
# or
yarn add uncss --dev
Here is an example code snippet that illustrates how to use UnCSS:
const unCss = require('uncss');

const files = ['index.html'];

const options = {
    stylesheets: ['style.css']
}

unCss(files, options, (error, output) => {
    console.log(output);
})
Executing this code should print all the CSS used in the project on your terminal. The image below shows all the CSS components used in our sample project:
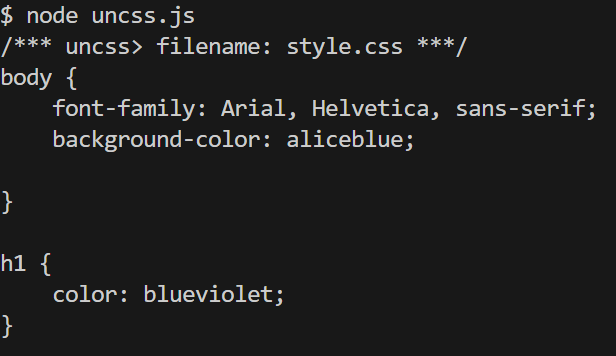
To learn more about UnCSS, check out the GitHub repository.
Clean CSS is an efficient tool to improve and optimize CSS, Node.js, or any modern web browser. It offers various features including minification, optimization, and compatibility. It helps reduce file size, improve performance, and enhance code readability.
Whether you have a small CSS file or a large stylesheet, Clean CSS can streamline your code for optimal usage. This repository illustrates how to use Clean CSS in your Node.js projects.
You can install Clean CSS using npm or yarn:
npm install clean-css --save-dev
# or
yarn add clean-css --dev
The sample code below illustrates how to use Clean CSS to minify a CSS file:
const CleanCSS = require('clean-css');

const cssContent = ["style.css"]

const minifiedCSS = new CleanCSS().minify(cssContent).styles;

console.log(minifiedCSS);
Tabifier is a simple online tool that helps to optimize code. It supports HTML, CSS, and C-style codes, which are code structures where code blocks have starting and ending curly braces, and semicolon end statements:
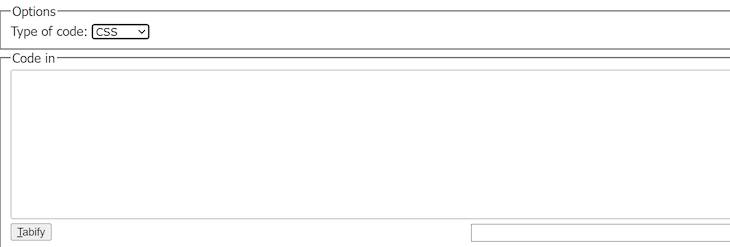
To use Tabifier, simply paste the CSS into the input box and hit the Tabify button.
PurgeCSS is a powerful tool used to remove unused CSS from your project. It analyzes your contents and CSS files to identify CSS selectors that are not being used. It also removes unused CSS from your code, thereby resulting in smaller and optimized CSS files.
PurgeCSS is beneficial when working with a large CSS library that contains an extensive stylesheet. To learn more about PurgeCSS and how to get started, check out this comprehensive guide.
cssnano is a CSS minification tool built on PostCSS, a tool for creating JavaScript plugins that transform styles. However, besides removing unused CSS, cssnano also removes whitespace, duplicate rules, old browser-specific prefixes, comments, and more.
cssnano uses a plugin system that lets you choose the specific optimizations for your project. It also offers presets for different optimization levels (safe, advanced, etc.).
You can integrate cssnano into your projects in two ways: with PostCSS, or with build tools like webpack, Gulp, and Grunt.
To use cssnano with PostCSS, first install PostCSS and the PostCSS CLI:
npm install postcss postcss-cli --save-dev
Next, create a postcss.config.js file in your project’s root directory and configure it to use cssnano:
module.exports = {
  plugins: [
    require('cssnano')({
      preset: 'default',
    }),
  ],
};
The preset option lets you set several cssnano presets based on your needs. The default option is a good starting point.
Next, open your package.json file and add a new script to run PostCSS with cssnano:
{
  "scripts": {
    "build:css": "postcss src/styles.css -o dist/styles.min.css"
  }
}
Replace src/styles.css with the path to your original CSS file and dist/styles.min.css with the path where you want the optimized CSS file to be saved.
Finally, run this script to compress and optimize your CSS file:
npm run build:css
If you are using webpack, you can integrate cssnano via css-loader and postcss-loader:
npm install css-loader postcss-loader --save-dev
After installation, configure webpack to use cssnano:
const CssMinimizerPlugin = require('css-minimizer-webpack-plugin');

module.exports = {
  // Your other webpack configuration
  module: {
    rules: [
      {
        test: /\.css$/,
        use: [
          'style-loader',
          'css-loader',
          {
            loader: 'postcss-loader',
            options: {
              postcssOptions: {
                plugins: [
                  ['cssnano', { preset: 'default' }],
                ],
              },
            },
          },
        ],
      },
    ],
  },
  optimization: {
    minimizer: [
      `...`,
      new CssMinimizerPlugin(),
    ],
  },
};
To use cssnano with Gulp, first install the necessary Gulp plugins:
npm install gulp gulp-postcss cssnano --save-dev
Next, set up Gulp to use cssnano:
const gulp = require('gulp');
const postcss = require('gulp-postcss');
const cssnano = require('cssnano');

gulp.task('css', function () {
  return gulp.src('src/*.css')
    .pipe(postcss([cssnano()]))
    .pipe(gulp.dest('dist'));
});
Adding cssnano to Grunt is also simple. First, install the necessary plugins:
npm install grunt-postcss cssnano --save-dev
Then, configure Grunt to use cssnano:
module.exports = function(grunt) {
  grunt.initConfig({
    postcss: {
      options: {
        processors: [
          require('cssnano')()
        ]
      },
      dist: {
        src: 'src/*.css',
        dest: 'dist/styles.min.css'
      }
    }
  });

  grunt.loadNpmTasks('grunt-postcss');
  grunt.registerTask('default', ['postcss']);
};
Using cssnano with your build system has several benefits. The main advantage is that it lets you focus on the important parts of your project without worrying about the complexity of your CSS files and how to manage them.
Stylelint is a linter that helps you enforce consistent CSS conventions in your code and catch errors in CSS, SCSS, and other CSS-like languages. It helps maintain clean and standardized stylesheets, improving code quality and reducing the likelihood of bugs and code redundancy.
Here are the key features of Stylelint:
To use Stylelint in your projects, you can install it using npm or yarn:
npm install stylelint --save-dev
# or
yarn add stylelint --dev
Next, create a .stylelintrc.json configuration file in the root directory of your project:
{
  "extends": "stylelint-config-standard",
  "rules": {
    "block-no-empty": true,
    "color-no-invalid-hex": true,
    "declaration-colon-space-after": "always",
    "indentation": 2,
    "max-empty-lines": 2,
    "unit-whitelist": ["em", "rem", "%", "s"]
  }
}
This config defines the rules that Stylelint will enforce. You can customize the rules object to fit your project’s needs.
Alternatively, you can install Stylelint and its standard config with its init tool:
npm init stylelint
Once you’re done setting it up, run Stylelint on all the CSS files in your project:
npx stylelint "src/**/*.css"
This command will lint all CSS files in the src directory and its subdirectories. If your project doesn’t have a src folder, you can run npx stylelint "**/*.css" instead.
Another way to integrate Stylelint is to integrate it into your project’s build tools like webpack and Gulp.
To use Stylelint with webpack, you need to first install the stylelint-webpack-plugin plugin for webpack:
npm install stylelint-webpack-plugin --save-dev
Next, set up webpack to use Stylelint:
const StylelintPlugin = require('stylelint-webpack-plugin');

module.exports = {
  // Your other webpack configuration
  plugins: [
    new StylelintPlugin({
      files: 'src/**/*.css'
    })
  ],
};
To use Stylelint with Gulp, install the gulp-stylelint plugin:
npm install gulp-stylelint --save-dev
Next, set up Gulp to use Stylelint:
const gulp = require('gulp');
const stylelint = require('gulp-stylelint');

gulp.task('lint-css', function lintCssTask() {
  return gulp
    .src('src/**/*.css')
    .pipe(stylelint({
      reporters: [
        {formatter: 'string', console: true}
      ]
    }));
});
To avoid building up unnecessary CSS in your projects, it’s best to adopt measures that prevent it from the onset, rather than relying on tools to clean them up later. This can be challenging, but there are established methodologies to help developers manage stylesheets in large projects. These methodologies help avoid problems like repeated code and difficulty making changes. Here are some common CSS frameworks and practices:
.text-red for red text, .margin-top-10px for a 10-pixel top margin, or .font-bold for bold text. These simple classes are combined to create more complex styles. For instance, to make a button, you would combine classes like .bg-green for a green background, .text-white for white text, .padding-4 for padding, and .border-2 for a border.button for button styles, .float-right for right-aligned elements, and .text-muted for muted text. These classes can be used throughout your website without depending on a specific HTML structure, which helps prevent redundant codehover and focus, and theme rules define the website’s overall lookIn this article, we considered the importance of decluttering your CSS files. We learned how to remove unused CSS from our project using Chrome DevTools as well as popular tools like PurifyCSS, UnCSS, Clean CSS, Tabifier, PurgeCSS, and more.
As web frontends get increasingly complex, resource-greedy features demand more and more from the browser. If you’re interested in monitoring and tracking client-side CPU usage, memory usage, and more for all of your users in production, try LogRocket.

LogRocket lets you replay user sessions, eliminating guesswork around why bugs happen by showing exactly what users experienced. It captures console logs, errors, network requests, and pixel-perfect DOM recordings — compatible with all frameworks.
LogRocket's Galileo AI watches sessions for you, instantly identifying and explaining user struggles with automated monitoring of your entire product experience.
Modernize how you debug web and mobile apps — start monitoring for free.
Would you be interested in joining LogRocket's developer community?
Join LogRocket’s Content Advisory Board. You’ll help inform the type of content we create and get access to exclusive meetups, social accreditation, and swag.
Sign up now
A breakdown of the wrapper and container CSS classes, how they’re used in real-world code, and when it makes sense to use one over the other.

This guide walks you through creating a web UI for an AI agent that browses, clicks, and extracts info from websites powered by Stagehand and Gemini.

This guide explores how to use Anthropic’s Claude 4 models, including Opus 4 and Sonnet 4, to build AI-powered applications.

Which AI frontend dev tool reigns supreme in July 2025? Check out our power rankings and use our interactive comparison tool to find out.