Editor’s note: This article was last updated by Chinwike Maduabuchi on 29 March 2024 to update code blocks, add information about the new React Email components, CodeBlock and CodeInline, and cover recent changes to the way subdirectories are created in React Email.

Email is an essential tool for communication, but creating well-designed and functional emails can be challenging and time-consuming for developers. Devs face several pain points when it comes to email creation, such as limited HTML support, compatibility issues across various email clients, and (worst of all) emails landing in spam folders.
In an attempt to breathe new life into the way we write emails, the Resend team has built a library, React Email, that promises to be a next-generation solution for crafting emails. React Email is a collection of quality, unstyled components that allow us to create emails with React, TypeScript, and even Tailwind. It also offers a utility function to compile JSX code into email-friendly HTML that will render seamlessly across all popular email clients.
In this article, we’ll look into React Email’s features, explore its styling options (including Tailwind CSS), and learn how to integrate Nodemailer to send emails directly from a Next.js app. We’ll also compare React Email to MJML, a popular open source email solution.
Here’s a demo of the promotional email that we’ll build for a florist site using the React Email library:

To follow along with this tutorial, you should have the following:
React Email is a powerful tool that enables developers to streamline their processes for creating and sending emails. Here are some of React Email’s key features:
Let’s now see how to integrate React Email into an existing Next.js project.
To set up a Next.js project with TypeScript, run the following command in your terminal:
npx create-next-app@latest --typescript <project-name>
This will launch a questionnaire to help you configure your application. I have opted for the App Router and the @/* alias setting. I named my project react-email-app.
After the installation, move into your project directory:
cd react-email-app
Next, install React Email using any one of the following commands. I’ll be using npm:
# npm
npx create-email@latest
# yarn
yarn create email
#pnpm
pnpm create email
After a successful installation, a new folder, react-email-starter, will be created within your project directory. This folder holds the emails directory, where your email templates are located, and a static folder for storing assets such as images.
Now, move into this folder and install the project dependencies:
cd react-email-starter && npm install
And run the development server:
npm run dev
Now, the preview application will be running on localhost:3000. However, I’ve edited the dev script to make it run on port 3001:
// react-email-starter/package.json
"scripts": {
    "dev": "email dev -p 3001",
}
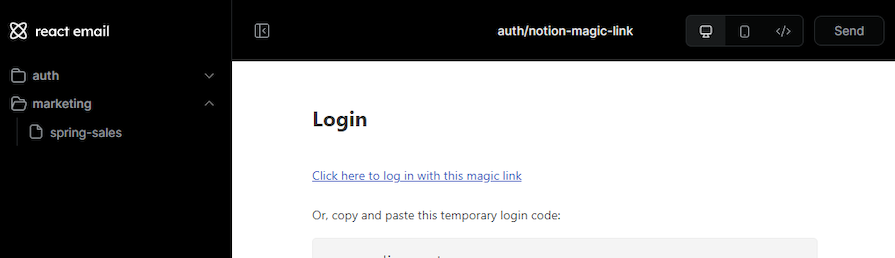
The React Email preview server is packed with features. Your templates are stacked in the side menu and you can toggle between Desktop and Email previews to improve your responsive design workflow. There’s also a Code button for revealing the markup behind your templates.
At any point during development, you can use the Send button at the top right of the screen to send test emails — a feature powered by Resend.
The latest version of React Email now lets us create subdirectories in the emails folder, allowing you to group your templates however you choose. In the emails folder, we’ll create two subdirectories — auth and marketing — and store our new email template there. Create the file marketing/spring-sales.tsx:
There are 15+ React components in the React Email library, including Html, Image, Button, Heading, Link, and more. You can view the full list of components here. In this tutorial, we’ll review a few of the components that you’re likely to use most regularly:
Html: React HTML component to wrap emails; all emails must be wrapped with this componentPreview: Preview text that will be displayed in the recipient’s inbox: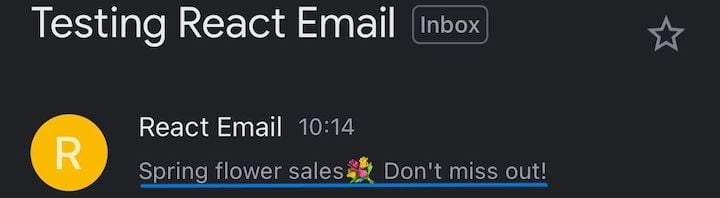
Image: Used to render images in your emailsFont: Used to apply font styling to all tags in our email.Link: An anchor tag to link web pages, email addresses, or anything else a URL can addressSection: Used to display a section that can later be formatted using Column and RowCodeBlock and CodeInline: Used to display accessible code with a selected theme and syntax highlighting using Prism.jsLet’s explore the available options for adding custom styles to these components.
React Email offers two ways to style components — using a style object or a Tailwind component. It’s best not to rely on external (<link rel="stylesheet">) or embedded stylesheets (styles within the <style> tag above the <body>) because many email services cut out everything above the body tag and disable external style sheets.
With that said, let’s go over React Email’s styling options.
Similar to CSS Modules, you can define styles using a JavaScript object in React. To do this, use the style prop and pass in an object with properties in camelCase representing the CSS properties and their corresponding values as strings:
import { Button } from '@react-email/components'

export const Email = () => {
  return (
    <Html>
      <Button href="https://google.com" style={cta}>
        Click me
      </Button>
      {/* or */}
      <Text style={{ color: '#61dafb' }}>Confirm subscription</Text>
    </Html>
  );
}

const cta = {
  padding: '13px 20px',
  borderRadius: '5px',
  backgroundColor: '#D13928',
  textAlign: 'center' as const,
  color: '#fff',
  display: 'block',
  width: '45%',
  margin: '0.5rem auto 0 auto',
}

export default Email
If you use TypeScript, you may notice that some values give you a Type 'string' is not assignable to type 'cssProperty' error. You can address this error by adding as const at the end.
Another option for styling React Email components is to use Tailwind CSS. Import the Tailwind component into your email and use the tailwind class as normal:
import { Button } from '@react-email/button';
import { Tailwind } from '@react-email/tailwind';

const Email = () => {
  return (
    <Tailwind
      config={{
        theme: {
          extend: {
            colors: {
              brand: '#007291',
            },
          },
        },
      }}
    >
      <Button
        href="https://example.com"
        className="bg-brand px-3 py-2 font-medium leading-4 text-white"
      >
        Click me
      </Button>
    </Tailwind>
  );
}
We’ll use a mix of the two styling strategies to design our email.
Here’s the promotional email we’ll build for our fictional florist business:
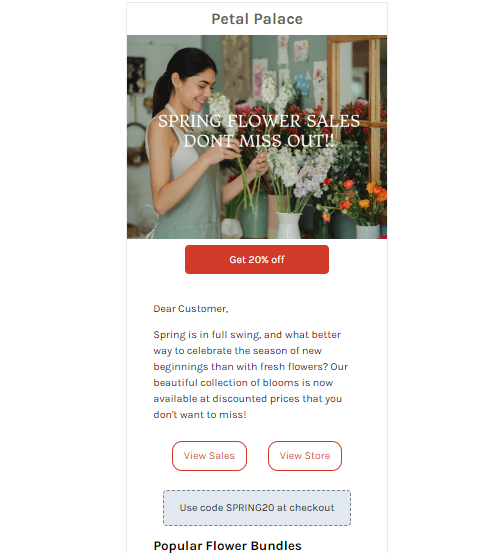
Open the spring-sales.tsx file and add the following markup to create the above email design:
#emails/marketing/spring-sales.tsx
import {
  Html,
  Head,
  Preview,
  Body,
  Container,
  Link,
  Img,
  Text,
  Section,
  Hr,
  Row,
  Column,
  CodeInline,
  Font,
} from '@react-email/components'
import { Tailwind } from '@react-email/tailwind'
import * as React from 'react'

// configure assest folder based on node environment
const baseUrl = process.env.VERCEL_URL ? `${process.env.VERCEL_URL}` : '/static'
interface SpringMailProps {
  userName: string
}
export const SpringSalesMail = ({ userName = 'Customer' }: SpringMailProps) => (
  <Html>
    <Head />
    <Font
      fontFamily='Karla'
      fallbackFontFamily='Verdana'
      webFont={{
        url: 'https://fonts.googleapis.com/css2?family=Karla:ital,wght@0,200..800;1,200..800&family=Poppins:ital,wght@0,100;0,200;0,300;0,400;0,500;0,600;0,700;0,800;0,900;1,100;1,200;1,300;1,400;1,500;1,600;1,700;1,800;1,900&display=swap',
        format: 'woff2',
      }}
      fontWeight={400}
      fontStyle='normal'
    />
    <Preview>Brighten up your home for less!</Preview>
    <Tailwind
      config={{
        theme: {
          extend: {
            colors: {
              primary: '#D13928',
              accent: '#66634B',
            },
          },
        },
      }}
    >
      <Body className='bg-white m-auto text-black'>
        <Container
          style={{
            border: '1.5px solid #eaeaea',
          }}
          className='w-[390px] my-[40px] mx-auto'
        >
          <Link
            href='#'
            className='block text-2xl py-2 px-0 font-bold text-accent text-center'
          >
            Petal Palace
          </Link>
          <Section className='relative w-full inline-block'>
            <Img src={`${baseUrl}/banner.png`} className='h-auto w-auto' />
            <Link
              href='#'
              className='py-3 px-5 rounded-md bg-primary text-center text-white block w-[45%] mt-2 mb-0 mx-auto'
            >
              Get 20% off
            </Link>
          </Section>
          <Container className='max-w-[90%] my-0 mx-auto p-5'>
            <Text style={paragraph}>Dear {userName},</Text>
            <Text style={paragraph}>
              Spring is in full swing, and what better way to celebrate the
              season of new beginnings than with fresh flowers? Our beautiful
              collection of blooms is now available at discounted prices that
              you don't want to miss!
            </Text>
            <Section className='my-10 mx-0 flex justify-around'>
              <Link href='#' style={secondaryCTA}>
                View Sales
              </Link>
              <Link href='#' style={secondaryCTA}>
                View Store
              </Link>
            </Section>
            <Section
              style={{
                border: '2px dashed gray',
              }}
              className='flex justify-center py-4 px-[4.5%] w-[90.5%] rounded-md bg-slate-200'
            >
              Use code <CodeInline>SPRING20</CodeInline> at checkout
            </Section>
            <Section>
              <Text className='text-xl font-bold'>Popular Flower Bundles</Text>
              <Section>
                <Link href='#'>
                  <Row>
                    <Column align='left'>
                      <Img
                        src={`${baseUrl}/plant.jpg`}
                        width='145'
                        height='120'
                        alt='Karupu Plant'
                        className='rounded-xl object-cover'
                      />
                    </Column>
                    <Column className='text-black py-0 px-3'>
                      <Text className='text-lg font-semibold'>
                        Karupu Plant
                      </Text>
                      <Text>
                        This plant is a rare breed and grows up to 1-5 meters.
                      </Text>
                    </Column>
                  </Row>
                </Link>
              </Section>
              <Hr style={{ margin: '1.5rem 0' }} />
              <Section className='w-[150px] my-0 mx-auto'>
                <Row>
                  <Column align='left'>
                    <Link href='#' style={socialIcon}>
                      <Img
                        src={`${baseUrl}/twitter.png`}
                        height='19'
                        width='19'
                      />
                    </Link>
                  </Column>
                  <Column align='center'>
                    <Link href='#' style={socialIcon}>
                      <Img
                        src={`${baseUrl}/instagram.png`}
                        height='19'
                        width='19'
                      />
                    </Link>
                  </Column>
                  <Column align='right'>
                    <Link href='#' style={socialIcon}>
                      <Img src={`${baseUrl}/mail.png`} height='19' width='19' />
                    </Link>
                  </Column>
                </Row>
              </Section>
              <Section className='text-center w-auto my-4 mx-auto'>
                <Link href='#' style={link}>
                  Unsubscribe
                </Link>
                <Text style={paragraph}>
                  Want to hear from us again?{' '}
                  <Link href='#' style={link}>
                    Click here
                  </Link>
                </Text>
              </Section>
            </Section>
          </Container>
        </Container>
      </Body>
    </Tailwind>
  </Html>
)
export default SpringSalesMail
const paragraph = {
  fontSize: '1rem',
}
const link = {
  color: '#000',
  textDecoration: 'underline',
}
const secondaryCTA = {
  padding: '0.7rem 1rem',
  border: '2px solid #D13928',
  color: '#D13928',
  borderRadius: '15px',
  margin: '0 1rem',
}
const socialIcon = {
  display: 'flex',
  width: '30px',
  height: '30px',
  margin: '0 0.5rem',
  alignItems: 'center',
  justifyContent: 'center',
  borderRadius: '50%',
  backgroundColor: '#000',
}
In the above code, we define a variable, baseUrl that holds the path to the assets folder, depending on our development environment. We use this strategy because the static folder won’t be available during development when you deploy your project. To solve this issue, we need to copy the email assets into the public folder at the root of our Next.js project. Now, when your project is deployed to Vercel, the assets are accessible at https://your-production-url/asset.jpg.
Also, copy all environmental variables in .env.local to your Vercel settings. Here’s how your .env.local should look:
.env.local
VERCEL_URL=https://your-production-url
GMAIL_USER=yourEmail
GMAIL_PASSWORD=yourAppPassword
In React Email, you can pass props like in a regular React component. However, the purpose of these props is to render dynamic values, rather than to execute JavaScript operations. It’s important to note that executing JavaScript in emails is not recommended, as it can lead to security vulnerabilities or even mark your emails as spam.
Next, let’s create a TypeScript interface for the email props and use it within the body:
# spring-sales.tsx
import {
  Html,
  /* other imports */
} from '@react-email/components'

// configure path to assest folder
const baseUrl = process.env.VERCEL_URL ? process.env.VERCEL_URL : '/static'

interface SpringMailProps {
  userName: string
}

export const SpringSalesMail = ({ userName = 'Customer' }: SpringMailProps) => (
  <Html>
    {/* markup... */}
    <Container style={container}>
      <Text style={paragraph}>Dear {userName},</Text>
      {/* markup... */}
    </Container>
    {/* markup... */}
  </Html>
)

/* styling objects... */
export default SpringSalesMail
In the snippet above, we’ve defined a TypeScript interface, SpringMailProps, with a userName field. This interface specifies the structure of the props that our SpringSalesMail component expects to receive. If no username is provided when the email is sent, the variable userName is initialized with a default value of “Customer.”
At this point, you can try sending a test email to yourself. Now that our email template is built, let’s use Nodemailer to send this email to our customers!
Next.js offers a feature called Route Handlers (previously called API Routes) that allows developers to create serverless functions that are automatically deployed on Vercel. Route Handlers can be used for different server-side tasks like querying a database. In our case, we‘ll use it to create a route handler that sends emails with Nodemailer, a popular open source library used to send emails through an SMTP server.
First, let’s install the necessary dependencies:
# navigate to root and install dependencies
cd ..
npm i @react-email/render nodemailer
This will install the React Email’s render utility for compiling our React Email templates and the Nodemailer package. We’ll also need to grab the types for the Nodemailer package:
npm i --save-dev @types/nodemailer
Next, we’ll create an email route handler by creating a new folder called email in app/api and adding a route.ts file inside. This file will contain the logic for handling email requests:
# app/api/email/route.ts
import nodemailer from 'nodemailer'
import { NextApiResponse } from 'next';
import { render } from '@react-email/render'
import { SpringSalesMail } from '../../../react-email-starter/emails/spring-sales'

export async function POST(req: Request, res: NextApiResponse){
  const { name, email } = await req.json()
  const emailHtml = render(SpringSalesMail({ userName: name }));
  // this will log the compiled email template created by React Email
  console.log(emailHtml)
}
In the code snippet above, we retrieve the name and email properties from the request body. After extracting name, we pass it as a prop to the SpringSalesMail component. Then, we use the render utility to compile the marketing email and store the resulting HTML code in the emailHtml variable. Now, we can use Nodemailer’s createTransport and sendEmail functions to send emails from this route.
For this example, we’ll be sending emails from a Gmail account. To follow along, you’ll need to log into your Google profile, enable two-factor authentication, and generate an app password. Ensure you store the password and email address in env.local under GMAIL_PASSWORD and GMAIL_USER, respectively.
Use the code below to send emails from this route:
# app/api/email/route.ts
import nodemailer from 'nodemailer'
import { render } from '@react-email/render'
import { SpringSalesMail } from '../../../react-email-starter/emails/spring-sales'

export async function POST(req: Request) {
  const { name, email } = await req.json()
  const emailHtml = render(SpringSalesMail({ userName: name }))

  const transporter = nodemailer.createTransport({
    service: 'gmail',
    auth: {
      user: process.env.GMAIL_USER,
      pass: process.env.GMAIL_PASSWORD,
    },
    tls: {
      rejectUnauthorized: false,
    },
  })

  const mailOptions = {
    from: process.env.GMAIL_USER,
    to: email,
    subject: "Spring flower sales💐 Don't miss out!",
    html: emailHtml,
  }

  // ensure name and email are included
  if (!name || !email) {
    return new Response(
      JSON.stringify({ message: 'Please submit your name and email' }),
      { status: 400 }
    )
  }

  // send email
  transporter.sendMail(mailOptions, (error, info) => {
    if (error) {
      console.error(error)
      return new Response(
        JSON.stringify({ message: 'Error: Could not send email' }),
        { status: 400 }
      )
    }

    console.log('Email sent: ' + info.response)
    return new Response(
      JSON.stringify({ message: 'Email sent successfully' }),
      { status: 200 }
    )
  })
}
This code snippet creates an email transporter using Nodemailer’s createTransport() function with an email service (in our case, Gmail) and authentication credentials stored in environment variables. The tls object is used to disable server certificate validation; this approach is just for testing purposes and is not recommended for production.
The email details are specified in mailOptions, with the following fields:
from: Set to the same email address stored in the GMAIL_USER environment variableto: Specifies the email address of the recipient — the email from the requestsubject: The email subject linehtml: Contains the HTML content of the email, which is the React Email template stored in emailHtmlThe code checks if the name and email have been submitted. If so, the sendMail() function is called with mailOptions. If an error occurs, an error message is returned with a 400 “bad request.” If the email is successfully sent, a success message is returned with a 200 “request status.”
Now, let’s test this functionality on the frontend! On the app/page.tsx homepage, use the code below to test the email route:
# app/page.tsx
'use client'
import * as React from 'react'

export default function Home() {
  const [name, setName] = React.useState('')
  const [email, setEmail] = React.useState('')
  const [isSending, setIsSending] = React.useState(false)

  const handleSubmit = async (e: React.FormEvent) => {
    e.preventDefault()
    setIsSending(true)

    try {
      const response = await fetch('http://127.0.0.1:3000/api/email', {
        method: 'POST',
        headers: { 'Content-Type': 'application/json' },
        body: JSON.stringify({
          name,
          email,
        }),
        mode: 'no-cors', // disable cors
      })
    } catch (error) {
      console.log(error)
      alert('Something went wrong. Please try again.')
    } finally {
      setIsSending(false)
    }
  }

  return (
    <main className='p-4'>
      <form onSubmit={handleSubmit}>
        <div className='my-2'>
          <label htmlFor='Name'>Name</label>
          <input
            type='text'
            className='text-black'
            value={name}
            onChange={(e) => setName(e.target.value)}
            required
          />
        </div>
        <div className='my-2'>
          <label htmlFor='Name'>Email</label>
          <input
            type='email'
            className='text-black'
            value={email}
            onChange={(e) => setEmail(e.target.value)}
            required
          />
        </div>
        <button
          type='submit'
          className='p-2 transition-colors bg-blue-500 rounded-sm disabled:bg-blue-300'
          disabled={isSending}
        >
          Send Email
        </button>
      </form>
    </main>
  )
}
And that’s the full gist of creating and sending emails with React Email!
Next, let’s see how React Email compares to MJML, a popular open source library in the email templating niche.
MJML is an open source email framework created by Mailjet in 2015 to simplify the process of creating responsive email templates by providing prebuilt components — similar to React Email. MJML has a proven track record and has been tested across multiple email clients.
Despite MJML’s popularity and longevity, there are several reasons why you might consider using a modern email templating solution, like React Email, instead of MJML. Let’s take a look.
The React Email team advocates for and prioritizes improving the developer experience. As a result, React Email is easy to use, integrates well with existing email service providers, and includes a provision for testing emails during development. The library was built with developers in mind, which is always a win.
MJML’s syntax is difficult to scan through, as every component is prefixed with mj-. Here’s a sample:
<mjml>
  <mj-head />
  <mj-body>
    <mj-section>
      <mj-text>Hello World!</mj-text>
    </mj-section>
  </mj-body>
</mjml>
In contrast, React Email’s syntax is much cleaner and, if you’re familiar with JSX, the learning curve is easier.
React Email was created to rethink and innovate the email creation and sending processes. By integrating with modern tools like Next.js, SendGrid, and Tailwind, you can be certain that the library is future-proof.
React Email has a supportive community that is constantly adding new features, fixing bugs, and helping developers get started with the library. In contrast, MJML’s community has dwindled recently. For example, its previous solution for using MJML with React is now deprecated.
MJML is still a solid choice for creating emails, particularly for creating responsive emails as React Email lacks in this department. Moreover, because React Email is relatively new, you may encounter more bugs. Your choice of email templating solution should ultimately depend on your project’s needs.
React Email is a modern tool that simplifies email creation by enabling React developers to leverage the power of React’s component-based architecture. With React Email, developers can create beautiful and reusable email templates without cumbersome table syntax.
React Email still has room for improvement but the project has a promising roadmap that includes a VS Code extension for previewing emails. As a React developer, you can contribute to the growth of this project by providing feedback and contributing to the community. Even in its current state, React Email offers a great developer experience, and I am excited about its future potential.
All of the code used in this article is available on GitHub.
Install LogRocket via npm or script tag. LogRocket.init() must be called client-side, not
server-side
$ npm i --save logrocket

// Code:

import LogRocket from 'logrocket';
LogRocket.init('app/id');
// Add to your HTML:

<script src="https://cdn.lr-ingest.com/LogRocket.min.js"></script>
<script>window.LogRocket && window.LogRocket.init('app/id');</script>

Learn how to set up Meilisearch, index documents, and build keyword, semantic, and hybrid search with AI-powered retrieval.

Compare pnpm and npm across security defaults, disk usage, dependency strictness, and workspace policy to decide which package manager fits your project.

I migrated 20 production-style components from Tailwind to StyleX. Here’s what the data showed about LOC, CSS bundle size, build time, and type safety.

A guide for using JWT authentication to prevent basic security issues while understanding the shortcomings of JWTs.
Would you be interested in joining LogRocket's developer community?
Join LogRocket’s Content Advisory Board. You’ll help inform the type of content we create and get access to exclusive meetups, social accreditation, and swag.
Sign up now

