With the rise of social media applications, the need for businesses to remain relevant and reach a wider audience cannot be overemphasized. As engineers, we often build products that impact people’s lives. While our solutions might be great, getting those solutions into the hands of users often takes more than just shipping them into production.

As our applications become more interconnected, it is increasingly important for our users to be able to share content with other applications — and thus, other audiences.
The aim of this article is to show you how to achieve content sharing with other applications in a React Native-powered application.
Before we explore the how and what of sharing, let’s consider the why first from the user’s perspective. Why do our mobile applications need to have content-sharing functionality? From the user’s perspective, sharing content with other apps helps them to:
From a business perspective, users sharing content from one application or social network to another increases the visibility and audience of the business. Think of it as an indirect form of word of mouth, from one user to their networks. A user who shares opens the door to potential new users of the application.
From the developer’s perspective, there are a few ways we can provide this functionality. React Native provides a package that enables sharing features for its powered mobile applications. Let’s dive briefly into this package.
To give us a sense of perspective, let’s install the share package from React Native, like so:
javascript
import React from 'react';
import { Share, View, Button } from 'react-native';

const ShareExample = () => {
  const onShare = async () => {
    try {
      const result = await Share.share({
        message:
          'React Native | A framework for building native apps using React',
      });
      if (result.action === Share.sharedAction) {
        if (result.activityType) {
          // shared with activity type of result.activityType
        } else {
          // shared
        }
      } else if (result.action === Share.dismissedAction) {
        // dismissed
      }
    } catch (error) {
      alert(error.message);
    }
  };
  return (
    <View style={{ marginTop: 50 }}>
      <Button onPress={onShare} title="Share" />
    </View>
  );
};

export default ShareExample;
Please note: This code was taken from the share package documentation.
The share method accepts two parameters: content and options. content has three fields; message, title, and url. The url field only works in iOS.
The problem with the share package from React Native is that it’s quite limited in its functionality. For example, you can’t easily share other forms of data like PDF or audio files using this package. With share from React Native, you can’t also share to specific social apps — e.g., to Instagram Stories.
To get around these limitations, we can use the more robust React Native Share package.
React Native Share was born out of React Native’s ever-growing community of contributors. It’s a package that enables social sharing with other applications and comes with inbuilt functionalities such as sharing PDF files, images, and such like on Facebook Stories and other social applications.
Let’s explore this package with a demo. For this demo, I’ll be using Expo. You can follow along by starting with a bare workflow. I won’t cover the installation part of this demo as the Expo docs discuss this in sufficient detail.
I’ll also be running this project in an Android emulator, but you can feel free to use the OS platform you’re targeting.
Run expo init <your_app_name> to get started.
As previously mentioned, to install the React Native Share package, please follow the Expo installation instructions.
After installing the package, run npm start and then npm run <os_name e.g. android> to start the application.
Let’s start with something simple: sharing a link.
javascript
import { StatusBar } from "expo-status-bar";
import React from "react";
import { StyleSheet, Text, View, Button } from "react-native";
import Share from "react-native-share";

const url = "https://awesome.contents.com/";
const title = "Awesome Contents";
const message = "Please check this out.";

const options = {
  title,
  url,
  message,
};

export default function App() {
  const share = async (customOptions = options) => {
    try {
      await Share.open(customOptions);
    } catch (err) {
      console.log(err);
    }
  };

  return (
    <View style={styles.container}>
      <Text>Open up App.js to start working on your app!</Text>
      <StatusBar style="auto" />
      <Button
        onPress={async () => {
          await share();
        }}
        title="Share"
      />
    </View>
  );
}

const styles = StyleSheet.create({
  container: {
    flex: 1,
    backgroundColor: "#fff",
    alignItems: "center",
    justifyContent: "center",
  },
});
Let’s understand what’s going on. First, we import the React Native Share package, then define three sets of options:
Then, we create a share function that handles calling the share’s open method and the options props are passed to this method. Next, we then pass this share function to a button.
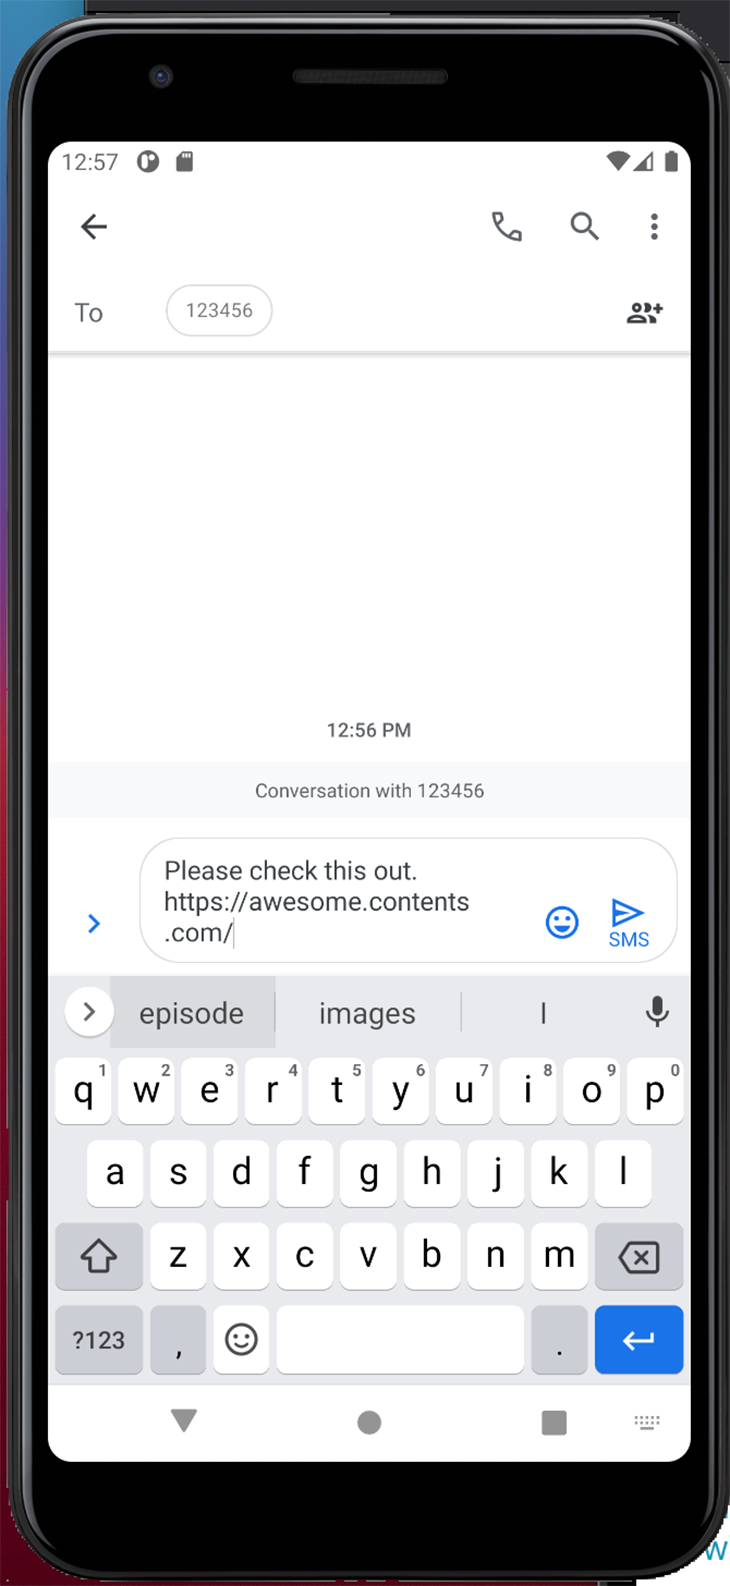
If you test this on the emulator, you’d see different share options available. I’ll use the SMS option. When you select this, you’d see the message and URL set in the body of the SMS.
Next, let’s share an image and a PDF file. To share media files, you’ll need to share the base64 encoded format of the file. For this tutorial, I’ve included a base64.js file that contains an image and PDF converted to the base64 format.
javascript
import { StatusBar } from "expo-status-bar";
import React from "react";
import { StyleSheet, Text, View, Button, Image } from "react-native";
import Share from "react-native-share";
import file from "./assets/base64";

const url = "https://awesome.contents.com/";
const title = "Awesome Contents";
const message = "Please check this out.";

const options = {
  title,
  url,
  message,
};
export default function App() {
  const [image, setImage] = React.useState(
    "file:///data/user/0/com.rnshare/cache/rn_image_picker_lib_temp_0f9dbf03-c89c-4728-a763-6b15e3752f8e.jpg"
  );
  const share = async (customOptions = options) => {
    try {
      await Share.open(customOptions);
    } catch (err) {
      console.log(err);
    }
  };

  return (
    <View style={styles.container}>
      <Text>Open up App.js to start working on your app!</Text>
      <StatusBar style="auto" />
      <Image
        source={{
          uri: image,
        }}
        style={{ ...styles.containerImg, ...styles.stretchImg }}
      />
      <View style={{ marginVertical: 5 }}>
        <Button
          onPress={async () => {
            await share();
          }}
          title="Share Text"
        />
      </View>
      <View style={{ marginVertical: 5 }}>
        <Button
          onPress={async () => {
            await share({
              title: "Sharing image file from awesome share app",
              message: "Please take a look at this image",
              url: file.img,
            });
          }}
          title="Share Image"
        />
      </View>
      <View style={{ marginVertical: 5 }}>
        <Button
          onPress={async () => {
            await share({
              title: "Sharing pdf file from awesome share app",
              message: "Please take a look at this file",
              url: file.pdf,
            });
          }}
          title="Share pdf"
        />
      </View>
    </View>
  );
}

const styles = StyleSheet.create({
  container: {
    flex: 1,
    backgroundColor: "#fff",
    alignItems: "center",
    justifyContent: "center",
  },
  containerImg: {
    paddingTop: 50,
    marginVertical: 20,
  },
  stretchImg: {
    width: 200,
    height: 200,
    resizeMode: "stretch",
  },
});
The image I’m sharing is present on the emulator.
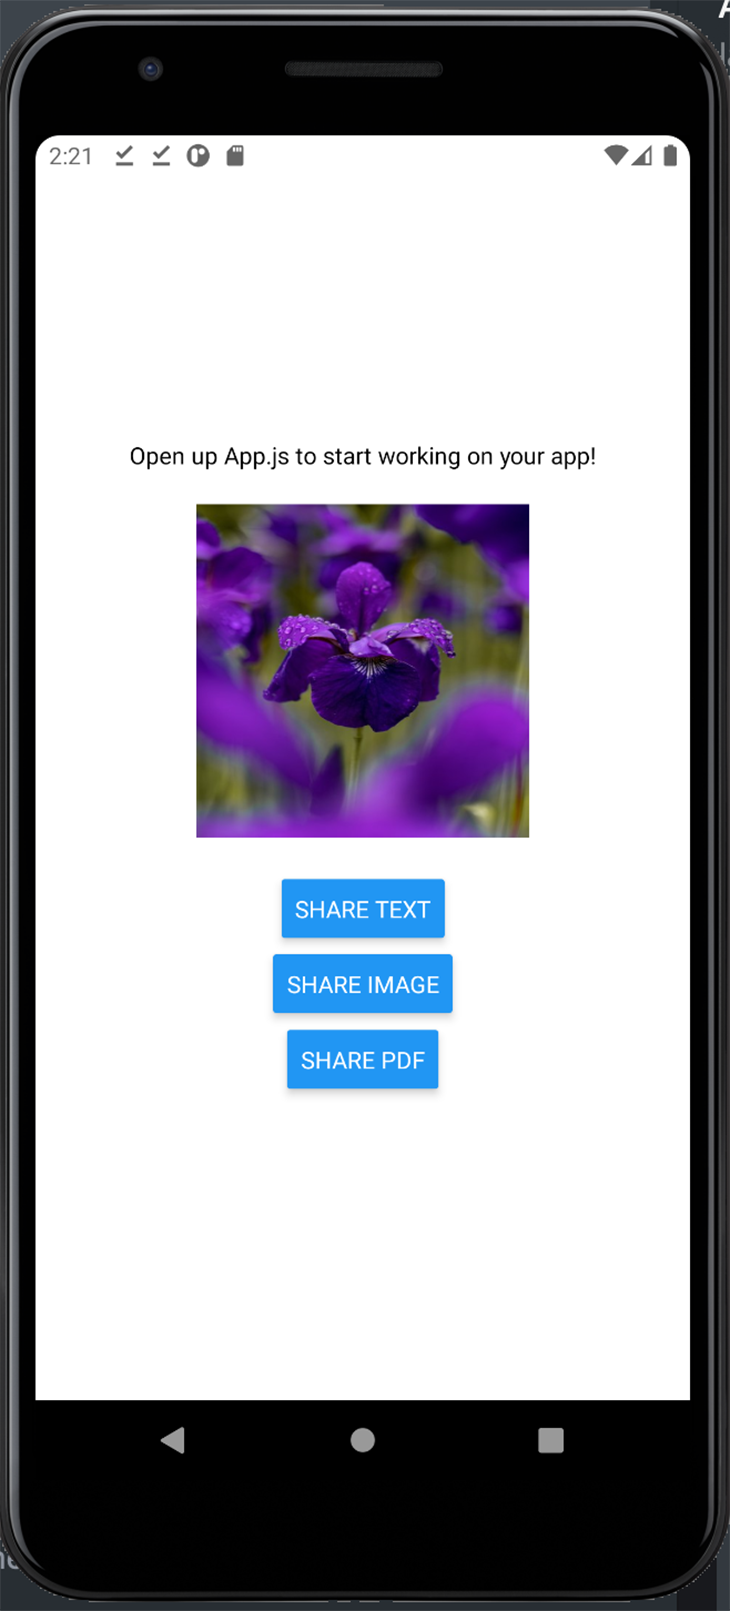
I’ve created two buttons — one to share the image, and another to share the encoded PDF file on the emulator.
When you tap the Share Image button, a UI that contains different apps that support sharing is displayed. You can then tap any of the apps through which you’d like to share.
It’s important to note that depending on the file type you’re sharing, some applications will not be displayed. For example, when you’re sharing a PDF file, photo applications would not be displayed in the list of shareable destinations.

We’ve only scratched the surface here, there’s a ton of things you can do with the React Native Share package. You can share directly to a specific application, e.g., WhatsApp if that’s what your use case requires. Let’s see how.
Add the following method below the initial share function created.
javascript
  const singleShare = async (customOptions) => {
    try {
      await Share.shareSingle(customOptions);
    } catch (err) {
      console.log(err);
    }
  };
Next, add the code below the last button:
javascript
 <View style={{ marginVertical: 5 }}>
        <Button
          onPress={async () => {
            await singleShare({
              title: "Share via whatsapp",
              message: "some awesome dangerous message",
              url: file.pdf,
              social: Share.Social.WHATSAPP,
              whatsAppNumber: "9199999999",
              filename: file.pdf,
            });
          }}
          title="Share to whatsapp"
        />
 </View>
So, let’s break it down. We access the singleShare method on the share package and it accepts similar options as the open method with additional properties. We pass the social app we want to target, followed by the whatsAppNumber, and lastly, we pass the file we want to share.
There’s support for tons of other social apps; please check the documentation for a list of them.
In the previous code, we assumed that the user has WhatsApp installed. While this may be true given the number of app downloads it has, we can’t make this assumption as engineers.
What if we wanted to detect if a user has an app installed? Luckily for us, the React Native Share package provides us with a useful method for that.
Let’s see it in action reusing our WhatsApp example, but do so by first confirming that the user has WhatsApp installed.
Refactor the singleShare function:
javascript
 const singleShare = async (customOptions) => {
    try {
      const { isInstalled } = await Share.isPackageInstalled(
        "com.whatsapp.android"
      );

      if (isInstalled) {
        await Share.shareSingle(customOptions);
      } else {
        Alert.alert(
          "Whatsapp not installed",
          "Whatsapp not installed, please install.",
          [{ text: "OK", onPress: () => console.log("OK Pressed") }]
        );
      }
    } catch (err) {
      console.log(err);
    }
  };
We first check if WhatsApp is installed using the isPackageInstalled method and passing the ID of the application. This ID must be a valid iOS or Android application ID. Then, if it’s installed, we call the singleShare method, else we alert the user that WhatsApp isn’t installed.
Unfortunately, the isPackageInstalled method only works for Android, but you can use the Linking.canOpenURL(<app_schema>) to check if the app is installed on the user’s device in iOS.
We’ve come a long way! We started by exploring the inbuilt share package from React Native and looked at its limitations. Next, we checked out the React Native Share package and the superpowers it gives us in sharing various types of media with various social apps.
One improvement we can make to our application is to first detect if certain, specific social apps, like WhatsApp, are installed on the application during the initial render, then hide or show the Share to WhatsApp button. This provides a better user experience.
It’s important to note that the React Native Share package doesn’t yet support Expo-managed, bootstrapped applications. In addition, this won’t work with the Expo Go client, even if you’re using a bare workflow. If your project is using Expo and depends on the Expo Go client, you should check out the Expo share package instead.
I hope in some way I’ve helped you understand how to enable the share feature in your apps. Go build something great, I am rooting for you.

LogRocket's Galileo AI watches sessions for you and and surfaces the technical and usability issues holding back your React Native apps.
LogRocket also helps you increase conversion rates and product usage by showing you exactly how users are interacting with your app. LogRocket's product analytics features surface the reasons why users don't complete a particular flow or don't adopt a new feature.
Start proactively monitoring your React Native apps — try LogRocket for free.

A guide for using JWT authentication to prevent basic security issues while understanding the shortcomings of JWTs.

Discover how to build, render, and automate product demo videos with Remotion, replacing traditional screen recordings with reusable React code.

Chrome’s Modern Web Guidance embeds modern web platform skills into AI coding agents, helping them choose native HTML, CSS, and browser APIs over legacy patterns.

Learn how to use Fallow to analyze AI-generated code, detect dead code, duplicate logic, and complexity issues, and integrate automated code quality checks into your AI-assisted development workflow.
Would you be interested in joining LogRocket's developer community?
Join LogRocket’s Content Advisory Board. You’ll help inform the type of content we create and get access to exclusive meetups, social accreditation, and swag.
Sign up now

