In modern web development, it’s common to build full-stack applications that consist of a frontend framework, like React, and a backend framework, like Express.js. In this model, React contributes a robust and interactive user interface, while Express handles server-side logic, data storage, and API endpoints.

To efficiently develop and test these applications, it’s essential to run React and Express servers simultaneously. One option is to manually start each server using separate terminal windows or tabs, but this approach is cumbersome and inefficient. An option is to use the concurrently or npm-run-all CLI tools designed to run multiple npm-scripts in parallel or sequentially.
In this article, we’ll explore how to set up and run React and Express together using the concurrently command-line tool to achieve streamlined development workflow, efficient management of frontend-backend integration, and enhanced productivity.
Jump ahead:
The Replay is a weekly newsletter for dev and engineering leaders.
Delivered once a week, it's your curated guide to the most important conversations around frontend dev, emerging AI tools, and the state of modern software.
The concurrently command-line tool allows you to run multiple commands or scripts simultaneously from a single terminal window, providing a convenient way to manage and orchestrate different processes within a development environment. concurrently is often used in the context of running React and Express together to streamline the development workflow.
Here’s how concurrently simplifies the development process:
concurrently supports running multiple scripts or commands in parallel. This means you can define separate scripts for starting the React and Express servers in your package.json file, and concurrently will execute them together.
For example, in your package.json file, you can define scripts, like so:
"scripts": {
  "start:frontend": "react-scripts start",
  "start:backend": "node server.js",
  "start": "concurrently \"npm run start:frontend\" \"npm run start:backend\""
}
The start script uses concurrently to execute both the frontend and backend scripts simultaneously. When you run the npm start command, concurrently will start the React and Express servers, allowing them to work together seamlessly.
Additionally, concurrently provides options to customize behavior, such as controlling the number of processes running simultaneously, specifying custom names for processes, and more. These options allow you to fine-tune the execution of multiple scripts based on your specific requirements.
To set up the React frontend, open your terminal, navigate to the desired directory for your project, and run the following commands:
> yarn create react-app concurrently-app
> cd concurrently-app
> mkdir server
> touch server/index.js
The above code creates a React app, as well as a server/index.js file inside the root directory for the backend application.
Next, install the express and nodemon packages. Nodemon is a tool that automatically restarts the server whenever changes are made, facilitating a smoother development experience:
> yarn add express
> yarn add -D nodemon
In the server/index.js file add the following code:
// server/index.js

const express = require("express");
const users = require("./users.json");

const app = express();

const PORT = 3001;

app.get("/api/users", (req, res) => {
  return res.json(users);
});

app.listen(PORT, () => console.log(`Listening on port ${PORT}`));
The code sets up an Express server that listens on port 3001. The server has a single API endpoint, /api/users, that responds with JSON data from the users.json file. When a request is made to the /api/users endpoint, the server sends back the JSON data containing user information.
Now let’s have a look at the React component:
// src/App.js

import { useEffect, useState } from "react";
import "./App.css";

function App() {
  const [users, setUsers] = useState([]);

  useEffect(() => {
    fetch(`/api/users`)
      .then((res) => res.json())
      .then((data) => setUsers(data));
  }, []);

  return (
    <div className="App">
      <h1>Users</h1>
      {users.map((user) => (
        <p key={user.id}>{user.name}</p>
      ))}
    </div>
  );
}

export default App;
The <App /> component fetches data from the backend, using the fetch API and the /api/users endpoint, and then renders the user names received from the backend API. The useEffect Hook is used to fetch the data when the component mounts. The fetched data is stored in the users state variable using the useState Hook.
Now, add the following code to your package.json file:
// package.json

{
...
  "scripts": {
    ...
    "start:frontend": "react-scripts start",
    "start:backend": "nodemon server/index.js"
  },
  "proxy": "http://localhost:3001"
}
The proxy field specifies the proxy server that will be used in development. It is set to http://localhost:3001, meaning any API requests made from the React frontend to endpoints starting with /api will be automatically proxied to the Express backend server running on port 3001.
It’s time to integrate the concurrently CLI. Begin by installing concurrently as a development dependency in your project. Open your terminal and run the following:
> yarn add -D concurrently
This command installs concurrently and makes it available for use in your project. Next, configure the "scripts" section of your project’s package.json file to use concurrently:
"scripts": {
  ...
  "start:frontend": "react-scripts start",
  "start:backend": "nodemon server/index.js",
  "start": "concurrently \"npm run start:frontend\" \"npm run start:backend\""
},
In the above configuration, the start:frontend script runs the React frontend using react-scripts start, and start:backend script starts the Express backend using nodemon server/index.js. In the start script, Concurrently is used to execute both the start:frontend and start:backend scripts simultaneously.
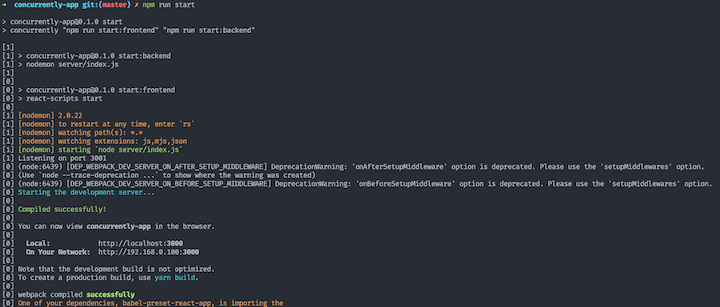
After running the npm run start command in your terminal, you should see the following output:

Here’s what you’ll see in the browser:

As you can see in the above terminal screen, it can be challenging to identify the source of console output and to distinguish between the frontend and backend processes. The basic configuration serves well for simple setups and fast initiation, but concurrently provides additional customization and flexibility options to enhance the development experience.
To enable a custom configuration, modify the "start" script according to the following snippet:
"scripts": {
    ...
    "start": "concurrently -n \"FRONTEND,BACKEND\" -c \"red,blue\" -p \"[{name}]\" \"npm run start:frontend\" \"npm run start:backend\""
  }
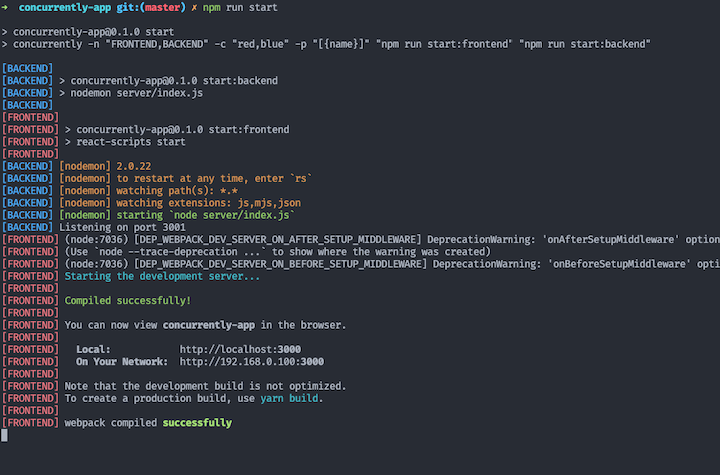
Now, when you run the npm run start command, you’ll see much clearer identification and differentiation between the frontend and backend processes in the console output:

Let’s take a closer look at the command options:
-n: Specifies the names of the processes, in this case, FRONTEND and BACKEND are used; allows us to customize the names of the concurrent processes for better clarity in the console output-c: Specifies the colors of the processes, in this case, red and blue are used; helps differentiate the console output of the two processes for easier identification-p: Specifies the pattern for the console output, in this case, [{name}] is used with the name specified by the -n option; this pattern helps distinguish the output of each processThe custom configuration provides a foundation for scalability and adaptability. As your application grows, you can easily modify the names, colors, and patterns to accommodate additional concurrent processes or specific requirements. It allows for easy customization based on your project’s needs, making it suitable for more advanced or complex applications.
Running React and Express with concurrently greatly simplifies the development process and enhances workflow when building full-stack applications. Developers can use concurrently to seamlessly run both the frontend and backend servers simultaneously from a single terminal window. Whether using a basic configuration or opting for a more customized setup, concurrently offers flexibility and convenience.
Devs can leverage the capabilities of concurrently to effectively construct and test full-stack applications, guaranteeing smooth integration between the React frontend and Express backend. This streamlined approach enhances productivity, enables rapid iteration, and ultimately leads to better DevEx.
Install LogRocket via npm or script tag. LogRocket.init() must be called client-side, not
server-side
$ npm i --save logrocket

// Code:

import LogRocket from 'logrocket';
LogRocket.init('app/id');
// Add to your HTML:

<script src="https://cdn.lr-ingest.com/LogRocket.min.js"></script>
<script>window.LogRocket && window.LogRocket.init('app/id');</script>

@container scroll-state: Replace JS scroll listeners nowCSS @container scroll-state lets you build sticky headers, snapping carousels, and scroll indicators without JavaScript. Here’s how to replace scroll listeners with clean, declarative state queries.

Explore 10 Web APIs that replace common JavaScript libraries and reduce npm dependencies, bundle size, and performance overhead.

Russ Miles, a software development expert and educator, joins the show to unpack why “developer productivity” platforms so often disappoint.

Discover what’s new in The Replay, LogRocket’s newsletter for dev and engineering leaders, in the February 18th issue.
Would you be interested in joining LogRocket's developer community?
Join LogRocket’s Content Advisory Board. You’ll help inform the type of content we create and get access to exclusive meetups, social accreditation, and swag.
Sign up now