Recently, the product team at my company discovered the majority of our users were not utilizing filters when using our search interface.

After looking at our analytics, it became apparent users weren’t engaging with filters because they didn’t know they existed.
To fix this problem, we decided to rebuild our UI in order to highlight this functionality.
But building a new search interface came with its own set of problems. In our case, we had three main concerns:
We achieved all of our objectives by using React’s Context API in conjunction with refs to create a centralized system for managing menu states and input focus.
In this article, we’ll cover the following:
Context: basic usage and strategies for injecting data anywhere in your component tree
Refs: what they are and why our use case calls for them
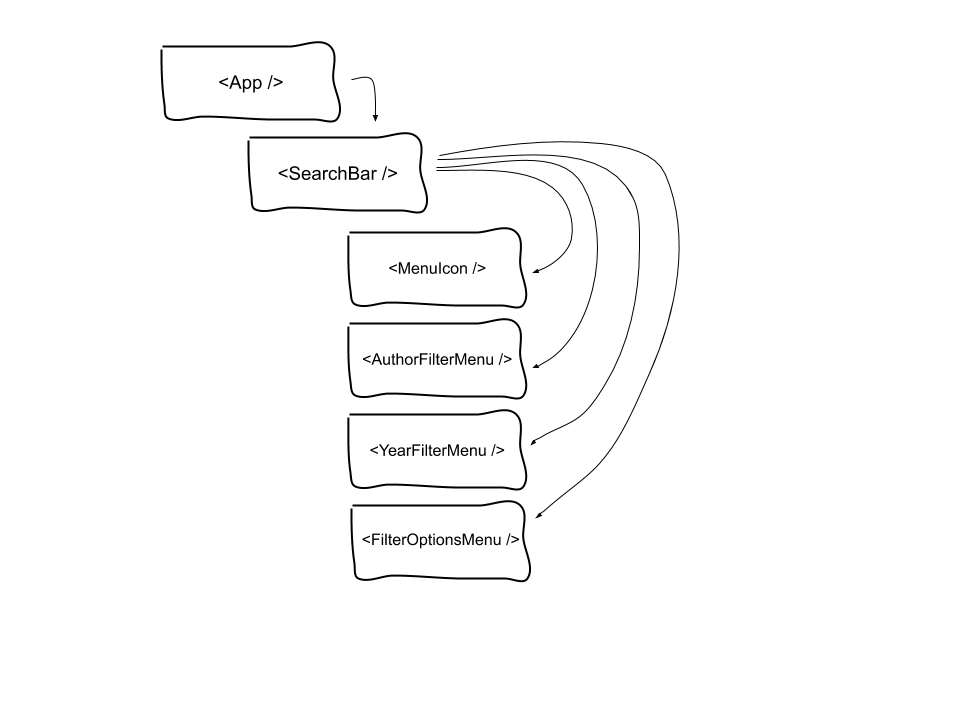
The official Context API was added to React in v16.3 and is intended to avoid what is commonly known as prop drilling, or manually passing props down a component tree.
While there is nothing wrong with this approach, it can be unwieldy when dealing with complex component hierarchies, especially if some components don’t care about the data and are simply passing it on.

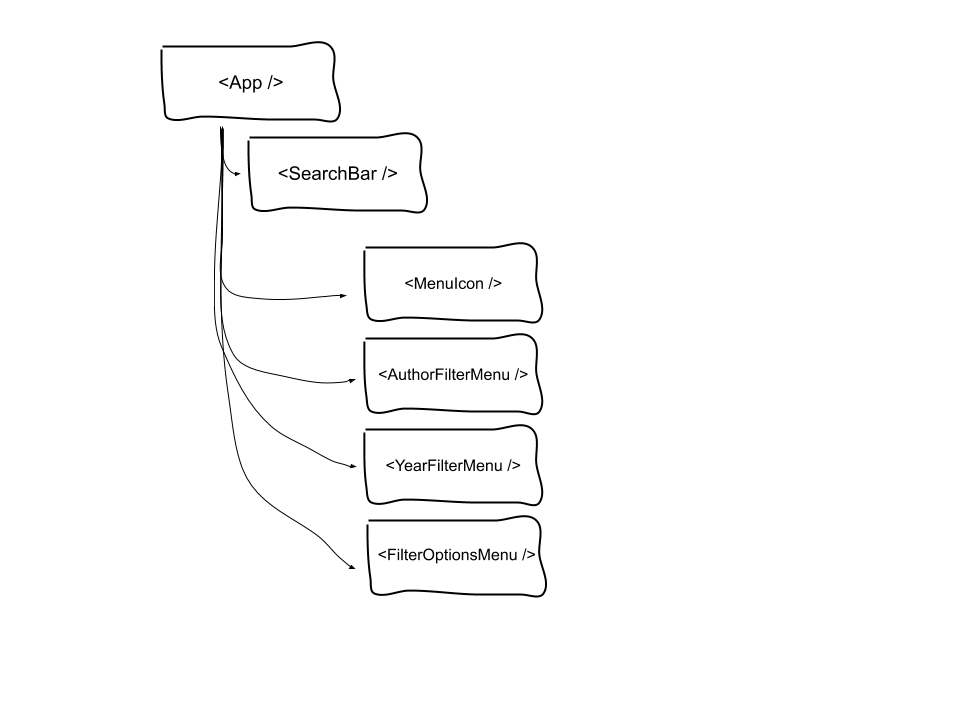
In order to use the Context API, you need to create a Context.Provider that takes a value prop representing all the data you want to inject into the child components that need it.
Before the advent of Hooks, you would do this by using an associated Context.Consumer, but in the post-Hooks world, we can leverage the useContext Hook to subscribe a component to the closest Provider above it in the component tree.

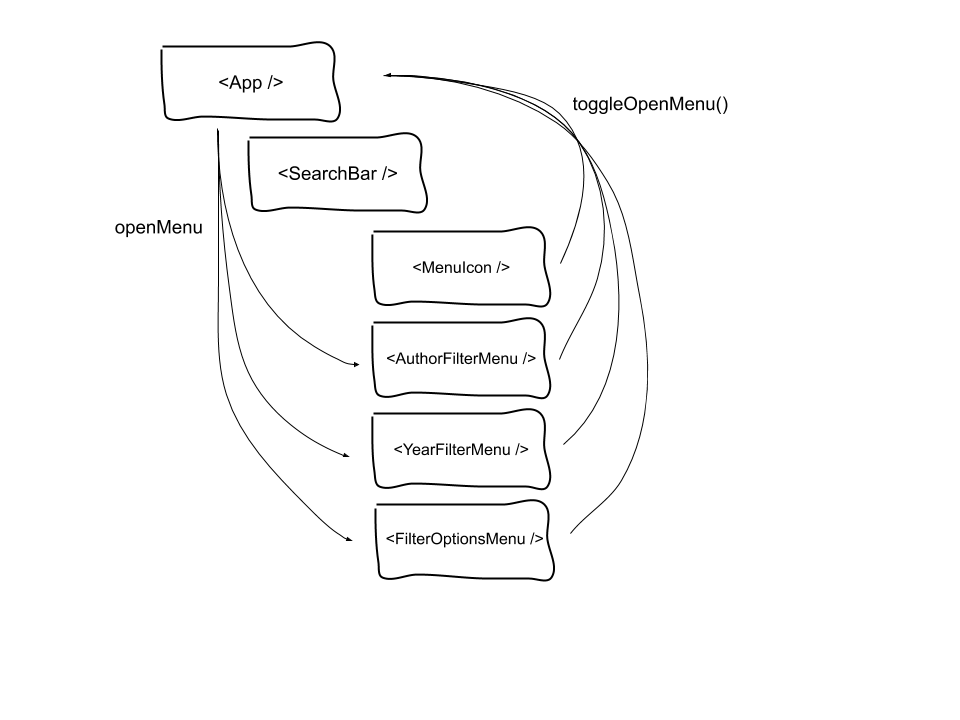
In this case, Context provides a way to keep track of which menu should be open in our parent component, and then passes that value down to its children who, in turn, conditionally render the appropriate dropdown.
The key here is that our Context also passes down a setter function. This is important because it allows the components consuming our context value to then update the state in our parent component, which causes the tree to re-render with the new menu now visible.

By using the pattern described above, we can similarly manage the focus state of the various inputs in the search bar and filter menus.
While they have been part of React for a while, refs can still be somewhat confusing even for more experienced developers.
Essentially, React provides a special ref attribute that can be applied to any element (JSX or HTML).
Depending on what type of element you assign it to, the ref provides access to that class instance or DOM element, respectively.
// Applying a ref directly to an HTML element
<input
  className="AuthorFilterMenu__filter-input"
  ref={authorFilterInputRef}
  placeholder="Filter by author..."
  value={filterInputValue}
  type="search"
  onInput={event => {
    setFilterInputValue(event.currentTarget.value);
  }}
/>

// Applying a ref to a React component instance
<AuthorFilterMenu ref={authorFilterInputRef} />
view rawex-1-applying-refs.js hosted with ❤ by GitHub
// Provide value in App.jsx
<section className="App__search">
  <SearchContext.Provider
    value={{
      openMenu: openMenu,
      toggleOpenMenu: toggleOpenMenu,
      addAuthor: addAuthor,
      addYear: addYear,
      selectedAuthors: selectedAuthors,
      selectedYears: selectedYears,
      authorFilterInputRef: authorFilterInputRef,
      searchBarRef: searchBarRef,
      yearFilterInputRef: yearFilterInputRef
    }}
  >
    <SearchBar />
  </SearchContext.Provider>
</section>

// In AuthorFilterMenu.jsx, we grab the ref from the searchContext
function AuthorFilterMenu(props) {
  const contextValue = React.useContext(SearchContext);
  const {
    addAuthor,
    openMenu,
    selectedAuthors,
    authorFilterInputRef
  } = contextValue;
}

// And then we apply it to the <input>
return (
  <div className={menuCn}>
    <input
      className="AuthorFilterMenu__filter-input"
      ref={authorFilterInputRef}
      placeholder="Filter by author..."
      value={filterInputValue}
      type="search"
      onInput={event => {
        setFilterInputValue(event.currentTarget.value);
      }}
    />
    <ul className="AuthorFilterMenu__list">{createMenuItems()}</ul>
  </div>
);
Though our use case requires us to go down this road, it is important to note that refs are a React antipattern because they allow direct DOM access. React does not really intend for developers to do this, so when using refs you should proceed with caution.
Alternatively, React is designed to have events update the virtual DOM (a snapshot of the document object model kept in memory,) and allow the framework to update the page as needed in a process known as reconciliation.
This not only makes React more performant by reducing the work done to update the page, but it also makes for a more consistent user experience.
For us, we need to directly access the three inputs in our component tree in order to use the browser’s .focus() method. Since we need to change focus states for our inputs based on user interaction, it makes sense to keep this logic in our parent component, too.
We’ll create three different refs in our parent component that will point to the following:
Using our Context, we can then pass these refs down to our child components. In the child component, we destructure the appropriate ref off the component’s props object and assign it directly to our HTML input:
// Applying a ref directly to an HTML element
<input
  className="AuthorFilterMenu__filter-input"
  ref={authorFilterInputRef}
  placeholder="Filter by author..."
  value={filterInputValue}
  type="search"
  onInput={event => {
    setFilterInputValue(event.currentTarget.value);
  }}
/>

// Applying a ref to a React component instance
<AuthorFilterMenu ref={authorFilterInputRef} />
view rawex-1-applying-refs.js hosted with ❤ by GitHub
// Provide value in App.jsx
<section className="App__search">
  <SearchContext.Provider
    value={{
      openMenu: openMenu,
      toggleOpenMenu: toggleOpenMenu,
      addAuthor: addAuthor,
      addYear: addYear,
      selectedAuthors: selectedAuthors,
      selectedYears: selectedYears,
      authorFilterInputRef: authorFilterInputRef,
      searchBarRef: searchBarRef,
      yearFilterInputRef: yearFilterInputRef
    }}
  >
    <SearchBar />
  </SearchContext.Provider>
</section>

// In AuthorFilterMenu.jsx, we grab the ref from the searchContext
function AuthorFilterMenu(props) {
  const contextValue = React.useContext(SearchContext);
  const {
    addAuthor,
    openMenu,
    selectedAuthors,
    authorFilterInputRef
  } = contextValue;
}

// And then we apply it to the <input>
return (
  <div className={menuCn}>
    <input
      className="AuthorFilterMenu__filter-input"
      ref={authorFilterInputRef}
      placeholder="Filter by author..."
      value={filterInputValue}
      type="search"
      onInput={event => {
        setFilterInputValue(event.currentTarget.value);
      }}
    />
    <ul className="AuthorFilterMenu__list">{createMenuItems()}</ul>
  </div>
);
Now, whenever one of the child components calls our menu state setter function to toggle a menu, we can add logic to also update which input is in focus.
For example, if one of our filter menus is open and then closes, we would want to refocus the search input bar to allow the user to continue their query.
One thing to note here is that function components don’t play well with refs.
In order to pass a ref into a function component, you will need to use React.forwardRef, which creates a new component that receives a ref attribute and then passes it on to another component below.
For a more detailed look at how to use* forwardRef, check out the official React docs.
While Context is a relatively new API and refs are somewhat of an antipattern, they compliment each other well in this case. By combining the two together, we are able to create a more straightforward way of managing both display and focus states within our new search interface.
While we didn’t use any stores in this example, you could easily wire one up and include it in this data flow.
For example, in the project I built at work, my parent component was subscribed to a store that provided a list of the items to be rendered in our dropdown menus.
Once the parent received this data, it added it to our Context’s value prop and passed it down to the child components.
Ultimately, the ability to centrally locate logic in this way allows for a more consistent user experience.
By using Context, we easily decoupled our business logic and data fetching from the presentation and functionality of our UI components.
We also made our code easier for other developers to read in the future, which is never a bad thing!
For the full tutorial, check out this demo: Demo App.
Install LogRocket via npm or script tag. LogRocket.init() must be called client-side, not
server-side
$ npm i --save logrocket

// Code:

import LogRocket from 'logrocket';
LogRocket.init('app/id');
// Add to your HTML:

<script src="https://cdn.lr-ingest.com/LogRocket.min.js"></script>
<script>window.LogRocket && window.LogRocket.init('app/id');</script>
Hey there, want to help make our blog better?
Join LogRocket’s Content Advisory Board. You’ll help inform the type of content we create and get access to exclusive meetups, social accreditation, and swag.
Sign up now
Learn how OpenAPI can automate API client generation to save time, reduce bugs, and streamline how your frontend app talks to backend APIs.

Discover how the Interface Segregation Principle (ISP) keeps your code lean, modular, and maintainable using real-world analogies and practical examples.

<selectedcontent> element improves dropdowns

Learn how to implement an advanced caching layer in a Node.js app using Valkey, a high-performance, Redis-compatible in-memory datastore.