
Editor’s note: This article was last reviewed and updated for accuracy by Shad Mirza on 8 February 2023.

As of February 2023, 60 percent of all website traffic comes from people using mobile devices. With that, the need to make great mobile apps is increasing along with different ways to build mobile apps.
With the increasing demand for hybrid apps, new frameworks are emerging that help us build cross-platform apps rapidly. This is in addition to existing frameworks like SwitchUI, React Native, Cordova, Xamarin, Ionic, Jetpack Compose, and Flutter.
Today, we will build an app using Ionic and React Native to compare these two frameworks based on a series of criteria. We will understand where these two frameworks shine and what the tradeoffs are. Let’s start!
Jump ahead:
The Replay is a weekly newsletter for dev and engineering leaders.
Delivered once a week, it's your curated guide to the most important conversations around frontend dev, emerging AI tools, and the state of modern software.
Ionic is an open source UI toolkit for building performant, high-quality mobile apps using web technologies. It’s platform agnostic, meaning we can build apps using React, Angular, and even Vue.
You can quickly build an Ionic app using HTML, CSS, JavaScript, and the Ionic UI kit’s components that look beautiful on every platform. These high-level components make the building block of an Ionic app. We build Ionic apps for the web and deploy them to Android and iOS devices with the help of WebView wrapper. Such apps are called Hybrid apps.
Because all the devices use the same web app, we can share the code across all platforms and save time. Ionic apps are web-first, so supporting native features like camera, GPS, etc., takes an extra step.
We must install plugins for every native feature we want to use with Cordova or Capacitor. Having the possibility to use native features, along with the speed of iterating using HTML and CSS, makes Ionic an excellent option for building cross-platform hybrid apps.
We’re going to build a basic Rock, Paper, Scissors game with React and Ionic. This demo will help us understand and compare the Ionic development workflow to ReactNative.
First, let’s install the @ionic/cli package to help us bootstrap an Ionic app:
npm install -g @ionic/cli
Now, we can use this package to create our app:
ionic start ionic-rock-paper-scissors blank --type react
Notice the --type react in the command above. It denotes that we are choosing React as our framework. You can also pick Angular or Vue.
Once our app creation is complete, we can start the local development server with the command below:
ionic serve
It should open the app in your browser:
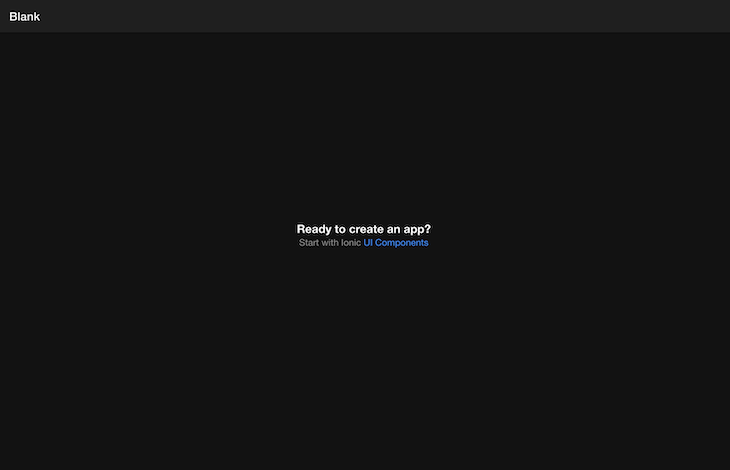
If you notice the folder structure, we already have a src folder created, and a few boilerplate files added. This is helpful because we can start changing some of the bootstrapped code and see our change on the browser.
The /pages directory includes all the pages our app contains. We are good with the home.jsx page for now, but we can always add more.
Similarly, the /components directory includes all the components. We can create a new component, GameContainer.jsx, and start writing our code.
Let’s start with adding some JSX, which will render the app. We will begin to add logic after that:
import { IonButton } from "@ionic/react";
import "./GameContainer.css";

const GameContainer = () => {
  return (
    <div className="container">
      <div className="user-choice">
        <IonButton color="primary" onClick={() => onSelect("rock")}>
          Rock 🪨
        </IonButton>
        <IonButton color="secondary" onClick={() => onSelect("paper")}>
          Paper 📄
        </IonButton>
        <IonButton color="tertiary" onClick={() => onSelect("scissors")}>
          Scissor ✂️
        </IonButton>
      </div>
    </div>
  );
};

export default GameContainer;
We have added three buttons to help the user select their choice. If you notice closely, we are using IonicButton from the @ionic/react package. IonicButton is one of the high-level building blocks that Ionic provides. They are called Components in the Ionic world, and we can use them directly in our Ionic app.
Ionic has a vast collection of such components, which help us prototype the app quickly. You can check out these components on their documentation website.
Because we are using React, we can use state and build the logic of our app. Let’s start by adding some states and handlers. Please follow the comments in the code block:
// create a tuple that helps us choose between rock paper scissors from a random index
const choiceArray = ["rock", "paper", "scissors"];

// create state to save user and computer choice
const [userChoice, setUserChoice] = useState(null);
const [compChoice, setCompChoice] = useState(null);

// save winner or draw in winner state
const [winner, setWinner] = useState(null);

// create states for scoreboard
const [userScore, setUserScore] = useState(0);
const [compScore, setCompScore] = useState(0);

// add onSelect handler to save user and computer choice
const onSelect = (choice) => {
  setUserChoice(choice);
  setCompChoice(getComputerChoice());
};

// add a helper function to get a random choice for computer
const getComputerChoice = () => {
  const random = Math.floor(Math.random() * 3);
  return choiceArray[random];
};
Now that we have initialized the state and added selection handlers, we can write the logic for selecting a winner:
// add a helper function to select the winner
const getWinner = useCallback(() => {
  if (userChoice === null) return null;
  if (userChoice === compChoice) return "draw";
  if (priorityMap[userChoice] === compChoice) {
    return "user";
  }
  return "computer";
}, [userChoice, compChoice]);

// select the winner whenever user and computer choice are updated
useEffect(() => {
  const whoWon = getWinner();
  if (!whoWon) return;
  setWinner(whoWon);

  // update the scoreboard
  if (whoWon === "user") {
    setUserScore((prevValue) => prevValue + 1);
  }
  if (whoWon === "computer") {
    setCompScore((prevValue) => prevValue + 1);
  }
}, [userChoice, compChoice, getWinner]);
Our logic for choosing the winner is complete. Now let’s quickly add a winner message and scoreboard in our JSX:
return (
  <div className="container">
    // add scoreboard
    <div className="score-sheet">
      <h2>Score</h2>
      <div className="score-container">
        <div className="score-board">
          <p className="score-name">User</p>
          <p className="score-value">{userScore}</p>
        </div>
        <div className="score-board">
          <p className="score-name">Computer</p>
          <p className="score-value">{compScore}</p>
        </div>
      </div>
    </div>
    <div>
      {winner && (
        <p className="winner-text">
          You selected {userChoice} while computer selected {compChoice}
        </p>
      )}
      {winner &&
        (winner === "draw" ? (
          <p className="winner-text">Match was a draw</p>
        ) : (
          <p className="winner-text">{winner} is winner</p>
        ))}
    </div>
    <div className="user-choice">
      <IonButton color="primary" onClick={() => onSelect("rock")}>
        Rock 🪨
      </IonButton>
      <IonButton color="secondary" onClick={() => onSelect("paper")}>
        Paper 📄
      </IonButton>
      <IonButton color="tertiary" onClick={() => onSelect("scissors")}>
        Scissor ✂️
      </IonButton>
    </div>
  </div>
);
Our app is complete, but we are not done yet. We talked about how Ionic lets us hook native features via plugins. Let’s add an option to share the game’s results via Share API supported on mobile devices.
Note: Web share API is supported but needs to be more reliable.
Install the @capacitor/share plugin first:
npm install @capacitor/share
npx cap sync
Now, we can use handle the sharing via a button:
// import Icon
import { IonButton, IonIcon } from "@ionic/react";
import { shareOutline } from "ionicons/icons";
// import the plugin
import { Share } from '@capacitor/share';

// add a share handler function
const handleResultShare = async () => {
    await Share.share({
      title: 'Checkout my result in rock, paper, scissors',
      text: `My score is User: ${userScore} and Computer: ${compScore}`,
      url: 'http://gameurl.com/',
      dialogTitle: 'Share with buddies',
    });
  }

// add a button in jsx
<IonButton
  className="share-button"
  color="primary"
  expand="block"
  onClick={handleResultShare}
>
  Share <IonIcon slot="end" icon={shareOutline}></IonIcon>
</IonButton>
You can update CSS according to your preference.
You can also preview the app in simulator using this command:
ionic capacitor run ios -l --external
This is how the game should look, along with sharing actions:
Our app is now complete! Ionic apps are capable of working as PWA-ready. If you look at the index.js file, you’ll see the service worker has already been added:
// If you want your app to work offline and load faster, you can change
// unregister() to register() below. Note this comes with some pitfalls.
// Learn more about service workers: https://cra.link/PWA
serviceWorkerRegistration.unregister();
PWA in Ionic is an opt-in feature. You can change it to register a service worker, and our app will be PWA-ready:
serviceWorkerRegistration.register();
PWA needs a manifest file along with a service worker. Thanks to Ionic, it is also added to the public folder, and you can customize it according to your needs.
This will allow our app to work offline and load faster. You can read more about PWA with Ionic on the documentation page.
The complete code can be found on the GitHub repository.
Let’s discuss the benefits and drawbacks of choosing Ionic.
We used IonicButton, a ready-to-use component from the Ionic library. Ionic provides tons of such components, which help us prototype fast. These components are built with extreme care and look good on Android, iOS, and the web. We don’t have to worry about styling and consistency across platforms.
Ionic has nearly no learning curve; we can use plain HTML, CSS, and JavaScript. Any web developer can start building hybrid apps from day one. Ionic is also flexible with which framework we want to use. We can pick any one among React, Angular, or Vue.
Additionally, development requires only a browser; you don’t have to worry about installing XCode or Android Studio for development. Also, a wide variety of plugins are available to hook native functionality.
Finally, first-class support for PWA allows the app to work offline, get push notifications, load faster, and provide a more app-like feel.
The app is primarily a web page wrapped in a WebView, and performance would be inferior to a truly native app.
Adding native functionality requires one extra step, and you have to install native plugins for every feature you want to use.
UI components are consistent, which means they will look the same across platforms. It’s both a benefit and a drawback because each forum has its design language. The look and feel of Android and iOS are different, which is hard to get from an Ionic app.
Finally, any animation-heavy app would perform poorly with Ionic because of performance bottleneck.
React Native is an open source library for building cross-platform apps, and it is React-based as it uses the same engine that drives React.
Unlike Ionic, React Native apps are truly native. The components provided by React Native are JavaScript wrappers around their native counterparts. The resultant app after compilation would be truly native, just like you would get using Android Swift or XCode.
This is a huge advantage, as native apps can use the device more effectively and provide a native experience.
React Native also has a rich native component library, which follows a different design language for each platform. A single codebase helps us build cross-platform apps that give a native feel on both Android and iOS.
A few well-known companies that use React Native are Facebook, Instagram, Flipkart, Coinbase and Discord.
Let’s build an app to learn about React Native in detail.
We’re going to build the same Rock, Paper, Scissors game as before, but using React Native. This will help us understand the core differences between the frameworks.
Expo is the best way to start a React Native project today, and we will use it to bootstrap a React Native app quickly:
npx create-expo-app rn-rock-paper-scissors
Once our app creation is complete, we can start the local development server:
npm run ios
This will open the app in the simulator:
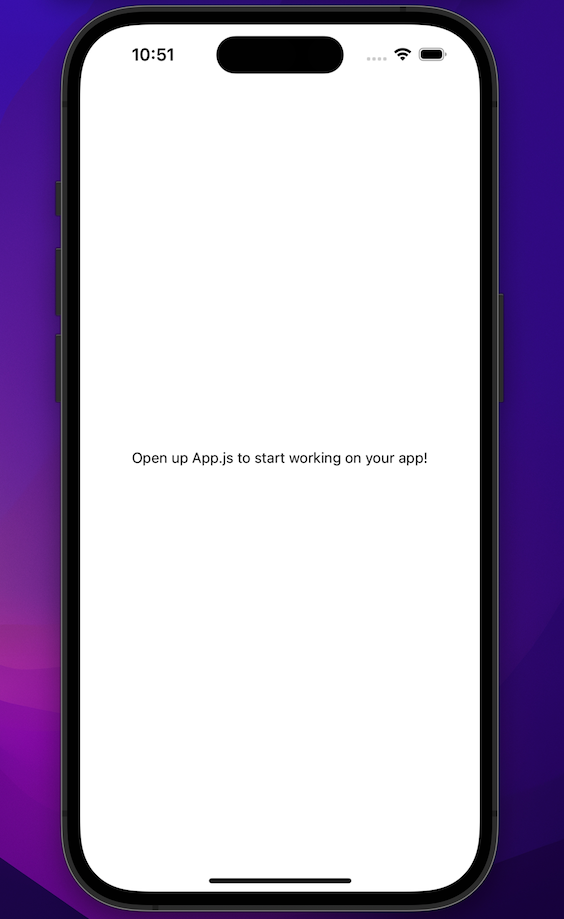
We need to create a folder structure like in the Ionic project earlier. It gives us the freedom to customize it according to our needs but requires some extra effort on our side.
I’m going to keep it similar to the one in the Ionic project. The /screens directory will include all the screens of our app. Similarly, the /components directory will include all the components. Everything will be wrapped inside a src folder.
Let’s start by adding some JSX, which will render the app. We will begin to create a screen first. Add a file Home.jsx in the screens folder:
// src/screens/Home.jsx
import { View, Text } from 'react-native'
import React from 'react'

const Home = () => {
  return (
    <View>
      <Text>Home</Text>
    </View>
  )
}

export default Home
If you look closely, we are importing View and Text components from the react-native package. These are the native components provided by React Native, and there are many more like these.
Ionic provided us with rich pre-styled components, which were ready to use. React Native is unopinionated in this regard. It provides only a JavaScript wrapper on native UI components; we get to style it ourselves.
But thanks to the rich community, we have many component libraries available. We are going to install react-native-elements, which is one such library.
Run this command to install React Native Elements from npm:
npm install @rneui/themed @rneui/base
We also need another package called react-native-safe-area-context. Let’s quickly install that as well:
npx expo install react-native-safe-area-context
This will install an Expo-supported version of react-native-safe-area-context.
Now we are ready to build our game. Because we are using React, state and other logic will be the same as Ionic, and only the usage of components will differ:
import React, { useEffect, useState, useCallback } from "react";
import { Button, Header } from "@rneui/base";
import { StyleSheet, Text } from "react-native";
import { View } from "react-native";
import { EvilIcons } from "@expo/vector-icons";
import { useSafeAreaInsets } from "react-native-safe-area-context";

const choiceArray = ["rock", "paper", "scissors"];
const priorityMap = {
  scissors: "paper",
  rock: "scissors",
  paper: "rock",
};

const Home = () => {
  const { bottom } = useSafeAreaInsets();
  const [userChoice, setUserChoice] = useState(null);
  const [compChoice, setCompChoice] = useState(null);
  const [winner, setWinner] = useState(null);
  const [userScore, setUserScore] = useState(0);
  const [compScore, setCompScore] = useState(0);

  const onSelect = (choice) => {
    setUserChoice(choice);
    setCompChoice(getComputerChoice());
  };

  const getComputerChoice = () => {
    const random = Math.floor(Math.random() * 3);
    return choiceArray[random];
  };

  const getWinner = useCallback(() => {
    if (userChoice === null) return null;
    if (userChoice === compChoice) return "draw";
    if (priorityMap[userChoice] === compChoice) {
      return "user";
    }
    return "computer";
  }, [userChoice, compChoice]);

  useEffect(() => {
    const whoWon = getWinner();
    if (!whoWon) return;
    setWinner(whoWon);
    if (whoWon === "user") {
      setUserScore((prevValue) => prevValue + 1);
    }
    if (whoWon === "computer") {
      setCompScore((prevValue) => prevValue + 1);
    }
  }, [userChoice, compChoice, getWinner]);

  return (
    <>
      <Header
        centerComponent={{ text: "Rock Paper Scissors", style: styles.heading }}
      />
      <View style={{ flex: 1, paddingBottom: bottom }}>
        <View style={styles.scoreSheet}>
          <Text style={styles.scoreHeading}>Score</Text>
          <View style={styles.scoreContainer}>
            <View style={styles.scoreBoard}>
              <Text style={styles.scoreName}>User</Text>
              <Text style={styles.scoreValue}>{userScore}</Text>
            </View>
            <View style={styles.scoreBoard}>
              <Text style={styles.scoreName}>Computer</Text>
              <Text style={styles.scoreValue}>{compScore}</Text>
            </View>
          </View>
          <Text style={styles.winnerText}>
            You selected {userChoice} while computer selected {compChoice}
          </Text>
          {winner &&
            (winner === "draw" ? (
              <Text style={styles.winnerText}>Match was a draw</Text>
            ) : (
              <Text style={styles.winnerText}>{winner} is winner</Text>
            ))}
        </View>
        <View style={styles.btnWrapper}>
          <Button
            title="Rock 🪨"
            size="sm"
            buttonStyle={styles.button}
            containerStyle={styles.btnContainer}
            onPress={() => onSelect("rock")}
          />
          <Button
            title="Paper 📄"
            size="sm"
            buttonStyle={[styles.button, { backgroundColor: "tomato" }]}
            containerStyle={styles.btnContainer}
            onPress={() => onSelect("paper")}
          />
          <Button
            title="Scissor ✂️"
            size="sm"
            buttonStyle={[styles.button, { backgroundColor: "green" }]}
            containerStyle={styles.btnContainer}
            onPress={() => onSelect("scissors")}
          />
        </View>
      </View>
    </>
  );
};

const styles = StyleSheet.create({
  heading: {
    color: "white",
    fontSize: 16,
    fontWeight: "600",
  },
  scoreSheet: {
    flex: 1,
    flexDirection: "column",
    alignItems: "center",
  },
  scoreHeading: {
    fontSize: 32,
    fontWeight: "800",
    alignSelf: "center",
  },
  scoreContainer: {
    flexDirection: "row",
    alignSelf: "center",
    marginTop: 12,
  },
  scoreBoard: {
    flexDirection: "column",
    alignItems: "center",
    marginHorizontal: 10,
    marginBottom: 26,
  },
  scoreName: {
    fontSize: 18,
    fontWeight: "700",
  },
  scoreValue: {
    fontSize: 32,
  },
  winnerText: {
    fontSize: 16,
    fontWeight: "700",
    marginTop: 10,
    textAlign: "center",
  },
  button: {
    backgroundColor: "rgba(78, 116, 289, 1)",
    borderRadius: 3,
    width: 100,
    paddingVertical: 10,
  },
  shareBtn: {
    backgroundColor: "teal",
    alignSelf: "flex-end",
    margin: 5,
  },
  btnWrapper: {
    flexDirection: "row",
    width: "100%",
    justifyContent: "space-around",
  },
});

export default Home;
We saw how we had to install the share plugin in Ionic. That is no longer necessary because React Native has first-class support for some of the common native features like Share. You can import Share from the react-native package directly and start using it:
// add import
import { Share } from 'react-native';

// add a share handler function
const handleResultShare = async () => {
  await Share.share({
    title: "Checkout my result in rock, paper, scissors",
    message: `My score is User: ${userScore} and Computer: ${compScore}`,
    url: "http://gameurl.com/",
  });
};

// add a button to handle share functionality
<Button
  title="Share"
  icon={<EvilIcons name="share-apple" size={28} color="white" />}
  iconRight
  buttonStyle={[styles.button, styles.shareBtn]}
  onPress={handleResultShare}
/>;
Let’s see the share sheet in action:
Our app is now complete! The complete code can be found on the GitHub repository.
Now, let’s discuss the benefits and drawbacks of choosing React Native.
react-native-web, eventually helping us share between Android, iOS, and the web while maintaining performance on mobile devicesBecause of React Native’s unopinionated nature, it’s very easy to build slow apps. Unoptimized components and memory leaks are often missed, leading to non-performant apps.
Additionally, debugging is still a pain point in the React Native ecosystem. The community is working on improving it, but it will take time.
A React Native developer often has to interact with native code, which is a bit difficult. The learning curve can be a little difficult for someone from a web background.
While you can build any complex animation or computation-heavy apps, we can’t ignore the efforts it takes to make it performant. Creating a smooth animation is a challenging task and requires expertise.
Many native features depend on the device, leading to features misbehaving on a few of the devices. It makes debugging and supporting every device difficult since APIs often get deprecated on older devices.
Finally, React Native is one of the fastest-changing ecosystems out there. Much of the code you writing today will soon be outdated and need refactoring, and it takes a lot of effort to catch up and stay up to date.
We already discussed the benefits and drawbacks of Ionic and React Native; now, let’s compare both in terms of some of the features below.
Ionic’s biggest strength is that it goes well with React, Angular, and Vue to develop apps that can be used on mobile and the web. In contrast, React Native is mainly a mobile app development library based on React.
React Native uses native components with React’s optimized rendering and targets mobile devices only (web support is possible using react-native-web, but needs to be more reliable). This makes React Native slightly challenging to approach for developers using frameworks other than React.
Ionic apps are called Hybrid apps. We serve apps built for the web using HTML, CSS, and JavaScript inside a WebView wrapper. Ionic’s components provide enough styling to look good on both platforms. However, they are still not native — an Ionic app results in a website/PWAs running in a browser.
On the other hand, React Native apps are truly native because the app is built using native components. It has the feel and performance of a native app and is non-distinguishable from apps built using Java/Kotlin or Swift.
While Ionic apps are good enough for large use cases, they cannot match the performance of a truly native app built using React Native. It lacks the performance, feels, and accessibility benefits a native app can offer.
While both frameworks allow us to share code, a hybrid app approach provides almost entirely shared code between the web, Android, and iOS. React Native’s code sharing is slightly less compared to and often needs conditional changes for each platform we want to support.
Ionic’s hybrid nature makes it perfect for PWA. PWA support is included in every Ionic app by default today. It helps the user get an app-like feeling and some offline benefits.
React Native doesn’t have PWA support and needs an extra step to get a PWA’s benefits. Offline support is especially tough to add to a React Native app.
React Native provides first-class support to most native APIs, while Ionic needs to install a plugin. We already saw it in the apps we built above by adding a share feature.
Ionic supports a wide range of native functionality, which we can quickly hook up by capacitor plugins, but the number is still limited. React Native has a vast community of third-party packages that let us hook any feature regardless of how complex they are.
For example, React Native recently started supporting react-native-skia. Skia is the graphics engine for Google Chrome and Chrome OS, Android, Flutter, Mozilla Firefox, Firefox OS, and many other products. With the help of the Skia engine, it is now possible to build much more complex animation and even sketching apps in React Native.
Because of React Native’s truly native nature, it can access the UI thread and draw graphics effortlessly without hurting the performance. Support like this is very limited in the Ionic world.
The tech advancement and learning resources have improved for both Ionic and React Native. It lead to an increase in adaptability of both frameworks over time. This means it’s much easier to build a cross platform apps today than it was three years ago.
React Native has seen a constant interest by the dev community for building cross-platform apps. It was followed by tremendous growth and many big tech companies betting on it. You can see more info from the state of JS survey in the chart below:
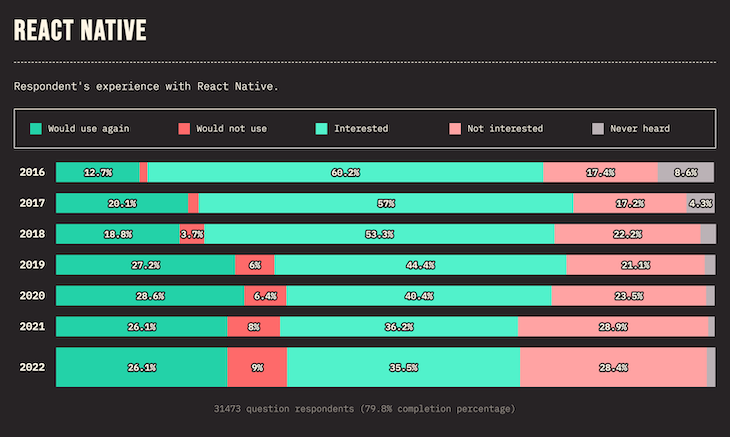
The inclusion of other players in the same category, like Flutter and SwiftUI, has made it much easier to build a true native app instead of something that behaves like an app.
This might the reason that the community’s interest in Ionic has seen a slight decline in past few years regardless of the improvements and native plugin support Ionic has added:
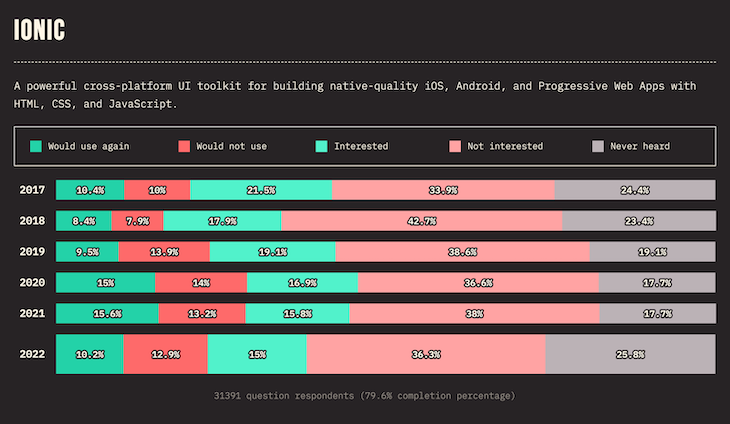
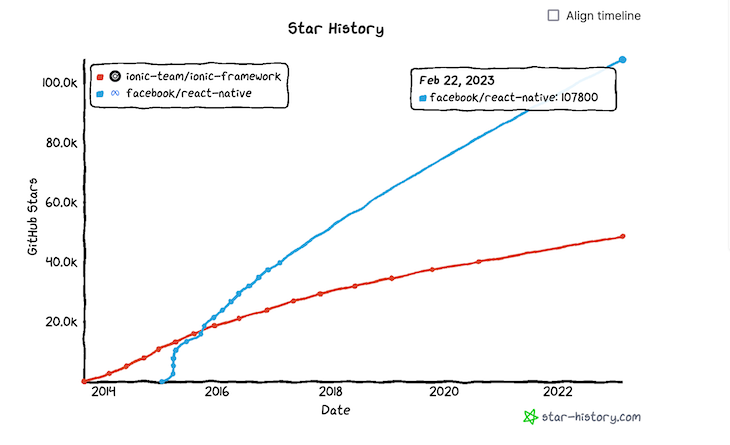
React Native has around 108k stars while Ionic has 48.6k stars on GitHub. The rise of React Native was much faster than Ionic:
If we compare the ranking over time, React Native (including Expo) is the 3rd most popular way of building apps. In contrast, Ionic stands in 9th place:
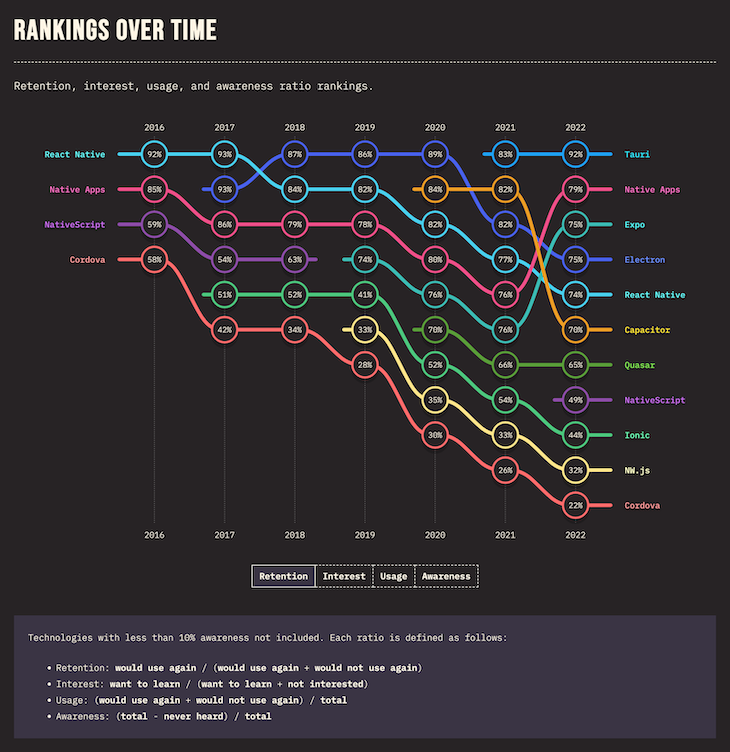
Overall, React Native wins in the community aspect whether we’re talking about GitHub stars, the number of third party solutions, or interest from the developer community.
More info can be found on The State of JS 2022 page.
Both Ionic and React Native support debugging tools along with good old console logs. We can use web inspector inside Chrome or Safari to debug Ionic apps, while React Native has tools like Flipper.
React Native lets you profile the app in more depth and audit the performance and other metrics. In comparison, Ionic apps have to manually rely on the browser to check the different areas for improvement. The lack of such tools in Ionic makes React Native a winner in this category, although both frameworks need better support for debugging.
Because Ionic ships a web app inside a WebView wrapper, its app size is comparably small. In contrast, React Native bundles all the compiled code and ships it to the end user, resulting in a bigger app size.
In both cases, the app size is still small (approximately 16 MB) and easy to download for any user. It makes both frameworks fit for app development regardless of their size differences.
Ionic apps benefit from instant updates because of the web-first approach. Changes reflect as soon as you update the code. If you require any change in native plugins, you only need to rebuild the app and submit it to the store.
By default, React Native requires you to build every time you need to change something. But with the CodePush, we can push OTA (Over the air) updates that reach users without them installing a new version. This requires an extra effort to set up and is more expensive to manage than updating web code. Moreover, CodePush updates target apps as long as there is no change in native dependencies, and it’s slightly tricky to manage versions of the app to target updates.
Choosing the right framework always depends on the requirements of the app you’re building and the skills you have at the moment.
PWA, code sharing between mobile and web, and the native plugin supports makes Ionic an excellent choice for a wide variety of app. You’ll be more than fine building an app like a newsfeed or an e-commerce site. Many big companies like McDonald’s and JustWatch use Ionic and have created great apps. Ionic only starts to struggle when your app is computation heavy.
React Native is much better if your use case has smooth app animation, such as accessing the camera module, rendering charts for a massive set of data, etc. React Native’s access to native components gives a truly native feel, which is essential to some companies. Apart from performance, the abundance of third-party libraries makes it easy to build complex features in React Native.
What about platform benefits? If you have developers that are well-versed in Angular and Vue, then choosing Ionic would greatly cut down on development time. Ionic’s adaptability to Vue, React, and Angular makes it easy to approach and has close to no learning curve.
Onboarding developers to use React Native is not always a cakewalk, especially if they are not familiar with React. So the talent pool plays a vital role in choosing the tech stack, and it is often overlooked.
The learning curve for React developers is comparable for both Ionic and React Native. So if you have a team of React developers, it comes down to what you expect from the app.

LogRocket's Galileo AI watches sessions for you and and surfaces the technical and usability issues holding back your React Native apps.
LogRocket also helps you increase conversion rates and product usage by showing you exactly how users are interacting with your app. LogRocket's product analytics features surface the reasons why users don't complete a particular flow or don't adopt a new feature.
Start proactively monitoring your React Native apps — try LogRocket for free.

Claude Code is deceptively capable. Point it at a codebase, describe what you need, and it’ll autonomously navigate files, write […]

Compare the top AI development tools and models of February 2026. View updated rankings, feature breakdowns, and find the best fit for you.

Broken npm packages often fail due to small packaging mistakes. This guide shows how to use Publint to validate exports, entry points, and module formats before publishing.

Discover what’s new in The Replay, LogRocket’s newsletter for dev and engineering leaders, in the February 11th issue.
Would you be interested in joining LogRocket's developer community?
Join LogRocket’s Content Advisory Board. You’ll help inform the type of content we create and get access to exclusive meetups, social accreditation, and swag.
Sign up now
9 Replies to "React Native vs. Ionic"
Thanks, I’m just starting to dabble in mobile dev and this is a really useful comparison. Some thoughtful categories here like the developer communities of each.
I wonder if React Native’s limits (being fixed to React) may perhaps be a strength for newcomers to mobile development? I’ve been researching Angular, Vue etc but as a back end dev it’s all a bit overwhelming – the relative simplicity of learning a single stack is appealing.
Another strength of both these frameworks is the flexibility of your development environment. I tried to follow a Swift/xcode tutorial and found it frustrating having to wrestle with the unintuitive UI, versus using a command line app for the setup/build and my favourite text editor for the code.
Thanks for sharing, this article is extremely great and helpful it is very useful for developers. Thanks and keep Sharing.
Thanks for sharing such informative and useful info! Keep it Up!
react native and ionic both languages have its own pros and cons , thanks for sharing this valuable blog with us
This is article incorrectly marks React native as the winner in some of the categories. Ionic now uses Capacitor to give true native experiences.Ionic even advertises itself as truly native now., anyone who uses Ionic rarely touches clunky cordova these days. Performance is on par, and you can compile, build and release to app stores from a pipeline in Ionic which you could never do in React Native. Obvious winner and the sooner cowboy developers realise that, the better.
Yes, Definitely LogRocket is a React Native monitoring solution that helps you reproduce issues instantly, prioritize bugs, and understand performance in your React Native apps.
Nice info, Thank you for sharing; this is a very useful and fantastic article.
Both React Native and Ionic are popular frameworks for cross-platform mobile app development. React Native offers a native-like experience with efficient performance, while Ionic provides a broader range of platform support. Choose based on project requirements and familiarity with JavaScript frameworks.
Great topic