
Editor’s note: This article was last updated on 13 June 2023 to add sections about optimizing Detox tests for large-scale React Native applications, and troubleshooting common issues with Detox tests, such as flaky tests and timeout errors.

End-to-end testing is a technique that is widely performed in the web ecosystem using frameworks and libraries like Cypress and Puppeteer. But when it comes to mobile applications, end-to-end testing is not as common. I have a theory that most mobile developers skip testing mobile applications because they think it’s hard, and requires too much setup and configuration.
In this article, we’ll cover how to implement the end-to-end testing framework Detox in a React Native application. We’ll write several interaction tests, and integrate Detox into your development workflow. For the sake of brevity, we’ll only focus on the iOS flow. Let’s get started!
You can access the full code for this project at the GitHub repository.
Jump ahead:
The Replay is a weekly newsletter for dev and engineering leaders.
Delivered once a week, it's your curated guide to the most important conversations around frontend dev, emerging AI tools, and the state of modern software.
In contrast to unit testing, end-to-end testing aims to cover as much of your application’s functionality as possible, simulating real user actions. The more areas your test covers, the more reliable it will be. Therefore, an end-to-end test includes all the stages of an application: setting up your environment, installing your application, initialization, executing routines, and expecting events or behaviors to happen.
End-to-end testing automation is integral for consistent and efficient validation of application functionality, especially as technology rapidly evolves and applications are frequently updated. Traditional manual testing becomes impractical due to time, resource demands, and human error risks.
E2e automation, using tools like Detox, delegates repetitive testing tasks to scripts. These scripts run faster and more accurately, simulating user interactions from clicks to page navigation. These tests run consistently, reducing variability, and catch bugs early in development.
Automated testing can be integrated into a CI/CD pipeline, which ensures that tests run automatically whenever new code is integrated.
End-to-end testing using Cypress looks like the following image in the browser:
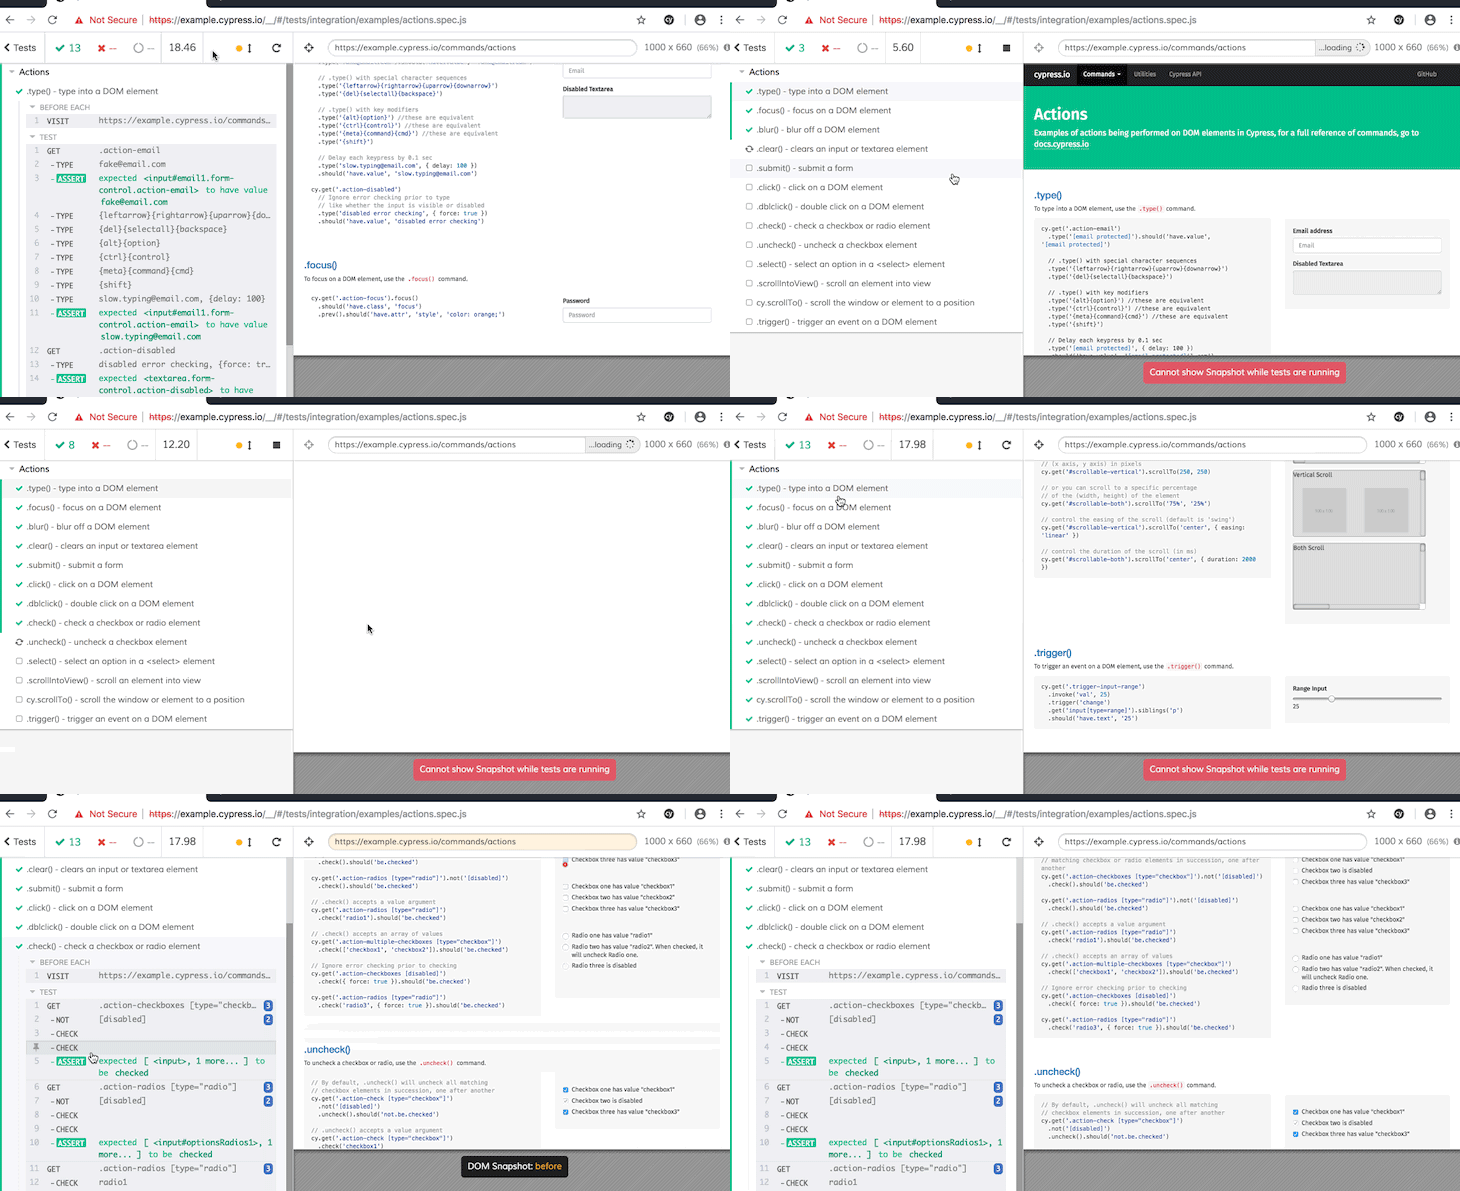
By selecting elements div, button, and input, using native selectors getElementById, getElementByName, and getElementByClassName, and then triggering events click, change, and focus, Cypress is able to create an instance of Chrome, run a URL, and begin interacting with the webpage.
At any point in the tests, the developer can expect something to happen or assert something to have a specific value. If all the expectations are true, the result of the test suite will be successful.
The process of testing mobile applications is similar to web applications. Let’s go through the steps:
In a mobile app, end-to-end testing with Detox looks like the video below:
Detox is an end-to-end framework for mobile apps developed by Wix, one of the top contributors to the React Native community. Wix also maintains amazing projects like react-native-navigation and react-native-ui-lib.
Detox provides great abstractions to select and trigger actions on elements. A normal test looks like the following code:
describe('Login flow', () => {
  it('should login successfully', async () => {
    await device.launchApp();
    // getting the reference of an element by ID and expecting to be visible
    await expect(element(by.id('email'))).toBeVisible();

    // Getting the reference and typing
    await element(by.id('email')).typeText('[email protected]');
    await element(by.id('password')).typeText('123456');

    // Getting the reference and executing a tap/press
    await element(by.text('Login')).tap();

    await expect(element(by.text('Welcome'))).toBeVisible();
    await expect(element(by.id('email'))).toNotExist();
  });
});
In the code above, the syntax is readable, and by using async/await, you can write synchronous, easily-understandable tests. Now, let’s jump into the demo!
To focus on testing over setting up React Native, I suggest bootstrapping your project using react-native init, which creates a simple and clean React Native project.
We’ll start by installing the dependency and creating a new project:
~ npm install react-native -g
~ react-native init testReactNativeDetox

               ######                ######
             ###     ####        ####     ###
            ##          ###    ###          ##
            ##             ####             ##
            ##             ####             ##
            ##           ##    ##           ##
            ##         ###      ###         ##
             ##  ########################  ##
          ######    ###            ###    ######
      ###     ##    ##              ##    ##     ###
   ###         ## ###      ####      ### ##         ###
  ##           ####      ########      ####           ##
 ##             ###     ##########     ###             ##
  ##           ####      ########      ####           ##
   ###         ## ###      ####      ### ##         ###
      ###     ##    ##              ##    ##     ###
          ######    ###            ###    ######
             ##  ########################  ##
            ##         ###      ###         ##
            ##           ##    ##           ##
            ##             ####             ##
            ##             ####             ##
            ##          ###    ###          ##
             ###     ####        ####     ###
               ######                ######


                  Welcome to React Native!
                 Learn Once Write Anywhere

✔ Downloading template
✔ Copying template
✔ Processing template
✔ Installing dependencies
✔ Installing CocoaPods dependencies (this may take a few minutes)

  Run instructions for iOS:
    • cd testReactNativeDetox && react-native run-ios
    - or -
    • Open testReactNativeDetox/ios/testReactNativeDetox.xcworkspace in Xcode or run "xed -b ios"
    • Hit the Run button

  Run instructions for Android:
    • Have an Android emulator running (quickest way to get started), or a device connected.
    • cd testReactNativeDetox && react-native run-android
After this step, you can try running the application in the emulator by executing the code below:
~ cd testReactNativeDetox
~ react-native run-ios
You should see an output like the following:
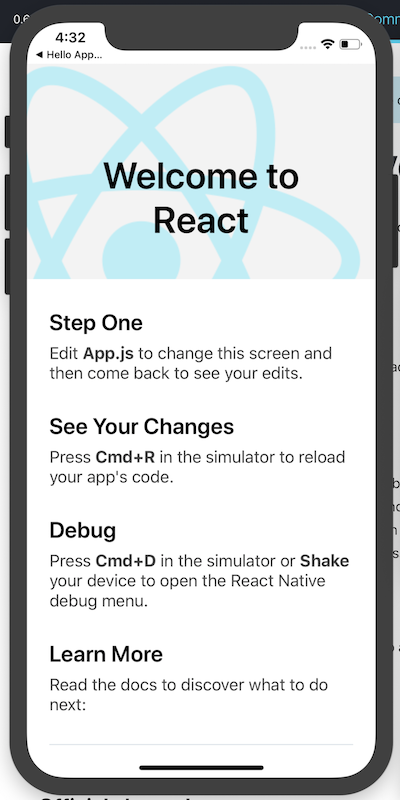
Before we can start testing our React Native application with Detox, you’ll need to have the following:
brew update && brew install nodeapplesimutils installed. Use brew tap wix/brew;brew install applesimutils;detox-cli installed. Use npm install -g detox-cliStart by adding Detox as a dependency for the project:
~ yarn add detox -D
Inside the CLI, you’ll find a command that can automatically set up the project. You’ll need to run the following:
~  detox init -r jest

detox[34202] INFO:  [init.js] Created a file at path: e2e/config.json
detox[34202] INFO:  [init.js] Created a file at path: e2e/init.js
detox[34202] INFO:  [init.js] Created a file at path: e2e/firstTest.spec.js
detox[34202] INFO:  [init.js] Patching package.json at path: /Users/USERNAME/Git/testReactNativeDetox/package.json
detox\[34202] INFO:  [init.js]   json["detox"\]["test-runner"] = "jest";
The code above will create a new folder called e2e with a basic test and some initial configuration like init.js, which is the file that tells Jest to start the simulator. Let’s modify the initial test to check if the first two sections are visible:
describe('Example', () => {
  beforeEach(async () => {
    await device.launchApp();
  });

  it('should have "Step One" section', async () => {
    await expect(element(by.text('Step One'))).toBeVisible();
  });

  it('should have "See Your Changes" section', async () => {
    await expect(element(by.text('See Your Changes'))).toBeVisible();
  });
});
Next, you need to add configuration for Detox inside your package.json or the .detoxrc.json file. If you’re using package.json, you need to add a detox section and add all the configurations shown below. Add the following object to the detox key, replacing the name of testReactNativeDetox with the name of your application at every occurrence:
{
  "detox": {
    "test-runner": "jest",
    "configurations": {
      "ios.release": {
        "binaryPath": "./ios/build/Build/Products/Release-iphonesimulator/testReactNativeDetox.app",
        "build": "xcodebuild -workspace ios/testReactNativeDetox.xcworkspace -configuration release -scheme testReactNativeDetox -sdk iphonesimulator -derivedDataPath ios/build",
        "type": "ios.simulator",
        "name": "iPhone X"
      }
    }
  }
}
To build the application, run the following command:
~ detox build
If your build failed with the message clang:error: linker command failed with exit code 1 (use-v to see invocation), please refer to this solution in GitHub issues and try running the command again. Remember, you must perform the build process above every time you change your application and want to test it.
If the command above still doesn’t work, check if you replaced all occurrences of your project name in package.json. If doing so also fails, try opening up Xcode and building the debug version yourself.
Finally, we’ll run the test:
~ detox test

 PASS  e2e/firstTest.spec.js (7.514s)
  Example
    ✓ should have "Step One" section (260ms)
    ✓ should have "See Your Changes" section (278ms)
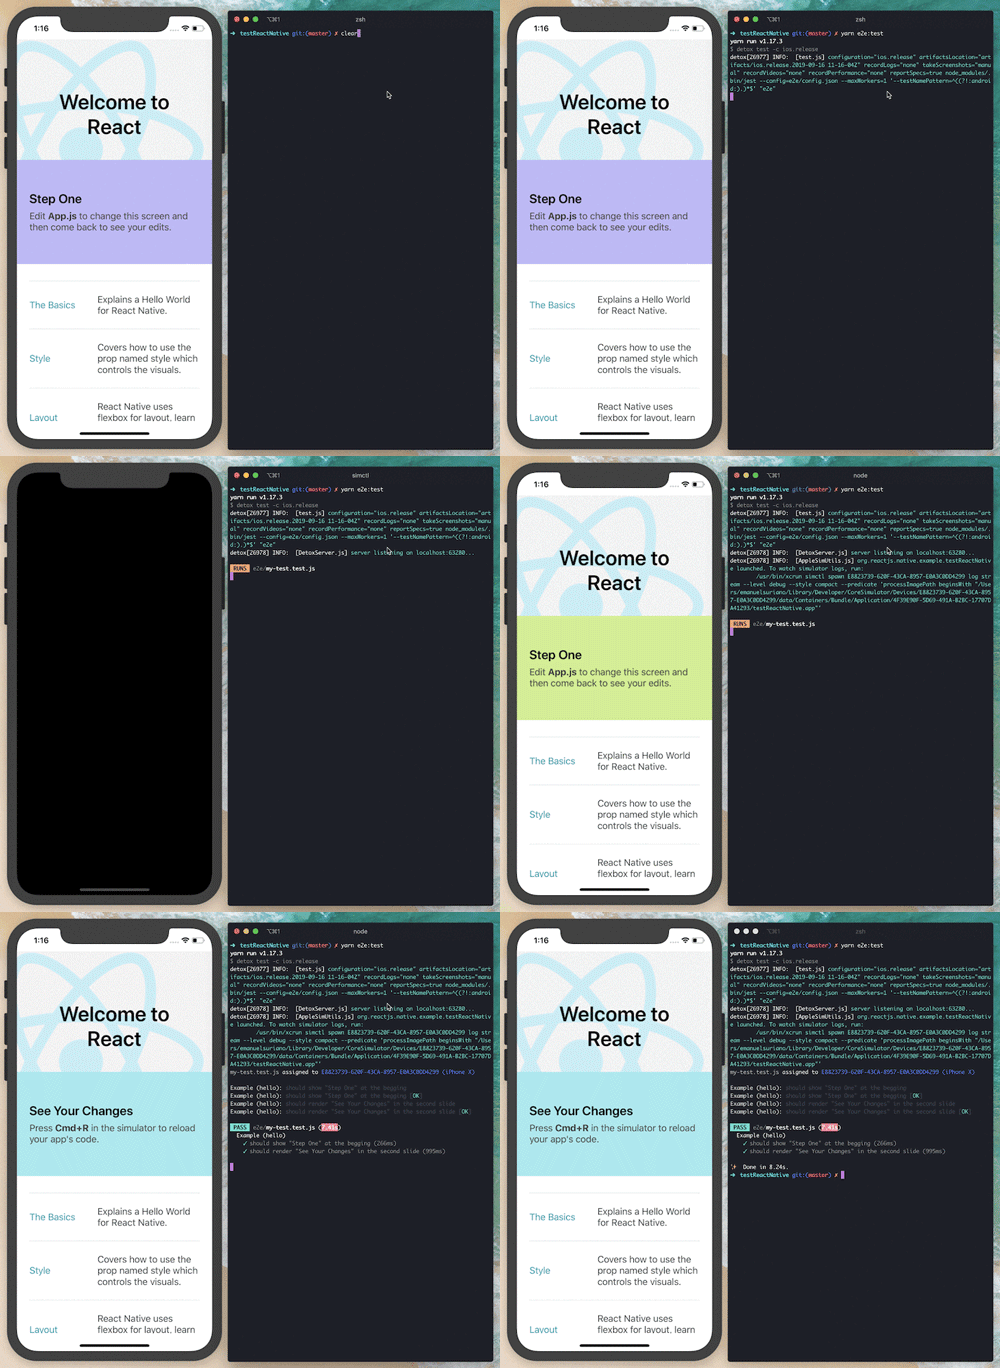
You should receive an output like the following:
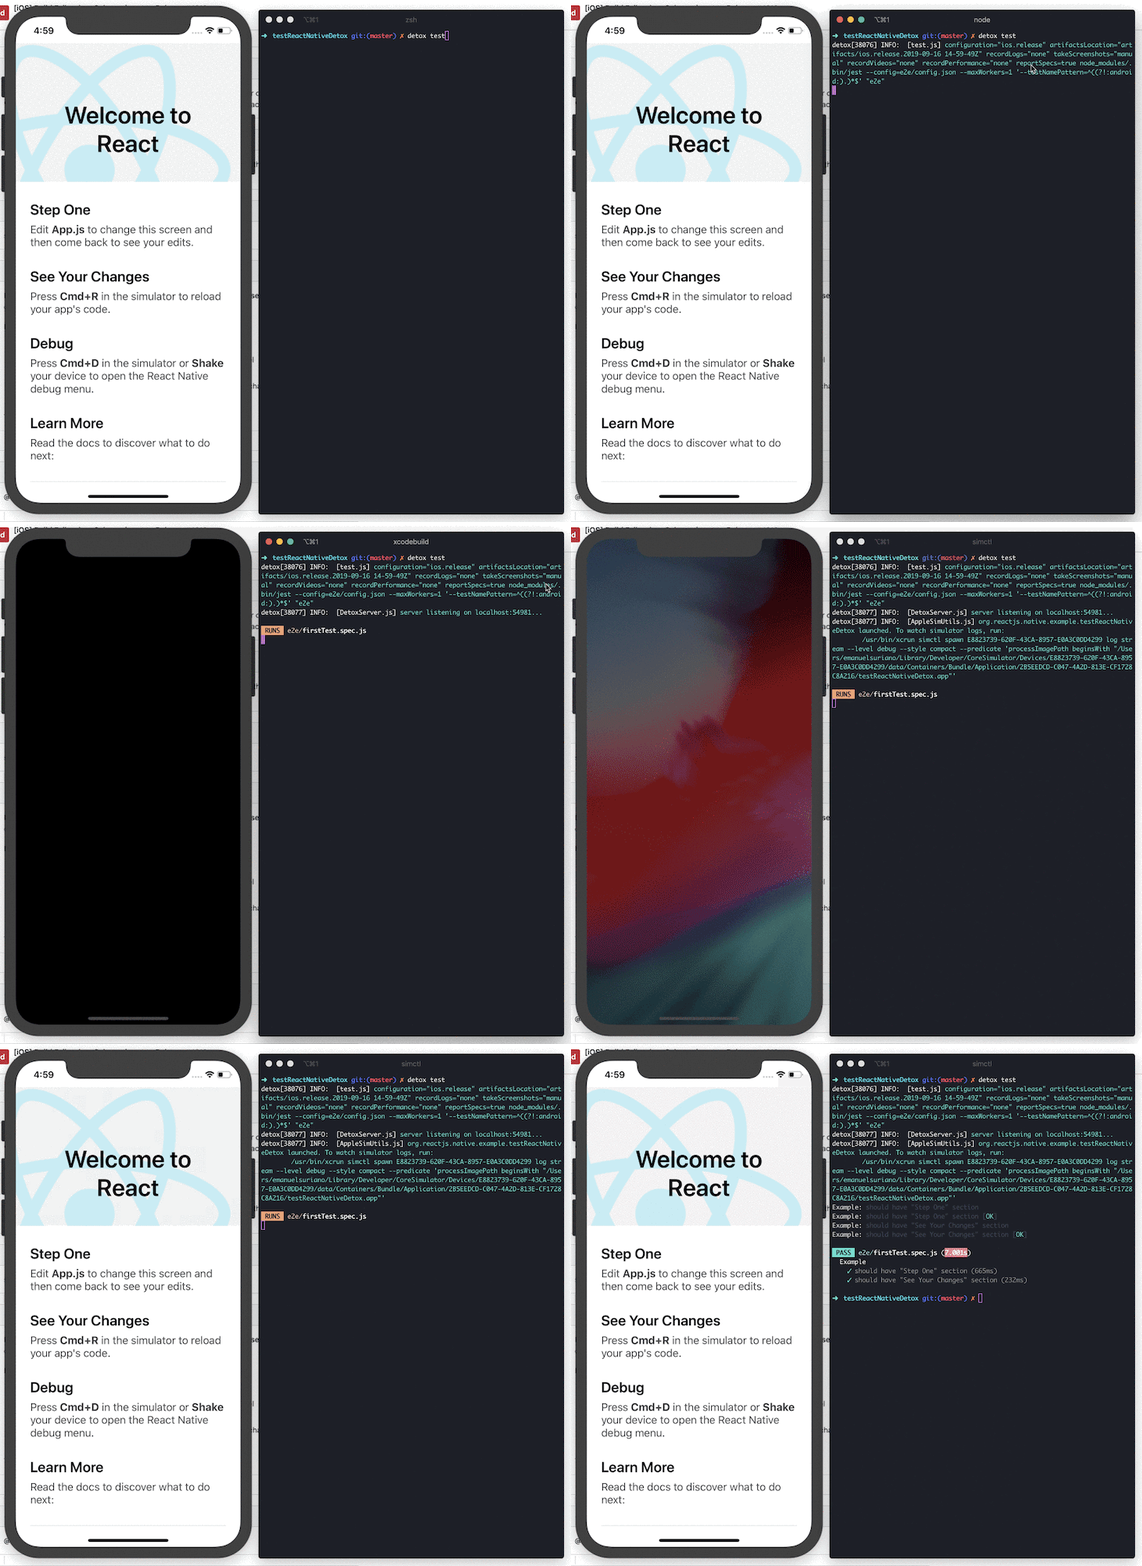
To improve our UI, let’s add a colorful image carousel. To save time, I decided to use an existing carousel component built by the community: react-swipeable-views-native. To generate random colors, I used randomColor.
Install both libraries as dependencies for the project:
~ yarn add react-swipeable-views-native randomcolor
Then, we’ll make a few modifications to our App.js file:
import React, {Fragment} from 'react';
import {
  SafeAreaView,
  StyleSheet,
  ScrollView,
  View,
  Text,
  TextInput,
  Button,
  StatusBar,
} from 'react-native';
import {
  Header,
  LearnMoreLinks,
  Colors,
  DebugInstructions,
  ReloadInstructions,
} from 'react-native/Libraries/NewAppScreen';
import randomColor from 'randomcolor';
import SwipeableViews from 'react-swipeable-views-native';
const Slide = ({children}) => (
  <View
    style={[
      styles.slide,
      {backgroundColor: randomColor({luminosity: 'light'})},
    ]}>
    {children}
  </View>
);
const App = () => {
  return (
    <Fragment>
      <StatusBar barStyle="dark-content" />
      <SafeAreaView>
        <ScrollView
          contentInsetAdjustmentBehavior="automatic"
          style={styles.scrollView}>
          <Header />
          {global.HermesInternal == null ? null : (
            <View style={styles.engine}>
              <Text style={styles.footer}>Engine: Hermes</Text>
            </View>
          )}
          <View style={styles.body}>
            <SwipeableViews testID="slides">
              <Slide>
                <Text style={styles.sectionTitle}>Step One</Text>
                <Text style={styles.sectionDescription}>
                  Edit <Text style={styles.highlight}>App.js</Text> to change
                  this screen and then come back to see your edits.
                </Text>
              </Slide>
              <Slide>
                <Text style={styles.sectionTitle}>See Your Changes</Text>
                <Text style={styles.sectionDescription}>
                  <ReloadInstructions />
                </Text>
              </Slide>
              <Slide>
                <Text style={styles.sectionTitle}>Debug</Text>
                <Text style={styles.sectionDescription}>
                  <DebugInstructions />
                </Text>
                <Button onPress={() => alert('Clicked!')} title="Click here!" />
              </Slide>
              <Slide>
                <Text style={styles.sectionTitle}>Learn More</Text>
                <TextInput
                  testID="docsInput"
                  multiline
                  style={styles.sectionDescription}>
                  Read the docs to discover what to do next:
                </TextInput>
              </Slide>
            </SwipeableViews>
            <LearnMoreLinks />
          </View>
        </ScrollView>
      </SafeAreaView>
    </Fragment>
  );
};
const styles = StyleSheet.create({
  scrollView: {
    backgroundColor: Colors.lighter,
  },
  engine: {
    position: 'absolute',
    right: 0,
  },
  body: {
    backgroundColor: Colors.white,
  },
  sectionTitle: {
    fontSize: 24,
    fontWeight: '600',
    color: Colors.black,
  },
  sectionDescription: {
    marginTop: 8,
    fontSize: 18,
    fontWeight: '400',
    color: Colors.dark,
  },
  highlight: {
    fontWeight: '700',
  },
  footer: {
    color: Colors.dark,
    fontSize: 12,
    fontWeight: '600',
    padding: 4,
    paddingRight: 12,
    textAlign: 'right',
  },
  slide: {
    padding: 24,
    height: 200,
    display: 'flex',
    justifyContent: 'center',
  },
});
export default App;
To enable swiping, we wrapped all the sections inside SwipeableViews. We then wrapped each section inside a custom View called Slide, which implements properties like padding and backgroundColor. Lastly, we added a Button and TextInput component to the last two slides.
The result is as follows:
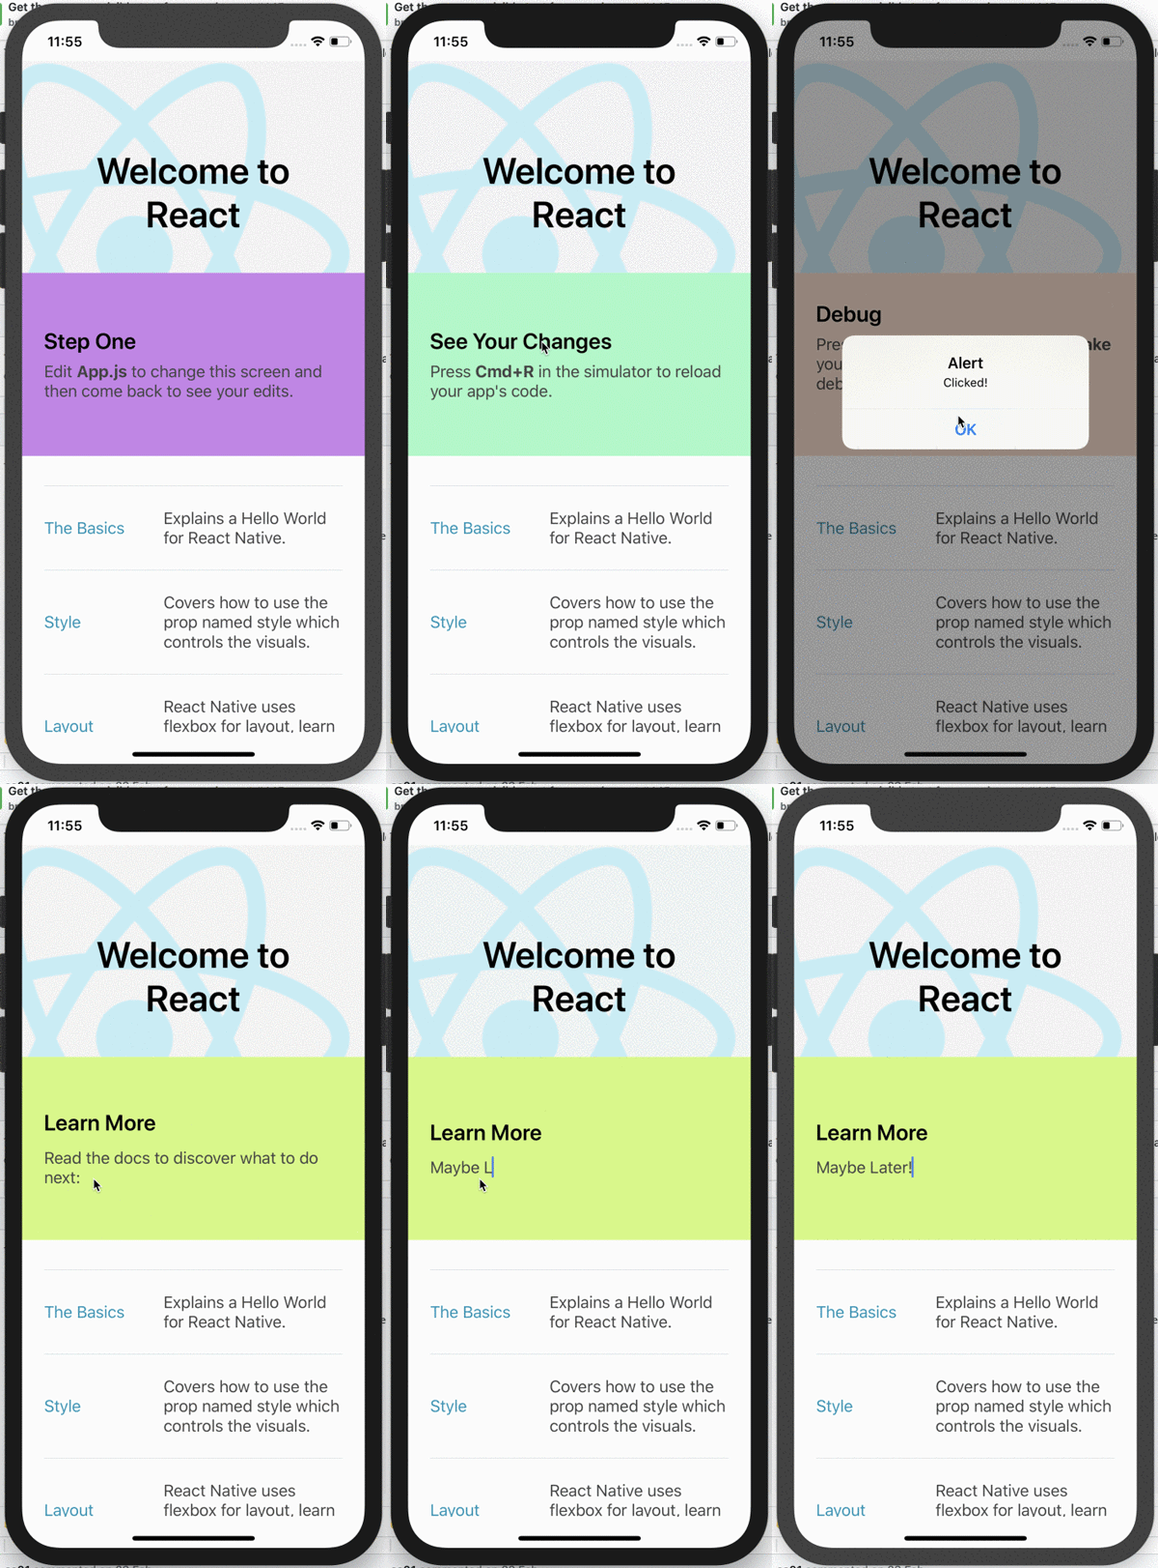
To make things easier, let’s add two new scripts to the package.json:
{
  "scripts": {
    "e2e:test": "detox test -c ios.release",
    "e2e:build": "detox build -c ios.release"
  }
}
Now that the application has changed, you need to create a new build to run tests with the modified version. Execute the following command:
~ yarn e2e:build
This process may take some time. In the meantime, let’s take a quick look at the existing tests:
describe('Example', () => {
  beforeEach(async () => {
    await device.launchApp();
  });

  it('should show "Step One"', async () => {
    await expect(element(by.text('Step One'))).toBeVisible();
  });

  it('should show "See Your Changes"', async () => {
    await expect(element(by.text('See Your Changes'))).toBeVisible(); // THIS TEST WILL FAIL!
  });
});
The See Your Changes section is now on the second slide of the carousel, which is not visible to the user until they swipe. Therefore, the second test will definitely fail. Let’s move Detox to that slide:
describe('Example', () => {
  // previous tests here

  it('should render "See Your Changes" in the second slide', async () => {
    // getting the reference of the slides and make a swipe
    await element(by.id('slides')).swipe('left');
    await expect(element(by.text('See Your Changes'))).toBeVisible(); // no this will pass!
    await element(by.id('slides')).swipe('right');
  });
});
We can use by.id() because we use the testID prop in the App component. At this point, you can execute the end-to-end tests with the following command, and they should pass:
~ yarn e2e:test

 PASS  e2e/firstTest.spec.js (7.514s)
  Example
    ✓ should have "Step One" section (260ms)
    ✓ should render "See Your Changes" in the second slide (993ms)
Let’s add a few more tests to cover the following scenarios:
ButtonTextInputdescribe('Example', () => {
// previous tests here
it('should enable swiping back and forth', async () => {
await expect(element(by.text('Step One'))).toBeVisible();
await element(by.id('slides')).swipe('left');
await element(by.id('slides')).swipe('right');
await expect(element(by.text('Step One'))).toBeVisible();
});
it('should render "Debug" and have a Button to click in the third slide', async () => {
await element(by.id('slides')).swipe('left');
await element(by.id('slides')).swipe('left');
await expect(element(by.text('Debug'))).toBeVisible();
await element(by.text('Click here!')).tap();
await expect(element(by.text('Clicked!'))).toBeVisible();
await element(by.text('OK')).tap();
});
it('should render "Learn More" and change text in the fourth slide', async () => {
await element(by.id('slides')).swipe('left');
await element(by.id('slides')).swipe('left');
await element(by.id('slides')).swipe('left');
await expect(element(by.text('Learn More'))).toBeVisible();
const docsInput = element(by.id('docsInput'));
await expect(docsInput).toBeVisible();
await docsInput.clearText();
await docsInput.typeText('Maybe later!');
await expect(docsInput).toHaveText('Maybe later!');
});
});
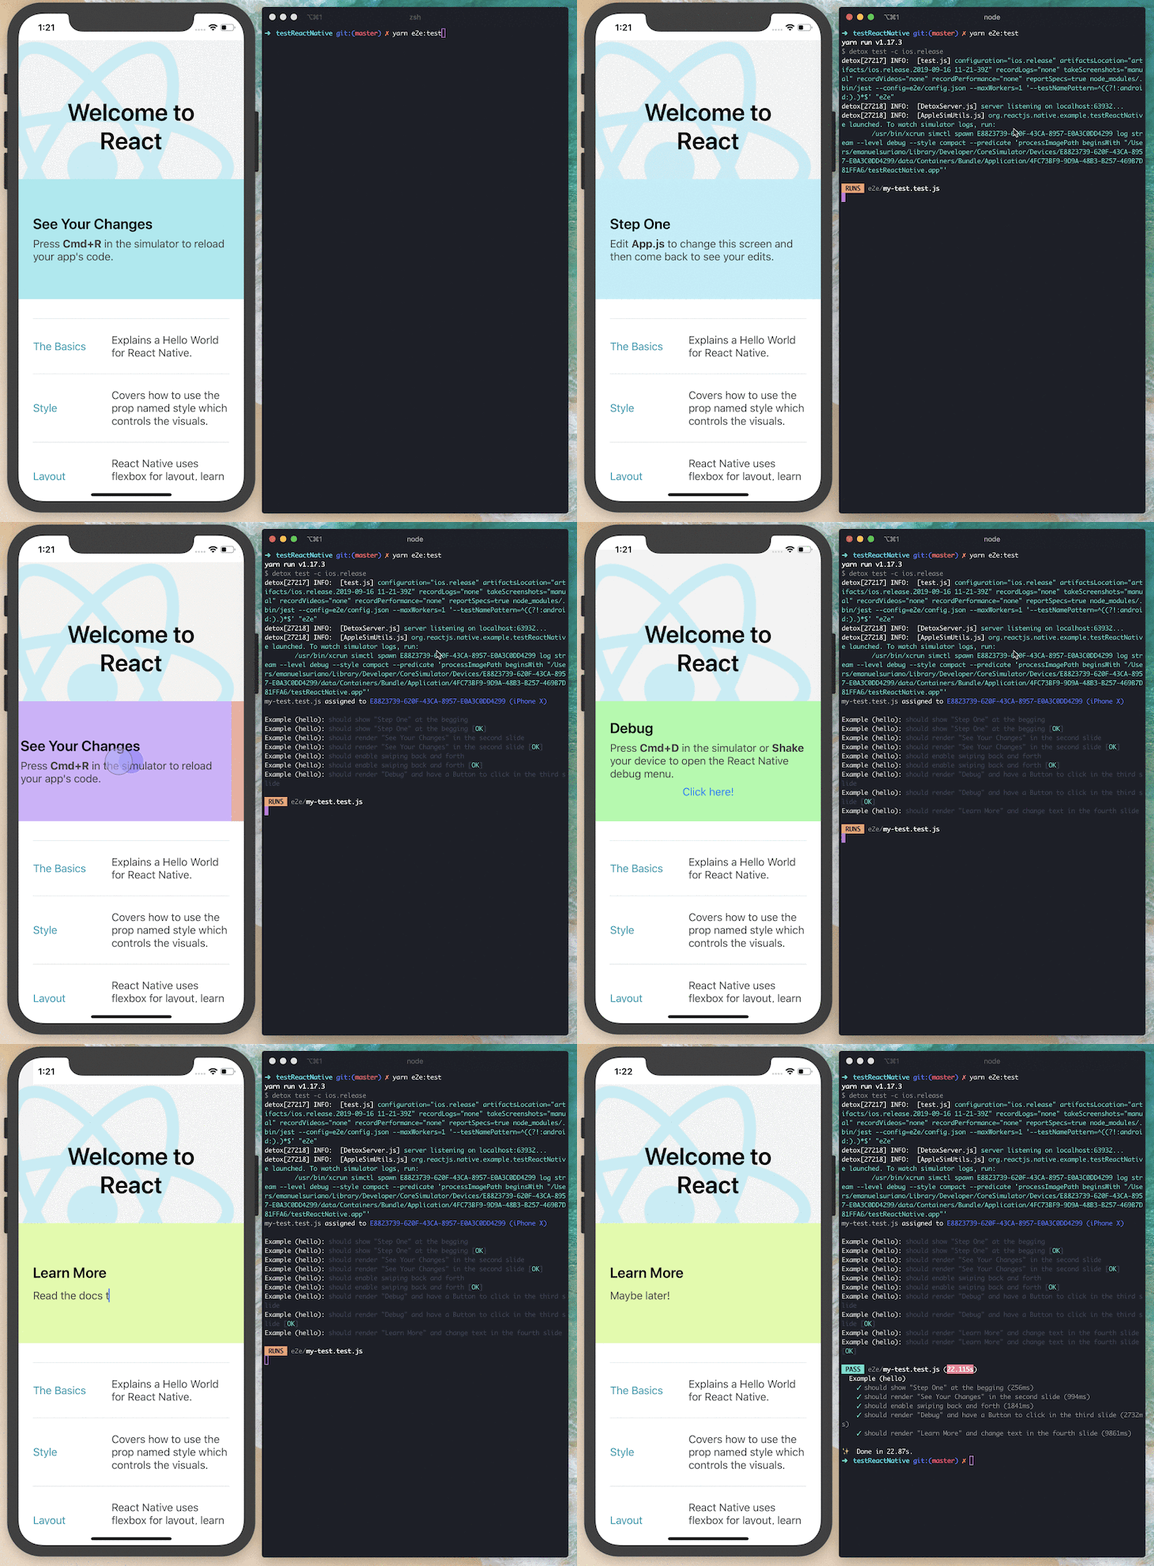
Let’s run the tests again:
~ yarn e2e:test

 PASS  e2e/firstTest.spec.js (22.128s)
  Example
    ✓ should have "Step One" section (268ms)
    ✓ should render "See Your Changes" in the second slide (982ms)
    ✓ should enable swiping back and forth (1861ms)
    ✓ should render "Debug" and have a Button to click in the third slide (2710ms)
    ✓ should render "Learn More" and change text in the fourth slide (9964ms)
Your app should now look like the following:
Running tests inside CI is important. It eliminates the need for manual testing and prevents shipping bugs to production. For this example, I decided to use Travis CI because it has an amazing integration with GitHub and also provides an unlimited plan for open source projects.
If you’re using GitHub, you can install the Travis application, create a new plan, and allow it to access your repositories. After that, create a new file inside your project called .travis.yml, which defines the steps you want to run in CI.
I tweaked the CI configuration inside the official Detox docs slightly. Below is the configuration that worked in my case:
language: objective-c
osx_image: xcode10.2

branches:
  only:
    - master

env:
  global:
    - NODE_VERSION=stable

install:
  - brew tap wix/brew
  - brew install applesimutils
  - curl -o- https://raw.githubusercontent.com/creationix/nvm/v0.33.2/install.sh | bash
  - export NVM_DIR="$HOME/.nvm" && [ -s "$NVM_DIR/nvm.sh" ] && . "$NVM_DIR/nvm.sh"
  - nvm install $NODE_VERSION
  - nvm use $NODE_VERSION
  - nvm alias default $NODE_VERSION

  - npm install -g react-native-cli
  - npm install -g detox-cli
  - npm install
  - cd ios; pod install; cd -;

script:
  - npm run e2e:ci
Finally, add the command e2e:ci into your package.json. The detox build command will build the application, detox test will run the tests, and the --cleanup flag will close the emulator to finish the execution:
{
  "scripts": {
    "e2e:test": "detox test -c ios.release",
    "e2e:build": "detox build -c ios.release",
    "e2e:ci": "npm run e2e:build && npm run e2e:test -- --cleanup"
  }
}
Once you’ve pushed all the changes into your master branch, try to open a new pull request. You should see a new pull request checker has been added, which we’ll call Travis. It runs the Detox tests:
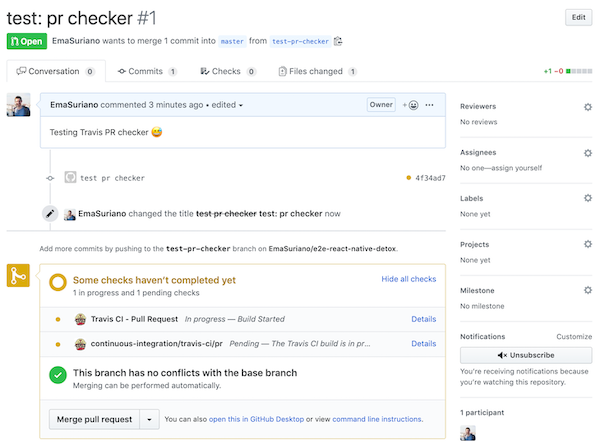
You can access that pull request in the GitHub repository.
As React Native applications grow, their complexity and the interdependencies between various components can increase significantly. When dealing with larger applications, Detox tests can be optimized through several approaches to effectively manage the complexity, enhance the execution speed, and maintain the overall test quality. Here are some strategies:
One of the key principles in software testing, as well as development, is modularity. As your application grows, it’s essential to structure your tests in a way that mirrors the modular architecture of your app. Divide your tests into smaller, self-contained units that target specific functionalities or components of the application.
For example, if your app includes user authentication, product browsing, and payment processing, you could create separate test modules for each feature. This approach keeps your test suite organized and makes it easier to identify and isolate problems when a test fails.
With larger applications, running the entire suite of tests after every small change can be time-consuming. To address this, prioritize your tests based on the criticality and usage frequency of the features they cover.
You can categorize your tests into different buckets, such as ‘critical’, ‘high’, ‘medium’, and ‘low’. Tests falling into the ‘critical’ bucket could be those that cover fundamental app functionalities, and any failure in these areas might severely impact the user experience. These tests should be run more frequently. On the other hand, ‘low’ priority tests could be those that test less frequently used features and can be run less often.
Parallel test execution is another powerful way to optimize your Detox tests. By running multiple tests simultaneously, you can significantly reduce the total time taken for test execution. Detox supports this parallelization, allowing you to leverage your CI/CD environment’s resources effectively.
However, while parallelizing, it’s important to ensure that tests don’t depend on each other or shared states, as this could lead to unexpected failures. Each test should be self-contained and capable of running independently of others.
In large-scale applications, certain tests might require complex setup or tear-down processes or depend on external services, making them slower and more prone to failure. In such cases, using mocks and stubs for certain parts of the application can help.
Mocks and stubs simulate the behavior of real objects or services, allowing you to remove dependencies on external factors. This way, you can focus your tests on the application’s behavior rather than on the infrastructure setup. But remember, while mocks and stubs can speed up your tests and make them more reliable, they should not entirely replace testing against real services.
Finally, always keep your Detox framework up-to-date. Each new version of Detox comes with improvements and bug fixes that can help maintain the speed and reliability of your tests. Regular updates will also ensure compatibility with the latest versions of React Native.
Like any tool, Detox isn’t without its challenges. Developers might encounter a few common issues when running Detox tests. Each of these challenges has unique solutions, which can significantly streamline your testing process.
Configuration errors are among the most common issues you might face when working with Detox. These errors are usually caused by incorrect setup or missing dependencies. They can range from issues with the environment setup, such as problems with the PATH variable, to problems with the configuration file, such as incorrect or missing properties.
When you encounter these errors, reviewing your setup carefully is essential. Make sure to follow the Detox documentation meticulously and confirm that all steps were executed as instructed. Also, ensure that all the required dependencies are installed and that the configuration file is set up correctly.
Flaky tests, which sometimes pass and sometimes fail without any code changes, can be a significant issue when running end-to-end tests. This inconsistency can be caused by various factors, such as race conditions, reliance on specific states, or not properly handling asynchronous operations.
If you’re dealing with flaky tests, consider revising your test cases to ensure that they’re deterministic, or will always produce the same outcome given the same initial conditions or inputs. Ensure that your tests are not dependent on a specific state or data that could change between runs. For asynchronous operations, ensure that you’re properly awaiting their completion before moving on with the test.
Timeout errors occur when an operation in the test takes longer than the allowed time. This could happen if your application is slow or an expected UI element doesn’t appear within the expected timeframe. When facing timeout errors, you might need to adjust your test strategy. Consider increasing the timeout period for operations that naturally take longer.
However, if the timeouts are due to slow application load times, you might need to optimize your application for faster loading. This could involve the lazy loading of resources, optimizing database queries, or other performance improvements.
This article explores end-to-end testing using the Detox framework. However, Detox is not the sole player when it comes to e2e testing frameworks for React Native. Below we’ve conducted a comparative analysis of Detox and its two main competitors, Appium and Jest, across several key features:
| Detox | Appium | Jest | |
|---|---|---|---|
| Ease of setup | Setup process is straightforward, especially with the detailed documentation provided. However, it does require some understanding of native iOS and Android environments. | Requires more time for setup than Detox as it supports various languages and platforms. However, its robust community can offer assistance if you encounter any issues. | Setting up Jest for unit testing is relatively simple. However, for end-to-end testing, you might need to use it in conjunction with other tools, which can complicate the setup. |
| Speed | Known for its high-speed test execution, thanks to its gray-box testing approach. | Appium tests can be slower to run due to their black-box testing approach. | Speed is generally fast for unit tests, but end-to-end testing speed can vary depending on the additional tools used. |
| Reliability | The framework is reliable and provides consistent results, largely due to its synchronization feature. | While it can occasionally suffer from flakiness, its reliability has been steadily improving. | Jest is highly reliable for unit testing, but reliability for end-to-end tests depends on the other tools used. |
| Community support | While Detox has a growing community, it might not be as large as that of Appium or Jest. | Appium has a large and active community, providing robust support. | Jest also boasts a large community, mostly due to its use in various JavaScript projects, not just React Native. |
I highly encourage you to try Detox to test your React Native applications. Detox is an amazing end-to-end testing solution for mobile. After using it for some time, its standout features are its neatly abstracted syntax for matchers, its capacity for triggering specific actions, great integration with Jest, and its ability to run tests in CI.
If you encounter configuration errors, finding the proper solution may take a while. The best way to address this problem is to go and take a look at GitHub Issues. I hope you enjoyed this article. Happy coding!

LogRocket's Galileo AI watches sessions for you and and surfaces the technical and usability issues holding back your React Native apps.
LogRocket also helps you increase conversion rates and product usage by showing you exactly how users are interacting with your app. LogRocket's product analytics features surface the reasons why users don't complete a particular flow or don't adopt a new feature.
Start proactively monitoring your React Native apps — try LogRocket for free.

@container scroll-state: Replace JS scroll listeners nowCSS @container scroll-state lets you build sticky headers, snapping carousels, and scroll indicators without JavaScript. Here’s how to replace scroll listeners with clean, declarative state queries.

Explore 10 Web APIs that replace common JavaScript libraries and reduce npm dependencies, bundle size, and performance overhead.

Russ Miles, a software development expert and educator, joins the show to unpack why “developer productivity” platforms so often disappoint.

Discover what’s new in The Replay, LogRocket’s newsletter for dev and engineering leaders, in the February 18th issue.
Hey there, want to help make our blog better?
Join LogRocket’s Content Advisory Board. You’ll help inform the type of content we create and get access to exclusive meetups, social accreditation, and swag.
Sign up now
2 Replies to "React Native end-to-end testing with Detox"
Pretty good intro to E2E with Detox. One thing I noticed was that I needed to run “applesimutils –list” on the console to get a valid name for my device to replace “iPhone X” with “iPhone 11” since that is the emulator I’m currently running. Might be a good idea to add that as a note to this article.
Can I test using a real device?