Travis CI is a popular continuous integration and continuous deployment tool, used to build, test, and deploy an application’s codebase. In this article, we will be deploying a Laravel application that has tests to properly simulate code integration and explain Travis CI’s linear process.

To follow this post you will need:
On your browser, visit Travis CI and create an account using your GitHub account. You will have to synchronize your repositories with Travis CI when you do this you will see a list of repositories. From the list of repositories, select the one you wish to enable Travis CI for:
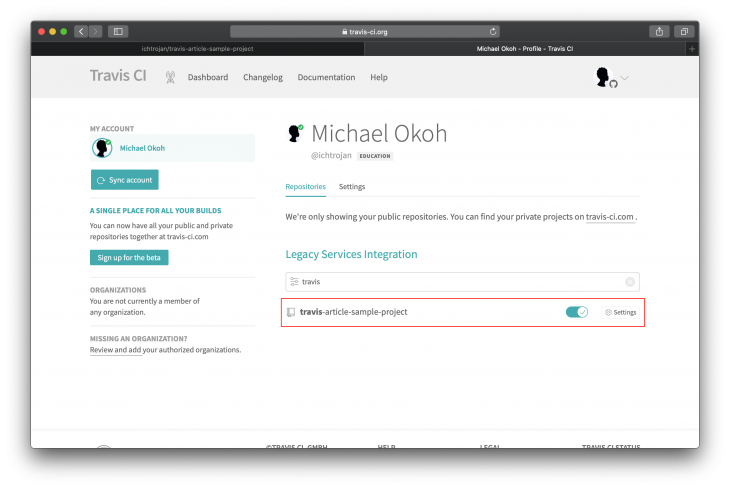
Click on settings to view the Travis CI customizations for this repository:
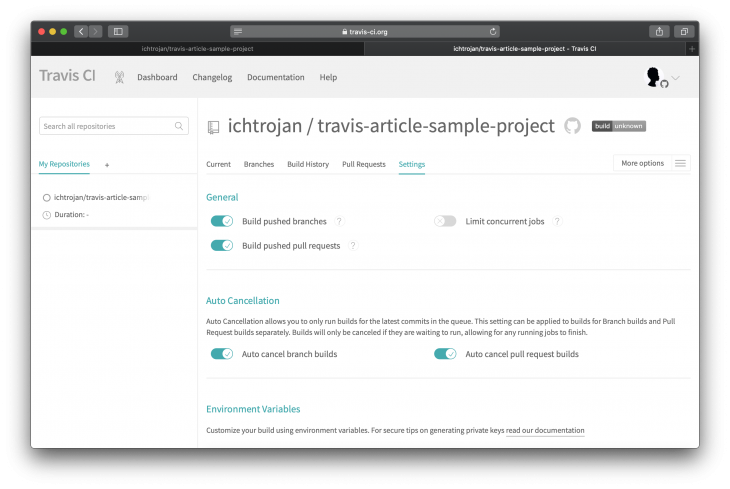
You can use the settings to configure different activities that trigger the CI/CD process, the defaults are good for us to go.
To generate SSH keys, log into your server via SSH:
ssh {SERVER_USER}@{SERVER_IP}
Note:
{SERVER_USER}is the server user authorized to log in.{SERVER_IP}is the IP address of the server.
Once inside the host machine, the first thing we want to do is set up an SSH key for the current user, and later we will download and save it on our local machine.
To get started, run:
cd ~/.ssh && ssh-keygen -t rsa -b 4096 -C "TravisArticle"
You will get a series of prompts, you can hit enter all through to accept defaults, after that, you should have your SSH key saved in the ~/.ssh/ directory.
Next, add the key as an authorized key on the server. This is necessary so that connections made to the host machine using the key we generated will be allowed. To add the key, run:
cat id_rsa.pub >> authorized_keys
This command should be executed in the ~/.ssh directory. After this, output the content of the public key stored in id_rsa.pub:
cat id_rsa.pub
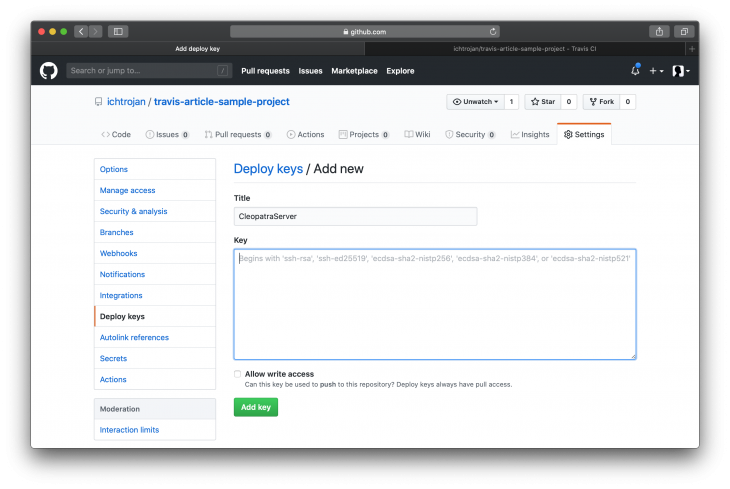
The command above will output the content of the public key on your console. You will see random texts on your console, mark it from the beginning to the end and copy it, you will be needing it in the next stage.
Go to your repository settings page on GitHub to add the text you just copied as a deploy key for that repository. This is to ensure that no username or password will be requested to pull changes from the repo to the server:
Go back to the server terminal window, change directory to /var/www:
cd /var/www
Next, clone the repository. We will be using SSH to clone the repository to avoid being prompted to input credentials. This is necessary since we would not have the opportunity to type in credentials interactively when the Travis CI process is running:
git clone [email protected]:ichtrojan/travis-article-sample-project.git
This will clone the repository. As a Laravel app, I will go ahead and install dependencies with composer and set my environment variables and make sure the website is running as expected. This is beyond the scope of this article so we won’t cover it today.
To ensure Travis can connect to our server and initiate the pull process that updates what is on the server, we will be using the scp command.
Change directory to where you have the project set up on your local machine. Next, execute:
scp {SERVER_USER}@{SERVER_IP}:/home/{SERVER_USER}/.ssh/id_rsa ./deploy_key

This will download the id_rsa private key to your current directory as deploy_key. Immediately the download is done, add deploy_key to .gitignore by executing:
echo 'deploy_key' > .gitignore
This will ensure that you do not accidentally commit the file to the repository. Committing the private key to the source code could expose the private key, anyone that has access to it can access the host machine.
The first thing we have to do is create a .travis.yml file that defines how Travis will handle our integration and deployment process. Run the following in the project directory:
touch .travis.yml
Next, log into Travis CLI by running:
travis login --org
On running the above command, a prompt will be shown asking for your username and password, input the required credentials, and hit enter. Encrypt the private key downloaded in the previous step by executing:
travis encrypt-file ./deploy_key --add
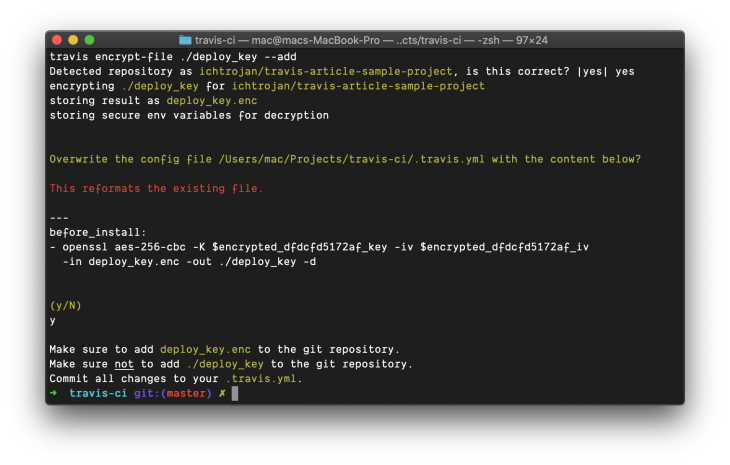
Immediately this command is executed, the .travis.yml file is updated with content similar to this:
before_install:
  - openssl aes-256-cbc -K $encrypted_db82b94960d2_key -iv $encrypted_db82b94960d2_iv
    -in deploy_key.enc -out ./deploy_key -d
This line is responsible for decrypting the private key we encrypted. This line will run before our deploy process will kick off so that we can have access to the private key.
Also, a deploy_key.enc file is generated in the same directory. This file is to be added to your repository:
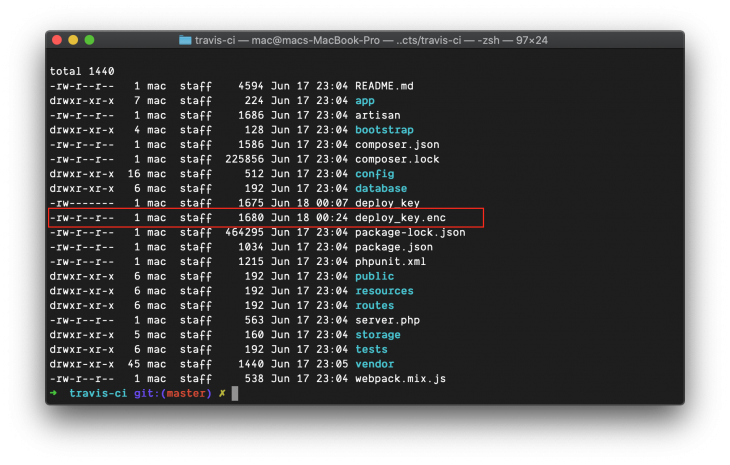
The next thing for us to do is test Travis. The first thing I’ll do in this case is update .travis.yml file at the root of the project directory.
This update will define all the processes Travis is going to use in testing and deploying our application. Here is what the new content will look like:
language: php
php:
  - 7.4
services:
  - mysql
before_script:
  - mysql -e 'CREATE DATABASE test_db;'
  - composer install --no-interaction
  - cp .env.example .env
  - php artisan key:generate
  - php artisan migrate
addons:
  ssh_known_hosts:
    - {SERVER_IP}
branches:
  only:
  - master
script:
  - vendor/bin/phpunit
after_script:
  - ssh -i ./deploy_key {SERVER_USER}@{SERVER_IP} cd /var/www/travis-ci-article && git pull origin master
before_install:
  - openssl aes-256-cbc -K $encrypted_240bf24cdcde_key -iv $encrypted_240bf24cdcde_iv -in deploy_key.enc -out ./deploy_key -d
  - eval "$(ssh-agent -s)"
  - chmod 600 ./deploy_key
  - echo -e "Host {SERVER_IP}\n\tStrictHostKeyChecking no\n" >> ~/.ssh/config
  - ssh-add ./deploy_key
Let us go through what these additions will do, some are specific to PHP while some are purposely for the objective of this article. This initial line indicates the language we intend to deploy along with our preferred version number:
language: php
php:
  - 7.4
...
The next step defines the services I want Travis to include for our build process. In this case, we included MySQL which we serve as our database:
...
services:
  - mysql
...
This part defines commands we would like to be executed before the running actions in the script section, these commands are PHP/Laravel specific if you were deploying an application written in another language, you replace these with the language-specific setup commands:
...
before_script:
  - mysql -e 'CREATE DATABASE test_db;'
  - composer install --no-interaction
  - cp .env.example .env
  - php artisan key:generate
  - php artisan migrate
...
This command creates a new database with the name test_db:
mysql -e 'CREATE DATABASE test_db;'
This command installs all the packages and dependencies using composer with no interaction:
composer install --no-interaction
This command will duplicate the contents of .env.example into .env:
cp .env.example .env
This command will generate the Laravel application security key:
php artisan key:generate
Finally, this command will run the database migrations:
php artisan migrate
Add your server IP address to the known hosts for Travis, this is useful to the server we are deploying to and allows Travis to communicate securely:
...
addons:
  ssh_known_hosts:
    - {SERVER_IP}
...
This part instructs Travis to only take note of the master branch so that all the build process will only be performed for the master branch. You can have a special deploy process that only happens when there is a push to a particular branch, in such a case this part is very useful:
...
branches:
  only:
  - master
...
This is the script we are running, what this does is runs the tests. If this script exits with a code that is not 0 i.e fails, the deployment process will not be initiated:
...
script:
  - vendor/bin/phpunit
...
This runs immediately Travis completes setting up the container our build is running in and if you take note, it’s where all the preparation for our Deploy Process happens. That is where we set up everything that will enable our deploy process to be successful:
before_install:
  - openssl aes-256-cbc -K $encrypted_240bf24cdcde_key -iv $encrypted_240bf24cdcde_iv -in deploy_key.enc -out ./deploy_key -d
  - eval "$(ssh-agent -s)"
  - chmod 600 ./deploy_key
  - echo -e "Host {SERVER_IP}\n\tStrictHostKeyChecking no\n" >> ~/.ssh/config
  - ssh-add ./deploy_key
This part shows the process for our deploy process. It’s important to note that this part ONLY runs when everything declared in the after_script section finishes and exits with 0, a failed test will not exit with 0 bringing the deploy process to a halt.
This is where the power of continuous integration lies. It follows linearly the build, test, deploy cycle. If one fails, the next will not be processed. If any of the tests fail, the deploy process will not happen. With this, you can tightly monitor your releases and ensure you are releasing what was intended. Which enables you to minimize bugs in your software by seeing them before they happen:
after_script:
  - ssh -i ./deploy_key {SERVER_USER}@{SERVER_IP} cd /var/www/travis-ci-article && git pull origin master
Immediate access to the target server is gained via SSH, we run a chain of commands like this:
cd /var/www/travis-ci-article && git pull origin master
These two commands basically enter the /var/www/travis-ci-article directory and run git pull origin master which pulls the changes from the master branch of the project.
To finish this process and test our build, test, and deploy process, commit your changes after updating your .travis.yml file as shown above and push to your master branch.
Immediately when you push to Github, Travis will receive the information about your push and will start the build and deploy process:
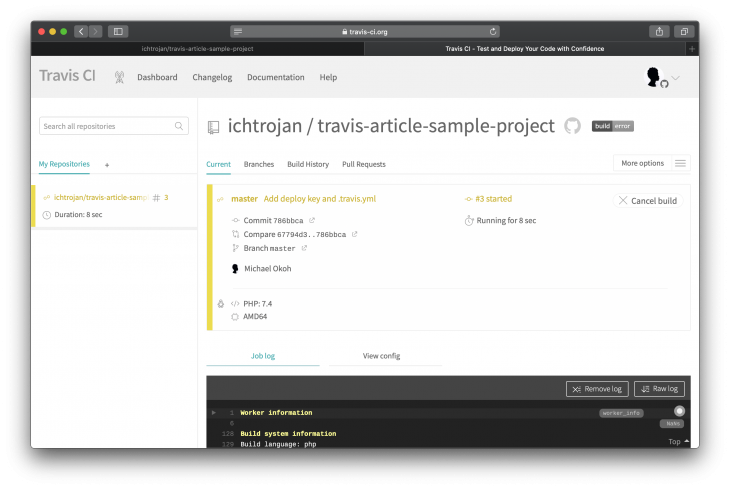
If everything is successful, you will have green as an indication:
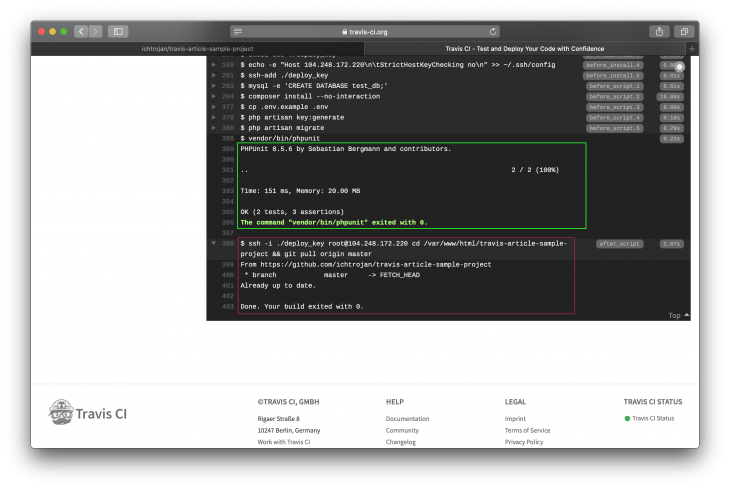
In the image above the red box shows the part that ran the test and it showed that all tests passed and exited with code 0. If the tests failed, the exit code will not be 0 and that will mark the build process as failed.
We can make some changes that will cause the test to fail and halt the CI process, which will prevent the deploy proceeds from taking place.
To do this, we would need to modify the home.blade.php located in the resources/views directory. Change the Welcome Home text there to Laravel.
<div class="title m-b-md">
    Laravel
</div>
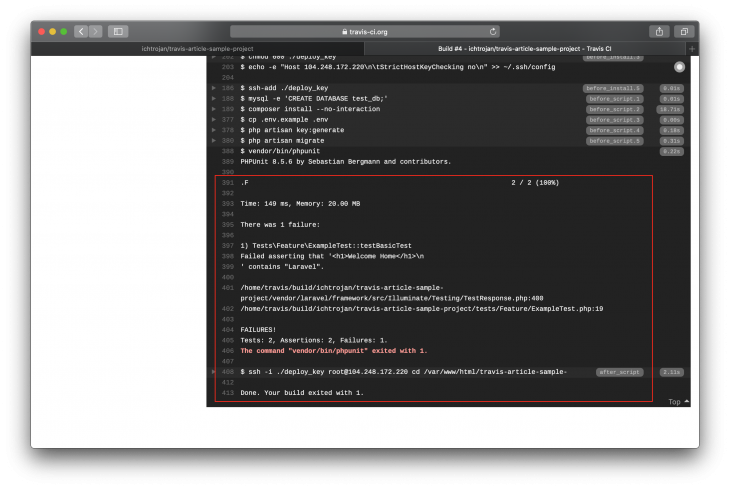
Our test will fail because it expects the text within the div to Laravel. When such failure happens you’d get something that looks like this:
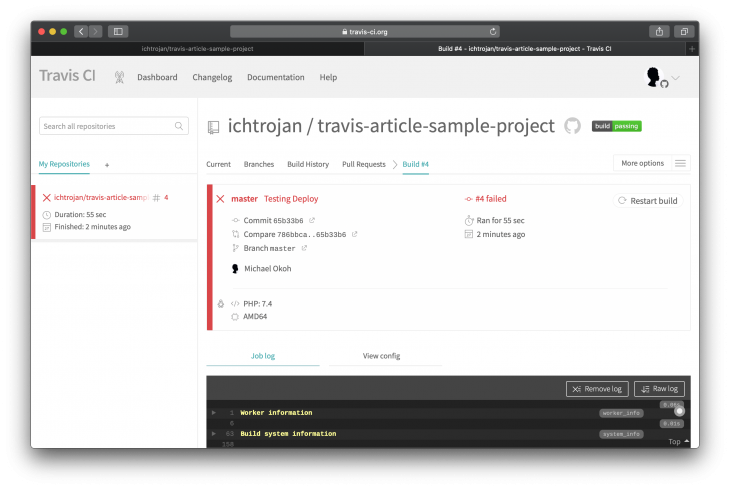
If you scroll down to see the details, you will see that the build exited with a Non-zero exit code, which is a result of the failure in the test. For the failure above, the status looks like this:
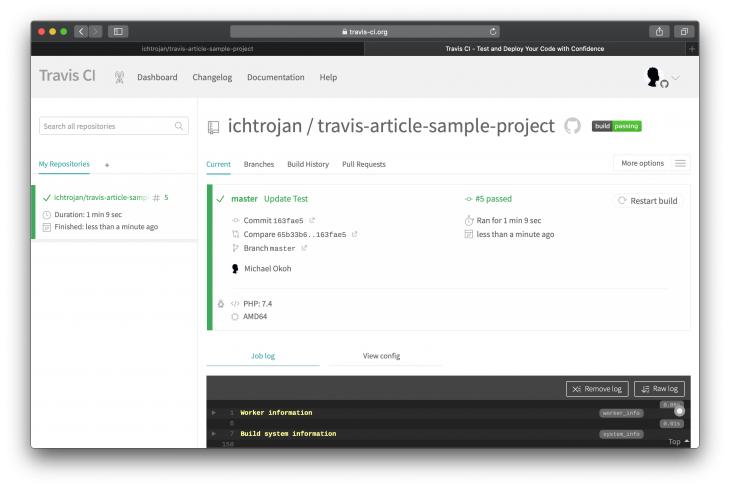
Adding changes to update the failing test and then making it pass resulted in the build process passing again. This leads to getting the successful build screen again:
At this point, you should have a clear understanding on how to set up continuous integration and continuous deployment pipelines with Travis CI, following this tutorial, we tested our setup at optimal conditions and also tested for failure, when something goes wrong.
Travis offers robust continuous integration for software. We were able to cover a simple process in this article even though different build processes can get more complicated based on what you want to achieve. I hope you’ve been able to gain some insight as to how a basic build, test, and deploy process can be performed with Travis. Make sure you don’t just read this article without trying yours, I’m sure you’ll like it.
Install LogRocket via npm or script tag. LogRocket.init() must be called client-side, not
server-side
$ npm i --save logrocket

// Code:

import LogRocket from 'logrocket';
LogRocket.init('app/id');
// Add to your HTML:

<script src="https://cdn.lr-ingest.com/LogRocket.min.js"></script>
<script>window.LogRocket && window.LogRocket.init('app/id');</script>
Would you be interested in joining LogRocket's developer community?
Join LogRocket’s Content Advisory Board. You’ll help inform the type of content we create and get access to exclusive meetups, social accreditation, and swag.
Sign up now
Discover how to use Gemini CLI, Google’s new open-source AI agent that brings Gemini directly to your terminal.

This article explores several proven patterns for writing safer, cleaner, and more readable code in React and TypeScript.

A breakdown of the wrapper and container CSS classes, how they’re used in real-world code, and when it makes sense to use one over the other.

This guide walks you through creating a web UI for an AI agent that browses, clicks, and extracts info from websites powered by Stagehand and Gemini.