Playwright is a browser automation framework available in multiple programming languages. In the fast-paced world of web development, Playwright has become one of the leading technologies for writing end-to-end tests for modern web applications, thanks to its rich and intuitive API.

Join us in this adoption guide and get ready to learn everything you need to know about Playwright and why to use it in your browser automation projects!
The Replay is a weekly newsletter for dev and engineering leaders.
Delivered once a week, it's your curated guide to the most important conversations around frontend dev, emerging AI tools, and the state of modern software.
Playwright is a cross-browser, cross-language, cross-platform browser automation framework developed by Microsoft. Originally created to meet the needs of end-to-end testing, it can cover many other user cases as well. It provides an intuitive, easy-to-learn, unified API for interacting with all modern rendering engines, including Chromium, WebKit, and Firefox.
Playwright works on Windows, Linux, and macOS; locally or on CI; on desktop or emulated mobile browsers; and in headless or headed mode. The framework supports several platforms and programming languages, such as JavaScript and TypeScript, Java, Python, and .NET.
Let’s now take a step back and review Playwright’s history before seeing what it offers, its main use cases, and how to get started with it.
Playwright was introduced by Microsoft in January 2020. The development team included engineers who had previously worked on Google’s Puppeteer project, the most popular JavaScript-based automated testing framework at the time.
The team’s experience with that technology helped them build a more flexible and modern framework that could overcome Puppeteer’s well-known limitations and shortcomings. For example, they immediately recognized the need for a tool that could support multiple browsers and not only Chromium-based browsers.
On 6 May 2020, the first stable version of Playwright was released. This included full support for Chromium, Firefox, and WebKit, establishing Playwright as a comprehensive cross-browser testing tool.
The Playwright Node.js test runner was released later as part of an effort to provide a more complete solution for running browser-based tests. Its development was driven by the need for a tool that could fully leverage the Playwright API and make end-to-end testing more robust and straightforward.
Since its initial release, Playwright has rapidly evolved. The team has worked hard to to make the framework more robust and extensive by keep adding new features. These include improved selectors, auto-wait mechanisms, network interception, device emulation, and integrations with popular CI/CD systems and testing frameworks.
With over 62k stars on GitHub and more than 5 million weekly downloads on npm, Playwright is now a leading browser automation technology. Its community boasts thousands of active users, with extensive documentation, tutorials, and community-driven content contributing to its widespread adoption.
To better understand how Playwright works, we need to dig into its two main components:
In other words, the Playwright library exposes the low-level API for interacting with browsers. Meanwhile, Playwright Test brings the framework and tools needed to efficiently manage and execute tests built using that API. Together, they form a powerful toolkit that enables developers to create robust and reliable web automation scripts and tests.
Playwright’s use cases depend on whether we’re referring to the Playwright library or Playwright Test.
These are some of the most common use cases for the Playwright library:
These are some of the main use cases of Playwright Test:
Playwright as a whole covers all the use cases presented above and many more.
Playwright requires different setups depending on which of its two components you need to use. Since the framework is popular primarily for its testing capabilities, let’s look at how to create a Playwright testing project in TypeScript using Node.js.
First, make sure you have Node.js installed on your machine. Then, run the command below in the project folder to start the Playwright setup wizard:
npm init playwright@latest
During the process, you will have to choose:
After answering these questions, the installation tool will start downloading, installing, and configuring the required dependencies. At the end of this process, your project folder will contain a Playwright test suite.
The configured test folder will contain an example.spec.ts test file you can run with this command:
npx playwright test
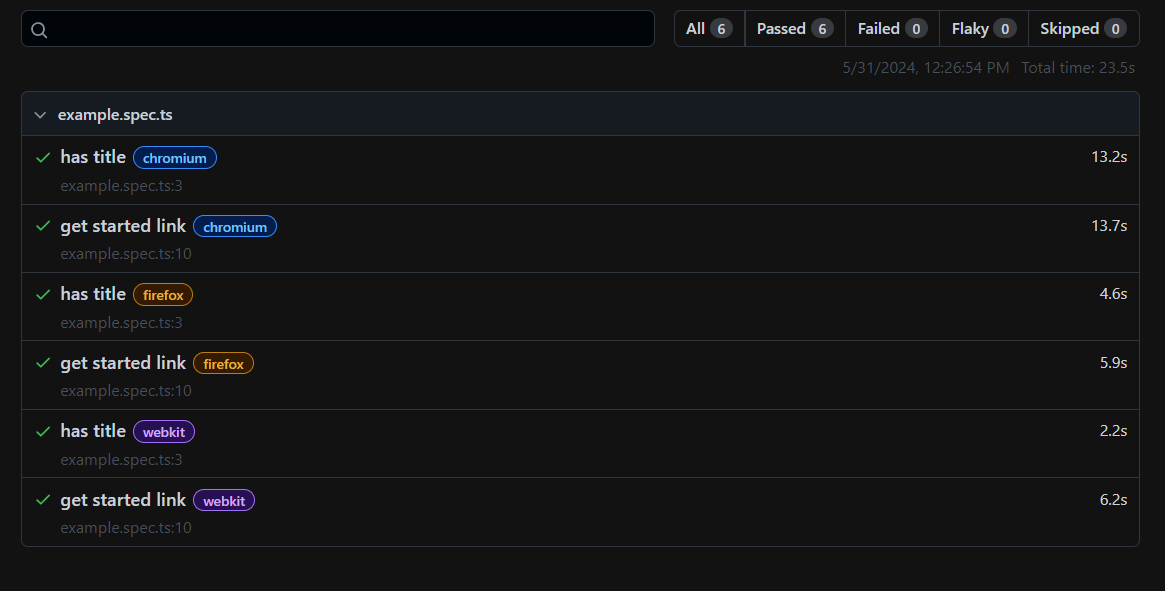
The result will be the following HTML report:

Awesome, you just set up a Playwright testing project!
Browser automation and test scripts follow two different structures in Playwright. We’ll go over how they work in the Playwright library and with Playwright Test.
A Playwright Library browser automation script generally performs the three steps below:
For example, this is what a simple web scraping Playwright script looks like:
const { chromium } = require("playwright");

(async () => {
  // launch a new browser instance
  const browser = await chromium.launch();
  // create a new browser context
  const context = await browser.newContext();
  // create a new page in the browser context
  const page = await context.newPage();

  // locate the h1 element on the page
  const firstH1 = await page.locator('h1');
  // extract the text in the h1 element
  const h1Text = await firstH1.textContent();

  // print the scraped data in the console
  console.log(h1Text);

  // release the browser resources
  await context.close();
  await browser.close();
})();
Behind the scenes, Playwright instructs Chromium to visit the specified page, search for the <h1> element, retrieve the text inside it, print it in the console, and close the browser.
In Playwright, a test is a sequence of commands enclosed in a test() block. These commands are the building blocks of the test logic and are usually methods on the page object provided by Playwright. Then, at the end of the test block, there is an except() assertion method to verify that a specific condition is true.
Playwright tests have a BDD syntax and follow the AAA pattern:
This is true for both unit and end-to-end tests.
In simple terms, a Playwright test performs actions on the application and verifies that it’s behaving as expected. Here is an example of a test:
import { test, expect } from "@playwright/test";

test("has title", async ({ page }) => {
  await page.goto("https://playwright.dev/");

  // expect a title "to contain" a substring.
  await expect(page).toHaveTitle(/Playwright/);
});

test("get started link", async ({ page }) => {
  await page.goto("https://playwright.dev/");

  // click the get started link.
  await page.getByRole("link", { name: "Get started" }).click();

  // expects page to have a heading with the name of Installation.
  await expect(page.getByRole("heading", { name: "Installation" })).toBeVisible();
});
Here, the test file contains two tests. The first test wraps the following two commands:
"https://playwright.dev/"The second test includes commands to:
"https://playwright.dev/"As you can notice, the commands are close to plain English and can be chained quite intuitively. This is what makes Playwright so popular — it ensures that tests are easy to write, read, and debug.
In Playwright, related tests can also be grouped together in a describe() block, like this:
import { describe, test, expect } from "@playwright/test";

describe("User Authentication Tests", () => {
  test("should let a user log in", async ({ page }) => {
    // test logic for user login...
  });

  test("should let new users sign up", async ({ page }) => {
    // test logic for new signups...
  });

  test("should let users reset their passwords", async ({ page }) => {
    // test logic for password reset functionality...
  });
});
describe() blocks are called test groups and live inside a spec file. All test groups in a spec file are called a test suite.
The devices and browsers to execute these tests on, as well as many other options, can be configured locally or globally in configuration files. In a TypeScript testing project, the global configuration file is playwright.config.ts.
Here are the main reasons why Playwright is such a popular option for browser automation, from its great ease of use to its extensive documentation and plethora of integrations:
Playwright is an excellent tool with many features supporting several use cases, but it also has some limitations. The most critical ones are:
playwright-extra, a community-driven project tthat adds extensibility to Playwright via several pluginsplaywright npm package has an uncompressed size of 3 MB and depends on playwright-core, which has an unpacked size of 7 MB. That is a total of 10 MB. On top of that, browser executables required by Playwright take hundreds of MBHaving seen the main strengths and weaknesses of Playwright, you’re ready to get into the specifics of what this popular automation tool can do.
What makes Playwright such a powerful tool is its strongly typed API, which allows you to:
maxDiffPixels to compare them for visual regression testingThese are just a few of the many features supported by the rich Playwright API. Check out the official documentation for more information.
Before performing any action on a web element, Playwright performs a series of actionability checks. These checks ensure that the action will behave as expected.
Specifically, Playwright automatically waits for all these checks to pass and only then executes the requested action. If the checks do not pass within the globally configured timeout value, the action fails with a TimeoutError.
For example, before performing a locator.click() action, Playwright will ensure that:
locator resolves to an exactly one elementIf you don’t like this behavior, you can opt out of auto-waiting by specifying the force option to false:
element.click({ force: true })
Playwright can mock and modify HTTP and HTTPS network traffic to API endpoints. In particular, it can mock or intercept and modify XHRs and fetch requests your frontend application makes on the browser. This is possible thanks to the page.route() method:
test("mocks a fruit and doesn't call api", async ({ page }) => {
  // mock the api call before the page navigation logic
  await page.route("*/**/api/v1/fruits", async route => {
    // response of the intercepted API call
    const json = [{ name: "Strawberry", id: 21 }];
    // return the given response
    await route.fulfill({ json });
  });

  // navigate to the page making the request to intercept
  await page.goto("https://demo.playwright.dev/api-mocking");

  // assert that the Strawberry fruit is visible
  await expect(page.getByText("Strawberry")).toBeVisible();
});
The above code intercepts all the frontend calls to the */**/api/v1/fruits endpoints and mocks a custom response for them.
Playwright also supports mocking requests via HTTP Archive (HAR) files. These files contain a record of all the network requests made by the page when it’s loaded by the browser, including information about the request and response headers, cookies, content, timings, and more. You can use Plawyright to record a HAR file, update it as required, and use it to mock network requests in your tests.
Playwright supports recording options to take screenshots or record videos of your tests. By default, videos are disabled but can be enabled with the global video option. This accepts the following values:
"off" —Do not record video (default value)"on" — Record a video for each test"retain-on-failure" — Record videos for each test, but remove all videos from successful test runs"on-first-retry" — Record video only when retrying a test for the first timeSimilarly, Playwright can be configured to capture screenshots after each test run by using the screenshot option. The supported values for this option are:
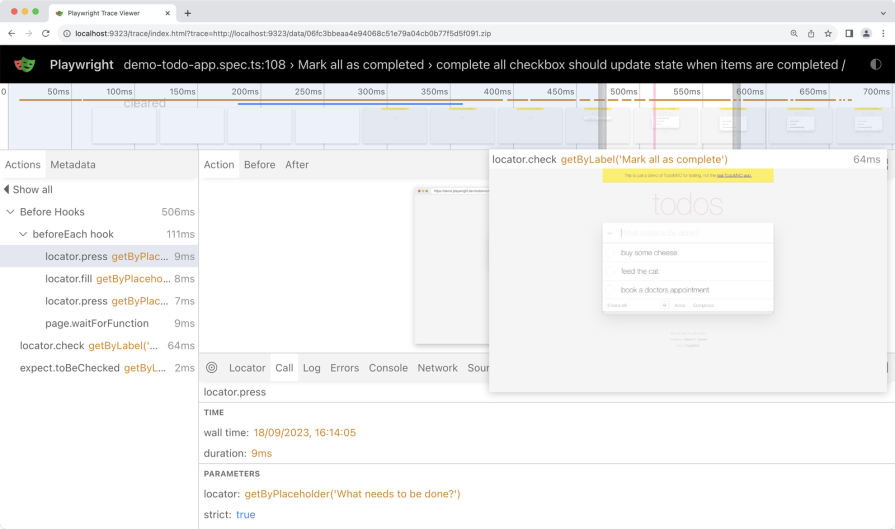
"off" — Do not capture screenshots (default value)"on" — Capture screenshots after each test"only-on-failure" — Capture screenshots after each test failureTrace Viewer is a powerful GUI tool to explore recorded Playwright traces after a test script has run. These traces provide comprehensive insights into your automated test runs, helping you debug and optimize your tests:

When you run a test with tracing enabled, Playwright collects detailed information about each operation performed. This includes network requests, screenshots, DOM snapshots, console logs, and more.
The traces are stored in an archive file that you can explore with the Trace Viewer in an interactive interface. Inside this tool, you can navigate through each action your test performed, view corresponding network activity, and examine how the page looked at any point in time.
The Trace Viewer is particularly useful for debugging a test failed in a CI/CD environment. It can help you gain a deeper understanding of test execution to quickly identify and address issues.
Playwright can test your web application on your current machine or emulate real devices, including mobile phones and tablets. Select a device from the list of supported ones or configure a custom device you would like to emulate by specifying values such as "userAgent", "screenSize", "viewport", and if it "hasTouch" enabled.
You can also emulate the "geolocation", "locale", and "timezone" for all tests or for a specific test, as well as set the "permissions" to show notifications or even change the "colorScheme".
Consider the following configuration file for your test suite:
// import the device list
import { defineConfig, devices } from "@playwright/test";

export default defineConfig({
  projects: [
    {
      name: "Mobile Safari",
      use: {
        // configure a special device
        ...devices["iPhone 13"],
      },
    },
  ],
});
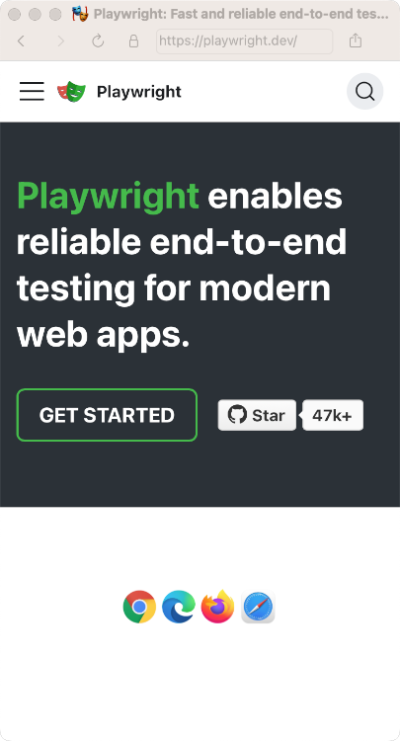
When running a test in headed mode, this is what you’ll see in the browser window:

As configured, the window browser your application is tested in has the same viewport size as an iPhone 13.
By default, Playwright runs tests in parallel. In detail, it launches multiple test files in parallel using different worker processes. These are operating system processes that run independently and are orchestrated by the Playwright test runner. All workers have identical environments, start their own browsers, and cannot communicate with each other.
To be executed, a test file must be first assigned to a free worker. Thus, test files are executed in parallel, but tests of a single file are run in order and within the same worker process. You can disable parallelism by setting the number of workers to 1. Playwright also supports sharding the test suite so that you can run it on multiple machines simultaneously.
Playwright supports test retries. This is a mechanism to automatically re-run a test when it fails, which is useful for detecting flaky behavior. By default, retries are disabled. When enabled, Playwright will retry failing tests multiple times until they pass or the maximum number of retries is reached.
You can configure retries in the Playwright configuration file as shown below:
import { defineConfig } from "@playwright/test";

export default defineConfig({
  // give failing tests 3 retry attempts
  retries: 3,
});
After you configure the retry logic, Playwright will categorize tests in the result report as follows:
"passed" — Tests that passed on the first run"flaky" — Tests that failed on the first run, but passed when retried"failed" — Tests that failed on the first run and failed on all other retriesPlaywright reporters are tools that generate detailed logs and summaries of test runs. They provide information on test executions, highlighting successes, failures, and other relevant details. You can also use multiple reporters at the same time.
Playwright comes with several built-in reporters, each tailored for different needs. These include:
In addition to the built-in options, Playwright allows developers to create custom reporters to fit their specific needs. You can achieve this by implementing the Reporter interface and defining how the test results should be processed and displayed.
Playwright offers the ability to generate tests without coding. This Codegen feature is a great way to quickly define new tests in any of the supported programming languages. When you specify the codegen option, Playwright opens two windows:
Playwright will generate the code associated with the interactions you perform on the page in the browser window. Codegen can determine the recommended locator for the elements you interact with and turns all actions you make on the page into lines of code. Thanks to a special toolbar, you can also define assertions to close the generated test logic.
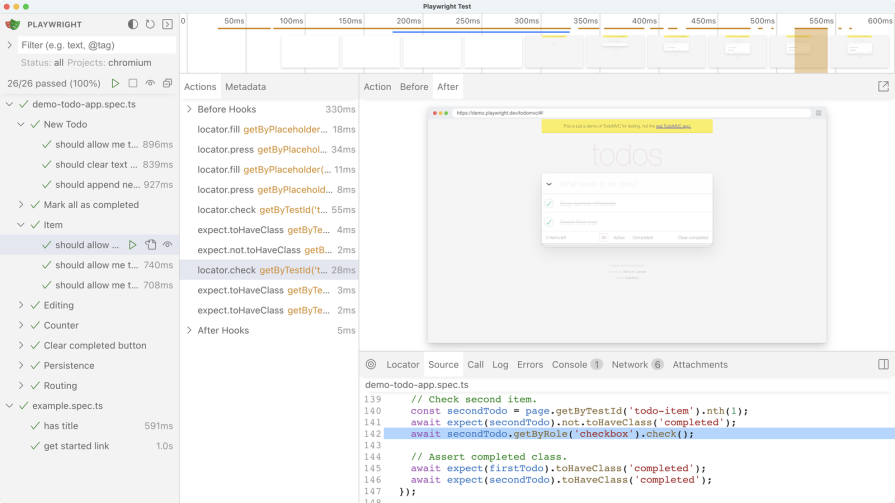
When launching a test in UI Mode, Playwright opens a window with a list of all test files in your suite:

Here you can explore, run, and debug individual tests within these test files. UI Mode allows you to run actions back and forth to see what happens during each action, while on the right you can see the application being tested. This time-travel experience makes it easier to understand what a test does on the web application to debug it.
UI mode also enables you to filter tests by text, tag, or outcome. Other features available in this tool include seeing DOM element selectors, inspecting console errors, looking at network calls, and more.
As powerful as Playwright is, no single tool can meet every developer’s needs. Some developers may prefer a lighter library, while others may require features such as spies and full support for component testing. Similarly, some teams might look for extensibility through a large ecosystem of plugins.
Below is a table comparing Playwright with its main competitors to help you make the right choice about which browser automation tool to use:
| Playwright | Selenium | Cypress | Puppeteer | |
|---|---|---|---|---|
| Tool type | Framework for web testing and automation | Browser automation framework and ecosystem | Front-end testing tool that runs in a browser | High-level API to control Chrome over the DevTools Protocol |
| GitHub stars | 62k+ | 29k+ | 46k+ | 87k+ |
| npm weekly downloads | ~5.6M | ~2M | ~5.5M | ~4M |
| Setup | Simple | Complex | Simple | Simple |
| Features | Several | Good amount | Several | Limited |
| Supported browsers | All major modern browsers | All major browsers, including IE | Chromium-based browsers, Firefox | Chromium-based browsers, experimental Firefox support |
| Supported languages | JavaScript, Python, Java, .NET languages | Java, JavaScript, C#, Python | JavaScript | JavaScript |
| Built-in test runner | Yes | No | Yes | No |
| Plugins | Not officially supported but available via playwright-extra | Only supported in Selenium IDE | Native support | Not officially supported but available via puppeteer-extra |
In this article, we discussed what Playwright is and how it has become one of the most popular browser automation and testing frameworks in the industry. We explored its functionality, advantages and disadvantages, main features, and how it compares to similar testing technologies. Playwright expertise unlocked!
The aim of this overview was to assist you in evaluating Playwright for your testing suite or browser automation project. If you have any further questions about what Playwright is best for and how to use it effectively, feel free to comment below.
Install LogRocket via npm or script tag. LogRocket.init() must be called client-side, not
server-side
$ npm i --save logrocket

// Code:

import LogRocket from 'logrocket';
LogRocket.init('app/id');
// Add to your HTML:

<script src="https://cdn.lr-ingest.com/LogRocket.min.js"></script>
<script>window.LogRocket && window.LogRocket.init('app/id');</script>

React Server Components and the Next.js App Router enable streaming and smaller client bundles, but only when used correctly. This article explores six common mistakes that block streaming, bloat hydration, and create stale UI in production.

Gil Fink (SparXis CEO) joins PodRocket to break down today’s most common web rendering patterns: SSR, CSR, static rednering, and islands/resumability.

@container scroll-state: Replace JS scroll listeners nowCSS @container scroll-state lets you build sticky headers, snapping carousels, and scroll indicators without JavaScript. Here’s how to replace scroll listeners with clean, declarative state queries.

Explore 10 Web APIs that replace common JavaScript libraries and reduce npm dependencies, bundle size, and performance overhead.
Would you be interested in joining LogRocket's developer community?
Join LogRocket’s Content Advisory Board. You’ll help inform the type of content we create and get access to exclusive meetups, social accreditation, and swag.
Sign up now