async, await, and Tasks vs. coroutines, C# Job System, and burst compiler
Performance is everything when you are trying to publish to the web, mobile, consoles, and even some of the lower-end PCs. A game or application running at less than 30 FPS can cause frustration for the users. Let’s take a look at some of the things we can use to increase the performance by reducing the load on the CPU.

In this post, we will be covering what async, await, and Task in C# are and how to use them in Unity to gain performance in your project. Next, we will take a look at some of Unity’s inbuilt packages: coroutines, the C# Job System, and the burst compiler. We will look at what they are, how to use them, and how they increase the performance in your project.
To start this project off, I will be using Unity 2021.3.4f1. I have not tested this code on any other version of Unity; all concepts here should work on any Unity version after Unity 2019.3. Your performance results may differ if using an older version as Unity did make some significant improvements with the async/await programming model in 2021. Read more about it in Unity’s blog Unity and .NET, what’s next, in particular the section labeled “Modernizing the Unity runtime.”
I created a new 2D (URP) Core project, but you can use this in any type of project that you like.
I have a sprite that I got from Space Shooter (Redux, plus fonts and sounds) by Kenney Vleugels.
I created an enemy prefab that contains a Sprite Render and an Enemy Component. The Enemy Component is a MonoBehaviour that has a Transform and a float to keep track of the position and the speed to move on the y axis:
using UnityEngine;

public class Enemy
{
   public Transform transform;
   public float moveY;
}
The Replay is a weekly newsletter for dev and engineering leaders.
Delivered once a week, it's your curated guide to the most important conversations around frontend dev, emerging AI tools, and the state of modern software.
async, await, and Task are in C#async?In C#, methods can have an async keyword in front of them, meaning that the methods are asynchronous methods. This is just a way of telling the compiler that we want to be able to execute code within and allow the caller of that method to continue execution while waiting for this method to finish.
An example of this would be cooking a meal. You will start cooking the meat, and while the meat is cooking and you are waiting for it to finish, you would start making the sides. While the food is cooking, you would start setting the table. An example of this in code would be static async Task<Steak> MakeSteak(int number).
Unity also has all kinds of inbuilt methods that you can call asynchronously; see the Unity docs for a list of methods. With the way Unity handles memory management, it uses either coroutines, AsyncOperation, or the C# Job System.
await and how do you use it?In C#, you can wait for an asynchronous operation to complete by using the await keyword. This is used inside any method that has the async keyword to wait for an operation to continue:
Public async void Update()
{
     // do stuff
     await // some asynchronous method or task to finish
     // do more stuff or do stuff with the data returned from the asynchronous task.
}
See the Microsoft documents for more on await.
Task and how do you use it?A Task is an asynchronous method that performs a single operation and does not return a value. For a Task that returns a value, we would use Task<TResult>.
To use a task, we create it like creating any new object in C#: Task t1 = new Task(void Action). Next, we start the task t1.wait. Lastly, we wait for the task to complete with t1.wait.
There are several ways to create, start, and run tasks. Task t2 = Task.Run(void Action) will create and start a task. await Task.Run(void Action) will create, start, and wait for the task to complete. We can use the most common alternative way with Task t3 = Task.Factory.Start(void Action).
There are several ways that we can wait for Task to complete. int index = Task.WaitAny(Task[]) will wait for any task to complete and give us the index of the completed task in the array. await Task.WaitAll(Task[]) will wait for all of the tasks to complete.
For more on tasks, see the Microsoft Documents.
taskexampleprivate void Start()
{
Task t1 = new Task(() => Thread.Sleep(1000));
Task t2 = Task.Run(() => Thread.Sleep(2000000));
Task t3 = Task.Factory.StartNew(() => Thread.Sleep(1000));
t1.Start();
Task[] tasks = { t1, t2, t3 };
int index = Task.WaitAny(tasks);
Debug.Log($"Task {tasks[index].Id} at index {index} completed.");
Task t4 = new Task(() => Thread.Sleep(100));
Task t5 = Task.Run(() => Thread.Sleep(200));
Task t6 = Task.Factory.StartNew(() => Thread.Sleep(300));
t4.Start();
Task.WaitAll(t4, t5, t6);
Debug.Log($"All Task Completed!");
Debug.Log($"Task When any t1={t1.IsCompleted} t2={t2.IsCompleted} t3={t3.IsCompleted}");
Debug.Log($"All Task Completed! t4={t4.IsCompleted} t5={t5.IsCompleted} t6={t6.IsCompleted}");
}
public async void Update()
{
float startTime = Time.realtimeSinceStartup;
Debug.Log($"Update Started: {startTime}");
Task t1 = new Task(() => Thread.Sleep(10000));
Task t2 = Task.Run(() => Thread.Sleep(20000));
Task t3 = Task.Factory.StartNew(() => Thread.Sleep(30000));
await Task.WhenAll(t1, t2, t3);
Debug.Log($"Update Finished: {(Time.realtimeSinceStartup - startTime) * 1000f} ms");
}
Now let’s compare the performance of a task versus the performance of a method.
I will need a static class that I can use in all of my performance checks. It will have a method and a task that simulates a performance-intensive operation. Both the method and the task perform the same exact operation:
using System.Threading.Tasks;
using Unity.Mathematics;

public static class Performance
{
   public static void PerformanceIntensiveMethod(int timesToRepeat)
   {
       // Represents a Performance Intensive Method like some pathfinding or really complex calculation.
       float value = 0f;
       for (int i = 0; i < timesToRepeat; i++)
       {
           value = math.exp10(math.sqrt(value));
       }
   }

   public static Task PerformanceIntensiveTask(int timesToRepeat)
   {
       return Task.Run(() =>
       {
           // Represents a Performance Intensive Method like some pathfinding or really complex calculation.
           float value = 0f;
           for (int i = 0; i < timesToRepeat; i++)
           {
               value = math.exp10(math.sqrt(value));
           }
       });
   }
}
Now I need a MonoBehaviour that I can use to test the performance impact on the task and the method. Just so I can see a better impact on the performance, I will pretend that I want to run this on ten different game objects. I will also keep track of the amount of time the Update method takes to run.
In Update, I get the start time. If I am testing the method, I loop through all of the simulated game objects and call the performance-intensive method. If I am testing the task, I create a new Task array loop through all of the simulated game objects and add the performance-intensive task to the task array. I then await for all of the tasks to complete. Outside of the method type check, I update the method time, converting it to ms. I also log it.
public class PerformanceTaskCoroutineJob : MonoBehaviour
{
   private enum MethodType
   {
       Normal,
       Task
   }

   [SerializeField] private int numberGameObjectsToImitate
= 10;

   [SerializeField] private MethodType method = MethodType.Normal;

   [SerializeField] private float methodTime;

   private async void Update()
   {
       float startTime = Time.realtimeSinceStartup;

       switch (method)
       {
           case MethodType.Normal:
               for (int i = 0; i < numberGameObjectsToImitate
; i++)
                   Performance.PerformanceIntensiveMethod(50000);
               break;
           case MethodType.Task:
               Task[] tasks = new Task[numberGameObjectsToImitate
];
               for (int i = 0; i < numberGameObjectsToImitate
; i++)
                   tasks[i] = Performance.PerformanceIntensiveTask(5000);
               await Task.WhenAll(tasks);
               break;
       }

       methodTime = (Time.realtimeSinceStartup - startTime) * 1000f;
       Debug.Log($"{methodTime} ms");
   }
}
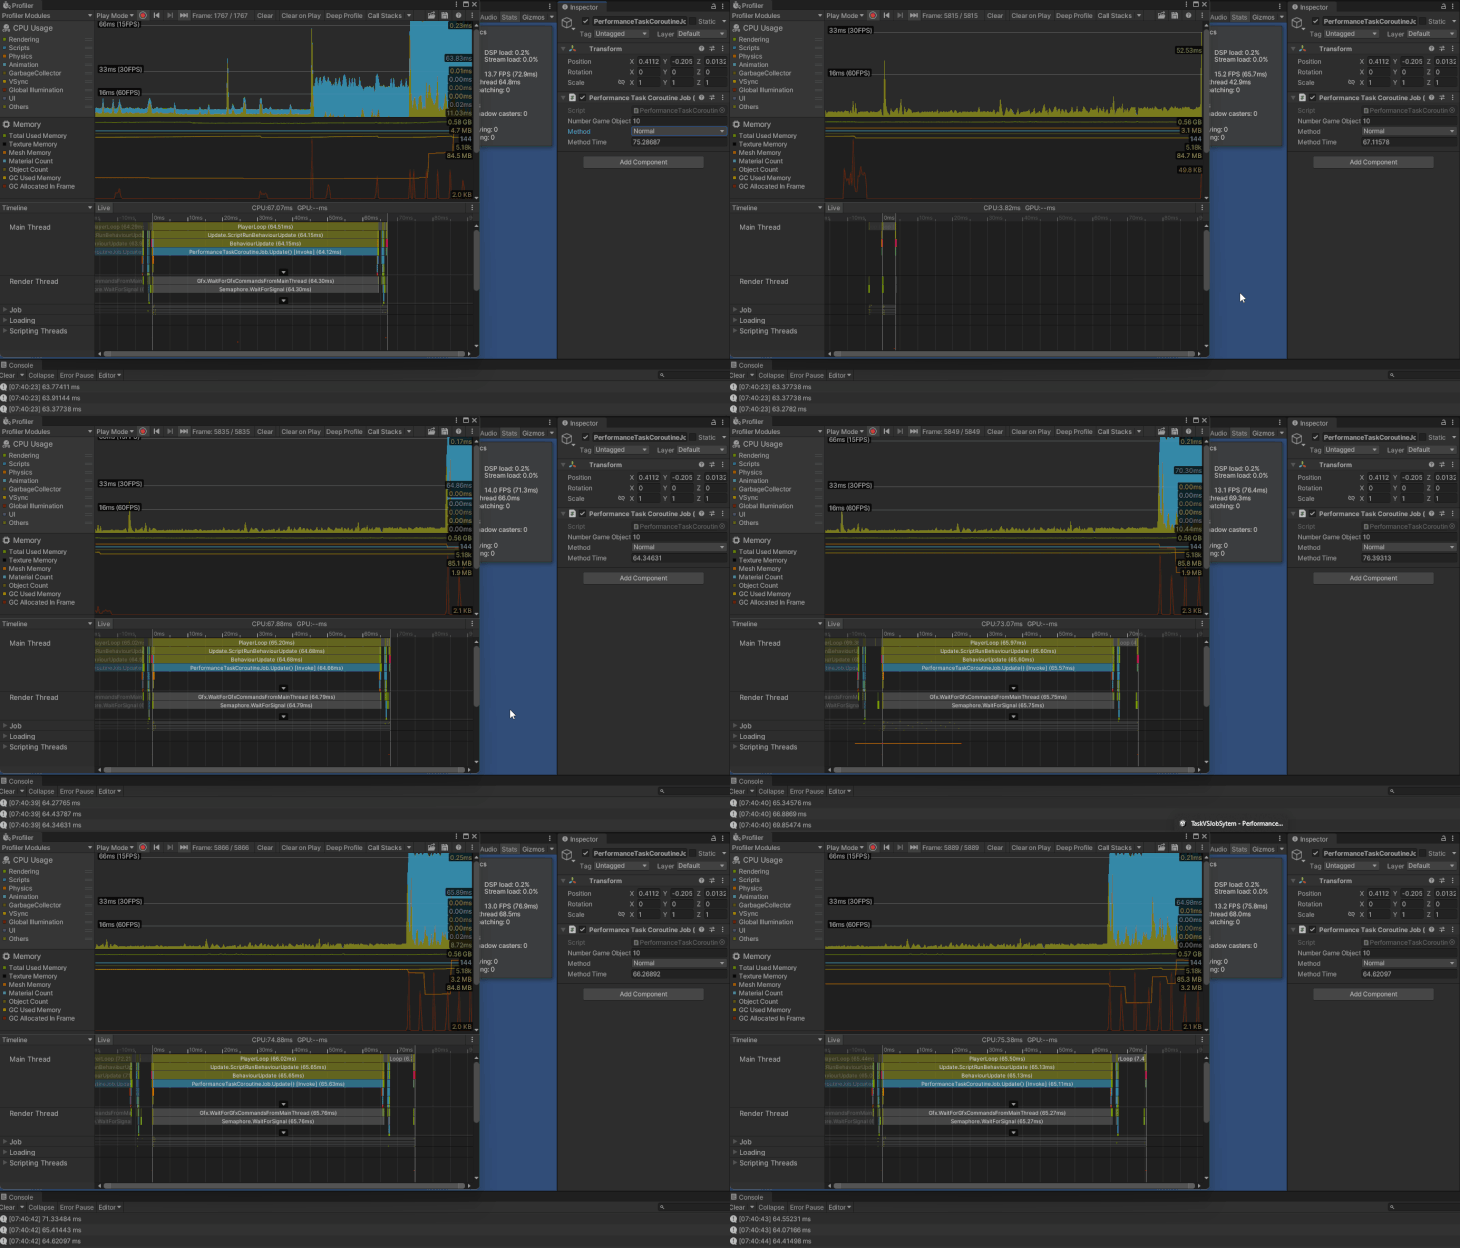
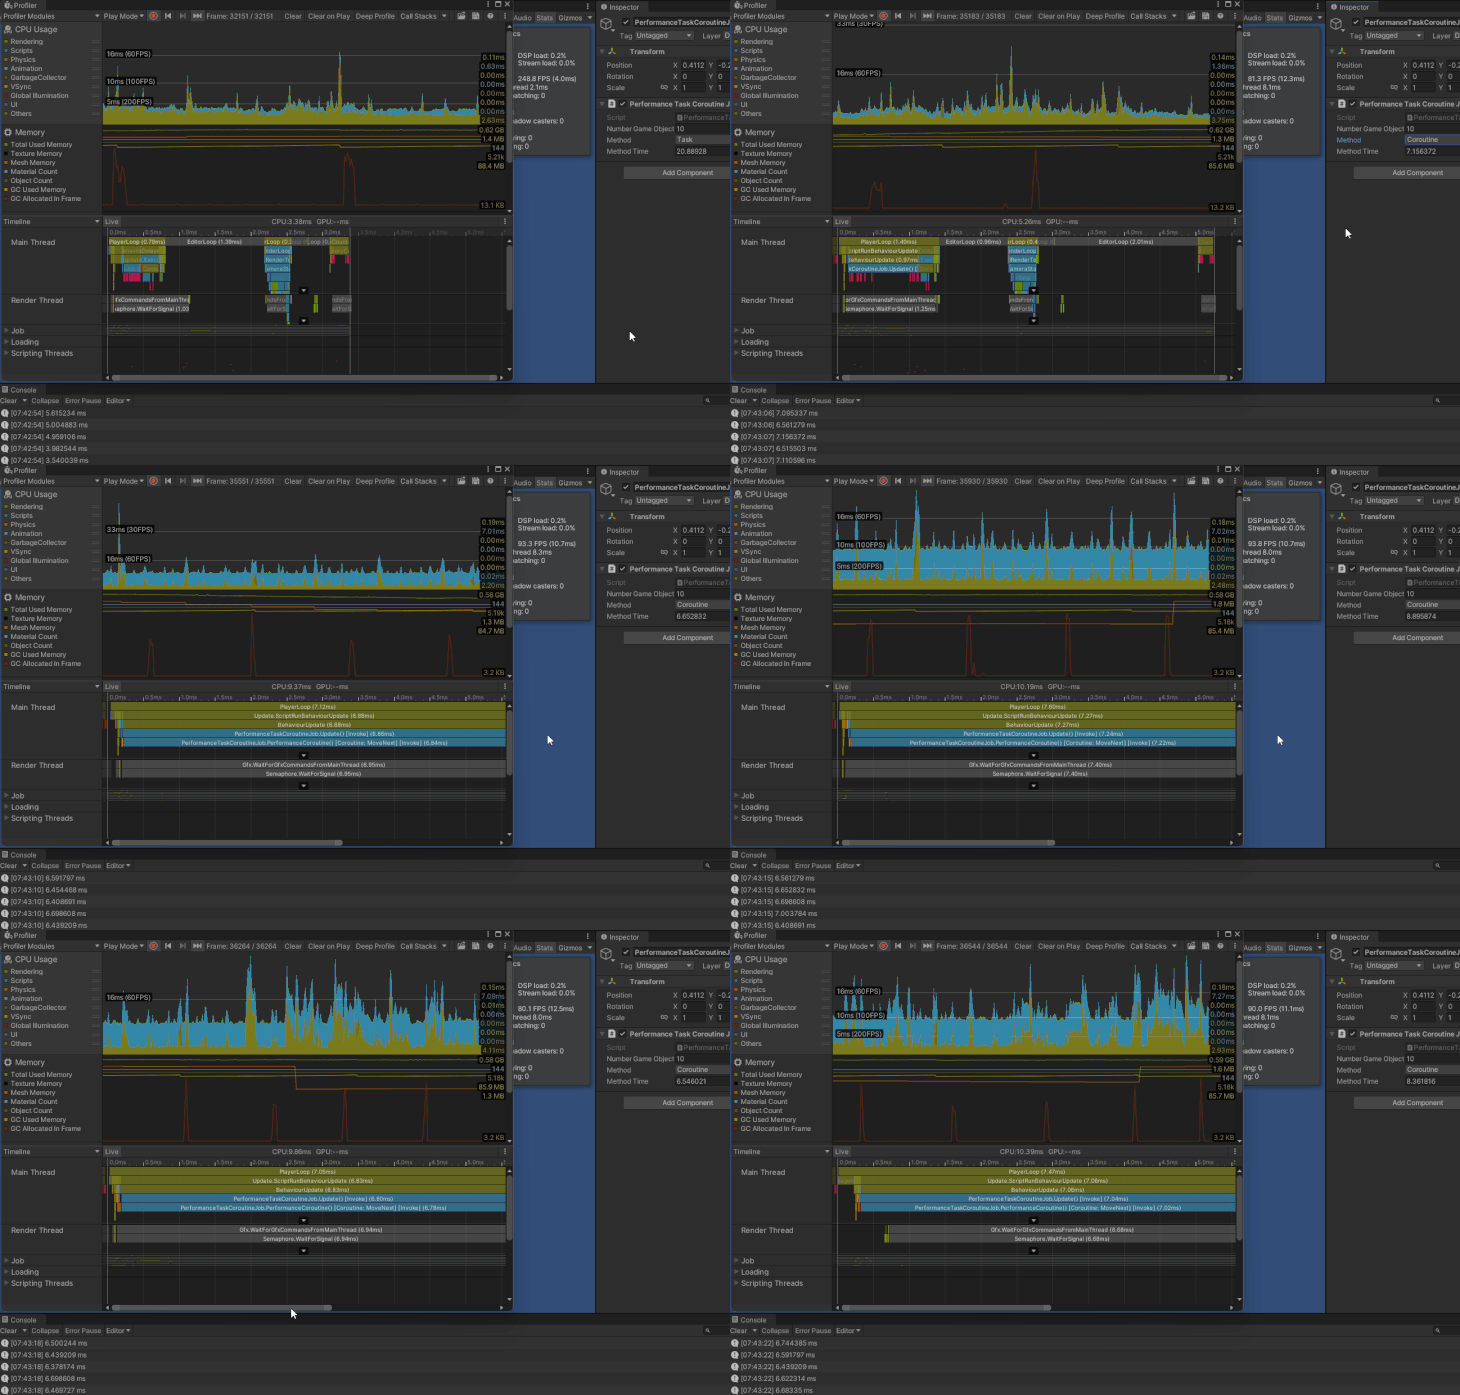
The intensive method takes around 65ms to complete with the game running at about 12 FPS.
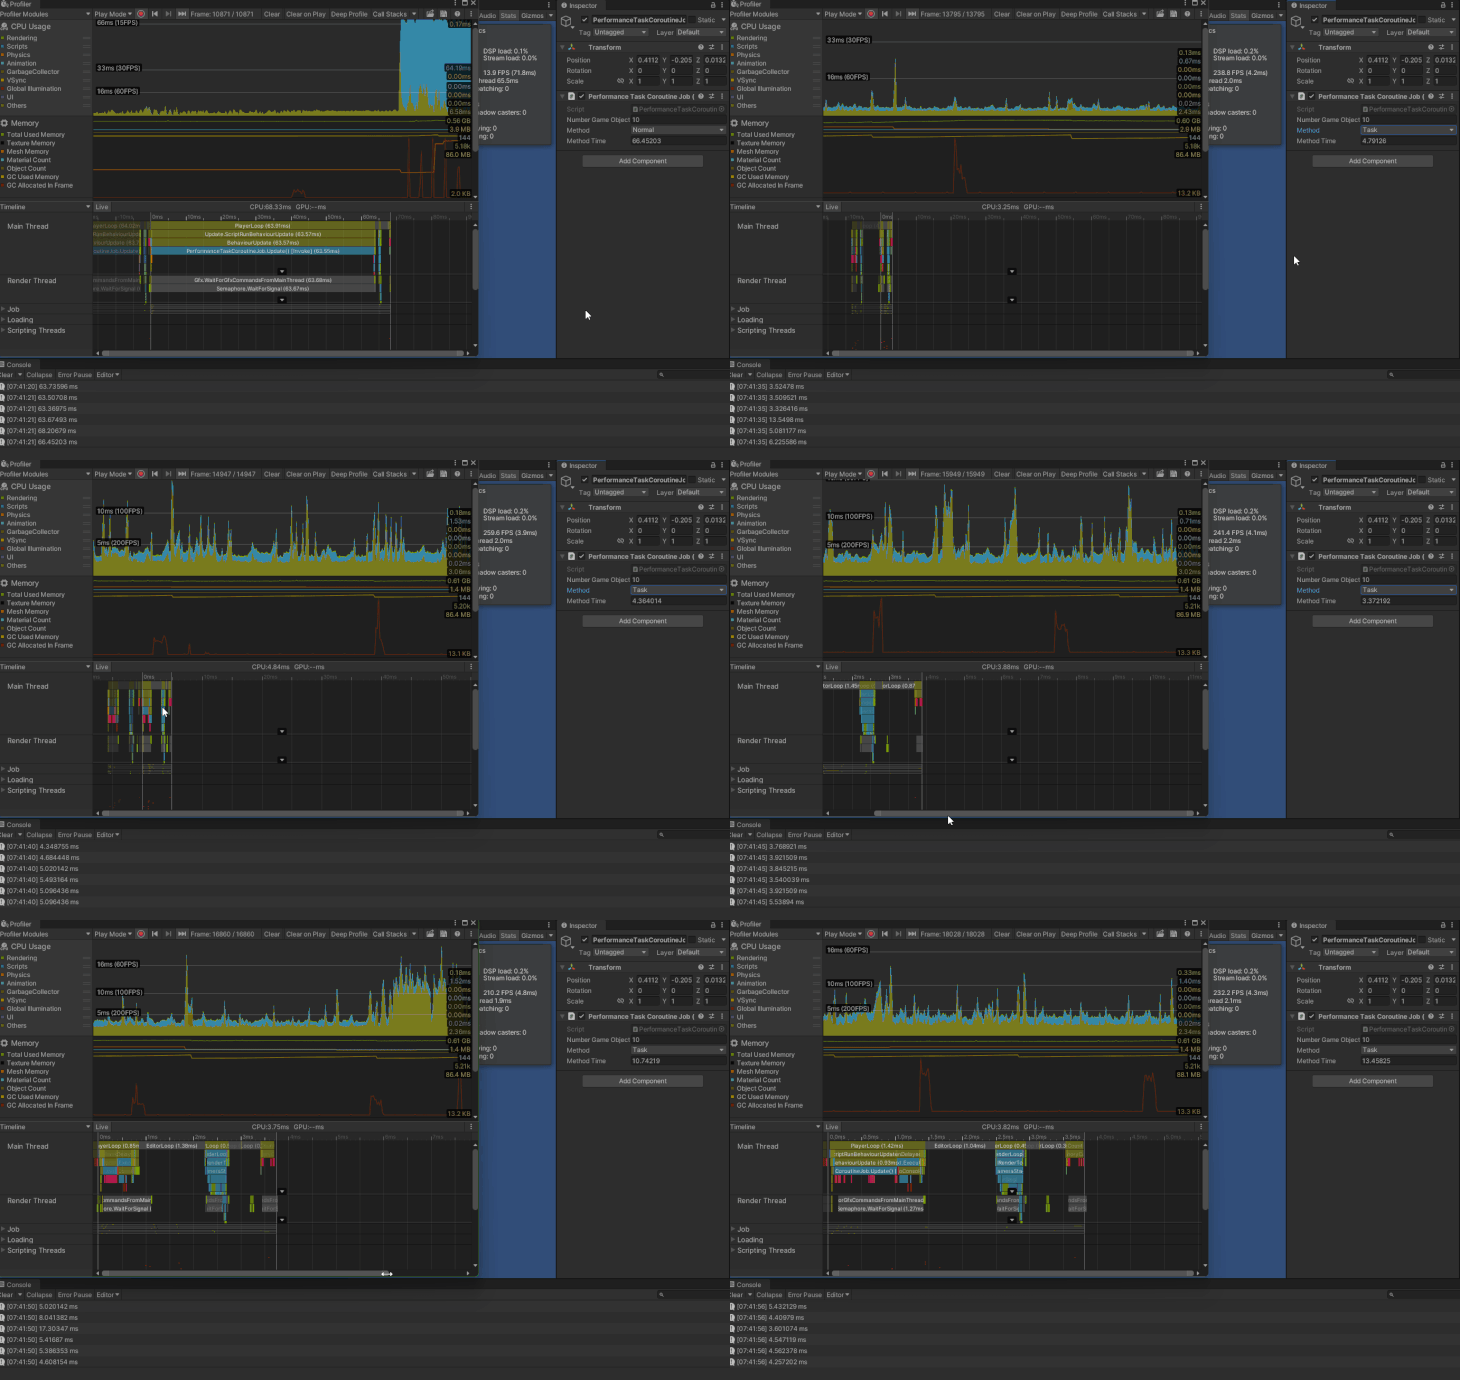
The intensive task takes around 4ms to complete with the game running at about 200 FPS.
Let’s try this with a thousand enemies:
using System.Collections.Generic;
using System.Threading.Tasks;
using Unity.Collections;
using Unity.Jobs;
using Unity.Mathematics;
using UnityEngine;
using Random = UnityEngine.Random;

public class PerformanceTaskJob : MonoBehaviour
{
   private enum MethodType
   {
       NormalMoveEnemy,
       TaskMoveEnemy
   }

   [SerializeField] private int numberEnemiesToCreate = 1000;
   [SerializeField] private Transform pfEnemy;

   [SerializeField] private MethodType method = MethodType.NormalMoveEnemy;
   [SerializeField] private float methodTime;

   private readonly List<Enemy> m_enemies = new List<Enemy>();

   private void Start()
   {
       for (int i = 0; i < numberEnemiesToCreate; i++)
       {
           Transform enemy = Instantiate(pfEnemy,
                                         new Vector3(Random.Range(-8f, 8f), Random.Range(-8f, 8f)),
                                         Quaternion.identity);
           m_enemies.Add(new Enemy { transform = enemy, moveY = Random.Range(1f, 2f) });
       }
   }

   private async void Update()
   {
       float startTime = Time.realtimeSinceStartup;

       switch (method)
       {
           case MethodType.NormalMoveEnemy:
               MoveEnemy();
               break;
           case MethodType.TaskMoveEnemy:
               Task<Task[]> moveEnemyTasks = MoveEnemyTask();
               await Task.WhenAll(moveEnemyTasks);
               break;
           default:
               MoveEnemy();
               break;
       }

       methodTime = (Time.realtimeSinceStartup - startTime) * 1000f;
       Debug.Log($"{methodTime} ms");
   }

   private void MoveEnemy()
   {
       foreach (Enemy enemy in m_enemies)
       {
           enemy.transform.position += new Vector3(0, enemy.moveY * Time.deltaTime);
           if (enemy.transform.position.y > 5f)
               enemy.moveY = -math.abs(enemy.moveY);
           if (enemy.transform.position.y < -5f)
               enemy.moveY = +math.abs(enemy.moveY);
           Performance.PerformanceIntensiveMethod(1000);
       }
   }

   private async Task<Task[]> MoveEnemyTask()
   {
       Task[] tasks = new Task[m_enemies.Count];
       for (int i = 0; i < m_enemies.Count; i++)
       {
           Enemy enemy = m_enemies[i];
           enemy.transform.position += new Vector3(0, enemy.moveY * Time.deltaTime);
           if (enemy.transform.position.y > 5f)
               enemy.moveY = -math.abs(enemy.moveY);
           if (enemy.transform.position.y < -5f)
               enemy.moveY = +math.abs(enemy.moveY);
           tasks[i] = Performance.PerformanceIntensiveTask(1000);
       }

       await Task.WhenAll(tasks);

       return tasks;
  }
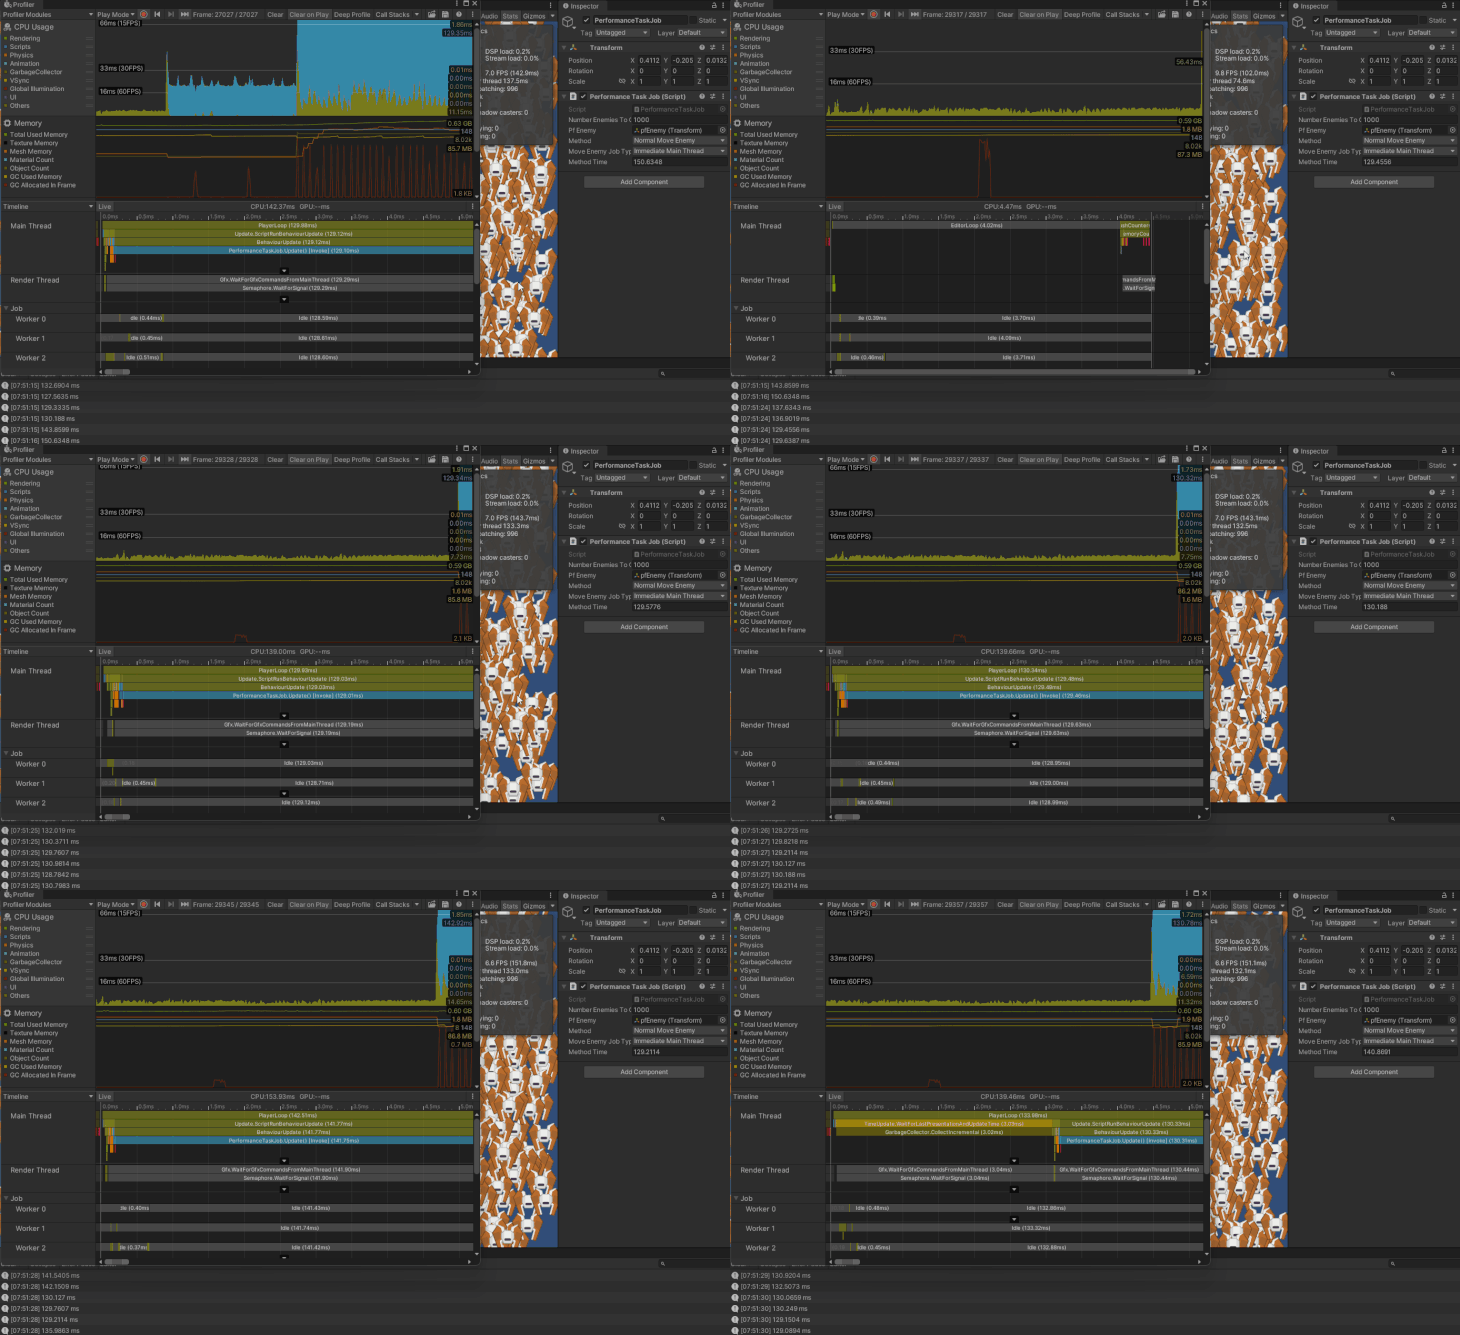
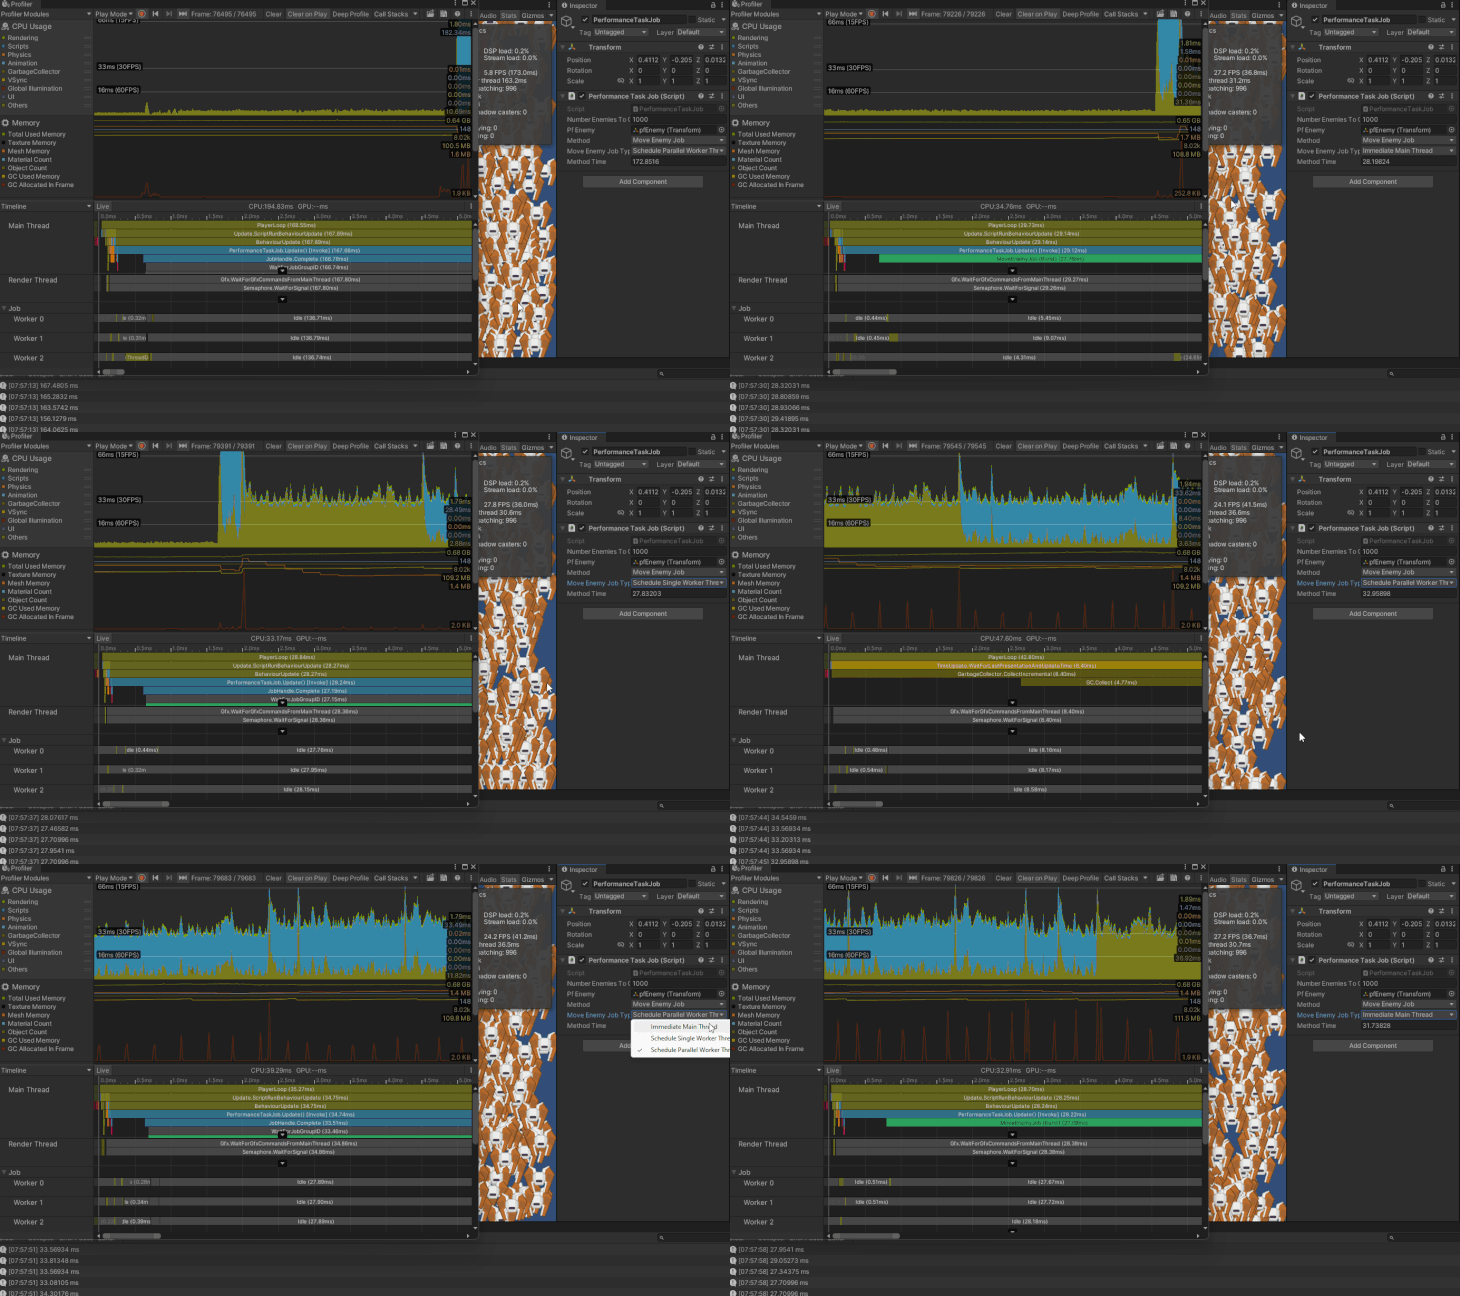
Displaying and moving a thousand enemies with the method took around 150ms with a frame rate of about 7 FPS.
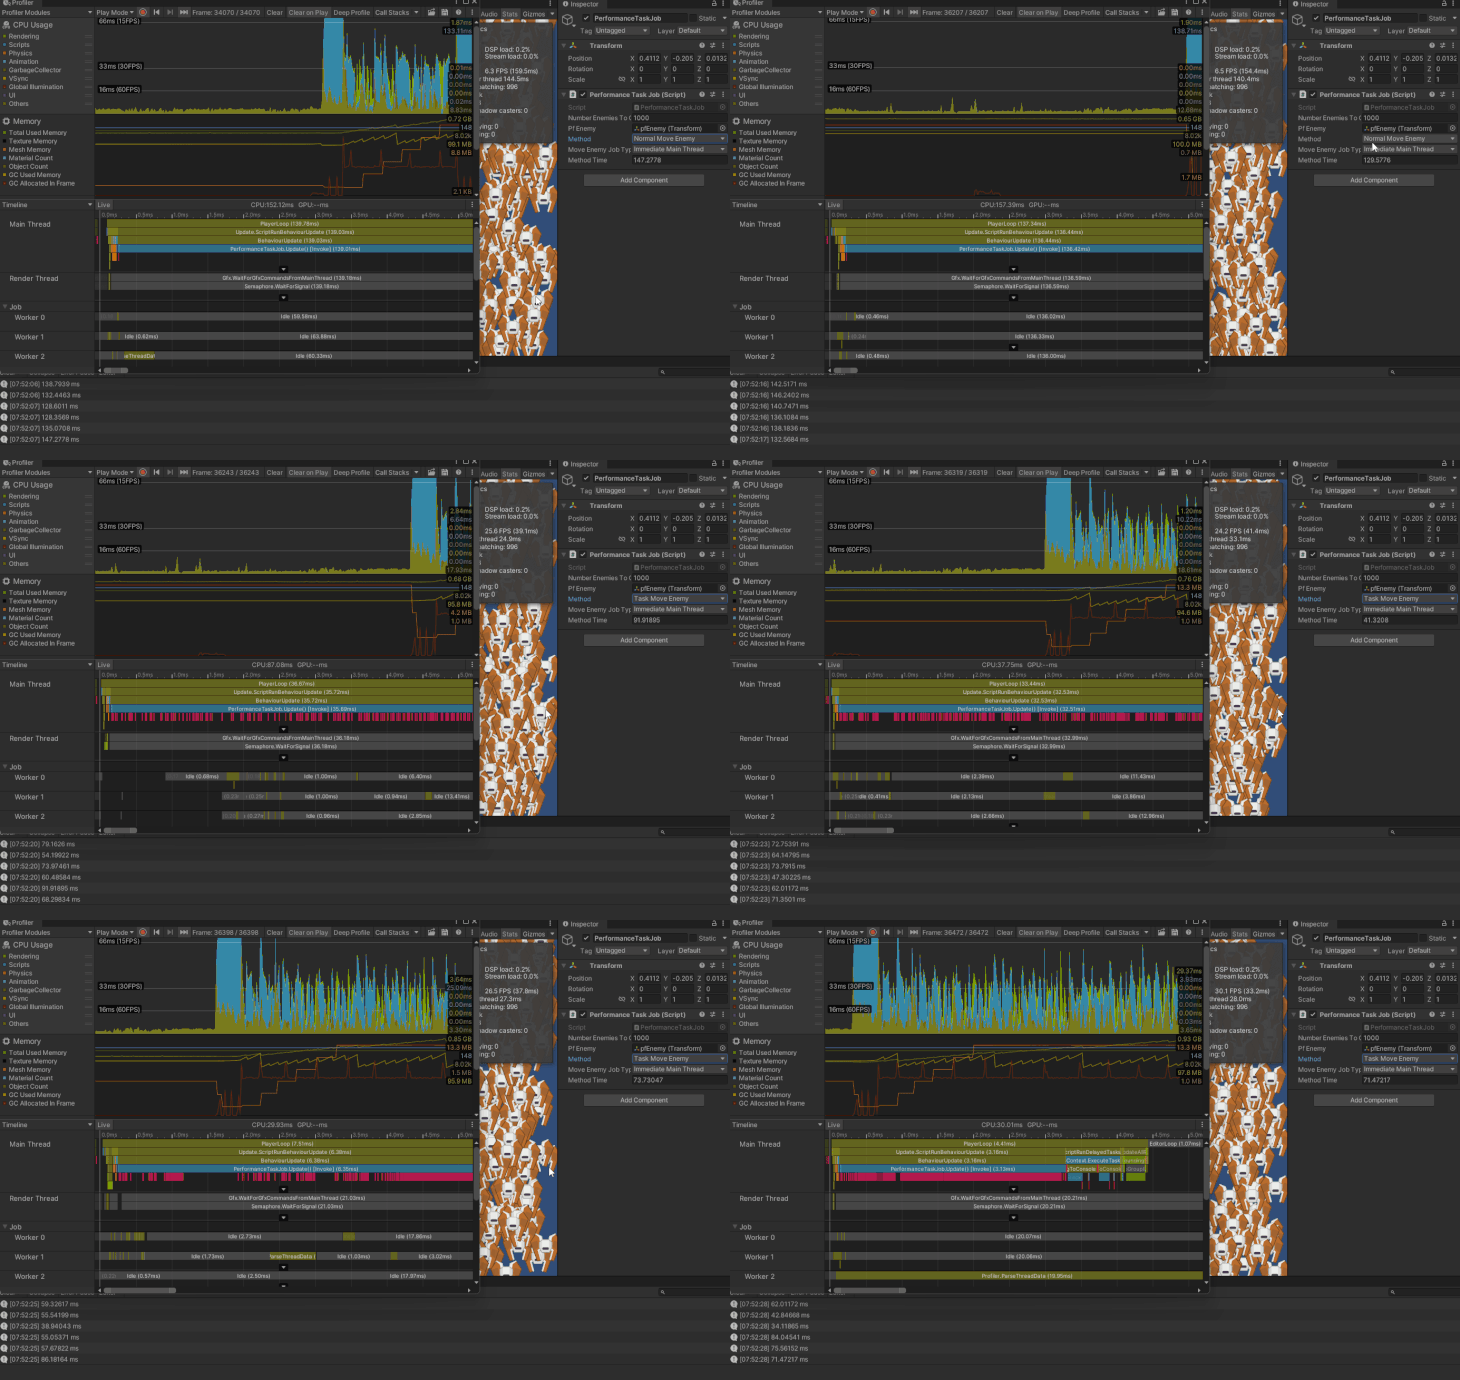
Displaying and moving a thousand enemies with a task took around 50ms with a frame rate of about 30 FPS.
useTasks?Tasks are extremely perficient and reduce the strain on performance on your system. You can even use them in multiple threads using the Task Parallel Library (TPL).
There are some drawbacks to using them in Unity, however. The major drawback with using Task in Unity is that they all run on the Main thread. Yes, we can make them run on other threads, but Unity already does its own thread and memory management, and you can create errors by creating more threads than CPU Cores, which causes competition for resources.
Tasks can also be difficult to get to perform correctly and debug. When writing the original code, I ended up with the tasks all running, but none of the enemies moved on screen. It ended up being that I needed to return the Task[] that I created in the Task.
Tasks create a lot of garbage that affect the performance. They also do not show up in the profiler, so if you have one that is affecting the performance, it is hard to track down. Also, I have noticed that sometimes my tasks and update functions continue to run from other scenes.
According to Unity, “A coroutine is a function that can suspend its execution (yield) until the given YieldInstruction finishes.”
What this means is that we can run code and wait for a task to complete before continuing. This is much like an async method. It uses a return type IEnumerator and we yield return instead of await.
Unity has several different types of yield instructions that we can use, i.e., WaitForSeconds, WaitForEndOfFrame, WaitUntil, or WaitWhile.
To start coroutines, we need a MonoBehaviour and use the MonoBehaviour.StartCoroutine.
To stop a coroutine before it completes, we use MonoBehaviour.StopCoroutine. When stopping coroutines, make sure that you use the same method as you used to start it.
Common use cases for coroutines in Unity are to wait for assets to load and to create cooldown timers.
using System.Collections;
using UnityEngine;
using UnityEngine.SceneManagement;

public class SceneLoader : MonoBehaviour
{
   public Coroutine loadSceneCoroutine;
   public void Update()
   {
       if (Input.GetKeyDown(KeyCode.Space) && loadSceneCoroutine == null)
       {
           loadSceneCoroutine = StartCoroutine(LoadSceneAsync());
       }

       if (Input.GetKeyDown(KeyCode.Escape) && loadSceneCoroutine != null)
       {
           StopCoroutine(loadSceneCoroutine);
           loadSceneCoroutine = null;
       }
   }

   private IEnumerator LoadSceneAsync()
   {
       AsyncOperation asyncLoad = SceneManager.LoadSceneAsync("Scene2");
       yield return new WaitWhile(() => !asyncLoad.isDone);
   }
}
Let’s see how using a coroutine impacts the performance of our project. I am only going to do this with the performance-intensive method.
I added the Coroutine to the MethodType enum and variables to keep track of its state:
public class PerformanceTaskCoroutineJob : MonoBehaviour
{
   private enum MethodType
   {
       Normal,
       Task,
       Coroutine
   }

   ...

   private Coroutine m_performanceCoroutine;
I created the coroutine. This is similar to the performance-intensive task and method that we created earlier with added code to update the method time:
   private IEnumerator PerformanceCoroutine(int timesToRepeat, float startTime)
   {
       for (int count = 0; count < numberGameObjectsToImitate; count++)
       {
           // Represents a Performance Intensive Method like some pathfinding or really complex calculation.
           float value = 0f;
           for (int i = 0; i < timesToRepeat; i++)
           {
               value = math.exp10(math.sqrt(value));
           }
       }

       methodTime = (Time.realtimeSinceStartup - startTime) * 1000f;
       Debug.Log($"{methodTime} ms");
       m_performanceCoroutine = null;
       yield return null;
   }
In the Update method, I added the check for the coroutine. I also modified the method time, updated code, and added code to stop the coroutine if it was running and we changed the method type:
   private async void Update()
   {
       float startTime = Time.realtimeSinceStartup;

       switch (method)
       {
           ...
           case MethodType.Coroutine:
               m_performanceCoroutine ??= StartCoroutine(PerformanceCoroutine(5000, startTime));
               break;
           default:
               Performance.PerformanceIntensiveMethod(50000);
               break;
       }

       if (method != MethodType.Coroutine)
       {
           methodTime = (Time.realtimeSinceStartup - startTime) * 1000f;
           Debug.Log($"{methodTime} ms");
       }

       if (method != MethodType.Coroutine || m_performanceCoroutine == null) return;
       StopCoroutine(m_performanceCoroutine);
       m_performanceCoroutine = null;
   }
The intensive coroutine takes around 6ms to complete with the game running at about 90 FPS.
The C# Job System is Unity’s implementation of tasks that are easy to write, do not generate the garbage that tasks do, and utilize the worker threads that Unity has already created. This fixes all of the downsides of tasks.
Unity compares jobs as threads, but they do say that a job does one specific task. Jobs can also depend on other jobs to complete before running; this fixes the issue with the task that I had that did not properly move my Units because it was depending on another task to complete first.
The job dependencies are automatically taken care of for us by Unity. The job system also has a safety system built in mainly to protect against race conditions. One caveat with jobs is that they can only contain member variables that are either blittable types or NativeContainer types; this is a drawback of the safety system.
To use the job system, you create the job, schedule the job, wait for the job to complete, then use the data returned by the job. The job system is needed in order to use Unity’s Data-Oriented Technology Stack (DOTS).
For more details on the job system, see the Unity documentation.
To create a job, you create a stuct that implements one of the IJob interfaces (IJob, IJobFor, IJobParallelFor, Unity.Engine.Jobs.IJobParallelForTransform). IJob is a basic job. IJobFor and IJobForParallel are used to perform the same operation on each element of a native container or for a number of iterations. The difference between them is that the IJobFor runs on a single thread where the IJobForParallel will be split up between multiple threads.
I will use IJob to create an intensive operation job, IJobFor and IJobForParallel to create a job that will move multiple enemies around; this is just so we can see the different impacts on performance. These jobs will be identical to the tasks and methods that we created earlier:
public struct PerformanceIntensiveJob : IJob { }
public struct MoveEnemyJob: IJobFor { }
public struct MoveEnemyParallelJob : IJobParallelFor { }
Add the member variables. In my case, my IJob does not need any. The IJobFor and IJobParallelFor need a float for the current delta time as jobs do not have a concept of a frame; they operate outside of Unity’s MonoBehaviour. They also need an array of float3 for the position and an array for the move speed on the y axis:
public struct MoveEnemyJob : IJobFor
{
   public NativeArray<float3> positions;
   public NativeArray<float> moveYs;
   public float deltaTime;
}
public struct MoveEnemyParallelJob : IJobParallelFor
{
   public NativeArray<float3> positions;
   public NativeArray<float> moveYs;
   public float deltaTime;
}
The last step is to implement the required Execute method. The IJobFor and IJobForParallel both require an int for the index of the current iteration that the job is executing.
The difference is instead of accessing the enemy’s transform and move, we use the array that are in the job:
public struct PerformanceIntensiveJob : IJob
{
   #region Implementation of IJob

   /// <inheritdoc />
   public void Execute()
   {
       // Represents a Performance Intensive Method like some pathfinding or really complex calculation.
       float value = 0f;
       for (int i = 0; i < 50000; i++)
       {
           value = math.exp10(math.sqrt(value));
       }
   }

   #endregion
}

// MoveEnemyJob and MoveEnemyParallelJob have the same exact Execute Method.

   /// <inheritdoc />
   public void Execute(int index)
   {
       positions[index] += new float3(0, moveYs[index] * deltaTime, 0);
       if (positions[index].y > 5f)
           moveYs[index] = -math.abs(moveYs[index]);
       if (positions[index].y < -5f)
           moveYs[index] = +math.abs(moveYs[index]);

       // Represents a Performance Intensive Method like some pathfinding or really complex calculation.
       float value = 0f;
       for (int i = 0; i < 1000; i++)
       {
           value = math.exp10(math.sqrt(value));
       }
   }
   private JobHandle PerformanceIntensiveMethodJob()
   {
       PerformanceIntensiveJob job = new PerformanceIntensiveJob();
       return job.Schedule();
   }
First, we need to instate the job and populate the jobs data:
NativeArray<float> result = new NativeArray<float>(1, Allocator.TempJob);

MyJob jobData = new MyJob();
jobData.myFloat = result;
Then we schedule the job with JobHandle jobHandle = jobData.Schedule();. The Schedule method returns a JobHandle that can be used later on.
We can not schedule a job from within a job. We can, however, create new jobs and populate their data from within a job. Once a job has been scheduled, it cannot be interrupted.
I created a method that creates a new job and schedules it. It returns the job handle that I can use in my update method:
public class PerformanceTaskCoroutineJob : MonoBehaviour
{
   ....

   private JobHandle PerformanceIntensiveMethodJob()
   {
       PerformanceIntensiveJob job = new PerformanceIntensiveJob();
       return job.Schedule();
   }
}
I added the job to my enum. Then, in the Update method, I add the case to the switch section. I created an array of JobHandles. I then loop through all of the simulated game objects, adding a scheduled job for each to the array:
public class PerformanceTaskCoroutineJob : MonoBehaviour
{
   private enum MethodType
   {
       Normal,
       Task,
       Coroutine,
       Job
   }

   ...
   private async void Update()
   {
       float startTime = Time.realtimeSinceStartup;

       switch (method)
       {
           ...
           case MethodType.Job:
               NativeArray<JobHandle> jobHandles =
                   new NativeArray<JobHandle>(numberGameObjectsToImitate, Allocator.Temp);
               for (int i = 0; i < numberGameObjectsToImitate; i++)
                   jobHandles[i] = PerformanceIntensiveMethodJob();
               break;
           default:
               Performance.PerformanceIntensiveMethod(50000);
               break;
       }

       ...
   }
}
MoveEnemy and MoveEnemyParallelJobNext, I added the jobs to my enum. Then in the Update method, I call a new MoveEnemyJob method, passing the delta time. Normally you would use either the JobFor or the JobParallelFor:
public class PerformanceTaskJob : MonoBehaviour
{
   private enum MethodType
   {
       NormalMoveEnemy,
       TaskMoveEnemy,
       MoveEnemyJob,
       MoveEnemyParallelJob
   }

   ...

   private async void Update()
   {
       float startTime = Time.realtimeSinceStartup;

       switch (method)
       {
           ...
           case MethodType.MoveEnemyJob:
           case MethodType.MoveEnemyParallelJob:
               MoveEnemyJob(Time.deltaTime);
               break;
           default:
               MoveEnemy();
               break;
       }

       ...
   }

   ...
The first thing I do is set an array for the positions and an array for the moveY that I will pass on to the jobs. I then fill these arrays with the data from the enemies. Next, I create the job and set the job’s data depending on which job I want to use. After that, I schedule the job depending on the job that I want to use and the type of scheduling I want to do:
private void MoveEnemyJob(float deltaTime)
   {
       NativeArray<float3> positions = new NativeArray<float3>(m_enemies.Count, Allocator.TempJob);
       NativeArray<float> moveYs = new NativeArray<float>(m_enemies.Count, Allocator.TempJob);

       for (int i = 0; i < m_enemies.Count; i++)
       {
           positions[i] = m_enemies[i].transform.position;
           moveYs[i] = m_enemies[i].moveY;
       }

       // Use one or the other
       if (method == MethodType.MoveEnemyJob)
       {
           MoveEnemyJob job = new MoveEnemyJob
           {
               deltaTime = deltaTime,
               positions = positions,
               moveYs = moveYs
           };

           // typically we would use one of these methods
           switch (moveEnemyJobType)
           {
               case MoveEnemyJobType.ImmediateMainThread:
                   // Schedule job to run immediately on main thread.
                   // typically would not use.
                   job.Run(m_enemies.Count);
                   break;
               case MoveEnemyJobType.ScheduleSingleWorkerThread:
               case MoveEnemyJobType.ScheduleParallelWorkerThreads:
               {
                   // Schedule job to run at a later point on a single worker thread.
                   // First parameter is how many for-each iterations to perform.
                   // The second parameter is a JobHandle to use for this job's dependencies.
                   //   Dependencies are used to ensure that a job executes on worker threads after the dependency has completed execution.
                   //   In this case we don't need our job to depend on anything so we can use a default one.
                   JobHandle scheduleJobDependency = new JobHandle();
                   JobHandle scheduleJobHandle = job.Schedule(m_enemies.Count, scheduleJobDependency);

                   switch (moveEnemyJobType)
                   {
                       case MoveEnemyJobType.ScheduleSingleWorkerThread:
                           break;
                       case MoveEnemyJobType.ScheduleParallelWorkerThreads:
                       {
                           // Schedule job to run on parallel worker threads.
                           // First parameter is how many for-each iterations to perform.
                           // The second parameter is the batch size,
                           //   essentially the no-overhead inner-loop that just invokes Execute(i) in a loop.
                           //   When there is a lot of work in each iteration then a value of 1 can be sensible.
                           //   When there is very little work values of 32 or 64 can make sense.
                           // The third parameter is a JobHandle to use for this job's dependencies.
                           //   Dependencies are used to ensure that a job executes on worker threads after the dependency has completed execution.
                           JobHandle scheduleParallelJobHandle =
                               job.ScheduleParallel(m_enemies.Count, m_enemies.Count / 10, scheduleJobHandle);

                           break;
                       }
                   }

                   break;
               }
           }
       }
       else if (method == MethodType.MoveEnemyParallelJob)
       {
           MoveEnemyParallelJob job = new MoveEnemyParallelJob
           {
               deltaTime = deltaTime,
               positions = positions,
               moveYs = moveYs
           };

           // Schedule a parallel-for job. First parameter is how many for-each iterations to perform.
           // The second parameter is the batch size,
           // essentially the no-overhead inner-loop that just invokes Execute(i) in a loop.
           // When there is a lot of work in each iteration then a value of 1 can be sensible.
           // When there is very little work values of 32 or 64 can make sense.
           JobHandle jobHandle = job.Schedule(m_enemies.Count, m_enemies.Count / 10);

           }
   }
We have to wait for the job to be completed. We can get the status from the JobHandle that we used when we scheduled the job to complete it. This will wait for the job to be complete before continuing execution: >handle.Complete(); or JobHandle.CompleteAll(jobHandles). Once the job is complete, the NativeContainer that we used to set up the job will have all the data that we need to use. Once we retrieve the data from them, we have to properly dispose of them.
This is pretty simple since I am not reading or writing any data to the job. I wait for all of the jobs that were scheduled to be completed then dispose of the Native array:
public class PerformanceTaskCoroutineJob : MonoBehaviour
{
   ...

   private async void Update()
   {
       float startTime = Time.realtimeSinceStartup;

       switch (method)
       {
           ...
           case MethodType.Job:
               ....
               JobHandle.CompleteAll(jobHandles);
               jobHandles.Dispose();
               break;
           default:
               Performance.PerformanceIntensiveMethod(50000);
               break;
       }

       ...
   }
}
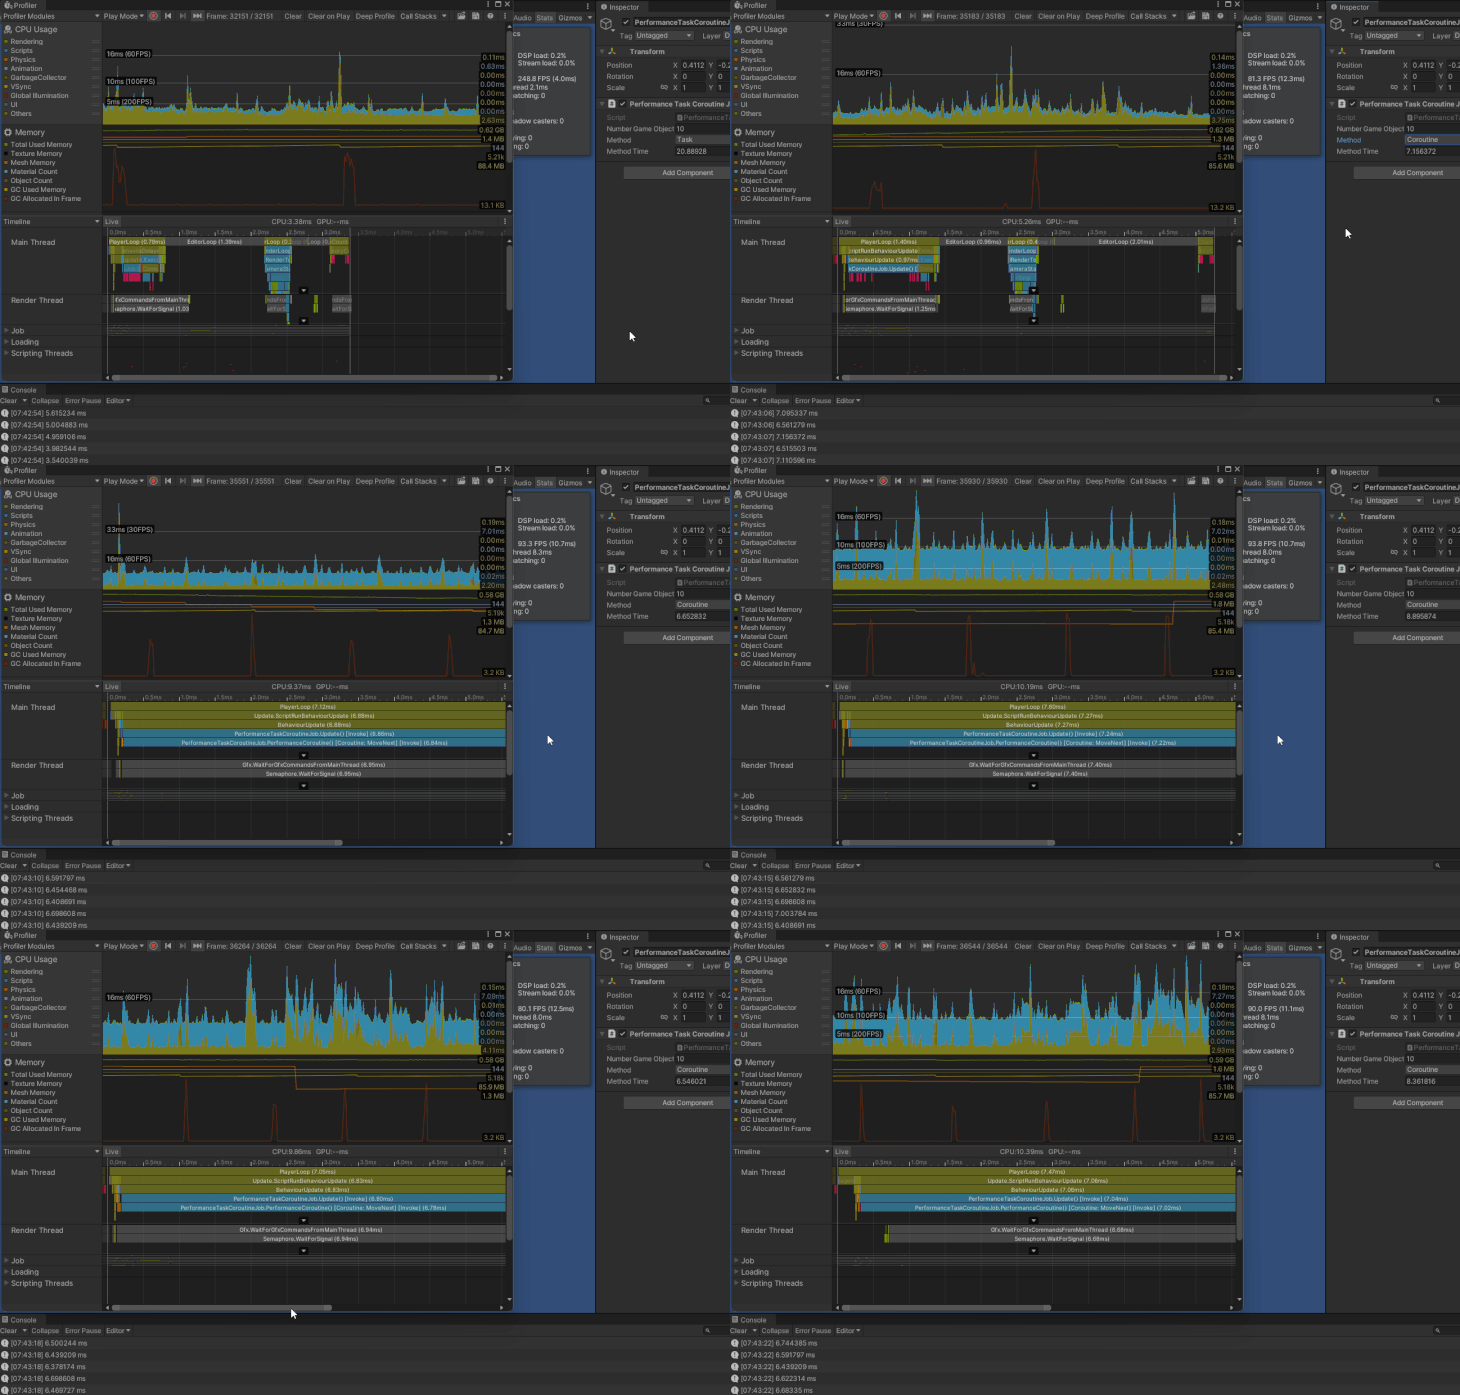
The intensive job takes around 6ms to complete with the game running at about 90 FPS.
MoveEnemy jobI add the appropriate complete checks:
   private void MoveEnemyJob(float deltaTime)
   {
      ....

       if (method == MethodType.MoveEnemyJob)
       {
          ....

           switch (moveEnemyJobType)
           {
               case MoveEnemyJobType.ScheduleSingleWorkerThread:
               case MoveEnemyJobType.ScheduleParallelWorkerThreads:
               {
                   ....

                   // typically one or the other
                   switch (moveEnemyJobType)
                   {
                       case MoveEnemyJobType.ScheduleSingleWorkerThread:
                           scheduleJobHandle.Complete();
                           break;
                       case MoveEnemyJobType.ScheduleParallelWorkerThreads:
                       {
                           scheduleParallelJobHandle.Complete();
                           break;
                       }
                   }

                   break;
               }
           }
       }
       else if (method == MethodType.MoveEnemyParallelJob)
       {
           ....

          jobHandle.Complete();
       }
   }
After the method type checks, I loop through all of the enemies, setting their transform positions and moveY to the data that was set in the job. Next, I properly dispose of the native arrays:
private void MoveEnemyJob(float deltaTime)
   {
      ....

       if (method == MethodType.MoveEnemyJob)
       {
          ....
       }
       else if (method == MethodType.MoveEnemyParallelJob)
       {
           ....
       }

       for (int i = 0; i < m_enemies.Count; i++)
       {
           m_enemies[i].transform.position = positions[i];
           m_enemies[i].moveY = moveYs[i];
       }

       // Native arrays must be disposed manually.
       positions.Dispose();
       moveYs.Dispose();
   }
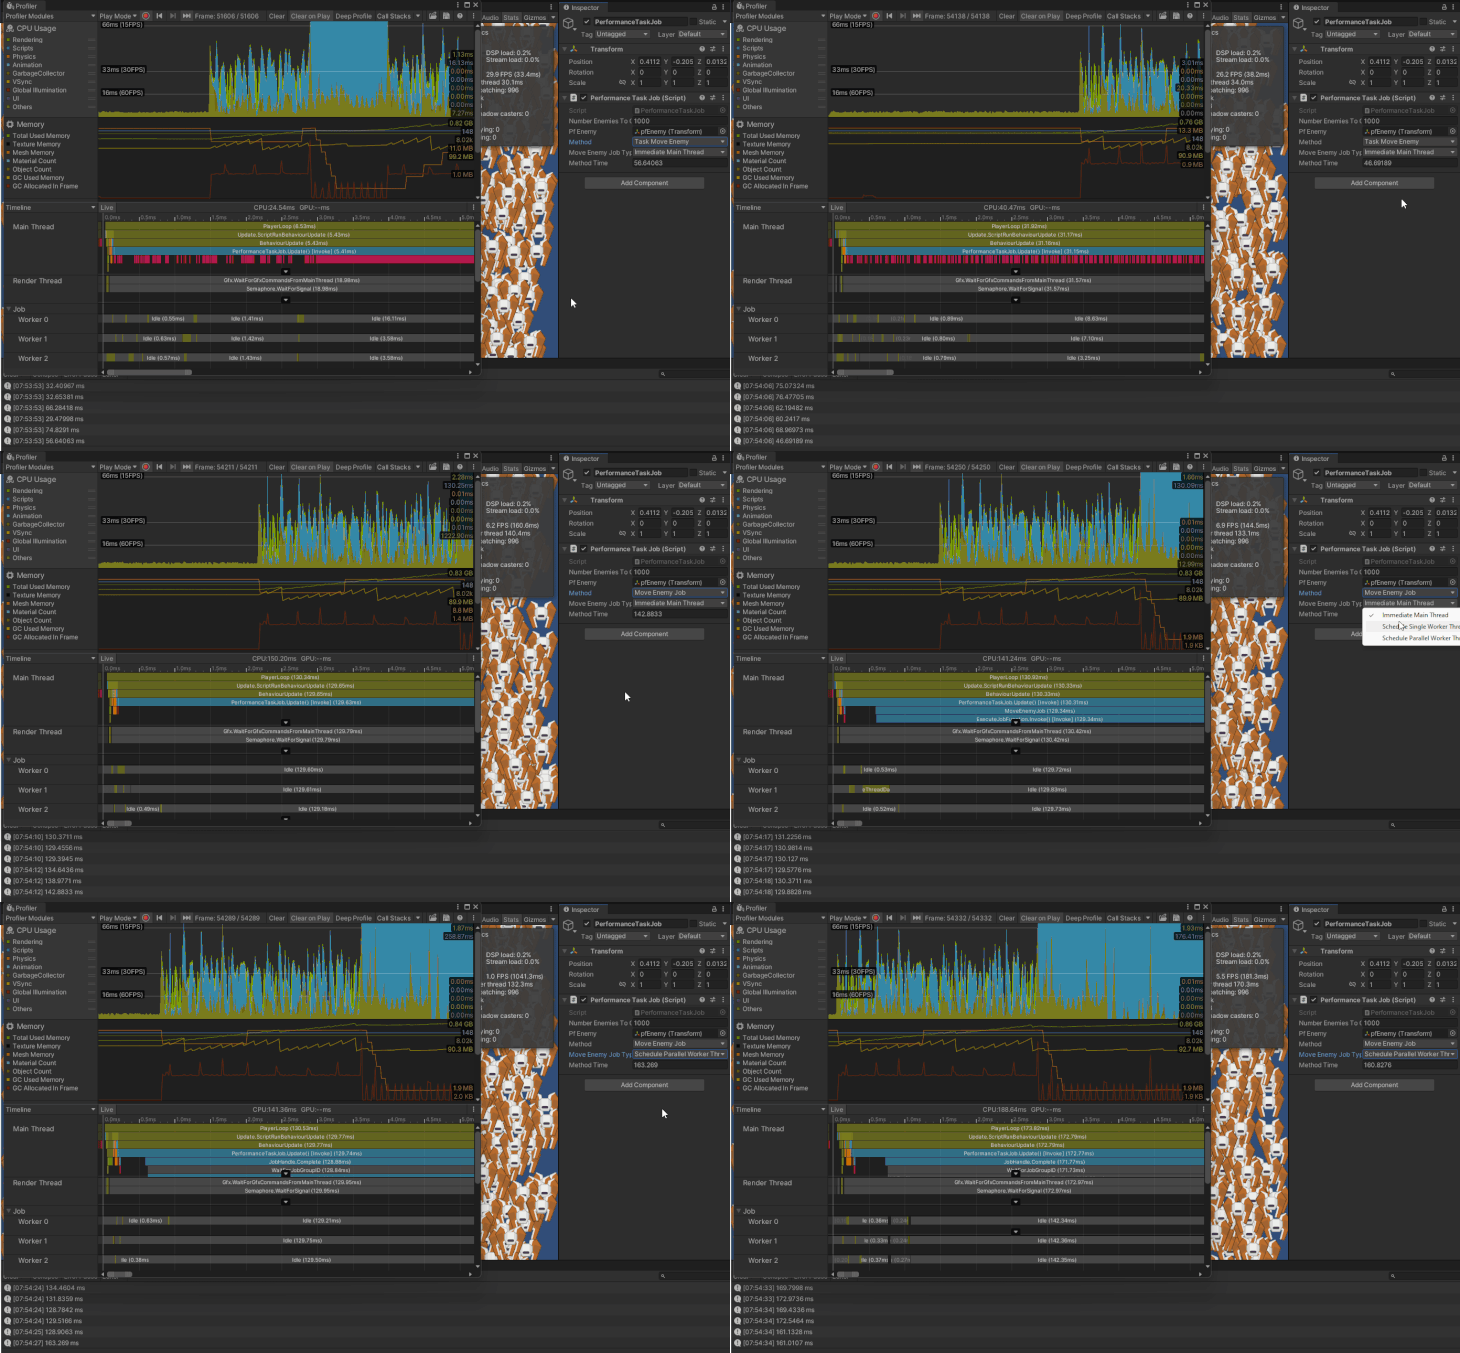
Displaying and moving a thousand enemies with job took around 160ms with a frame rate of about 7 FPS with no performance gains.
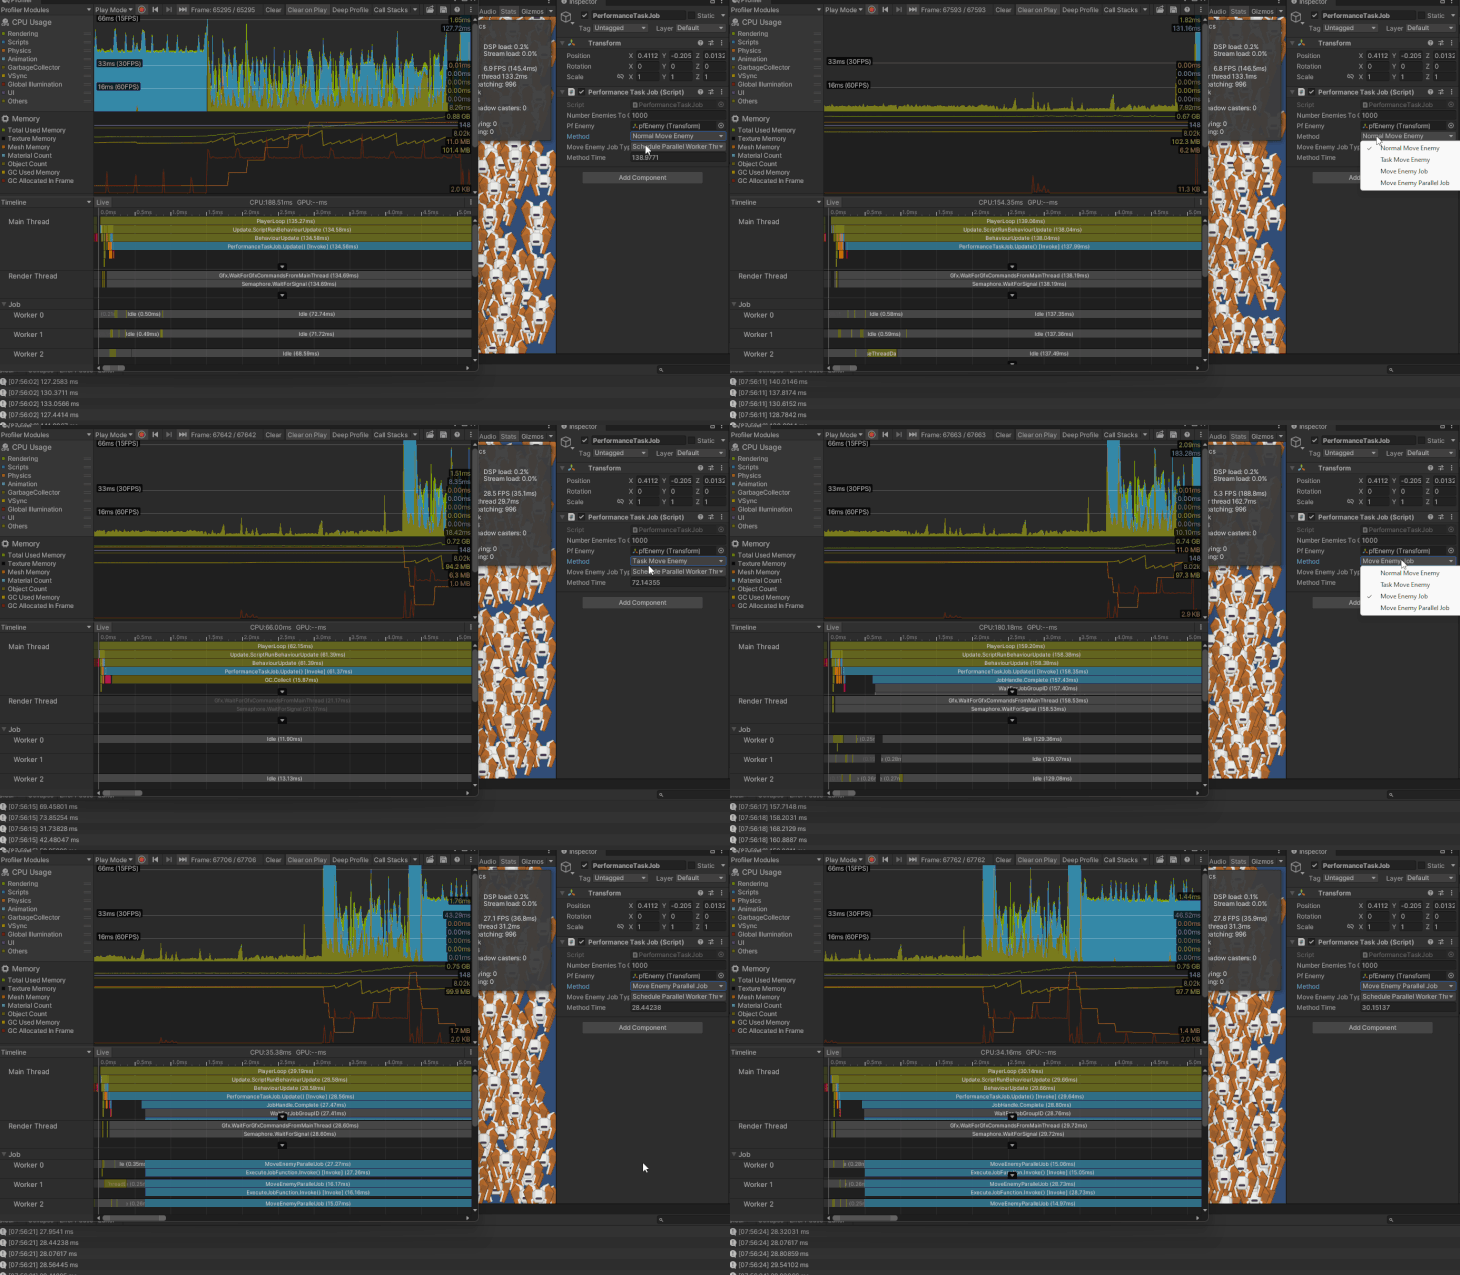
Displaying and moving a thousand enemies with job parallel took around 30ms with a frame rate of about 30 FPS.
The burst compiler is a compiler that translates from bytecode to native code. Using this with the C# Job System improves the quality of the code generated, giving you a significant boost in performance as well as reducing the consumption of the battery on mobile devices.
To use this, you just tell Unity that you want to use burst compile on the job with the [BurstCompile] attribute:
using Unity.Burst;
using Unity.Jobs;
using Unity.Mathematics;

[BurstCompile]
public struct PerformanceIntensiveJob : IJob
{
   ...
}


using Unity.Burst;
using Unity.Collections;
using Unity.Jobs;
using Unity.Mathematics;

[BurstCompile]
public struct MoveEnemyJob : IJobFor
{
   ...
}
[BurstCompile]
public struct MoveEnemyParallelJob : IJobParallelFor
{
   ...
}
Then in Unity, select Jobs > Burst > Enable Completion
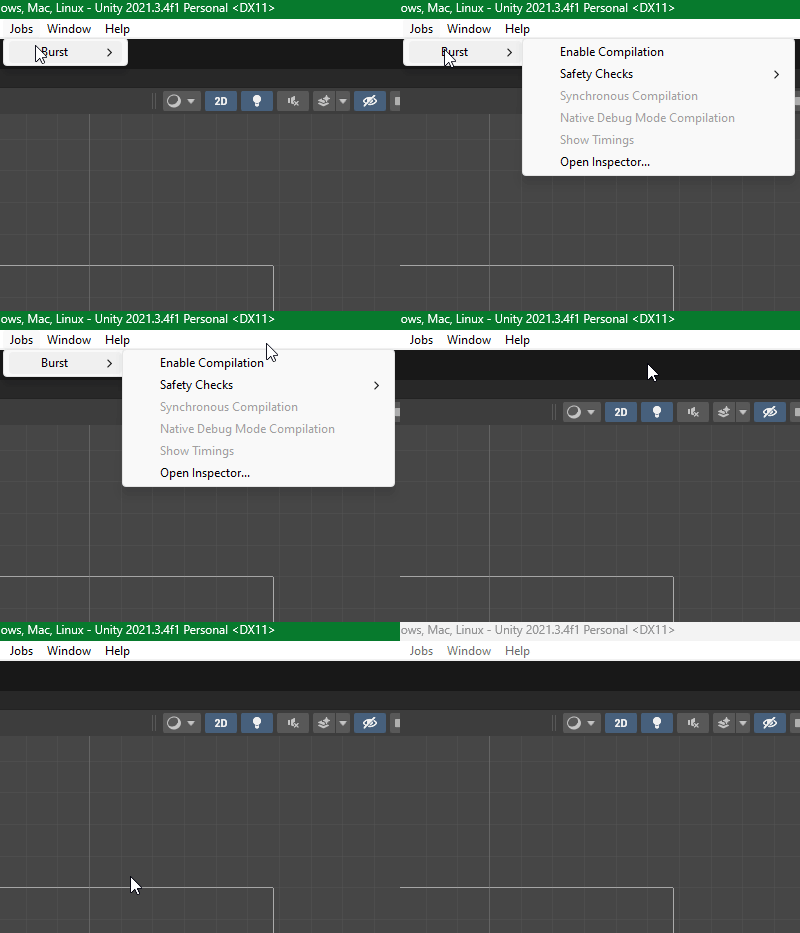
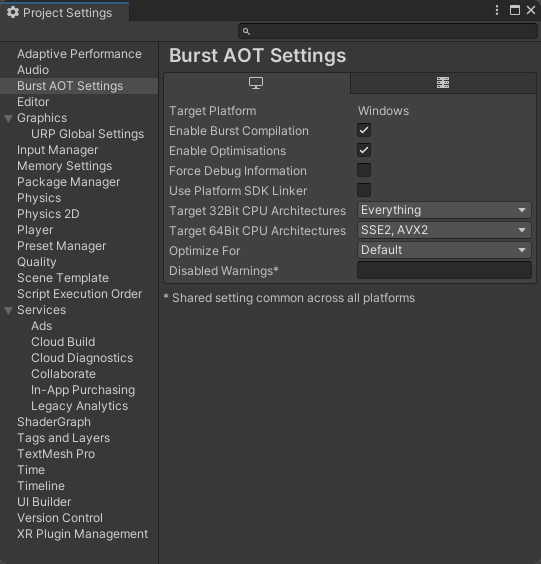
Burst is Just-In-Time (JIT) while in the Editor, meaning that this can be down while in Play Mode. When you build your project it is Ahead-Of-Time (AOT), meaning that this needs to be enabled before building your project. You can do so by editing the Burst AOT Settings section in the Project Settings Window.
For more details on the burst compiler, see the Unity documentation.
An intensive job with burst takes around 3ms to complete with the game running at about 150 FPS.
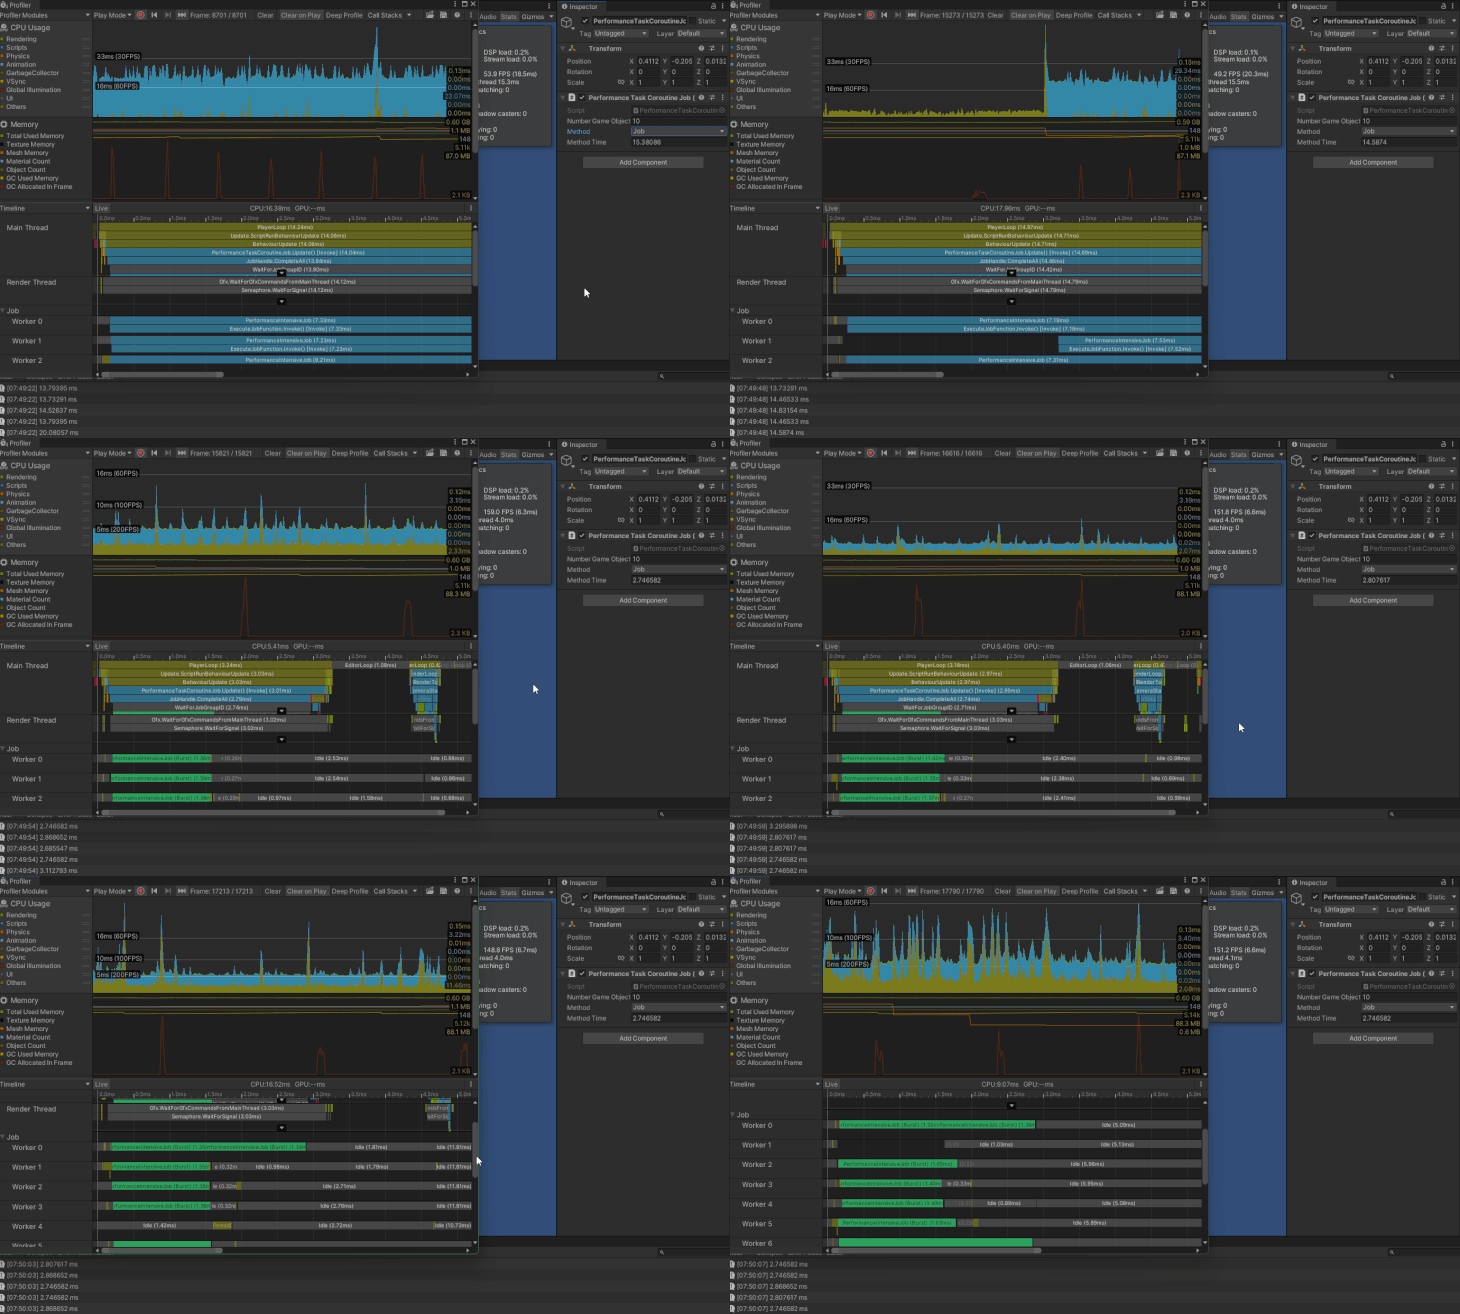
Displaying and moving a thousand enemies, the job with burst took around 30ms with a frame rate of about 30 FPS.
Displaying and moving a thousand enemies, the job parallel with burst took around 6ms with a frame rate of about 80 to 90 FPS.
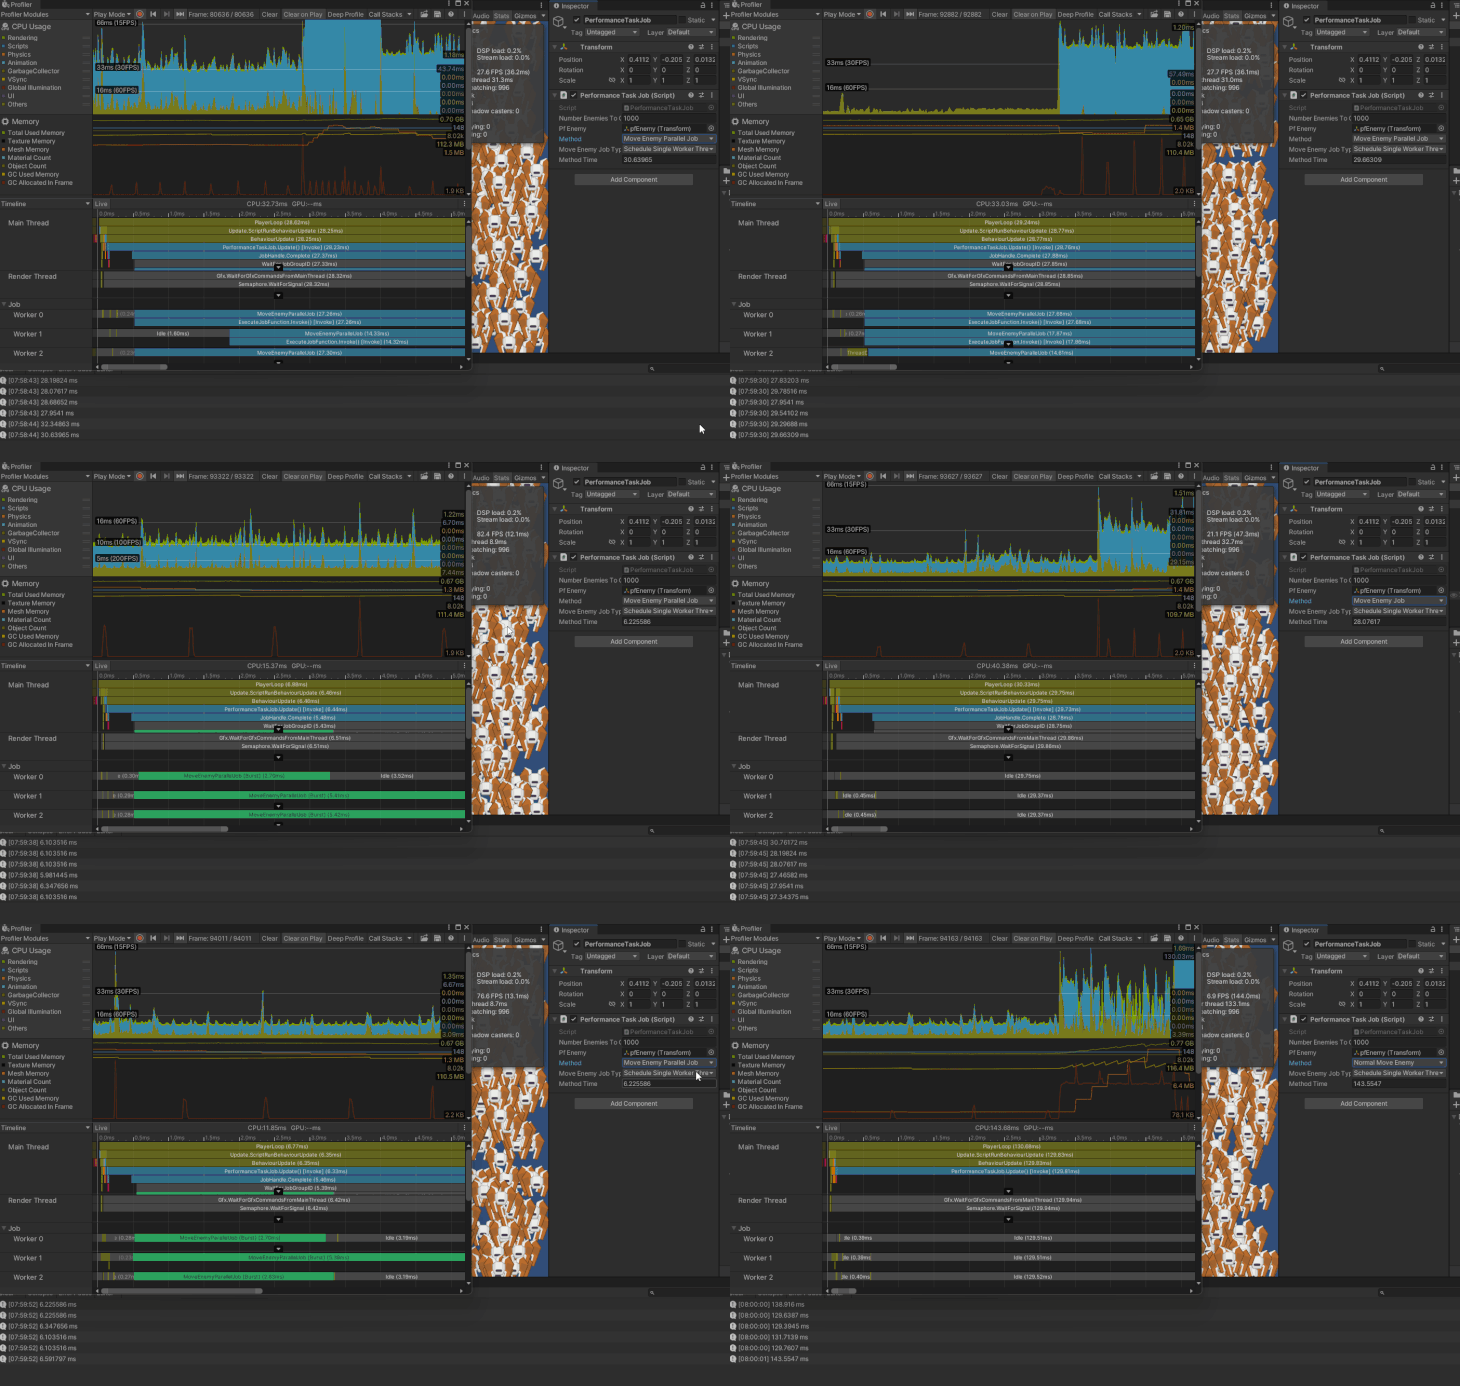
We can use Task to increase the performance of our Unity applications, but there are several drawbacks to using them. It is better to use the things that come packaged in Unity depending on what we want to do. Use coroutines if we want to wait for something to finish loading asynchronously; we can start the coroutine and not stop the process of our program from running.
We can use the C# Job System with the burst compiler to get a massive gain in performance while not having to worry about all of the thread management stuff when performing process-intensive tasks. Using the inbuilt systems, we are sure that it is done in a safe manner that does not cause any unwanted errors or bugs.
Tasks did run a little better than the jobs without using the burst compiler, but that is due to the little extra overhead behind the scenes to set everything up safely for us. When using the burst compiler, our jobs performed our tasks. When you need all of the extra performance that you can get, use the C# Job System with burst.
The project files for this can be found on my GitHub.
Install LogRocket via npm or script tag. LogRocket.init() must be called client-side, not
server-side
$ npm i --save logrocket

// Code:

import LogRocket from 'logrocket';
LogRocket.init('app/id');
// Add to your HTML:

<script src="https://cdn.lr-ingest.com/LogRocket.min.js"></script>
<script>window.LogRocket && window.LogRocket.init('app/id');</script>

@container scroll-state: Replace JS scroll listeners nowCSS @container scroll-state lets you build sticky headers, snapping carousels, and scroll indicators without JavaScript. Here’s how to replace scroll listeners with clean, declarative state queries.

Explore 10 Web APIs that replace common JavaScript libraries and reduce npm dependencies, bundle size, and performance overhead.

Russ Miles, a software development expert and educator, joins the show to unpack why “developer productivity” platforms so often disappoint.

Discover what’s new in The Replay, LogRocket’s newsletter for dev and engineering leaders, in the February 18th issue.
Hey there, want to help make our blog better?
Join LogRocket’s Content Advisory Board. You’ll help inform the type of content we create and get access to exclusive meetups, social accreditation, and swag.
Sign up now
4 Replies to "Performance in Unity: <code>async</code>, <code>await</code>, and <code>Tasks</code> vs. coroutines, C# Job System, and burst compiler"
“Next, we start the task t1.wait. Lastly, we wait for the task to complete with t1.wait.”
Am I missing something here, or is the point that we start the task and wait for it to complete in a single statement?
It should have been t1.run to start the task and t1.wait to wait for it to complete. You can do it in one line with await t1.Run or using the factory method. The point is to show different ways if starting and waiting for tasks to complete.
Typically you want to start all of the tasks. So they are all running in parallel, then you wait for a specific task to complete before moving on to other things, it really depends on what you are trying to accomplish.
You might want to run one task and wait for it to complete before starting other task if they depend on things from the first task.
Typically it’s not tasks run on the caller’s thread it’s that they synchronize back to the caller’s thread. Are you saying Unity is forcing Tasks to run on the main thread or that because you’re not using ConfigureAwait they’re synchronized to the Unity’s main thread by default?
The parameter passed to the method version is 50,000, but to the async and coroutine versions it is 5,000. Yeah, that’s going to impact the testing.