Real-time video streaming is essential for modern web applications. It supports activities like live broadcasting, video conferencing, and media interaction. For developers using Next.js, finding a reliable streaming solution is important for creating smooth user experiences.
One popular choice is HLS.js, a JavaScript library that enables adaptive bitrate streaming using HTTP Live Streaming (HLS) directly in the browser.
In this article, we will show you how to set up real-time video streaming in Next.js using HLS.js. You’ll learn about integration and advanced features like adaptive streaming and token-based authentication. We will also compare HLS.js with other open source options to help you pick the best solution based on cost, latency, features, and scalability.
HLS.js is a free JavaScript library that allows browsers to play HTTP Live Streaming (HLS) content. HLS is a popular video streaming method created by Apple. It helps deliver live and on-demand video smoothly over standard web servers.
HLS.js works well even when browsers don’t support HLS natively, which often varies across platforms. It reads HLS manifest files (usually with the .m3u8 extension), separates the video and audio streams, and then feeds them into a standard HTML5 <video> element. This structure helps adapt to changing network conditions, ensuring the best video quality with little buffering.
HLS.js features:
Before implementing HLS.js in Next.js, ensure you have:
Start by creating a fresh Next.js project using the official create-next-app command:
npx create-next-app@latest next-video-streaming
During the setup process, you’ll be prompted to configure your project. For video streaming applications, we recommend the following selections:
TypeScript: Yes (recommended for better development experience)
ESLint: Yes (helps maintain code quality)
Tailwind CSS: Yes (for styling components)
App Router: Yes (uses the modern App Router)
Import alias: Yes (helps with cleaner imports)
Navigate to your project directory:
cd video-streaming-app
Next, we will install hls.js for our video streaming functionality:
npm install hls.js
If you’re using TypeScript, you might also want to install the type definitions:
npm install --save-dev @types/hls.js
To start a live broadcast using HLS, you need to create and manage an HLS playlist that keeps updating with new video segments. This section explains how to add live streaming to your Next.js application.
HLS splits video into small segments and creates a playlist file (.m3u8) that lists these segments. For live streaming, this playlist updates regularly with new segments as the broadcast continues.
Create a new component for live streaming:
"use client";
import { useEffect, useRef, useState } from 'react';
import Hls from 'hls.js';

export default function LiveStream({ playlistUrl }: { playlistUrl: string }) {
  const videoRef = useRef<HTMLVideoElement>(null);
  const hlsRef = useRef<Hls | null>(null);
  const [isLive, setIsLive] = useState(false);
  const [error, setError] = useState<string | null>(null);
  useEffect(() => {
    const video = videoRef.current;
    if (Hls.isSupported() && video) {
      const hls = new Hls({
        // Enable live streaming optimizations
        liveSyncDurationCount: 3,
        liveMaxLatencyDurationCount: 5,
      });
      hlsRef.current = hls;
      // Load the live playlist
      hls.loadSource(playlistUrl);
      hls.attachMedia(video);
      return () => {
        hls.destroy();
      };
    } else if (video?.canPlayType('application/vnd.apple.mpegurl')) {
      // Safari native HLS support
      video.src = playlistUrl;
      setIsLive(true);
    } else {
      setError('Live streaming not supported in this browser');
    }
  }, [playlistUrl]);
  const startBroadcast = () => {
    const video = videoRef.current;
    if (video && isLive) {
      video.play();
    }
  };
  const stopBroadcast = () => {
    const video = videoRef.current;
    if (video) {
      video.pause();
    }
  };
  return (
    <div>
      <div className='mb-2'>
        <span
        className={`text-sm font-bold ${isLive ? 'text-green-500' : 'text-red-500'}`}>
          {isLive ? 'LIVE' : 'OFFLINE'}
        </span>
      </div>
      {error ? (
        <div className='text-red-500'>Error: {error}</div>
      ) : (
        <video
          ref={videoRef}
          controls
          className='w-full h-auto'
        />
      )}
      <div className='mt-2'>
        <button onClick={startBroadcast} disabled={!isLive} className='bg-blue-500 text-white px-4 py-2 rounded-md'>
          Start Watching
        </button>
        <button onClick={stopBroadcast} className='ml-2 bg-red-500 text-white px-4 py-2 rounded-md'>
          Stop
        </button>
      </div>
    </div>
  );
}
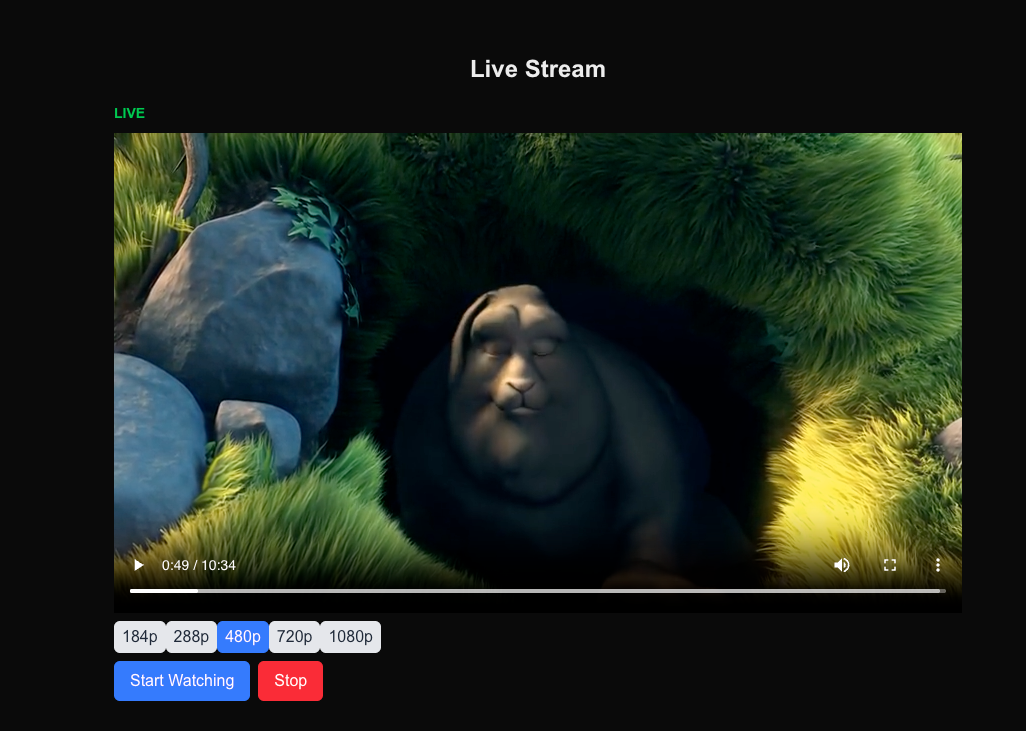
The LiveStream component shows how to stream video. It takes an HLS playlist URL (.m3u8) and uses the Hls class to load the stream into an HTML5 <video> element. Important configurations like liveSyncDurationCount and liveMaxLatencyDurationCount help keep the stream close to real-time, reducing delays while ensuring smooth playback.
For browsers that don’t support HLS.js, such as Safari with its native HLS support, the component directly sets the video source to the playlist URL. This way, the component works well across most modern browsers.
Now, import the component into your page.js file:
'use client';
import LiveStream from "@/components/live-stream";
export default function Home() {
  return (
    <div className="flex flex-col justify-center items-center h-screen">
      <h1 className="text-2xl font-bold mb-4">Live Stream</h1>
      <LiveStream playlistUrl="https://test-streams.mux.dev/x36xhzz/x36xhzz.m3u8" />
    </div>
  );
}
Start the dev server and go to your browser. You will be able to start and stop the stream.
HLS.js has a system of events that helps you manage and control streaming. By listening to these events, you can track the streaming status (like live, buffering, or errors) and improve the user experience with immediate updates. The key events for live streaming are:
Hls.Events.MANIFEST_LOADED: This happens when the main playlist is loadedHls.Events.LEVEL_LOADED: This is triggered when a quality level playlist is loadedHls.Events.FRAG_LOADED: This occurs when video segments load successfullyHls.Events.ERROR: This handles different types of streaming errorsHls.Events.BUFFER_APPENDED: This indicates when video data is added to the bufferNow, to integrate event handling into the LiveStream component, modify the useEffect Hook:
useEffect(() => {
  const video = videoRef.current;

  if (Hls.isSupported() && video) {
    const hls = new Hls({
      liveSyncDurationCount: 3,
      liveMaxLatencyDurationCount: 5,
    });
    hlsRef.current = hls;

    hls.loadSource(playlistUrl);
    hls.attachMedia(video);

    // Event listeners
    hls.on(Hls.Events.MANIFEST_PARSED, () => {
      setIsLive(true);
    });
    hls.on(Hls.Events.ERROR, (event, data) => {
      if (data.fatal) {
        setError(`Stream error: ${data.details}`);
      }
    });

    return () => hls.destroy();
  } else if (video?.canPlayType('application/vnd.apple.mpegurl')) {
    video.src = playlistUrl;
    setIsLive(true);
  } else {
    setError('Live streaming not supported in this browser');
  }
}, [playlistUrl]);
This code updates the isLive state when the manifest is parsed and sets an error message for fatal errors, improving user feedback.
As your streaming app becomes more complex and gains more users, it’s important to add features that enhance performance, security, and user experience. This section discusses three key advanced features: 1) adaptive bitrate streaming to provide different video quality levels, 2) secure token-based authentication for user safety, and 3) performance optimization through configuration adjustments.
Adaptive Bitrate Streaming (ABR) is important for providing a smooth video experience, no matter how good or bad the internet connection is or what kind of device you are using. HLS.js uses smart ABR methods that automatically change the video quality based on current network speed, how much data is stored, and the device being used.
HLS.js determines the best video quality based on several factors:
In our Next.js application, we can allow users to choose video quality levels for more control.
HLS.js automatically adjusts video quality based on the playlist’s variant streams. However, you can improve the user experience by letting them select quality levels. Here is an example of how to set this up in the LiveStream component:
"use client";
import { useEffect, useRef, useState } from 'react';
import Hls from 'hls.js';
export default function LiveStream({ playlistUrl }: { playlistUrl: string }) {
  const videoRef = useRef<HTMLVideoElement>(null);
  const hlsRef = useRef<Hls | null>(null);
  const [isLive, setIsLive] = useState(false);
  const [error, setError] = useState<string | null>(null);
  const [qualityLevels, setQualityLevels] = useState<Hls.Level[]>([]);
  const [currentQuality, setCurrentQuality] = useState<number | null>(null);
  useEffect(() => {
    const video = videoRef.current;
    if (Hls.isSupported() && video) {
      const hls = new Hls({
        // Enable live streaming optimizations
        liveSyncDurationCount: 3,
        liveMaxLatencyDurationCount: 5,
      });
      hlsRef.current = hls;
      // Load the live playlist
      hls.loadSource(playlistUrl);
      hls.attachMedia(video);
        // Event listeners
        hls.on(Hls.Events.MANIFEST_PARSED, () => {
            setQualityLevels(hls.levels as unknown as Hls.Level[]); // store available quality levels
            setIsLive(true);
        });
        hls.on(Hls.Events.LEVEL_SWITCHED, (event, data) => {
            console.log(`Switched to quality level: ${data.level}`);
            setCurrentQuality(data.level);
        });
        hls.on(Hls.Events.ERROR, (event, data) => {
            if (data.fatal) {
            setError(`Stream error: ${data.details}`);
            }
        });
      return () => {
        hls.destroy();
      };
    } else if (video?.canPlayType('application/vnd.apple.mpegurl')) {
      // Safari native HLS support
      video.src = playlistUrl;
      setIsLive(true);
    } else {
      setError('Live streaming not supported in this browser');
    }
  }, [playlistUrl]);
  const changeQuality = (levelIndex: number) => {
    if (hlsRef.current) {
      hlsRef.current.currentLevel = levelIndex;
    }
  };
  const startBroadcast = () => {
    const video = videoRef.current;
    if (video && isLive) {
      video.play();
    }
  };
  const stopBroadcast = () => {
    const video = videoRef.current;
    if (video) {
      video.pause();
    }
  };
  return (
    <div>
      <div className='mb-2'>
        <span
        className={`text-sm font-bold ${isLive ? 'text-green-500' : 'text-red-500'}`}>
          {isLive ? 'LIVE' : 'OFFLINE'}
        </span>
      </div>
      {error ? (
        <div className='text-red-500'>Error: {error}</div>
      ) : (
        <div>
          <video ref={videoRef} controls className='w-full h-auto' />
          <div className='mt-2'>
            {qualityLevels.map((level, index) => (
              <button key={index} onClick={() => changeQuality(index)} className={`${currentQuality === index ? 'bg-blue-500 text-white' : 'bg-gray-200 text-gray-800'} px-2 py-1 rounded-md`}>
                {level.height}p
              </button>
            ))}
          </div>
        </div>
      )}
      <div className='mt-2'>
        <button onClick={startBroadcast} disabled={!isLive} className='bg-blue-500 text-white px-4 py-2 rounded-md'>
          Start Watching
        </button>
        <button onClick={stopBroadcast} className='ml-2 bg-red-500 text-white px-4 py-2 rounded-md'>
          Stop
        </button>
      </div>
    </div>
  );
}
The Hls.Events.MANIFEST_PARSED event gathers the available quality levels and saves them in the state. Each quality level includes information like height for resolution. The changeQuality function lets users manually pick a quality level by setting hls.currentLevel. HLS.js will automatically change quality levels unless the currentLevel is set. You can adjust how quickly it changes quality with settings like abrEwmaFastLive and abrEwmaSlowLive to respond to network changes. The component shows buttons for each quality level, which let users switch resolutions easily:
If you need specific behavior from ABR, you can also create your own switching logic.
Protecting HLS streams is important for premium content, private broadcasts, and subscription services. HLS.js offers different ways to authenticate users by using a flexible system that lets you add authentication tokens to playlist requests and segment downloads.
HLS authentication works in two main steps:
.m3u8 manifest file.ts or .mp4 filesThe typical authentication flow is:
HLS.js lets you change HTTP requests using the xhrSetup callback. Here’s how to set up token-based authentication:
"use client";
import { useEffect, useRef, useState } from 'react';
import Hls from 'hls.js';
interface AuthResponse {
  authenticated: boolean;
  user?: {
    id: string;
    username: string;
    subscription: string;
  };
  stream?: {
    id: string;
    name: string;
    url: string;
  };
  accessGranted?: boolean;
  error?: string;
}
interface SecureVideoPlayerProps {
  streamId: string;
  authToken: string;
  onAuthError: (error: string) => void;
}
export default function SecureVideoPlayer({ streamId, authToken, onAuthError }: SecureVideoPlayerProps) {
  const videoRef = useRef<HTMLVideoElement>(null);
  const hlsRef = useRef<Hls | null>(null);
  const [isLive, setIsLive] = useState(false);
  const [error, setError] = useState<string | null>(null);
  const [isLoading, setIsLoading] = useState(true);
  const [isAuthenticated, setIsAuthenticated] = useState(false);
  const [user, setUser] = useState<any>(null);
  const [streamUrl, setStreamUrl] = useState<string | null>(null);
  const [qualityLevels, setQualityLevels] = useState<Hls.Level[]>([]);
  const [currentQuality, setCurrentQuality] = useState<number | null>(null);
  // Authenticate with the API
  const authenticate = async () => {
    try {
      setIsLoading(true);
      setError(null);
      const response = await fetch(`/api/auth?token=${authToken}&streamId=${streamId}`, {
        method: 'GET',
        headers: {
          'Content-Type': 'application/json',
        },
      });
      const data: AuthResponse = await response.json();
      if (!response.ok) {
        throw new Error(data.error || 'Authentication failed');
      }
      if (!data.authenticated || !data.accessGranted) {
        throw new Error('Access denied to this stream');
      }
      setIsAuthenticated(true);
      setUser(data.user);
      setStreamUrl(data.stream?.url || null);
    } catch (err) {
      const errorMessage = err instanceof Error ? err.message : 'Authentication failed';
      setError(errorMessage);
      onAuthError(errorMessage);
    } finally {
      setIsLoading(false);
    }
  };
  // Initialize HLS stream after authentication
  useEffect(() => {
    if (!isAuthenticated || !streamUrl) return;
    const video = videoRef.current;
    if (!video) return;
    if (Hls.isSupported() && video) {
      const hls = new Hls({
        xhrSetup: (xhr) => {
          xhr.setRequestHeader('Authorization', `Bearer ${authToken}`);
          xhr.setRequestHeader('X-Custom-Auth', authToken);
          xhr.setRequestHeader('X-Timestamp', Date.now().toString());
          xhr.setRequestHeader('X-Stream-ID', streamId);
        },
        liveSyncDurationCount: 3,
        liveMaxLatencyDurationCount: 5,
        manifestLoadingTimeOut: 10000,
        fragLoadingTimeOut: 20000,
      });
      hlsRef.current = hls;
      hls.loadSource(streamUrl);
      hls.attachMedia(video);
      hls.on(Hls.Events.MANIFEST_PARSED, () => {
        setQualityLevels(hls.levels as unknown as Hls.Level[]);
        setIsLive(true);
        setIsLoading(false);
      });
      hls.on(Hls.Events.LEVEL_SWITCHED, (event, data) => {
        console.log(`Switched to quality level: ${data.level}`);
        setCurrentQuality(data.level);
      });
      hls.on(Hls.Events.ERROR, (event, data) => {
        if (data.fatal) {
          switch (data.type) {
            case Hls.ErrorTypes.NETWORK_ERROR:
              if (data.response?.code === 401 || data.response?.code === 403) {
                setError('Authentication failed. Please log in again.');
                onAuthError('Authentication failed. Please log in again.');
              } else {
                setError('Network error occurred');
              }
              break;
            case Hls.ErrorTypes.MEDIA_ERROR:
              setError('Media error occurred');
              break;
            default:
              setError('An unknown error occurred');
              break;
          }
        }
      });
      return () => {
        hls.destroy();
      };
    } else if (video?.canPlayType('application/vnd.apple.mpegurl')) {
      video.src = streamUrl;
      setIsLive(true);
      setIsLoading(false);
    } else {
      setError('Live streaming not supported in this browser');
    }
  }, [isAuthenticated, streamUrl, authToken, streamId, onAuthError]);
  useEffect(() => {
    authenticate();
  }, [streamId, authToken]);
  const changeQuality = (levelIndex: number) => {
    if (hlsRef.current) {
      hlsRef.current.currentLevel = levelIndex;
    }
  };
  const startBroadcast = () => {
    const video = videoRef.current;
    if (video && isLive) {
      video.play();
    }
  };
  const stopBroadcast = () => {
    const video = videoRef.current;
    if (video) {
      video.pause();
    }
  };
  if (isLoading) {
    return (
      <div className="flex items-center justify-center h-64 bg-gray-100 rounded-lg">
        <div className="text-center">
          <div className="animate-spin rounded-full h-8 w-8 border-b-2 border-blue-500 mx-auto mb-2"></div>
          <p className="text-gray-600">Authenticating and loading stream...</p>
        </div>
      </div>
    );
  }
  if (error) {
    return (
      <div className="bg-red-50 border border-red-200 rounded-lg p-4">
        <div className="text-red-800 font-medium">Error: {error}</div>
        <button
          onClick={authenticate}
          className="mt-2 bg-red-600 text-white px-4 py-2 rounded-md hover:bg-red-700"
        >
          Retry Authentication
        </button>
      </div>
    );
  }
  return (
    <div className="space-y-4">
      {user && (
        <div className="bg-blue-50 border border-blue-200 rounded-lg p-3">
          <div className="text-sm text-blue-800">
            <span className="font-medium">User:</span> {user.username}
            <span className="ml-2 font-medium">Subscription:</span> {user.subscription}
          </div>
        </div>
      )}
      <div className="flex items-center space-x-2">
        <span className={`text-sm font-bold ${isLive ? 'text-green-500' : 'text-red-500'}`}>
          {isLive ? 'LIVE' : 'OFFLINE'}
        </span>
        {isAuthenticated && (
          <span className="text-xs bg-green-100 text-green-800 px-2 py-1 rounded-full">
            Authenticated
          </span>
        )}
      </div>
      <div className="relative">
        {isLoading && (
          <div className="absolute inset-0 flex items-center justify-center bg-black bg-opacity-50 z-10">
            <div className="text-white">Loading secure stream...</div>
          </div>
        )}
        <video
          ref={videoRef}
          controls
          className="w-full h-auto rounded-lg"
          onLoadStart={() => setIsLoading(true)}
          onCanPlay={() => setIsLoading(false)}
        />
      </div>
      {qualityLevels.length > 0 && (
        <div className="space-y-2">
          <h4 className="text-sm font-medium text-gray-700">Quality Options:</h4>
          <div className="flex flex-wrap gap-2">
            {qualityLevels.map((level, index) => (
              <button
                key={index}
                onClick={() => changeQuality(index)}
                className={`px-3 py-1 rounded-md text-sm font-medium transition-colors ${
                  currentQuality === index
                    ? 'bg-blue-500 text-white'
                    : 'bg-gray-200 text-gray-800 hover:bg-gray-300'
                }`}
              >
                {level.height}p
              </button>
            ))}
          </div>
        </div>
      )}
      <div className="flex space-x-2">
        <button
          onClick={startBroadcast}
          disabled={!isLive}
          className="bg-blue-500 text-white px-4 py-2 rounded-md hover:bg-blue-600 disabled:bg-gray-300 disabled:cursor-not-allowed"
        >
          Start Watching
        </button>
        <button
          onClick={stopBroadcast}
          className="bg-red-500 text-white px-4 py-2 rounded-md hover:bg-red-600"
        >
          Stop
        </button>
      </div>
    </div>
  );
}
In the code above, we used the xhrSetup function in the HLS instance to add an Authorization header with a Bearer token to every HTTP request made by HLS.js, such as for .m3u8 playlists and .ts/fMP4 segments. We pass the authToken as a prop, which we can retrieve after user signup through our authentication service from the backend API. This process ensures secure access for each user.
Additionally, we should listen for the Hls.Events.ERROR event to capture authentication failures, such as an invalid token, so that we can display clear error messages:
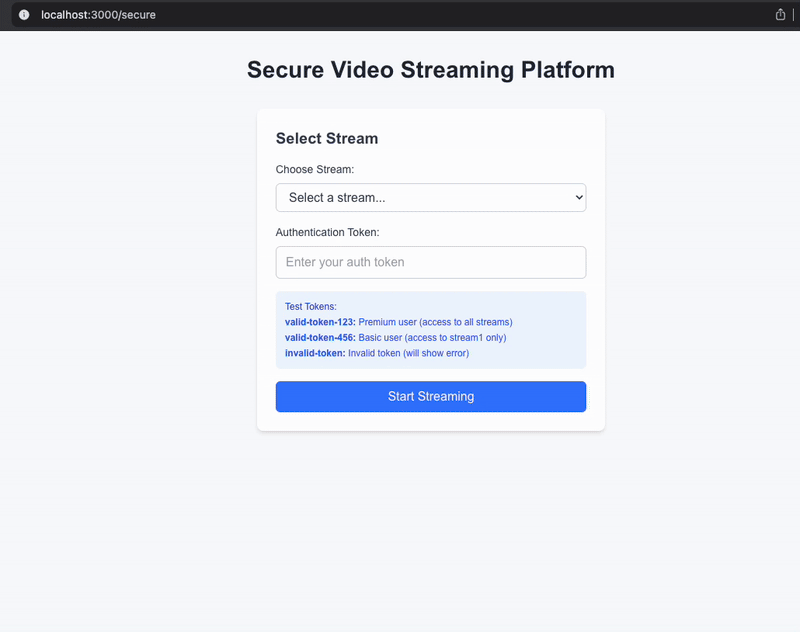
We have already created a mock user database, a mock stream data, and an authentication form. We kept it short for the purpose of the article. For the full code, visit the GitHub repository.
HLS.js offers many configuration options to help improve performance across various situations. By setting it up correctly, you can reduce startup time, decrease buffering, and enhance the overall viewing experience.
Here are some settings for HLS.js to improve performance in the LiveStream component. Add this option to the Hls instance:
  const hls = new Hls({
    liveSyncDurationCount: 3,
    liveMaxLatencyDurationCount: 5,
    maxBufferLength: 30,
    maxMaxBufferLength: 60,
    lowLatencyMode: true,
    backBufferLength: 90,
    abrEwmaFastLive: 3,
    abrEwmaSlowLive: 9,
    enableWorker: true,
    startLevel: -1,
  });
liveSyncDurationCount: 3: This keeps the player three segments behind the live broadcast, balancing latency and stabilityliveMaxLatencyDurationCount: 5: If latency exceeds five segments, the stream skips segments to stay close to real-timelowLatencyMode: true: This activates features that help achieve less than three seconds of latencymaxBufferLength: 30: The buffer is limited to 30 seconds to reduce memory usemaxMaxBufferLength: 60: The buffer size is capped at 60 seconds to prevent too much buffering on fast networksbackBufferLength: 90: This keeps 90 seconds of past content available for DVR featuresabrEwmaFastLive: 3: This quickly adjusts to network changes for live streamsabrEwmaSlowLive: 9: This helps stabilize stream quality during small changesenableWorker: true: This uses a Web Worker to handle processing, improving performance on the main threadstartLevel: -1: This allows HLS.js to automatically choose the best quality based on the network conditionsHLS.js is a strong option for video streaming in Next.js. However, developers can also choose from several open source alternatives, including Video.js, Stream’s API, Daily.co, Node.js/FFmpeg, and Dolby OptiView.
Each alternative has its own strengths, making them suitable for different use cases, such as live broadcasting, video conferencing, or low-latency streaming.
Video.js is a popular open source tool for playing HTML5 videos. It works consistently across different browsers and devices and can use Flash or other technologies when HTML5 video isn’t fully supported.
While Video.js mainly focuses on playing videos, it has many plugins that let you customize it and add more features with special plugins. Video.js also provides a complete user interface with options for ads, analytics, and virtual reality.
Key Video.js features include:
videojs-contrib-hls plugin is important for HLS supportvideojs-contrib-hls), which adds a small overheadHere’s how to install Video.js via npm or yarn:
npm install video.js @types/video.js
Here’s how to implement it in your project:
import { useEffect, useRef } from 'react';
import videojs from 'video.js';
import 'video.js/dist/video-js.css';

export default function VideoJSPlayer({ options }) {
  const videoRef = useRef(null);
  const playerRef = useRef(null);

  useEffect(() => {
    if (!playerRef.current) {
      const videoElement = videoRef.current;
      if (!videoElement) return;

      playerRef.current = videojs(videoElement, options, () => {
        console.log('Player ready');
      });
    }

    return () => {
      if (playerRef.current) {
        playerRef.current.dispose();
        playerRef.current = null;
      }
    };
  }, [options]);

  return (
    <div data-vjs-player>
      <video ref={videoRef} className="video-js vjs-big-play-centered" />
    </div>
  );
}
Stream provides a set of APIs for building real-time applications. Its Video API offers a simple, managed way to handle live streaming and video playback on demand. Instead of using client-side libraries for playback, Stream’s API manages the entire streaming process from capturing and encoding video to delivering it globally. This approach reduces the technical burden on developers, letting them concentrate on building their applications.
Its key features include:
Here’s how to install Stream via npm or yarn:
npm install @stream-io/video-react-sdk
Here’s a basic implementation of Stream:
import {
  StreamCall,
  StreamVideo,
  StreamVideoClient,
  User,
} from "@stream-io/video-react-sdk";

const apiKey = "your-api-key";
const userId = "user-id";
const token = "authentication-token";
const user: User = { id: userId };

const client = new StreamVideoClient({ apiKey, user, token });
const call = client.call("default", "my-first-call");
call.join({ create: true });

export const LiveStream = () => {
  return (
    <StreamVideo client={client}>
      <StreamCall call={call}>
        /* <MyVideoUI /> */
      </StreamCall>
    </StreamVideo>
  );
};
Daily.co offers an easy-to-use API and SDKs that let you add real-time video and audio calls to both web and mobile apps. It uses WebRTC technology to handle video conferencing smoothly, whether it’s one-on-one or with many people.
Daily.co provides APIs for peer-to-peer video rooms with features like screen sharing, recording, and end-to-end encryption. This makes it a great choice for live interactions where quick connections and clear communication are essential.
Its key features include:
daily-react makes it easier to integrate Daily.co into your React/Next applications using npm:
npm i @daily-co/daily-react
To get started with using Daily.co in a Next.js app, include DailyProvider in your app:
import { DailyProvider, useCallObject } from '@daily-co/daily-react';

function App() {
  // Create an instance of the Daily call object
  const callObject = useCallObject();

  return <DailyProvider callObject={callObject}>{children}</DailyProvider>;
}
The combination of Node.js and FFmpeg represents the most flexible and customizable approach to video streaming. This setup gives you complete control over the video streaming process. You use Node.js as the backend to manage video tasks, and FFmpeg, which is an open source multimedia tool written in C for processing video and audio files.
FFmpeg can work with almost any media format. It can transcode, package, segment (for HLS/DASH), and stream videos, among other things. With this combination, you can create your own custom media server.
Its features include:
.m3u8 playlists, .ts or fMP4 segments) or DASH manifests and segmentsBasic implementation:
const { spawn } = require('child_process');
const express = require('express');
const app = express();

app.use(express.static('public')); // Serve HLS files

const ffmpeg = spawn('ffmpeg', [
  '-i', 'input-stream-url', // e.g., RTMP or live feed
  '-c:v', 'libx264',
  '-c:a', 'aac',
  '-f', 'hls',
  '-hls_time', '4',
  '-hls_segment_filename', 'public/stream_%03d.ts',
  'public/stream.m3u8',
]);

ffmpeg.stderr.on('data', (data) => console.log(data.toString()));

app.listen(3000, () => console.log('Server running on port 3000'));
Dolby OptiView is a video streaming solution that provides high-quality and fast streaming across different platforms. It combines the technology of Dolby.io with THEOplayer’s efficient HTML5 video player.
Dolby OptiView focuses on sports, media, entertainment, and interactive applications such as live sports betting, auctions, and online gaming. It aims to enhance real-time engagement, ensure consistent performance across platforms, and create opportunities for revenue through features like server-guided ad insertion (SGAI).
Features include:
You can integrate Dolby OptiView in your Next.js/React using npm or yarn:
npm install @dolbyio/comms-sdk-web
Here is a basic live stream implementation:
"use client";
import { useEffect, useRef, useState } from 'react';
import VoxeetSDK from '@dolbyio/comms-sdk-web';

function DolbyPlayer({ appKey, appSecret }) {
  const videoRef = useRef(null);
  const [isJoined, setIsJoined] = useState(false);

  useEffect(() => {
    // Initialize Dolby SDK
    VoxeetSDK.initialize(appKey, appSecret);
  }, [appKey, appSecret]);

  const joinStream = async () => {
    try {
      // Open session
      await VoxeetSDK.session.open({ name: 'User' });

      // Create/join conference
      const conference = await VoxeetSDK.conference.create({ alias: 'stream' });
      await VoxeetSDK.conference.join(conference);

      setIsJoined(true);
    } catch (error) {
      console.error('Join failed:', error);
    }
  };

  const leaveStream = async () => {
    try {
      await VoxeetSDK.conference.leave();
      await VoxeetSDK.session.close();
      setIsJoined(false);
    } catch (error) {
      console.error('Leave failed:', error);
    }
  };

  return (
    <div>
      <video
        ref={videoRef}
        autoPlay
        controls
        style={{ width: '100%', height: '400px', background: '#000' }}
      />

      <div style={{ marginTop: '10px' }}>
        {!isJoined ? (
          <button onClick={joinStream}>Join Stream</button>
        ) : (
          <button onClick={leaveStream}>Leave Stream</button>
        )}
      </div>
    </div>
  );
}

export default function Home() {
  const appKey = 'your-dolby-app-key';
  const appSecret = 'your-dolby-app-secret';

  return (
    <div style={{ padding: '20px' }}>
      <h1>Dolby Stream</h1>
      <DolbyPlayer appKey={appKey} appSecret={appSecret} />
    </div>
  );
}
| Tool | Latency | Cost | Best for | Scalability |
|---|---|---|---|---|
| HLS.js | 3–10s | Free | Custom HLS players | High (client-side) |
| Video.js | 3–10s | Free | Multi-format playback | Moderate |
| Stream API | <500ms | Paid | Interactive apps | Very High (managed) |
| Daily.co | <1s | Freemium | Video conferencing | High (managed) |
| Node.js/FFmpeg | Configurable | Free (infrastructure) | DIY streaming pipelines | Self-hosted |
| Dolby OptiView | <1s | Enterprise | High-quality broadcasts | High (managed) |
To implement real-time video streaming in Next.js, consider several key factors: latency, scalability, development resources, and long-term maintenance. This article discusses HLS.js as a strong choice for HTTP Live Streaming. We demonstrated how to create production-ready streaming applications that include features like adaptive bitrate streaming, secure authentication, and optimized performance. We also looked at alternatives, including Video.js, Stream, and Daily.co.
When choosing your streaming solution, think about your specific needs, use HLS.js or Video.js for reliable and widely compatible streaming, choose Daily.co for real-time interaction, use Stream’s API for quick development with managed infrastructure, apply Node.js/FFmpeg for full customization, or take advantage of Dolby OptiView for high-quality experiences.
With what you’ve learned from this article, you are ready to create engaging video streaming experiences that grow with your application and adapt to user needs!
Debugging Next applications can be difficult, especially when users experience issues that are difficult to reproduce. If you’re interested in monitoring and tracking state, automatically surfacing JavaScript errors, and tracking slow network requests and component load time, try LogRocket.
LogRocket captures console logs, errors, network requests, and pixel-perfect DOM recordings from user sessions and lets you replay them as users saw it, eliminating guesswork around why bugs happen — compatible with all frameworks.
LogRocket's Galileo AI watches sessions for you, instantly identifying and explaining user struggles with automated monitoring of your entire product experience.
The LogRocket Redux middleware package adds an extra layer of visibility into your user sessions. LogRocket logs all actions and state from your Redux stores.


Modernize how you debug your Next.js apps — start monitoring for free.

Learn how to protect full-stack projects from NPM supply chain attacks with a practical security checklist.

Explore 15 essential MCP servers for web developers to enhance AI workflows with tools, data, and automation.

Learn how contrast-color() automatically picks accessible text colors using native CSS, without JavaScript.

Learn how to build a harness-style AI workflow using Claude Code with specialized Dev, QE, and Ops subagents, gated handoffs, MCP telemetry, and LEARNING.md.
Would you be interested in joining LogRocket's developer community?
Join LogRocket’s Content Advisory Board. You’ll help inform the type of content we create and get access to exclusive meetups, social accreditation, and swag.
Sign up now

