For a while, hosting infrastructure and deploying sites was our only option. You deployed your site, bought a URL, and paid a subscription to keep it active. Today, Netlify has successfully improved this with a host of features including cross-framework support, analytics, and serverless functions. One particular feature, which was rolled out recently, is proving to be a game changer.

In this post, we’re going to learn what Netlify build plugins are, what they do, and how you can create one. This tutorial assumes basic knowledge of Netlify and its features – if you’re not familiar with Netlify, you can check this comprehensive guide out.
Build plugins let you automate tasks that can be connected to the build process of your projects. For every time your project is deployed, these tasks are asynchronously carried out. You can use build plugins to perform a variety of actions each time your project is deployed, such as making a cryptocurrency donation each time your site deploys or sending notifications to the rest of the team – the possibilities are endless.
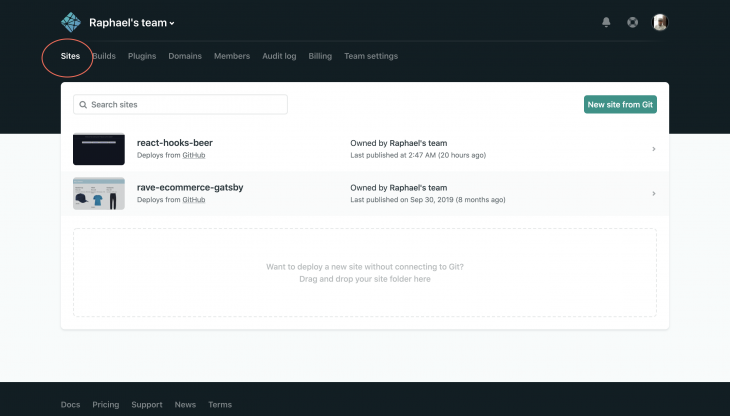
There’s a lot of published plugins created by developers that you can add to your project and perform cool stuff on every deploy. To add a plugin to your project, on your Netlify dashboard, navigate to Sites and then select the project on which you want to add the plugin to:
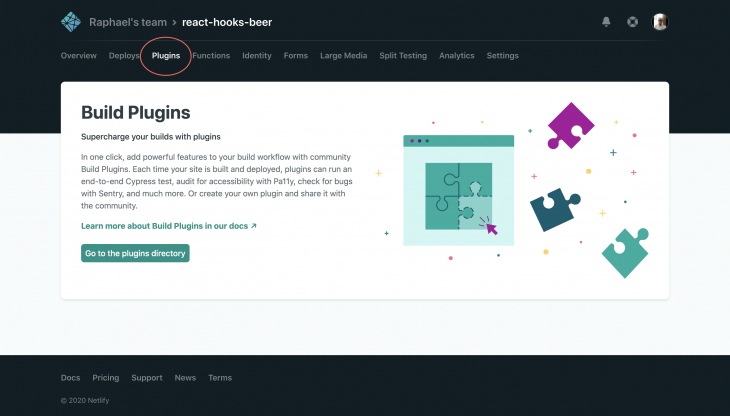
Next, click on the Plugins tab and navigate through the plugin directory, then select the plugin you would like to have on your project:
Screen Recording 2020 06 01 at 22 32 59
Uploaded by Raphael Ugwu on 2020-06-01.
Every Netlify build plugin has a “skeletal” structure that is made up of three files:
index.js — The entry point for the plugin. This is where you embed the logic that defines your plugin’s actions with any of Netlify’s Hooks such as onPrebuild, onPostbuild , or onEndmanifest.yml — This file handles interactive data. It could be a set of user inputs or information that will be needed whenever a deploy is to be madepackage.json — This file handles non-interactive data, it contains things like your plugin’s name, author, and dependenciesThen there’s an additional file, netlify.toml , which will specify the path to your plugin when it’s included in your project. Note that this file is only useful when your plugin hasn’t been published to NPM yet.
We’re going to work on these four files but first, we need to globally install Netlify in our project’s folder. For my project, I will be deploying an e-commerce store demo built with React Hooks. Using our terminal, let’s navigate to our project folder and install Netlify:
# Navigate to your project
cd react-hooks-app

# Install Netlify CLI globally
npm install netlify-cli -g

### OR use Yarn ###
yarn global add netlify-cli
Next, in our project, we’ll create a folder for our plugin. In your project folder, create a folder in which the contents of your plugin will be stored. Netlify plugins follow a naming convention where plugins are named according to what they do. We’re building a plugin that sends an email to a teammate or boss for each time our app is deployed so we’ll call this netlify-emailplugin:
+ react-hooks-app
   + .netlify
   + build
   + node_modules
   + public
     - index.html
   + src
   + netlify-emailplugin
     - index.js
     - manifest.yml
     - package.json
package.jsonLet’s first handle the package.json file where we’ll define our plugin and install any necessary dependencies we’ll need. In your terminal, navigate to your plugin’s folder and run npm init – this will display a couple of question you will need to fill in about your plugin:
{
  "name": "netlify-emailplugin",
  "version": "1.0.0",
  "description": "A Netlify plugin that emails my boss each time I make an update",
  "main": "index.js",
  "devDependencies": {},
  "scripts": {
    "test": "echo \\\"Error: no test specified\\\" && exit 1"
  },
  "repository": {
    "type": "git",
    "url": "git+https://github.com/fullstackmafia/netlify-emailplugin.git"
  },
  "keywords": [
    "netlify",
    "netlify-plugin",
    "build",
    "plugins"
  ],
  "author": "Raphael Ugwu <[email protected]>",
  "license": "MIT",
  "bugs": {
    "url": "https://github.com/fullstackmafia/netlify-emailplugin/issues"
  },
  "homepage": "https://github.com/fullstackmafia/netlify-emailplugin#readme"
}
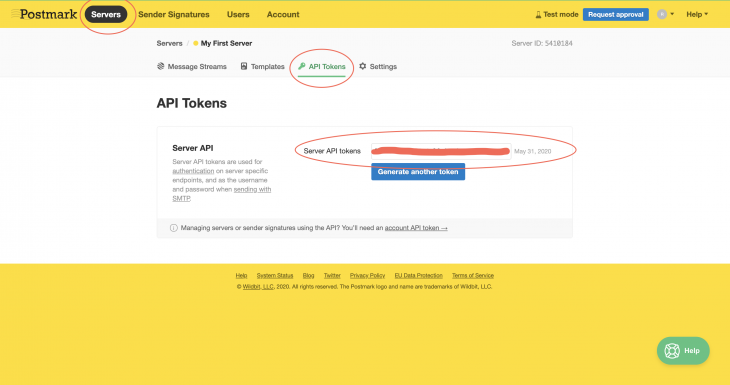
It’s very important you have netlify and netlify-plugin as keywords to enhance your plugin’s chances of being found whenever it is looked up. For our plugin, we’ll need to include a dependency that fires off email notifications after each deploy. For this purpose, we’ll use Postmark – an awesome email API. First, let’s sign up with Postmark and get a set of API keys:
Next, we’ll install Postmark as a dependency on our plugin’s folder:
# Navigate to your plugin's folder
cd netlify-emailplugin

# Install Postmark
npm install postmark

### OR use Yarn ###
yarn add postmark
Once this is done, you’ve successfully set up your package.json file.
netlify.tomlNext, in the root folder of our project, we need to create the netlify.toml file where we’ll specify the pathway to our plugin:
[[plugins]]
package = "./netlify-emailplugin"
Because we’re using a local plugin, we need to include Netlify’s local core installer plugin which will assist with enabling any dependencies installed in our package.json file:
 [[plugins]]
 package = "@netlify/plugin-local-install-core"

 [[plugins]]
 package = "./netlify-emailplugin"
manifest.ymlOur manifest.yml file should contain basic information about our plugin. Since this is an email plugin, we’ll include the plugin’s name, sender’s email (my email) and the receiver’s email (my boss’s email):
name: netlify-emailplugin
inputs:
  - name: from
    description: Sender email
    default: [email protected]
  - name: to
    description: Receiver email
    default: [email protected]
Before we build up our index.js file, let’s take a moment to understand Netlify’s build events. Build events let you access different stages of your app’s build process – with them you can decide where exactly you want your plugin to be triggered. Altogether, Netlify has seven build processes:
onInit — runs before anything elseonPreBuild — runs before build commands are executedonBuild — runs while build commands are being executedonPostBuild — runs after build commands are executedonSuccess — runs once build is completed successfullyonError — runs if there is a build erroronEnd — runs on build error or success when the build process endsFor our plugin, we’ll use the onEnd build event – so for each time we run a successful build, an email is sent.
index.jsThe first step to creating our index.js file is to include any dependency installed earlier in package.json:
var postmark = require("postmark");
Next, we need to include the constants our plugin will be interacting with. In this case, our constants are the sender’s email, receiver’s email, and our Postmark’s API key. To keep this accessible, unique, and yet secure for each user who will be using this plugin, Netlify lets us save these constants in the Build and Deploy section of our project:
Screen Recording 2020 06 03 at 22 08 51
Uploaded by Raphael Ugwu on 2020-06-03.
Now we can include these constants in our file:
const {
    FROM_EMAIL,
    KEY,
    TO_EMAIL,
 } = process.env
Following best practices, we ought to include some form of error handling in our plugin. To do this, we’ll throw an error for each time our plugin is missing a constant:
if (!FROM_EMAIL) {
  throw new Error('No sender email present')
}
if (!TO_EMAIL) {
  throw new Error('No recipient email present')
}
if (!KEY) {
  throw new Error('No KEY present')
}
Finally, we’ll initiate a Postmark instance that sends our email. We’ll also provide our plugin with the option of accessing the user input in our manifest.yml file:
const client = new postmark.ServerClient(KEY);
const message = 'Hello Boss, we just deployed some bug fixes'
await client.sendEmail({
  From: inputs.from || FROM_EMAIL,
  To: inputs.to || TO_EMAIL,
  Subject: "New Deploy",
  TextBody: message
There! We’re done compiling our index.js file, what’s left is to wrap all our code in a module.exports function so it’s accessible to the rest of our project:
module.exports = {
    onEnd: async ({ inputs }) => {
        if (!FROM_EMAIL) {
            throw new Error('No sender email present')
          }
          if (!TO_EMAIL) {
            throw new Error('No recipient email present')
          }
          if (!KEY) {
            throw new Error('No KEY present')
          }
          const client = new postmark.ServerClient(KEY);
          const message = 'Hello Boss, we just deployed some bug fixes'
          await client.sendEmail({
            From: inputs.from || FROM_EMAIL,
            To: inputs.to || TO_EMAIL,
            Subject: "New Deploy",
            TextBody: message
          })
    },
}
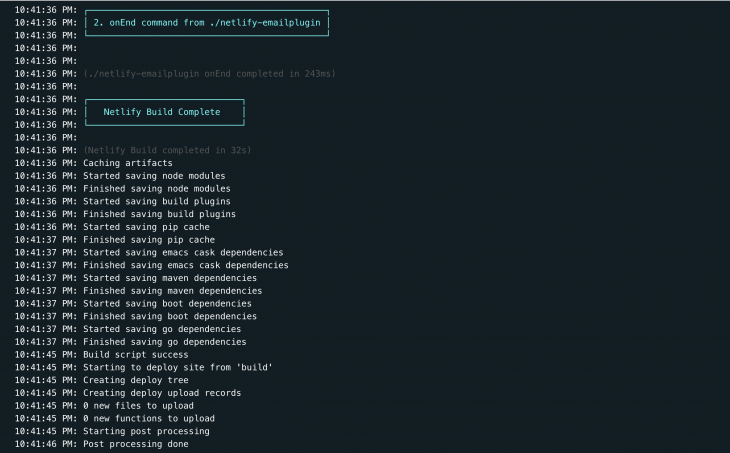
Now we’re set to use our plugin. Update your most recent changes with a Git push and after that, deploy your project on Netlify. You should receive a summary your build went well and that your plugin was used:
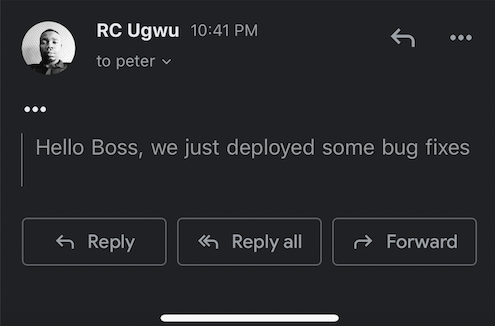
And your boss should receive your email:
Build plugins will unlock so many chances for cross-collaboration. They haven’t been around for very long but they are already going mainstream. You can check out more awesome examples of build plugins made by other developers in this repo. If you’d like to review the source code of this plugin, you can do so here.
Install LogRocket via npm or script tag. LogRocket.init() must be called client-side, not
server-side
$ npm i --save logrocket

// Code:

import LogRocket from 'logrocket';
LogRocket.init('app/id');
// Add to your HTML:

<script src="https://cdn.lr-ingest.com/LogRocket.min.js"></script>
<script>window.LogRocket && window.LogRocket.init('app/id');</script>
Would you be interested in joining LogRocket's developer community?
Join LogRocket’s Content Advisory Board. You’ll help inform the type of content we create and get access to exclusive meetups, social accreditation, and swag.
Sign up now
Discover how the Interface Segregation Principle (ISP) keeps your code lean, modular, and maintainable using real-world analogies and practical examples.

<selectedcontent> element improves dropdowns

Learn how to implement an advanced caching layer in a Node.js app using Valkey, a high-performance, Redis-compatible in-memory datastore.

Learn how to properly handle rejected promises in TypeScript using Angular, with tips for retry logic, typed results, and avoiding unhandled exceptions.

