Ruby is a dynamic, interpreted language popular for its expressiveness and developer-friendly syntax. However, it may not be the best choice in terms of performance and scalability. As your Ruby project grows in complexity and workload size, you may encounter performance bottlenecks and other limitations.

On the other hand, Go is a statically typed, compiled, and efficient language that provides built-in concurrency features. It’s designed to be highly performant and enable concurrent programming without sacrificing simplicity.
By migrating your Ruby projects to Go, you can leverage Go’s powerful features and unlock significant improvements in performance and scalability. In this article, we will cover:

Although Ruby is popular for its elegant syntax and developer-friendly features, certain projects may encounter limitations and challenges. It excels at web development and rapid prototyping, but its performance limitations create the need to consider other languages.
Ruby is an interpreted language, resulting in slower execution speeds than a compiled language. This makes it less suitable for high-performance or computationally intensive tasks.
Furthermore, Ruby’s memory usage tends to be higher than other languages, which affects scalability and efficiency in resource-intensive projects.
Another consideration is the lack of true parallelism in Ruby’s standard implementation. This is due to the Global Interpreter Lock (GIL), where only one thread can execute Ruby code at a time.
This limits the language’s ability to utilize multi-core processors fully, which can impact applications that require concurrent or parallel processing.

Go is a viable alternative for Ruby developers facing the previously mentioned limitations. This statically typed, compiled language offers excellent performance, efficient memory management, and built-in support for concurrency, making it a great choice for frontend developers.
The key strengths of Go lie in its simplicity and readability. Its minimalistic syntax makes it easy to learn and understand, reducing the time needed to onboard new team members. Go’s strict typing system also makes code more reliable and easier to maintain, minimizing the likelihood of runtime errors.
Go’s built-in concurrency features, such as channels and goroutines, enable efficient parallel processing. These lightweight concurrent constructs make it effortless to write scalable and concurrent applications.
Additionally, Go’s tooling and ecosystem support web development, networking, and system-level programming.
The similarities and differences between Go and Ruby should influence your choice as you consider migrating your project from Rust to Go.
For example, both languages:
Some differences include:
The benefits you stand to gain from migrating your project from Ruby to Go include improved execution speed, efficient memory management, and more. Let’s take a look at how to migrate your project next.
Your migration approach must be slow and steady; the process might take time. You’ll want to keep using Ruby until you’ve built a complete replica of the project in Go with all the required functionality running.
Here are the steps you can take for your Ruby to Go project migration:
Let’s explore each step in more detail below.
While Go is a powerful language suitable for a wide range of applications, it might not be suitable or the best option for your project. Before diving into the migration process, make sure to assess your project’s requirements and evaluate whether Go is compatible with your project’s specific use case.
You’ll want to consider the factors and challenges making it necessary to migrate your project off Ruby and thoroughly research and analyze your options.
Some potential challenges include:
Considering these factors will help you ensure that Go will satisfy your project’s needs and align with your project’s long-term goals.
Once you’ve determined that Go is perfect for your project, you must then analyze the dependencies and libraries.
Go‘s libraries and packages may have functionalities that differ from the ones you use with Ruby. Research and evaluate available libraries and packages to ensure the Go options you choose match the required functionalities provided by the Ruby libraries you used.
You can check out Go’s packages repository for well-maintained and actively supported packages with good documentation, tutorials, and community engagements.
The exciting yet critical part is refactoring your Ruby code to Go. The syntaxes of Go and Ruby differ significantly, but good software design and engineering principles are constant.
Start by understanding the core logic of your Ruby code and how it interacts with external dependencies. Then, break down your code into smaller, manageable functions and identify key data structures and algorithms.
Once you have a clear understanding of your Ruby code, start translating the Ruby code into its Go equivalent. Go’s statically typed nature will require you to declare variables explicitly, define types, and handle errors. Embrace Go’s simplicity and focus on writing clean idiomatic code.
The example below demonstrates the conversion of a Ruby method to Go.
Here’s the Ruby code:
def greet(name)
  puts "Hello, #{name}!"
end
Compare the above to its equivalent Go code:
func greet(name string) {
  fmt.Printf("Hello, %s!\\\\n", name)
}
Refactoring involves adapting your code to Go’s conventions and patterns. Leverage Go’s native features, like goroutines and channels, to improve the performance of your migrated code.
Your project’s migration can be automatic or manual. You can search for automated migration or code conversion tools for Ruby to Go conversion.
After your code refactoring process, thorough testing and debugging are critical to ensure the stability and reliability of your migrated project.
Create a comprehensive suite of tests covering your application’s different aspects, including integration, performance, and unit tests. You can use Go’s built-in testing framework or popular testing libraries like Testify or Go Convey for testing.
Additionally, you can use popular Go debugging tools like the Delve debugger to step through your code and identify potential issues. Ensure you leverage logging and error handling mechanisms to capture and analyze runtime errors or unexpected behaviors.
By following the steps in this migration guide, you’ll be on the path to a successful code migration process.
There are a few tools that can ease your migration process, especially the process of refactoring Ruby code to Go. Unfortunately, no libraries in the Go ecosystem exist for completely automatic Ruby-to-Go code migration.
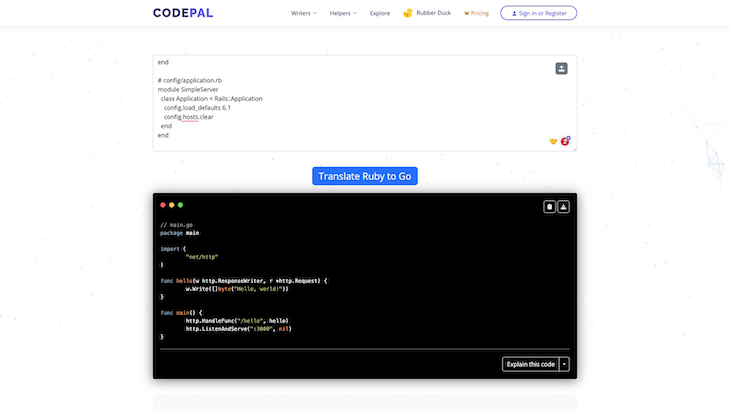
However, there are many AI tools you can use to refactor and translate code between languages, including ChatLLMs and AI language translators. Let’s explore how you can use Codepal’s AI language translator to convert Ruby code to Go.

CodePal Language Translator is a tool that helps developers translate code from one programming language to another. It uses AI to analyze the structure and logic of the code and generate equivalent code in the target language.
This language translator tool supports a wide range of programming languages, including Python, Java, C++, JavaScript, and PHP, along with the file formats used to write code in those languages.
To use CodePal’s Language Translator, upload your code file or paste the code contents on the website. The tool will analyze and generate equivalent code in the target language that you can download and use in your project.
Here’s an example Ruby program that starts a server with the Ruby on Rails framework:
# Gemfile
# This file specifies the Ruby gems that are required for this project.
source '<https://rubygems.org>'
gem 'rails', '~> 6.1.3'

# config/routes.rb
# This file defines the routes for this application.
Rails.application.routes.draw do
  # The `get` method is used to define a route that will respond to GET requests.
  get '/hello', to: 'welcome#hello'
end

# app/controllers/welcome_controller.rb
# This file defines the `WelcomeController` class.
class WelcomeController < ApplicationController
  # The `def hello` method defines a method that will be called when the `/hello` path is requested.
  def hello
    # The `render plain: 'Hello, world!'` line renders the text `Hello, world!`.
    render plain: 'Hello, world!'
  end
end

# config/application.rb
# This file defines the `SimpleServer::Application` class.
module SimpleServer
  class Application < Rails::Application
    # The `config.load_defaults 6.1` line specifies that the Rails application should use the default settings for Rails 6.1.
    config.load_defaults 6.1
    # The `config.hosts.clear` line clears the list of hosts that are allowed to access the Rails application.
    config.hosts.clear
  end
end
After inputting the code on the Ruby to Go code translator, here’s the Go code equivalent:
// main.go
package main

import (
        "net/http"
)

// hello is a handler function that writes "Hello, world!" as the response.
func hello(w http.ResponseWriter, r *http.Request) {
        w.Write([]byte("Hello, world!"))
}

func main() {
        // Register the hello function to handle requests to the "/hello" path.
        http.HandleFunc("/hello", hello)

        // Start the HTTP server on port 3000.
        http.ListenAndServe(":3000", nil)
}
Although the code conversion was entirely accurate in this instance, you shouldn’t blindly trust AI tools or any automatic code migration tools. Follow the steps in this migration guide to ensure better results. If you do use any such tool, check the results closely to find and correct any mistakes.
Migrating Ruby projects to Go offers significant benefits in terms of performance and scalability.
While Ruby is known for its expressiveness and developer-friendly syntax, it may fall short of your project requirements when it comes to handling larger workloads and computationally intensive tasks. Go, on the other hand, excels in efficiency, concurrency, and simplicity.
By carefully assessing project requirements and compatibility, analyzing dependencies and libraries, and refactoring Ruby code to Go, you can leverage Go’s powerful features and unlock improvements in execution speed and memory management.
Thorough testing and debugging are crucial to ensure the stability and reliability of the migrated project.
Install LogRocket via npm or script tag. LogRocket.init() must be called client-side, not
server-side
$ npm i --save logrocket

// Code:

import LogRocket from 'logrocket';
LogRocket.init('app/id');
// Add to your HTML:

<script src="https://cdn.lr-ingest.com/LogRocket.min.js"></script>
<script>window.LogRocket && window.LogRocket.init('app/id');</script>
Hey there, want to help make our blog better?
Join LogRocket’s Content Advisory Board. You’ll help inform the type of content we create and get access to exclusive meetups, social accreditation, and swag.
Sign up now
Not sure if low-code is right for your next project? This guide breaks down when to use it, when to avoid it, and how to make the right call.

Compare Firebase Studio, Lovable, and Replit for AI-powered app building. Find the best tool for your project needs.

Discover how to use Gemini CLI, Google’s new open-source AI agent that brings Gemini directly to your terminal.

This article explores several proven patterns for writing safer, cleaner, and more readable code in React and TypeScript.