There are many frameworks and technologies for building web applications today. Previously, these were focused on presenting content in a traditional HTML, CSS, and JavaScript project.

With the somewhat recent emergence of WebAssembly (Wasm for short), engineers can now build applications in traditional languages like C, Rust, C#, and others, and then deploy them the same way they would HTML, CSS, and JavaScript bundled applications.
Microsoft has built an open-source technology that leverages Wasm called Blazor. Blazor is very powerful in that it brings .NET development directly to the browser. Applications can now be built with C# in place of JavaScript, but also leverage existing JavaScript libraries and frontend concepts.
Microsoft has two different versions of Blazor:
Both versions of Blazor are now production-ready. The Server version was made production-ready in 2019, and the WebAssembly version was just made production-ready in May 2020. For more information on this, I recommend checking out the Visual Studio Magazine article here.
Both projects follow patterns that you would see with traditional ASP.NET razor pages. The main difference with Blazor and traditional ASP.NET razor pages is that you can package a Blazor site as either a single application (with IIS) or a static site similar to what you see with Angular, React, Vue.js, and other frameworks.
Since Blazor also makes use of Wasm, you can connect JavaScript packages with C# dependencies directly. You also build your Blazor projects using components. The sample project I’ll be walking through just uses one page with a simple template, but in a real “production” application, there would be multiple components for each page.
This post is effectively a high-level intro to Blazor. I’m going to explain some fundamentals of how it works, and then I’m going to walk through a WebAssembly project and a Server project. I’ll also cover a few notes on deployment and next steps.
The sample projects we’ll review are available at the GitHub repo here. This post also assumes some familiarity with C# and expects that you have already set up Visual Studio on your machine with the instructions here.

Blazor runs with a version of Xamarin’s Mono framework that is compiled for Wasm. The end result is that you can actually run a .NET (C#) application directly in the browser. Blazor compiles your .NET code into Wasm, which can then be deployed as a static bundle. For older browsers, Blazor makes use of asm.js to compile down to a common framework that older browsers can support.
Blazor also supports interoperability with JavaScript libraries. You can still use an npm module with a Blazor project by just importing it with the build. Blazor provides the “IJSRuntime” and “JSRuntime” in C# to directly interact with JavaScript packages alongside your C# code. Check out the Microsoft Docs here for a more detailed explanation. I also recommend walking through this post on using npm packages with Blazor.
Blazor has several built-in lifecycle hooks that enable you to control behaviors when the application loads, is destroyed, etc. These are just like lifecycle hooks seen in JavaScript frameworks, and you can find details on them here.
Blazor also has several built-in technologies that improve web application performance and controlling rendering behavior. Check out the docs for pre-rendering here and fine-grained controls here. Microsoft has some great documentation covering more details on this. I highly recommend checking out the post here.
As I stated in the intro, there are two flavors of Blazor: the WebAssembly and the Server versions. In both cases, you can use Visual Studio to scaffold out the basic project by following the instructions here.
For the WebAssembly version of the project, the initial scaffolding looks like this:
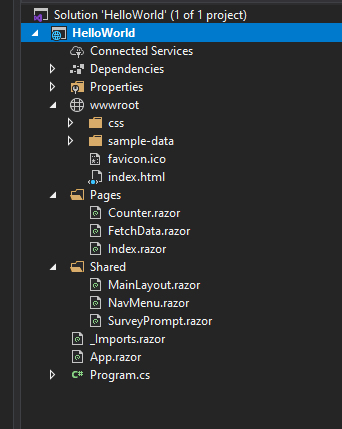
The project structure basically follows the patterns below:
wwwroot
index.html file that your finished site will referencePages
FetchData page to show you how to handle retrieving JSON with HTTPShared
Program.cs
If you run this locally, you’ll see the following:
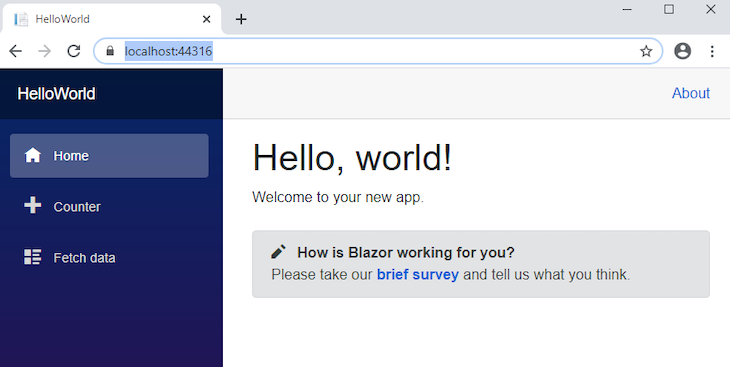
The default application provides some scaffolded content that shows you how to handle passing data back and forth. The Counter provides a basic razor page with some methods showing a counter in the template. The Fetch data page provides an example of retrieving JSON content via HTTP.
The Server version of Blazor is slightly different in that it bootstraps services that you will build in an additional Data folder. I will cover that more in the Blazor Server section below.
For my walk-through of both the Server and WebAssembly projects, I’ve built a Vending Machine application. It is very simple, but showcases the basics of Blazor and ways to send and retrieve data between client and server.
Since I wanted to make this as simple as possible, I removed the scaffolded razor pages and did most of the work for both the WebAssembly and Server versions of the project in the Pages/index.razor page. If you were going to build a production-quality application, you would, of course, have many more razor pages and a more complex folder structure.
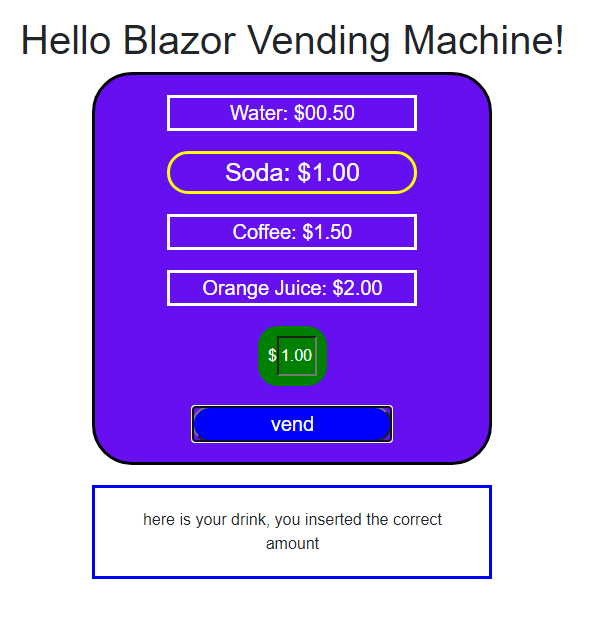
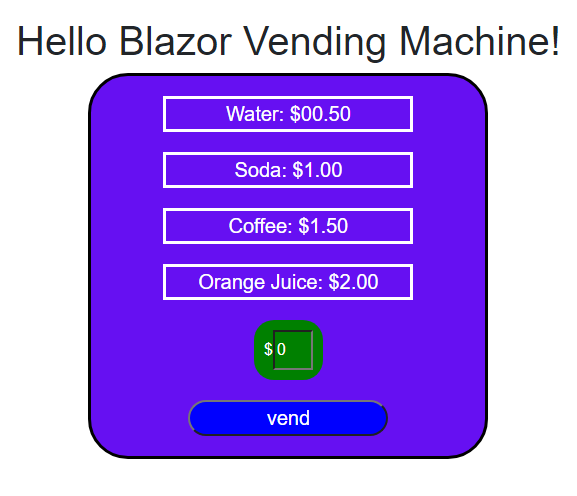
When the app renders, you are shown a list of drinks. You click on one of the drinks, and then enter an amount as “cash” to be sent. Then you click the “vend” button and it will give you a response based on your selection and if you’ve provided too much or too little money.
If you do a clone of my GitHub project and go into the BlazorWebAssembly folder, you’ll see the WebAssembly version of my Vending Machine.
Since the WebAssembly version of Blazor doesn’t have an actual server, I wrote two basic Azure Functions that I can call locally. In a production-quality version of this application, I would host these on Azure and then get my client app to call the HTTP endpoints from my functions.
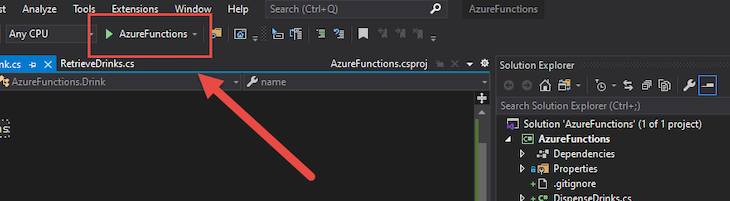
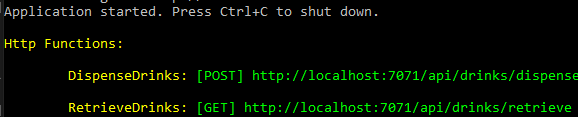
To see the WebAssembly version of the project running locally, we first need to get the Azure Functions running locally. Open a Visual Studio session at the blazor-intro/AzureFunctions/AzureFunctions.sln file. Then, run the Azure Functions locally by using the runner at the top of Visual Studio:
Then you should see a terminal session that opens, showing you the ports that they are running on:
Then, open another Visual Studio session at blazor-intro/BlazorWebAssembly/BlazorWebAssembly.sln and start that application as well with the runner (this is the example WebAssembly project). You should see the following:
If you open Chrome DevTools (or whatever your browser of choice uses for inspection) and look at the source, you’ll see the Wasm compiled code:

When you look at the basic structure of this sample project, you’ll first note that I use Blazor’s dependency injection to pull in the HTTP module in the Pages/index.razor file:
@page "/"
@inject HttpClient Http

...
You’ll also note that I use standard razor syntax in the template to bind the values shown to what is described in the @code block at the bottom of the file. In the template, you’ll note that I make use of @onclick and @bind, just like you would with any other razor page:
...

            <article class="money">
                <article class="money-input">
                    <span class="cash">
                        <input placeholder="cash" @bind="@money" />
                    </span>
                </article>
                <button class="machine-button" @onclick="@(e => vend())">vend</button>
            </article>

...
In the @code block, you’ll notice I use the OnInitializedAsync hook to load the names of the drinks from my Azure Functions. You’ll also notice that in the vend method, I call the /api/drinks/dispense endpoint, just like you would any other HTTP endpoint in a frontend application:
...

@code {

    private string money = "0";
    private string selection = "drink";
    private string message = "";
    private Drink[] drinks;

    protected override async Task OnInitializedAsync()
    {
        drinks = await Http.GetFromJsonAsync<Drink[]>("http://localhost:7071/api/drinks/retrieve");
    }

    public void setDrink(string drink)
    {
        this.selection = drink;
    }

    public async Task vend()
    {
        DrinkSelected drinkSelected = new DrinkSelected()
        {
            name = this.selection,
            cash = this.money
        };

        var response = await Http.PostAsJsonAsync<DrinkSelected>("http://localhost:7071/api/drinks/dispense", drinkSelected);
        this.message = "";
        this.message = await response.Content.ReadAsStringAsync();
    }

    public class Drink
    {
        public string name { get; set; }
        public string cost { get; set; }
    }

    public class DrinkSelected
    {
        public string name { get; set; }
        public string cash { get; set; }
    }
}

...
Finally, you’ll note that I’ve added some custom styles. I import those in the wwwroot/app.css file from a file I have at wwwroot/custom.css, as you see here:
@import url('open-iconic/font/css/open-iconic-bootstrap.min.css');
@import url('custom.css');

...
The Blazor Server project is set up similarly to the WebAssembly project, with the exception that we can actually build out our data (backend) layer within the same project.
If you do a clone of my GitHub project and go into the BlazorServer folder, you’ll see the Server version of my Vending Machine.
Before I show you my sample project’s Server implementation, it helps to just use the default dialog with Visual Studio to scaffold a HelloWorld. If you follow the Visual Studio Create Project flow and select Blazor → Blazor Server, you will get a project that looks like this:
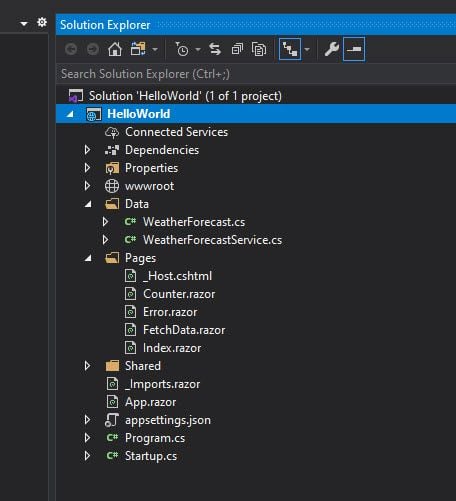
The default setup looks very similar to the WebAssembly project with the exception of a few extras. Most notably, you’ll notice there are service definitions within the Data folder. These are boilerplate and are just there to provide some examples. However, this is where you will define the same set of functions that we had done with Azure Functions before.
In the sample project, open the solution file with Visual Studio at the blazor-intro/BlazorServer/BlazorServer.sln file. You will see the following:
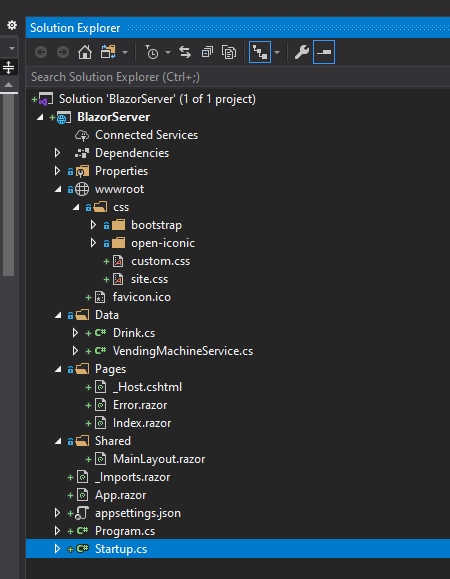
It looks fairly similar to the WebAssembly project. There is a defined service in the Data/VendingMachineService folder that has methods for retrieving drinks and a method for dispensing drinks:
using System;
using System.Linq;
using System.Threading.Tasks;
using System.Collections.Generic;

namespace BlazorServer.Data
{
    public class VendingMachineService
    {
        public Task<List<Drink>> RetrieveDrinks()
        {
            List<Drink> drinks = new List<Drink>();
            drinks.Add(new Drink
            {
                name = "Water",
                cost = "$00.50"
            });
            drinks.Add(new Drink
            {
                name = "Soda",
                cost = "$1.00"
            });
            drinks.Add(new Drink
            {
                name = "Coffee",
                cost = "$1.50"
            });
            drinks.Add(new Drink
            {
                name = "Orange Juice",
                cost = "$2.00"
            });

            return Task.FromResult(drinks);
        }

        public Task<string> DispenseDrinks(string name, string cash)
        {
            List<Drink> drinks = new List<Drink>();
            drinks.Add(new Drink
            {
                name = "Water",
                cost = "$00.50"
            });
            drinks.Add(new Drink
            {
                name = "Soda",
                cost = "$1.00"
            });
            drinks.Add(new Drink
            {
                name = "Coffee",
                cost = "$1.50"
            });
            drinks.Add(new Drink
            {
                name = "Orange Juice",
                cost = "$2.00"
            });

            Drink drinkRequest = drinks.Find(x => x.name.Equals(name));

            string response = "";

            if (drinkRequest == null)
            {
                response = "drink was not found";
            }
            else
            {
                cash = cash.Replace("$", "");
                drinkRequest.cost = drinkRequest.cost.Replace("$", "");
                double cashSent = Double.Parse(cash);
                double cashRequired = Double.Parse(drinkRequest.cost);

                if (cashSent == cashRequired)
                {
                    response = "here is your drink, you inserted the correct amount";
                }
                else
                {

                    if (cashSent < cashRequired)
                    {
                        double differenceLess = cashRequired - cashSent;
                        response = "you did not provide enough money, please insert an additional $" + differenceLess.ToString("F");
                    }
                    else if (cashSent > cashRequired)
                    {
                        double differenceMore = cashSent - cashRequired;
                        response = "you provided too much money, you will get back $" + differenceMore.ToString("F");
                    }
                }
            }

            return Task.FromResult(response);
        }
    }
}
Both of these are referenced in the @code block in the Server Index.razor file, as you see here:
...

@code {

    private string money = "0";
    private string selection = "drink";
    private string message = "";
    private Drink[] drinks;

    protected override async Task OnInitializedAsync()
    {
        drinks = (VendingMachineService.RetrieveDrinks().Result).ToArray();
    }

    public void setDrink(string drink)
    {
        this.selection = drink;
    }

    public async Task vend()
    {
        this.message = "";
        this.message = await VendingMachineService.DispenseDrinks(this.selection, this.money);
    }

    public class DrinkSelected
    {
        public string name { get; set; }
        public string cash { get; set; }
    }
}
Additionally, if you open the Startup.cs file at the project root, you’ll note that the service is registered as a singleton at startup:
...
        // This method gets called by the runtime. Use this method to add services to the container.
        // For more information on how to configure your application, visit https://go.microsoft.com/fwlink/?LinkID=398940
        public void ConfigureServices(IServiceCollection services)
        {
            services.AddRazorPages();
            services.AddServerSideBlazor();
            services.AddSingleton<VendingMachineService>();
        }
...
Once the service is registered with the Startup.cs file, Blazor then uses dependency injection to pull in the service in the page that we have defined:
@page "/"
@using BlazorServer.Data
@inject BlazorServer.Data.VendingMachineService VendingMachineService
...
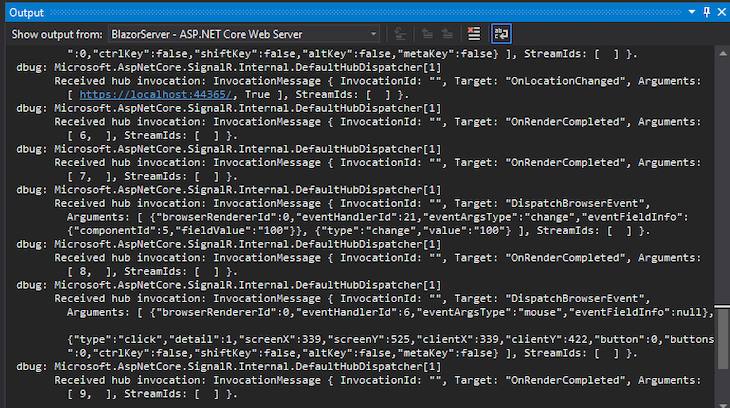
Beyond this, the two projects are basically the same, with the exception that the app uses SignalR for message passing. In the sample app here, I’ve turned on logging so when you run the app locally you can see the messages being passed between the client and the backend (instructions here).
If you run the app locally with Visual Studio and look at the ASP.NET server output, you’ll see the frontend template’s interaction with the backend server:
When you’re ready to deploy your projects, both the WebAssembly and Server implementations connect easily with Azure as well as other cloud providers. The WebAssembly implementation also works nicely with static web hosting since the build results in a bundle that can be deployed and read by any browser.
For the Server version, you just need a server that is capable of hosting an ASP.NET core app. Specific configuration details can be found here. For the WebAssembly version, you can use IIS or the files that are created in the standalone output when the project is built (instructions here).
Additionally, if you are interested in working with Azure Functions for your sites backend, you can easily deploy them by connecting your GitHub repo as you see here.
Since the Server project uses IIS or at least an ASP.NET app to deploy, I’m not going to cover that other than just pointing you to the docs link I have listed above. For the WebAssembly project, if you do a build, the standalone files (including the Wasm-compiled version of the site) will be located at /bin/Debug/netstandard2.1/wwwroot/_framework, and you should see something like the structure here:
.
├── _bin
├── blazor.boot.json
├── blazor.boot.json.gz
├── blazor.webassembly.js
├── blazor.webassembly.js.gz
└── wasm
    ├── dotnet.3.2.0.js
    ├── dotnet.3.2.0.js.gz
    ├── dotnet.timezones.dat
    ├── dotnet.timezones.dat.gz
    ├── dotnet.wasm
    └── dotnet.wasm.gz
I hope this post has shown you some basics of how to work with Blazor. After working with the build tools and Visual Studio, I can definitely appreciate how this could be a powerful platform to work with.
I really see the benefit of Blazor for teams that may lack frontend skills but have strong .NET experience. Additionally, Blazor is definitely a way that you can package .NET libraries and dependencies easily with many of the popular JavaScript packages we use today.
My only real complaint with Blazor is that there is a moderate learning curve, and the tools do not lend themselves to the rapid prototyping that you often see with frameworks like Angular or React. That being said, I think if one spent some time building production applications with Blazor, they would probably find ways to improve the build cycle. It’s really just getting used to patterns.
Microsoft has a lot of great documentation and guides that can get you up to speed relatively quickly with Blazor. Additionally, the examples that come with the starter built by Visual Studio really give you the basics and make it easy to build more complex applications faster.
I recommend checking out the basic docs that are available on Blazor.net as well as the intro docs here. I also recommend checking many of the popular blog sites, as several people have created some great how to guides on some of the more advanced features of Blazor.
Thanks for reading my post, follow me on andrewevans.dev.
There’s no doubt that frontends are getting more complex. As you add new JavaScript libraries and other dependencies to your app, you’ll need more visibility to ensure your users don’t run into unknown issues.
LogRocket is a frontend application monitoring solution that lets you replay JavaScript errors as if they happened in your own browser so you can react to bugs more effectively.

LogRocket works perfectly with any app, regardless of framework, and has plugins to log additional context from Redux, Vuex, and @ngrx/store. Instead of guessing why problems happen, you can aggregate and report on what state your application was in when an issue occurred. LogRocket also monitors your app’s performance, reporting metrics like client CPU load, client memory usage, and more.
Build confidently — start monitoring for free.

Learn how to protect full-stack projects from NPM supply chain attacks with a practical security checklist.

Explore 15 essential MCP servers for web developers to enhance AI workflows with tools, data, and automation.

Learn how contrast-color() automatically picks accessible text colors using native CSS, without JavaScript.

Learn how to build a harness-style AI workflow using Claude Code with specialized Dev, QE, and Ops subagents, gated handoffs, MCP telemetry, and LEARNING.md.
Would you be interested in joining LogRocket's developer community?
Join LogRocket’s Content Advisory Board. You’ll help inform the type of content we create and get access to exclusive meetups, social accreditation, and swag.
Sign up now

