With a 94% satisfaction rate voted by developers in the last State of JS survey, GraphQL is quickly becoming the default API choice for developers when consuming data in a web application.
The performance gains GraphQL promises have been a major reason for its increased adoption in many applications at different scales.
Within this tutorial, we’ll learn how to consume data from a GraphQL API in a Blazor WebAssembly application. Although we will not consider the performance impact of using GraphQL, we will focus on how to integrate the GraphQL API into the application.
Before starting this tutorial, ensure you have an elementary understanding of C# and have the .NET SDK installed on your local computer.
Graph Query Language, popularly known as GraphQL, is an API technology that allows a client to fetch data from a server in a declarative manner by requesting the exact data needed through a query.
When working with a GraphQL API, you can execute the three following operations against a GraphQL server:
GET HTTP verb in a REST API that fetches data from a serverPOST, UPDATE and DELETE HTTP verbs within a REST APIWithin this article, we will execute a query and mutation operation from a Blazor application against a prebuilt Node.js application. This exposes a GraphQL endpoint when started.
To begin, clone the GraphQL application from its GitHub repository using the Git CLI from your terminal:
git clone https://github.com/vickywane/blazor-graphql-api.git
Next, execute the commands below to change the terminal’s current directory into the cloned blazor-graphql-api project and install the two dependencies listed in the package.json file within the project:
# change directory
cd blazor-graphql-api

# install dependencies
npm install
With the project dependencies installed, execute the command below to start the application:
yarn start
The command above executes the index.js file in the project, which uses ApolloServer to run the GraphQL server on your localhost, making it accessible at port 4000.
Keep the GraphQL application running until this tutorial concludes because we will use the GraphQL API in later parts of the tutorial.
Blazor is an open source framework that lets developers build interactive user interfaces using C# by leveraging WebAssembly. This allows code that’s not JavaScript to execute in a browser.
Some of the client libraries available for consuming a GraphQL API within a .NET application are:
For this article, we’ll use the graphql-dotnet library because it has a quicker setup to get started.
We’ll begin by bootstrapping a new Blazor application with the default boilerplate pages and rewrite the FetchData.razor page to use data fetched from a GraphQL API.
Execute the command below from your local terminal to create a new Blazor application through the dotnet CLI:
dotnet new blazorserver -o BlazorApp --no-https
The command above creates a new directory containing a .NET 5.0 application named Graphql-blazor with FetchData, Counter, and Index pages rendered using the Razor syntax.
Next, add the package references below into the new project using the dotnet CLI:
# Graphql package
dotnet add package Graphql

# NewtonsoftJsonSerializer package
dotnet add package GraphQL.Client.Serializer.Newtonsoft

# GraphQLHttpClient package
dotnet add package GraphQL.Client.Http
The packages installed above connect the Blazor application to a GraphQL API.
Through the opened terminal, change the default terminal directory into the Graphql-blazor directory, and start the application in a watch mode by executing the command below:
dotnet watch run
After executing the command above, the Blazor server runs on your localhost at port 5000.
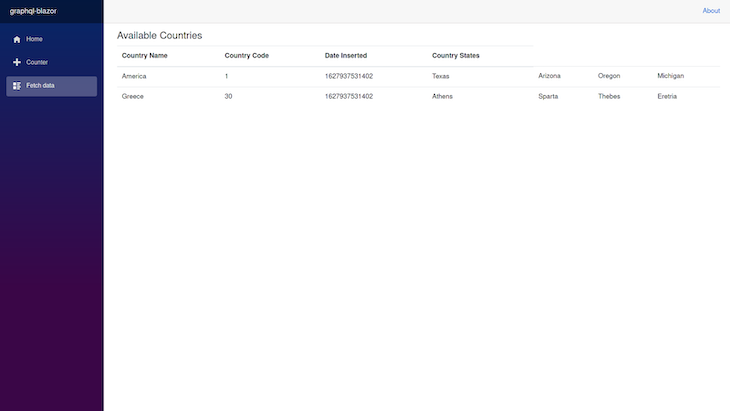
At this point, we can view the running application through our web browser at http://localhost:5000. Our focus, however, will be on the fetchData page at http://localhost:5000/fetchdata, which displays a tabular list of weather forecasts.
This table element details five days of forecasts rendered from the fetchData.razor file.
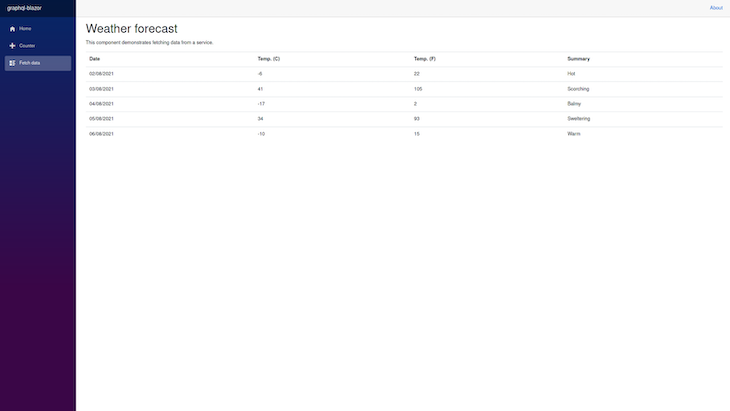
Going through the fetchData.razor file, which renders the page above, the OnInitializedAsync lifecycle method fetches the mock forecast data from the GetForecastAsync method within the WeatherForecastService class in the data/WeatherForecastService file.
Moving forward, we will change the weather forecasts data to country data to showcase how to use an external GraphQL API.
To do this, we must create a new GraphqlService class containing a GraphQL client, and a method to execute a GraphQL query that fetches data through the GraphQL client.
Similar to storing data in a C# application, we must create classes with fields and properties to store and structure the data returned from each GraphQL operation.
Without going through the API’s codebase, one way to know the schema definition of a GraphQL API is by introspecting the GraphQL API schema.
Most GraphQL APIs have a Playground that allows users to write and execute GraphQL operations against the API. The Docs section within the playground also allows users to introspect the API using a web browser.
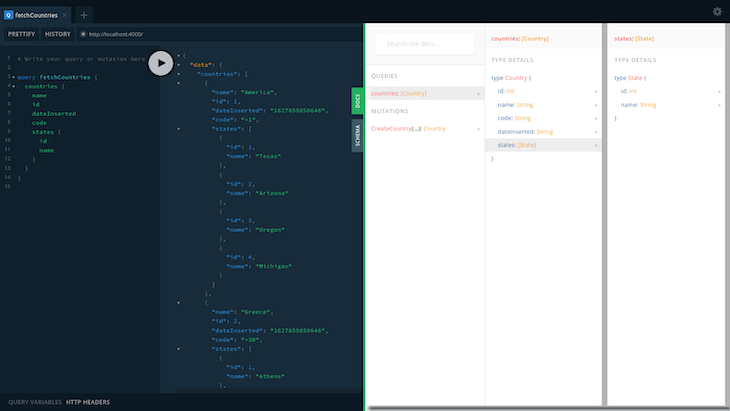
Open the GraphiQL Playground for the cloned GraphQL API in your web browser at http://localhost:4000.
We’ll execute the query below to retrieve all existing countries in the GraphQL application:
 query {
    name
    id
    dateInserted
    states {
      id
      name
    }
  }
Click the grey Play button to execute the query above. This returns a data object after the request completes.
Clicking the green Docs button in the GraphiQL Playground opens the schema definition where we can introspect the GraphQL operations within the API, including their return types.
The image below shows the schema definition for the single countries query within the cloned GraphQL API that returns an array of countries containing an id, name, code, dateInserted, and a nested states array.
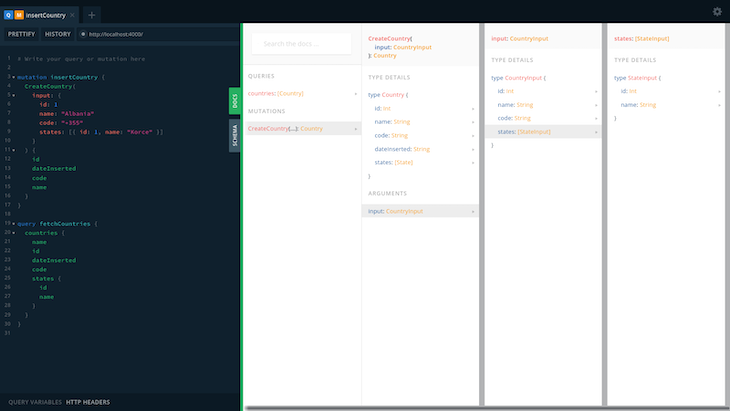
Switching to mutations, executing the literal in the code block below from the GraphiQL playground executes a mutation operation against the GraphQL API to create a country.
The schema definition for the single CreateCountries mutation within the cloned GraphQL API accepts an integer ID, alongside a name and code of string type. This returns an object containing an id, name, code, dateInserted, and a nested states array.
Now that we know what the data types return from the mutation and query operation, we can proceed to create the classes to structure them within the Blazor application.
Create a GraphqlData.cs file within the data directory. This stores the returned query data definition that fetches the available countries.
The file below contains four classes that define the data structure returned from a query and mutation operation:
// ./data/GraphqlData.cs
using System.Collections.Generic;

namespace graphql_blazor.Data
{
    public class CreateCountry
    {
        public int id { get; set; }
        public string name { get; set; }
        public string dateInserted { get; set; }
        public string code { get; set; }
    }

    public class GraphqlData
    {
        public List<Countries> countries { get; set; }
    }

    public class Countries
    {
        public string name { get; set; }
        public int id { get; set; }
        public string dateInserted { get; set; }
        public int code { get; set; }

        public List<State> states { get; set; }
    }

    public class State
    {
        public int id { get; set; }

        public string name { get; set; }
    }
}
Starting from the topmost class, GraphqlData describes the entire data response using the List collection from the generic namespace with the public Countries class.
The Countries class contains the name, id, code, dateInserted properties, and the State class contains a name and an id property.
All these classes use the shorter automatic properties syntax to define the GET/SET accessors within each class, and they are all marked public.
Next, we must create a custom Singleton service containing a class to create the GraphQL Client. This connects the application to the cloned GraphQL application through its URL endpoint. Methods also send GraphQL operations through the connected API.
To begin, create a GraphqlService.cs file and add the content of the below code block:
# ./data/GraphqlService.cs

using GraphQL.Client.Serializer.Newtonsoft;
using GraphQL.Client.Http;

namespace graphql_blazor.Data
{
    public class GraphqlService
    {
       private readonly GraphQL.Client.Http.GraphQLHttpClient _graphqlClient =
        new GraphQLHttpClient("http://localhost:4000", new NewtonsoftJsonSerializer());
 }
}
Note that when deploying this application, consider using environment variables to store and retrieve the GraphQL API endpoint URL rather than hardcoding it in the class.
With the GraphQL client instance available within the GraphqlService class, the next step is to use the instance to send a GraphQL Query operation.
To do this, add the code block below into the GraphqlService.cs file:
// ./data/GraphqlService.cs

using GraphQL.Client.Serializer.Newtonsoft;
using GraphQL;
using GraphQL.Client.Http;
using System.Threading.Tasks;

namespace graphql_blazor.Data
{
    public class GraphqlService
    {
       private readonly GraphQL.Client.Http.GraphQLHttpClient _graphqlClient =
       new GraphQLHttpClient("http://localhost:4000", new NewtonsoftJsonSerializer());

        private readonly GraphQLRequest _fetchCountriesQuery = new GraphQLRequest
        {
            Query = @"
            query FetchCountries {
                countries {
                    name
                    id
                    dateInserted
                    code
                    states {
                      id
                      name
                    }
                  }
            }
        ",
            OperationName = "FetchCountries"
        };

        public async Task<GraphQL.GraphQLResponse<graphql_blazor.Data.GraphqlData>> FetchCountries()
        {
            var fetchQuery = await _graphqlClient.SendQueryAsync<GraphqlData>(_fetchCountriesQuery);

            return fetchQuery;
        }
    }
}
This code block contains a new private field holding the GraphQL query string and an asynchronous method, FetchCountries, which executes the SendQueryAsync method from the GraphQL client class.
This fetches the data from the connected GraphQL API and returns the result.
In addition to the GraphQL query, we want to insert more country data into the GraphQL application. This can be done by implementing a mutation within the GraphqlService class.
Add the new method within the code block below into the /data/GraphqlService.cs file to send a GraphQL mutation through the connected GraphQL API to the cloned GraphQL application.
This adds a new parameterized method, InsertCountry, into the GraphqlService class:
# ./data/GraphqlService.cs

using GraphQL.Client.Serializer.Newtonsoft;
using GraphQL;
using GraphQL.Client.Http;
using System.Threading.Tasks;

        public async Task InsertCountry(string countryName, string code)
        {
            var createCountryMutationString = new GraphQLRequest
            {
                Query = @"
                 mutation insertCountry($code : String, $countryName : String) {
                   CreateCountry(input: {
                       name: $countryName
                       code: $code
                     })
                    {
                      id
                      dateInserted
                      code
                      name
                     }
                 }
             ",
                OperationName = "insertCountry",
                Variables = new
                {
                    countryName,
                    code
                }
            };

            await _graphqlClient.SendMutationAsync<CreateCountry>(createCountryMutation);
        }
The InsertCountry method signature contains two string parameters, and when executed, the createCountryMutationvariable forms, containing the GraphQL strings for a mutation with countryName and code parameter values.
Lastly, the SendMutationAsync method from the GraphQL client instance sends the mutation contained in the createCountryMutation variable through the connected GraphQL API.
We will test the two new methods added to the GraphqlService class in the next section when we rebuild the boilerplate fetchData.razor file to use the GraphqlService class.
FetchData pageSo far, we created a GraphqlService class containing two methods to send a mutation and query operation, respectively. We are now left with executing these methods from the fetchData page.
However, we must first add the custom GraphqlService service to the configured services within the application before we can inject it into the fetchData component.
Using your code editor, open the Startup.cs file and add the new GraphqlService class to the list of existing default services within the ConfigureServices method in the Startup class:
# ./Startup.cs

    services.AddSingleton<GraphqlService>();
Next, replace the entire code in the fetchData.razor file with the content of the code block below to redesign the FetchData page. This allows us to use the methods within the GraphqlService service:
//./pages/fetchData.cs
@page "/fetchdata";

@using graphql_blazor.Data;
@using System.ComponentModel.DataAnnotations
@inject GraphqlService GraphqlOps;

<section>
    <h4> Available Countries </h4>

    <div>
        @if (countriesData == null)
        {
            <p>
                <em>Loading...</em>
            </p>
        }
        else
        {
            <table class="table">
                <thead>
                <tr>
                    <th>Country Name</th>
                    <th>Country Code </th>
                    <th> Date Inserted </th>
                    <th>Country States </th>
                </tr>
                </thead>
                <tbody>
                @foreach (var item in countriesData.Data.countries)
                {
                    <tr>
                        <td>@item.name</td>
                        <td>@item.code</td>
                        <td format-value="yyyy-MM-dd" >@item.dateInserted</td>

                        @if (item.states != null)
                        {
                            @foreach (var state in item.states)
                            {
                                <td> @state.name </td>
                            }
                        }

                    </tr>
                }
                </tbody>
            </table>
        }
    </div>
</section>

@code {
   // countries state data
    private GraphQL.GraphQLResponse<graphql_blazor.Data.GraphqlData> countriesData;

    private async Task FetchCountryData()
    {
        countriesData = await GraphqlOps.FetchCountries();
    }

    // Executed immediately component is created
    protected override async Task OnInitializedAsync()
    {
        await FetchCountryData();
    }
}
The component above is redesigned to inject the GraphqlService service through the @inject custom directive.
Immediately, the FetchData component is created, the OnInitializedAsync lifecycle method executes the FetchCountryData method, which sends a GraphQL query in an HTTP request to the cloned GraphQL application.
The data in the query result returned from the FetchCountryData is stored in the countriesData local state.
When the component’s interface renders after the OnInitializedAsync lifecycle event executes, the query result’s data, stored in the countriesData component state, renders a tabular list of the countries returned from the GraphQL API.
Open the fetchData page in your local browser at http://localhost:5000/fetchdata to view the new changes.
Now we are left with inserting a new country through a mutation from the fetchData page. Add the code block below into the fetchData.cs file:
// ./pages/fetchData.cs

<section id="create-country" >
    <div>
        <h4> Insert A New Country </h4>
        <hr/>

        <form>
            <div class="input-container" style="display: flex; flex-direction: column;" >
                <label> Country Name </label>
                <input @bind="countryName" placeholder="Country Name"/>
            </div>

            <br />
            <div style="display: flex; flex-direction: column;"  class="input-container">
                <label> Country Code </label>
                <input @bind="countryCode" placeholder="Country Name"/>
            </div>
            <br />

            <button
                @onclick="HandleCreateCountry"
            @onclick:preventDefault="true"
                > Submit country details </button>
        </form>
    </div>
</section>

<br/>
<br/>


@code {
    bool _isLoading;

    private string countryName { get; set; }
    private string countryCode { get; set; }

    async void HandleCreateCountry()
    {
        _isLoading = true;

        await GraphqlOps.InsertCountry(countryName, countryCode);
        await FetchCountryData();

        _isLoading = false;
        this.StateHasChanged();
    }
}
The create-country section in the fetchData component contains two input fields that are bound to the countryName and countryCode properties, respectively.
After filling the two input fields, the HandleCreateCountry method executes the InsertCountry method within the GraphqlService custom service with the string countryName and countryCode input values as parameters.
To test the mutation, type in the name of a country in the Country Name text field and the corresponding country code in the Country Code text field. For this tutorial, we’ll use “Albania” as the country name, and “+355” as the country code.
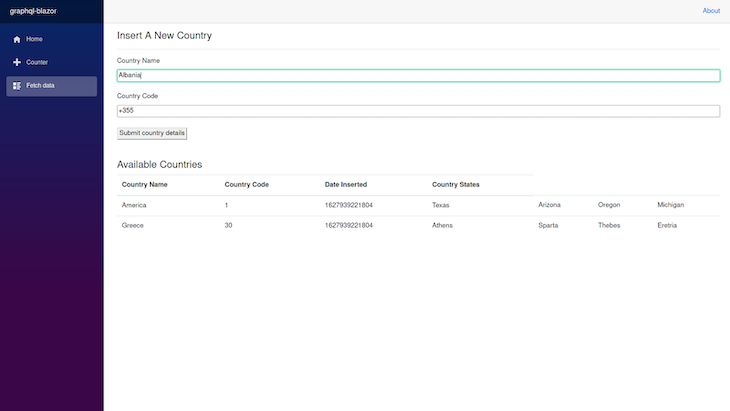
Click the Submit country details button to send the GraphQL mutation consisting of the input values from the two input fields in the fetchData page.
After the mutation operation executes successfully, the FetchCountryData method refetches the new country’s data.
Finally, after the two asynchronous operations in the FetchCountryData resolve, the StateHasChanged method is called to manually notify the component of a state change. This rerenders the component to display the new data.
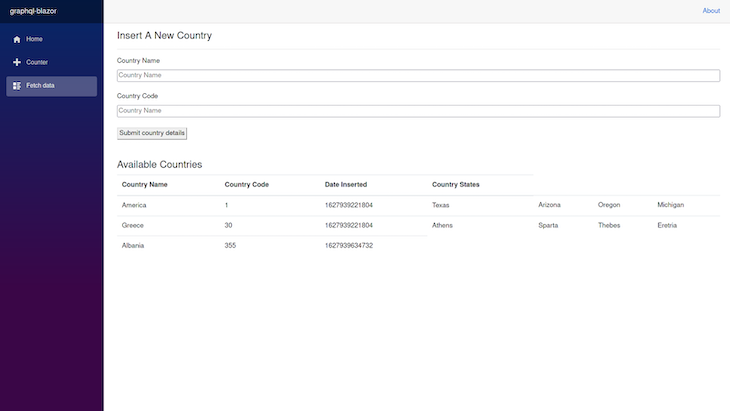
At this point, the entire application has been fully rebuilt to use a GraphQL API. You can repeat the process of creating new countries using the input fields to add more data.
To further clean the application up, you can delete the unused WeatherForcast.cs and WeatherForcastService.cs files, and remove the service from the registered services within the ConfigureServices method in the Startup.cs file.
The entire Blazor application built within this tutorial has been pushed into this GitHub repository. Feel free to download or clone the application for your personal use.
While GraphQL has some features for debugging requests and responses, making sure GraphQL reliably serves resources to your production app is where things get tougher. If you’re interested in ensuring network requests to the backend or third party services are successful, try LogRocket.


LogRocket lets you replay user sessions, eliminating guesswork around why bugs happen by showing exactly what users experienced. It captures console logs, errors, network requests, and pixel-perfect DOM recordings — compatible with all frameworks.
LogRocket's Galileo AI watches sessions for you, instantly aggregating and reporting on problematic GraphQL requests to quickly understand the root cause. In addition, you can track Apollo client state and inspect GraphQL queries' key-value pairs.

Learn how to protect full-stack projects from NPM supply chain attacks with a practical security checklist.

Explore 15 essential MCP servers for web developers to enhance AI workflows with tools, data, and automation.

Learn how contrast-color() automatically picks accessible text colors using native CSS, without JavaScript.

Learn how to build a harness-style AI workflow using Claude Code with specialized Dev, QE, and Ops subagents, gated handoffs, MCP telemetry, and LEARNING.md.
Hey there, want to help make our blog better?
Join LogRocket’s Content Advisory Board. You’ll help inform the type of content we create and get access to exclusive meetups, social accreditation, and swag.
Sign up now

