Paying through a website to buy a service or product has become increasingly common. Consequently, being able to implement this feature is more important than ever. Thankfully, several payments platforms have been released to help developers, so you can avoid struggling with the most common problems related to payments.

Braintree is one such platform, and it promises to make it easy to accept payments in any app or website. Particularly, their APIs, libraries, and tools can be used to implement a payments system effortlessly.
In this article, you will learn how to integrate Braintree in your React app by employing the official Braintree JavaScript client SDK. Follow this tutorial to learn how to achieve the following result:
react-braintree-drop-in-demo
No Description
This is the list of all the prerequisites for the demo application you are going to build:
As stated in the official documentation, the Braintree JavaScript SDK allows you to easily accept payments while maintaining PCI (Payment Card Industry) compliance. In other terms, their SDK lets you implement a complete payments system while automatically ensuring the security of credit card transactions and data as required by credit card companies.
The Braintree JavaScript client SDK supports payments from credit cards, PayPal, digital wallets, and several other payment methods. You can find the complete list of supported payment methods here. Each of these payment methods can be configured and integrated with no effort.
To install the Braintree JavaScript SDK, launch the following npm command:
npm install --save braintree-web
This way, the braintree-web npm library will be added to your project’s dependencies. If you are not an npm user, you can find all the other supported ways to install the SDK here.
After installing it, you have to learn how to use it. In detail, what you need to know is that Braintree comes with two different integrations: Hosted Fields and Drop-in. The first one offers all the tools required to implement a custom UI, while the second one offers a ready-to-use, preformatted payment form with an elegant UI, and it represents the recommended approach.
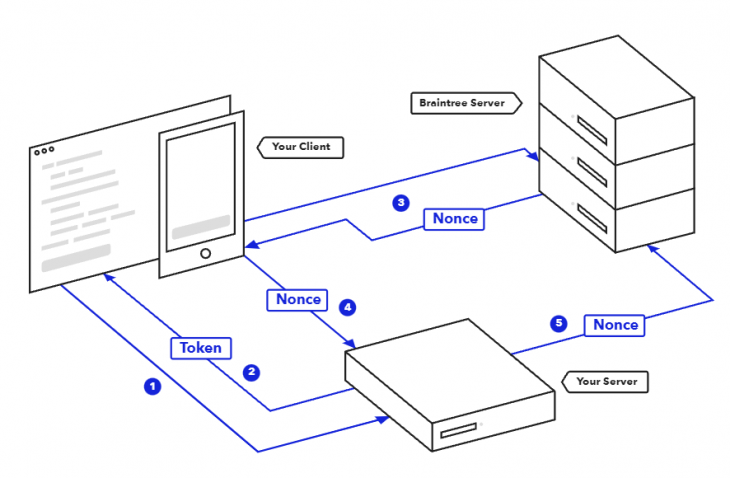
In both cases, you need to retrieve an authorization token from Braintree. How to achieve this will be addressed later in the tutorial. This information is required by Braintree to authorize your frontend application.
Then, after completing the procedure to enter the data necessary to make the payment, a Braintree payment method nonce will be generated. This represents a secure and one-time-use nonce referencing the payment information. Such a nonce should be sent to your server and used to perform the actual payment by harnessing the Braintree server SDK.
In other words, the payment method nonce generated by the Braintree frontend UI allows your server to communicate sensitive payment information to the Braintree servers and perform the operation without exposing sensitive data.
You can see a simplified diagram of the Braintree payment flow below. Also, you can read this article from the official documentation to learn more about how Braintree works.
Now, let’s delve into both frontend approaches offered by Braintree.
The Braintree Hosted Fields approach allows merchants to deal with the SAQ A (Self-Assessment Questionnaire A) eligibility while being in control over the styling and layout of their payment form.
Specifically, the Hosted Fields solution automatically renders an iframe containing the following payment fields: card number, CVV, expiration date, and postal code. This is because to meet the basic level of PCI compliance, you must host the information on an external payment gateway’s domain and present those five fields to your users in an iframe or with a redirect.
So, this approach allows you to fully customize your payment form while ensuring that you are compliant with PCI requirements. At the same time, Hosted Fields involve custom logic. This is especially true if you want to implement other payment methods, such as PayPal. This is why this solution is not the most widely used and should be taken into account only when being in full control over logic and style is required.
You can find a few examples of custom Hosted Fields integrations here.
The Braintree Drop-in UI is a complete, off-the-shelf payment UI offering a straightforward way to accept payments securely. By default, the interface includes a card entry form asking for a credit card number, cardholder name, expiration date, postal code, and CVV.
Plus, you can enable PayPal, Apple Pay, Google Pay, and Venmo buttons through special configurations. Follow this link to see what the default Braintree Drop-in UI looks like.
To use it, you need to launch the following npm command to add the required dependency to your project:
npm install --save braintree-web-drop-in
This way, the braintree-web-drop-in will be installed. This premade payments UI was built using the aforementioned Braintree JS client SDK. As a result, braintree-web-drop-in depends on braintree-web. So, by adding braintree-web-drop-in to your dependencies, the braintree-web library will be automatically installed. Thus, when using the braintree-web-drop-in library, you can omit braintree-web in your project’s dependencies.
As stated in the official documentation, the Braintree Drop-in is the quickest and recommended approach to start accepting payments when using Braintree. This is because the default Drop-in UI qualifies you for SAQ A PCI compliance, natively supports 23 languages (and gives you the possibility to integrate your own language), supports the 3D Secure 2 verification, and allows users to delete saved payment methods. All this in a ready-to-use solution requiring only a bunch of lines of code to be implemented.
Here you can see an overview of the principal differences between the two approaches presented above.
You can clone the GitHub repository supporting this article and try the demo application by launching the following commands:
git clone https://github.com/Tonel/react-braintree-drop-in-demo.git
cd react-braintree-drop-in-demo
npm i
npm start
Otherwise, you can keep following this step-by-step tutorial.
You can easily initialize a React project is by using Create React App. This is the officially supported way to create a working, single-page React application. In particular, you can create a new project called react-braintree-drop-in-demo with the following command:
npx create-react-app react-braintree-drop-in-demo
Now, you will be able to explore a demo project located in the react-brantree-drop-in-demo folder having the following file structure:
react-braintree-drop-in-demo
├── README.md
├── node_modules
├── package.json
├── .gitignore
├── public
│   ├── favicon.ico
│   ├── index.html
│   ├── logo192.png
│   ├── logo512.png
│   ├── manifest.json
│   └── robots.txt
└── src
    ├── App.css
    ├── App.js
    ├── App.test.js
    ├── index.css
    ├── index.js
    ├── logo.svg
    ├── reportWebVitals.js
    └── setupTests.js
Then, enter the react-brantree-drop-in-demo folder and start the local server to check if everything is working by running this command:
cd react-braintree-drop-in-demo
npm start
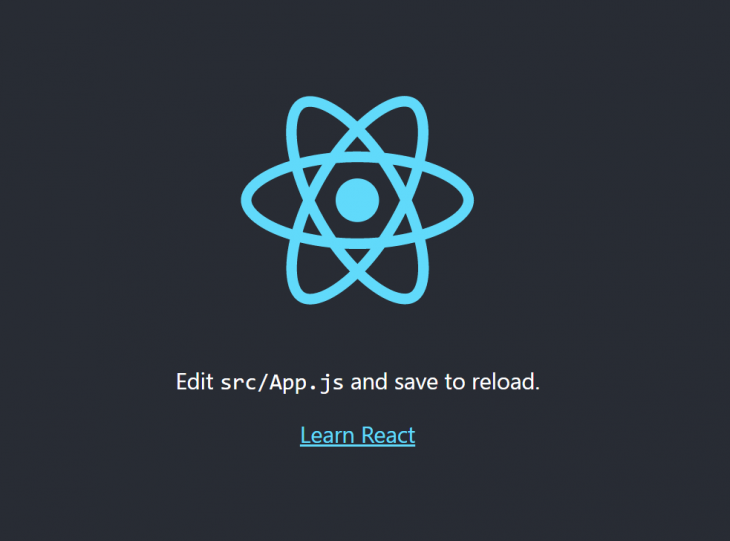
Reach the http://localhost:3000/ page in your browser, and you should now be seeing the default Create React App screen, as follows:
As explained in the official documentation, there are two different ways to let Braintree authorize your frontend application.
The first one involves a client token, which must be generated by your server by using the Braintree server SDK. This gives you access to all the Braintree client API capabilities.
The second one is a tokenization key, which is a static key authorizing only a limited subset of the Braintree client API features. For the sake of simplicity, a tokenization key will be used to authorize the Braintree Drop-in.
You can retrieve a valid tokenization key in your Braintree Control Panel by following this procedure:
Select the API option from the drop-down menu
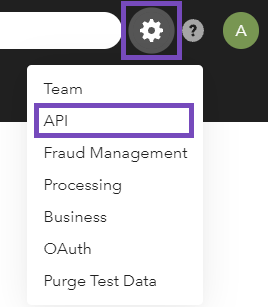

Store your Braintree tokenization key in a safe place
You are now ready to start using braintree-drop-in. Let’s see how.
First, launch the following command to install the braintree-web-drop-in library:
npm install --save braintree-web-drop-in
Then, you can start using it by implementing a BraintreeDropIn component as follows:
import React, {useEffect, useState} from 'react'
import './index.css';
import dropin from "braintree-web-drop-in"
import {Button} from "reactstrap";

export default function BraintreeDropIn(props) {
    const { show, onPaymentCompleted } = props;

    const [braintreeInstance, setBraintreeInstance] = useState(undefined)

    useEffect(() => {
        if (show) {
            const initializeBraintree = () => dropin.create({
                // insert your tokenization key or client token here
                authorization: "sandbox_s9gd7m2p_vp62s592633kc5p5",
                container: '#braintree-drop-in-div',
            }, function (error, instance) {
                if (error)
                    console.error(error)
                else
                    setBraintreeInstance(instance);
            });

            if (braintreeInstance) {
                braintreeInstance
                    .teardown()
                    .then(() => {
                        initializeBraintree();
                    });
            } else {
                initializeBraintree();
            }
        }
    }, [show])

    return (
        <div
            style={{display: `${show ? "block" : "none"}`}}
        >
            <div
                id={"braintree-drop-in-div"}
            />

            <Button
                className={"braintreePayButton"}
                type="primary"
                disabled={!braintreeInstance}
                onClick={() => {
                    if (braintreeInstance) {
                        braintreeInstance.requestPaymentMethod(
                            (error, payload) => {
                                if (error) {
                                    console.error(error);
                                } else {
                                    const paymentMethodNonce = payload.nonce;
                                    console.log("payment method nonce", payload.nonce);

                                    // TODO: use the paymentMethodNonce to
                                    //  call you server and complete the payment here

                                    // ...

                                    alert(`Payment completed with nonce=${paymentMethodNonce}`);

                                    onPaymentCompleted();
                                }
                            });
                    }
                }}
            >
                {
                    "Pay"
                }
            </Button>
        </div>
    )
}
As you see, the Braintree Drop-in is created by using the create() function coming from the dropin variable imported from braintree-web-drop-in. That function requires an authorization field that contains your tokenization key or a valid client token, and a container pointing to the HTML identifier of a <div> where to mount the Braintree UI. Similarly, it accepts many other fields that can be used to enable the 3D Secure module, PayPal, and other options and payment methods. You can find all the parameters supported by the create() function here.
The create function immediately returns a Promise, which subsequently returns an error message or a valid Braintree Drop-in instance. This can be used to retrieve the payment nonce required by Braintree to complete the payment server-side. Specifically, it is generated by clicking the “Pay” button and calling the requestPaymentMethod() function.
Again, the requestPaymentMethod() function immediately returns a Promise, which will later return an error message or a payload object containing the desired payment method nonce. As explained early on, this is what the Braintree server SDK expects and requires to perform the payment server-side without exposing any personal data.
Then, you need to call your custom API harnessing the Braintree server SDK and the method payment nonce to perform the payment. Since this is a frontend-only tutorial, this part is omitted.
After successfully completing the payment, the show props will be set to false by the onPaymentCompleted() function and the BraintreeDropIn component will disappear. Plus, the next time the BraintreeDropIn component will be showed the Braintree Drop-in instance initializing process explained above will be performed again. But in that case, there will already be a valid braintreeInstance containing the data entered by the previous user. So, the create() function will return the same braintreeInstance.
This is a problem because Braintree might generate the same payment nonce used before again. As a result, this would cause the Braintree servers to respond with a 409 Conflict “Gateway Rejected” error. To avoid this, you must destroy the braintreeInstance first and then initialize it again.
This is why the teardown() function is called before invoking the create() function when braintreeInstance is not undefined. As you can imagine, such a problem happens only in single-page applications, where resources are not destroyed implicitly when changing the page.
Et voilà! You now have everything required to start using the Braintree Drop-in UI.
Let’s see the BraintreeDropIn component in action by simulating a checkout page in React:
import './App.css';
import 'bootstrap/dist/css/bootstrap.min.css';
import BraintreeDropIn from "./components/BraintreeDropIn";
import {Col, Container, Input, Row, Button} from "reactstrap";
import {useState} from "react";

export default function App() {
const [showBraintreeDropIn, setShowBraintreeDropIn] = useState(false);
const [numberOfProducts, setNumberOfProducts] = useState(1);
const PRICE = 50;

return (
    <Container>
        <Col>
            <Row
                className={"productHeaderRow"}
            >
                <Col
                    xs={4}
                >
                    {
                        "Product"
                    }
                </Col>
                <Col
                    xs={2}
                    className={"text-center"}
                >
                    {
                        "Price"
                    }
                </Col>
                <Col
                    xs={2}
                    className={"text-center"}
                >
                    {
                        "Quantity"
                    }
                </Col>
                <Col
                    xs={2}
                    className={"text-center"}
                >
                    {
                        "Total"
                    }
                </Col>
                <Col
                    xs={2}
                />
            </Row>
            <Row
                className={"productInfoRow"}
            >
                <Col
                    xs={4}
                    className={"productInfoColumn"}
                >
                    {
                        "Foo product"
                    }
                </Col>
                <Col
                    xs={2}
                    className={"productInfoColumnCenter"}
                >
                    {
                        `$ ${PRICE}`
                    }
                </Col>
                <Col
                    xs={2}
                    className={"productInfoColumnCenter"}
                >
                    <Input
                        placeholder="0"
                        min={1}
                        max={100}
                        type="number"
                        step="1"
                        value={numberOfProducts}
                        onChange={((e) => {
                            setNumberOfProducts(e.target.value)
                        })}
                    />
                </Col>
                <Col
                    xs={2}
                    className={"productInfoColumnCenter"}
                >
                    {
                        `$ ${numberOfProducts * PRICE}`
                    }
                </Col>
                <Col
                    xs={2}
                    className={"productInfoColumnCenter"}
                >
                    <Button
                        onClick={() => {setShowBraintreeDropIn(true)}}
                        disabled={showBraintreeDropIn}
                    >
                        {
                            "Go to Checkout"
                        }
                    </Button>
                </Col>
            </Row>
        </Col>
        <BraintreeDropIn
            show={showBraintreeDropIn}
            onPaymentCompleted={() => {
                setShowBraintreeDropIn(false);
                setNumberOfProducts(1);
            }}
        />
    </Container>
);
}
The application implemented here is the same one you saw at the beginning of the article. Click on Go to Checkout and test out the Braintree Drop-In payment approach by following the instructions and using one of the many test credit card numbers accepted by Braintree, such as:
Any valid expiration date after today and before 2030 will do.
Now, you only have to learn how to make your application accept real payments. The only thing you have to do is to replace the tokenization key or client token you put in the authorization field during the Braintree Drop-in initialization.
Instead of using this data coming from the Sandbox platform, replace it with a valid one by retrieving it in the Braintree Production platform. You can now receive real money.
In this article, we looked at what Braintree is and how it can be used to accept payments frontend. As shown, Braintree comes with a JavaScript client SDK offering many tools and feature to make this easy and quick. In particular, it offers two different possible integrations: Hosted Fields and Drop-in.
The first one involves custom logic and should only be used in special circumstances. On the other hand, the second one is a ready-made solution that allows you to start accepting payments using Braintree in few lines of code.
Thanks to this latter approach, implementing this increasingly requested feature is not complex.
Thanks for reading! I hope that you found this article helpful. Feel free to reach out to me with any questions, comments, or suggestions.
Install LogRocket via npm or script tag. LogRocket.init() must be called client-side, not
server-side
$ npm i --save logrocket

// Code:

import LogRocket from 'logrocket';
LogRocket.init('app/id');
// Add to your HTML:

<script src="https://cdn.lr-ingest.com/LogRocket.min.js"></script>
<script>window.LogRocket && window.LogRocket.init('app/id');</script>
Hey there, want to help make our blog better?
Join LogRocket’s Content Advisory Board. You’ll help inform the type of content we create and get access to exclusive meetups, social accreditation, and swag.
Sign up now
Learn how to integrate MediaPipe’s Tasks API into a React app for fast, in-browser object detection using your webcam.

Integrating AI into modern frontend apps can be messy. This tutorial shows how the Vercel AI SDK simplifies it all, with streaming, multimodal input, and generative UI.

Interviewing for a software engineering role? Hear from a senior dev leader on what he looks for in candidates, and how to prepare yourself.

Set up real-time video streaming in Next.js using HLS.js and alternatives, exploring integration, adaptive streaming, and token-based authentication.


