UX plays an important role in mobile applications because the app’s success is often directly determined by how easily users can interact with it. To that end, React Native provides different methods to open external links within an application.

One common approach is redirecting the user to an external browser. After the user completes the request, they are redirected back to the application.
But this method usually results in a poor user experience due to the issues related to external redirection between two applications. In this article, we’ll learn how to use the react-native-inappbrowser-reborn package to solve this issue and enhance UX in React Native applications.
Jump ahead:
Before getting started with this tutorial, ensure you have the following:
You can find the complete code for this demo project on GitHub.
In mobile app onboarding, users often prefer to authenticate via SSO due to its ease and speedy authentication process. However, the common approach of redirecting users to an external web browser using Expo’s WebBrowser can significantly degrade the user experience.
When users are redirected to an external browser, they are typically prompted to confirm their account through this process before gaining full access to the application. Once the authentication is completed, they are redirected back to the application.
Unfortunately, this back-and-forth interaction can disrupt the onboarding flow, compelling users to restart the app to complete the login, resulting in a disjointed and poor user experience.
react-native-inappbrowser-reborn is a powerful React Native library designed to enhance the user experience by enabling seamless in-app browsing.
With this library, developers can effortlessly integrate an in-app browser, eliminating the need to redirect users to external browsers when using browser features. This integration provides a better UX, enabling users to stay within the app while accessing web-based information.
The react-native-inappbrowser-reborn package significantly enhances UX by providing a range of features that help improve in-app browsing within mobile applications, including:
To use the in-app browser feature in your React Native application, you need to install the react-native-inappbrowser-reborn dependency within the application. Open the project folder in your terminal and run the command below:
npm install react-native-inappbrowser-reborn --save
After the installation, you need to configure the project to work with react-native-inappbrowser-reborn. The configuration process differs between the iOS and Android platforms. We can set up the in-app browser using the following configurations:
To configure an in-app browser for the iOS platform, open the project in your code editor. From the project’s root directory, navigate to the ios folder and open the Podfile file. Then, add the following configuration:
#...
target 'AwesomeProjectTests' do
    inherit! :complete
    # Pods for testing
    pod 'RNInAppBrowser', :path => '../node_modules/react-native-inappbrowser-reborn'
  end
#...
Next, in your terminal, run the following commands:
cd ios && pod install && cd ..
With that, you can begin using the in-app browser features when building an iOS app.
To configure react-native-inappbrowser-reborn for Android, navigate to the Android folder and open the build.gradle file. Update the file with the following settings:
// Top-level build file where you can add configuration options common to all sub-projects/modules.
buildscript {
    ext {
        androidXBrowser = "1.3.0"
// ...
To open the in-app browser in your application, you need to first import the react-native-inappbrowser-reborn components using the following import statement:
import InAppBrowser from 'react-native-inappbrowser-reborn';
After importing the library, you can start using its components in your code. The code below demonstrates how to open the in-app browser using the InAppBrowser.open function. This function takes the URL and the in-app browser customization options as parameters.
To open the in-app browser, add the function below to your code:
const handleOpenInAppBrowser = async () => {
    if (InAppBrowser) {
        const url = 'https://example.com'; // Replace with the URL you want to open
        const isAvailable = await InAppBrowser.isAvailable;
        // await InAppBrowser.close();
          const result = await InAppBrowser.open(url, {
            // iOS-specific options
            dismissButtonStyle: 'close',
            preferredBarTintColor: '#000',
            preferredControlTintColor: 'white',
            readerMode: false,
            animated: true,
            modalPresentationStyle: 'fullScreen',
            modalTransitionStyle: 'coverVertical',
            modalEnabled: true,
            enableBarCollapsing: false,
        // Android-specific options
                showTitle: true,
                enableUrlBarHiding: true,
                enableDefaultShare: true,
                forceCloseOnRedirection: false,
                headers: {
                  'my-custom-header': 'my-custom-header-value'
                },
          });
          console.log(result);
          } else {
      console.error('InAppBrowser is null');
    }
  };
In the code above, we import the InAppBrowser component and define an asynchronous function called handleOpenInAppBrowser. Within this function, we utilize the InAppBrowser.open function to open the in-app browser by providing the URL of the external link and customize the browser. This integration allows the in-app browser to open whenever the function is called.
Now let’s add the function above to a click event using the code below:
<TouchableOpacity onPress={handleOpenInAppBrowser}>
  <Text>Open In-App Browser</Text>
</TouchableOpacity>
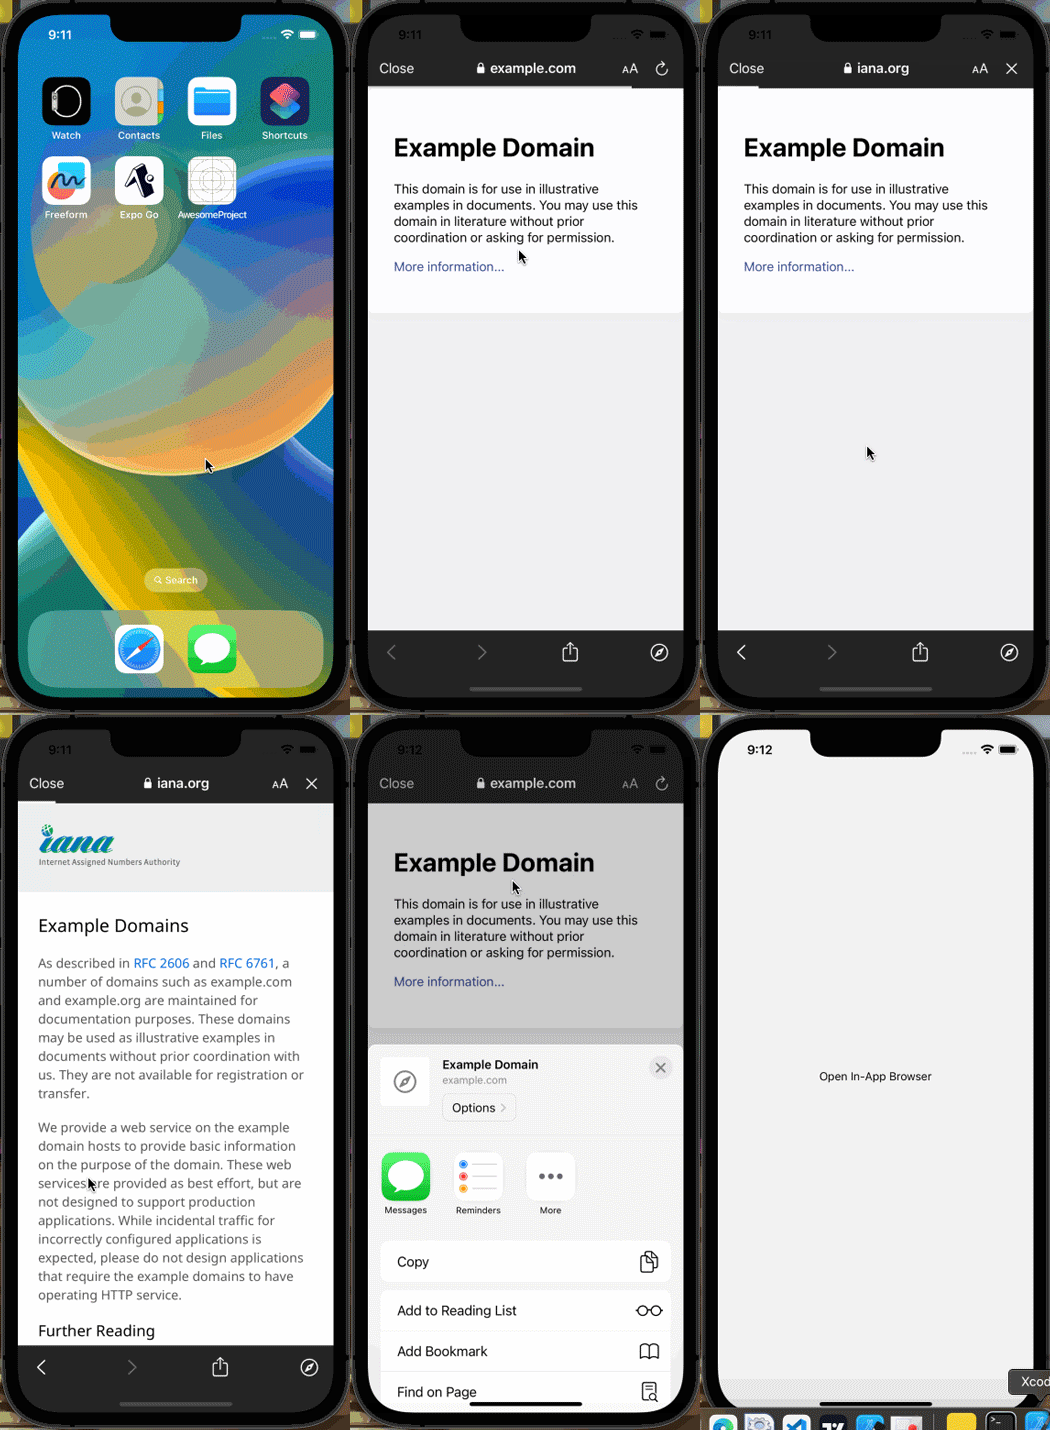
Save the code and start the application. You should have the following output:

We can use react-native-inapp-browser-reborn’s features to enhance UX during third-party authentication. In this section, we will add a 'Log in with Spotify' button that opens the in-app browser for user authentication.
Before we continue, let’s set up Spotify’s web API. Note that you’ll need a Spotify login, so create one now if you don’t have one.
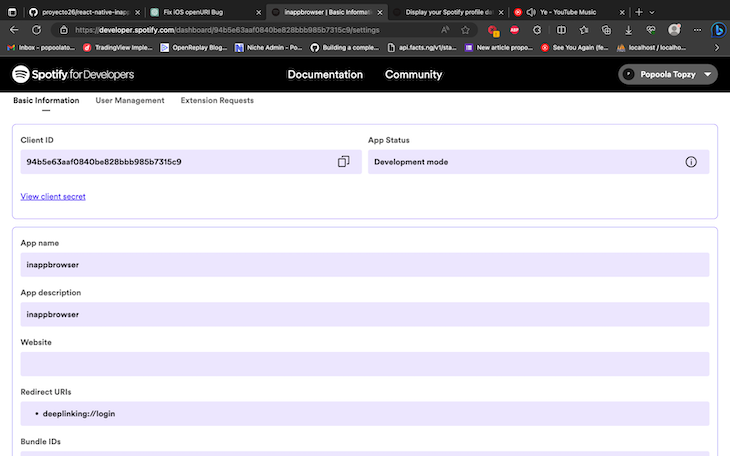
Next, log in to the Spotify developer dashboard and configure the application as shown in the image below:

Set the redirect URL to a valid scheme URL format: url-scheme://profile, as shown in the image above.
Next, you’ll need to install the React Navigation dependency by running the following commands in your terminal:
npm install @react-navigation/native @react-navigation/native-stack react-native-screens react-native-safe-area-context
With the above installation, let’s create a login screen that will contain a simple login form and a 'Log in with Spotify' button. This button will pop up the in-app browser for user authentication.
From the project root folder, create a folder named screens. Inside the folder, create a LoginScreen.js file and add the following code to it:
import React from 'react';
import { View, TextInput, Button, StyleSheet,Linking } from 'react-native';
import InAppBrowser from 'react-native-inappbrowser-reborn';
const LoginScreen = ({ navigation }) => {
  const handleLogin = () => {
    navigation.navigate('Profile', { token:"username" });
  };
  const handleOpenInAppBrowser = async () => {
    const redirectUri = 'url-scheme://Profile'; // Replace with your redirect URI
    const clientID ="94b5e63aaf0840be828bbb985b7315c9"; // Replace with your spotify clientID
    const authUrl = `https://accounts.spotify.com/authorize?client_id=${clientID}&redirect_uri=${redirectUri}&response_type=token`;
    try {
      const response = await InAppBrowser.openAuth(authUrl, redirectUri, {});
      if (response.type === 'success' && response.url) {
        const accessToken = response.url.match(/access_token=([^&]*)/)[1];
        console.log('Access Token:', accessToken);
        navigation.navigate('Profile', { token:accessToken });
        // Handle the access token (e.g., store it in state, perform actions, etc.)
      }
    } catch (error) {
      console.error('Error opening InAppBrowser:', error);
    }
  };
  return (
    <View style={styles.container}>
      <TextInput
        style={styles.input}
        placeholder="Username"
      />
      <TextInput
        style={styles.input}
        placeholder="Password"
      />
      <Button title="Login" onPress={handleLogin} />
      <Button   title="Log in with Spotify" onPress={handleOpenInAppBrowser} />
    </View>
  );
};
const styles = StyleSheet.create({
  container: {
    flex: 1,
    justifyContent: 'center',
    padding: 16,
  },
  input: {
    height: 40,
    borderColor: 'gray',
    borderWidth: 1,
    marginBottom: 12,
    padding: 8,
  },
});
export default LoginScreen;
In the code above, replace the value of redirectUri with the scheme URL set in the Spotify dashboard, and clientID with your Spotify clientID. The inAppBrowser is opened by passing the authentication URL and the redirect URI to the InAppBrowser.openAuth function.
The InAppBrowser.openAuth function returns a response with an access token once the authentication is successful. We then navigate to the profile screen, passing the access token as a parameter.
Now let’s display the name of the authenticated user on the profile screen. First, we will get the access token from the URL and then make a request to the https://api.spotify.com/v1/me endpoint to retrieve the user information in our application.
To do this, create a file named ProfileScreen.js in the screen folder and add the following code to it:
import React, { useEffect, useState } from 'react';
import { View, Text, StyleSheet } from 'react-native';
const ProfileScreen = ({ route }) => {
  const { token } = route.params;
  const [profileData, setProfileData] = useState(null);
  const fetchProfile = async (token) => {
    try {
      const result = await fetch("https://api.spotify.com/v1/me", {
        method: "GET",
        headers: {
          Authorization: `Bearer ${token}`
        }
      });
      const data = await result.json();
      setProfileData(data);
      console.log(data);
    } catch (error) {
      console.error('Error fetching profile:', error);
    }
  };
  useEffect(() => {
    if (token) {
      fetchProfile(token);
    }
  }, [token]);
  return (
    <View style={styles.container}>
      {profileData ? (
        <Text style={styles.text}>Welcome, {profileData.display_name}!</Text>
      ) : (
        <Text style={styles.text}>Loading profile...</Text>
      )}
    </View>
  );
};
const styles = StyleSheet.create({
  container: {
    flex: 1,
    justifyContent: 'center',
    alignItems: 'center',
    padding: 16,
  },
  text: {
    fontSize: 20,
  },
});
export default ProfileScreen;
In the code above, we define the ProfileScreen function that takes a token as a parameter, fetches the user’s Spotify profile information using the token, and displays a welcome message with the user’s display name once the data is retrieved.
Now, you can link the two screens together in the app.tsx file. To do this, open app.tsx and replace its existing code with the following:
import * as React from "react";
import { NavigationContainer } from "@react-navigation/native";
import { createNativeStackNavigator } from "@react-navigation/native-stack";
import LoginScreen from "./screens/LoginScreen";
import ProfileScreen from "./screens/ProfileScreen";
const Stack = createNativeStackNavigator();
export default function App() {
  return (
    <NavigationContainer >
      <Stack.Navigator initialRouteName="login">
        <Stack.Screen name="login" component={LoginScreen} />
        <Stack.Screen name="Profile" component={ProfileScreen} />
      </Stack.Navigator>
    </NavigationContainer>
  );
}
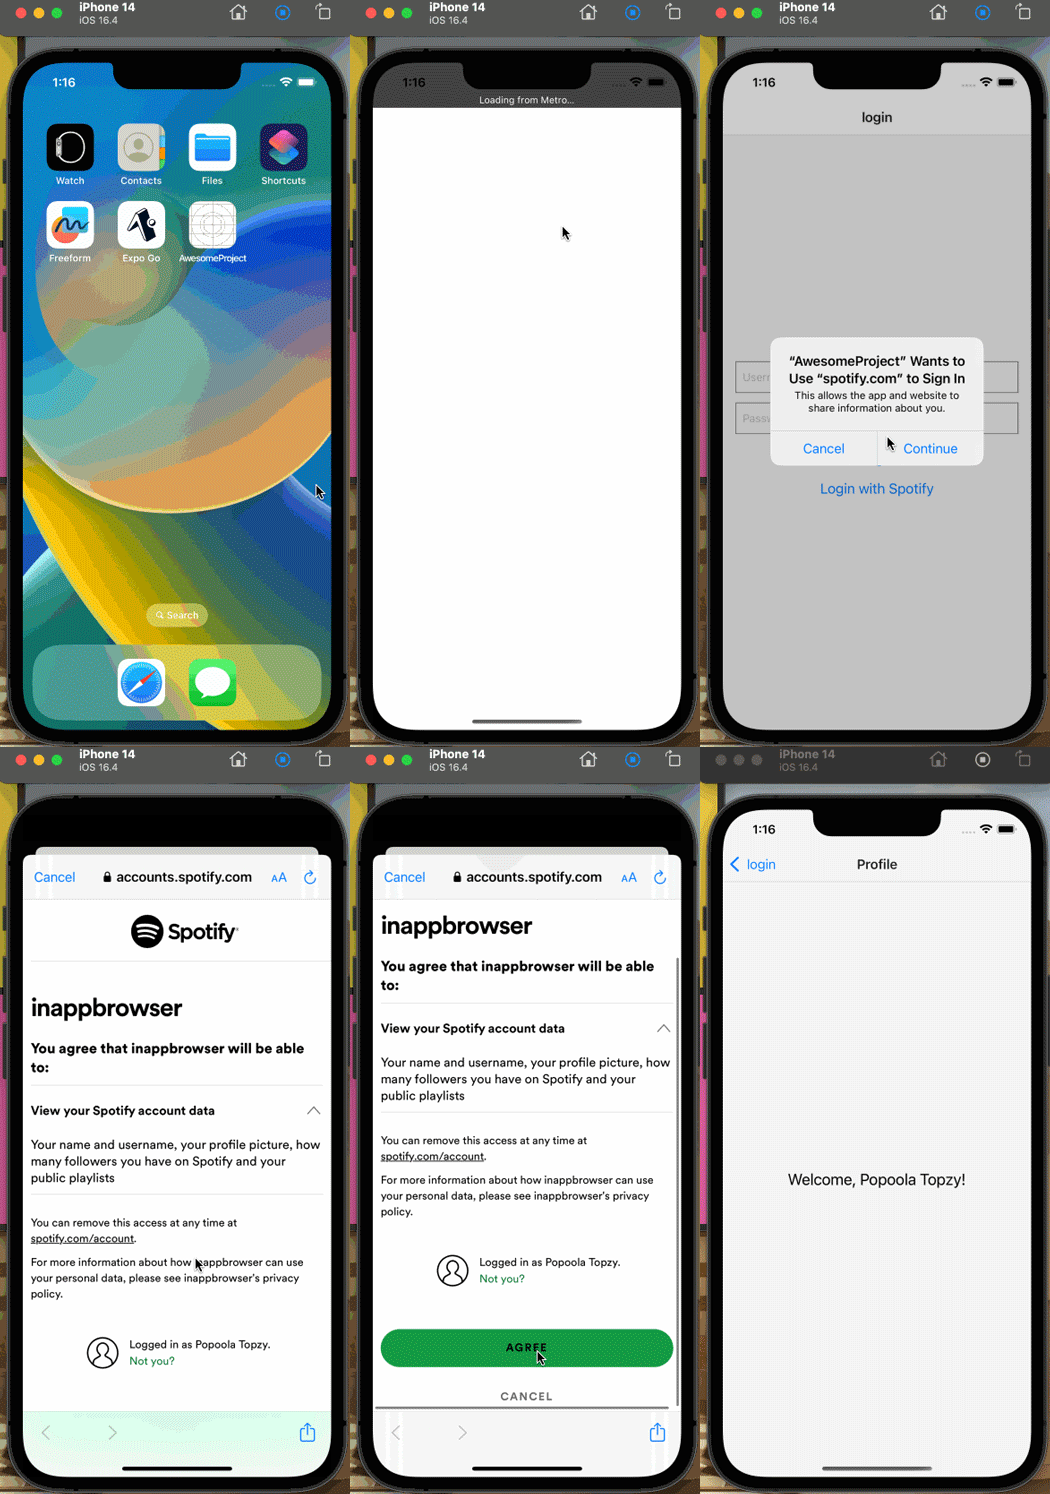
Save your work and restart the application. You should now have the application running, as shown in the image below:

In this tutorial, we learned how react-native-inappbrowser-reborn provides a seamless in-app browser experience by eliminating the need to redirect users to external browsers. Traditional methods of redirecting users to external browsers for certain functionalities can disrupt the user flow and negatively impact UX. As user expectations for near-perfect mobile experiences continue to rise, tools like react-native-inappbrowser-reborn can give your app a leg up on the competition by providing a great mobile UX.

LogRocket's Galileo AI watches sessions for you and and surfaces the technical and usability issues holding back your React Native apps.
LogRocket also helps you increase conversion rates and product usage by showing you exactly how users are interacting with your app. LogRocket's product analytics features surface the reasons why users don't complete a particular flow or don't adopt a new feature.
Start proactively monitoring your React Native apps — try LogRocket for free.
Would you be interested in joining LogRocket's developer community?
Join LogRocket’s Content Advisory Board. You’ll help inform the type of content we create and get access to exclusive meetups, social accreditation, and swag.
Sign up now
Learn how OpenAPI can automate API client generation to save time, reduce bugs, and streamline how your frontend app talks to backend APIs.

Discover how the Interface Segregation Principle (ISP) keeps your code lean, modular, and maintainable using real-world analogies and practical examples.

<selectedcontent> element improves dropdowns

Learn how to implement an advanced caching layer in a Node.js app using Valkey, a high-performance, Redis-compatible in-memory datastore.