Editor’s note: This React Native biometric authentication tutorial was last updated on 11 February 2022; all outdated information has been updated and a new section on Using react-native-biometrics was added.

In this biometric authentication tutorial, we’ll show you how to authenticate users with face ID and touch ID in a bare-bones React Native and Expo app.
We’ll use an Expo SDK, expo-local-authentication, to implement biometric authentication in our app. This uses the Platform APIs to access the device hardware so there is no chance of leaking any private information from the device.
With this SDK, we’ll implement local authentication with both facial recognition and fingerprint scanning in our React Native apps.
Throughout the course of this tutorial, we’ll cover:
react-native-biometrics
Let’s get started!
Biometric authentication is a type of multifactor authentication (MFA) that employs data derived from the device user’s biological traits, such as facial characteristics, voice recognition, and fingerprints, to protect personal information and sensitive assets.
Mobile apps of all kinds use local biometric authentication. The best thing about biometric authentication is that it is performed entirely within the user’s device, so there is no risk of leaking sensitive data to a third-party API.
Aside from verifying user identities, biometrics can also serve as an additional layer of security alongside traditional sign-in methods, such as email/password.
To start our tutorial, let’s go over the steps for installing, importing, and setting up biometric authentication in an Expo app. We’ll start with a expo-local-authentication example.
expo-local-authenticationFirst, run the following command to install the expo-local-authentication library:
// with yarn
yarn add expo-local-authentication


// with npm
npm install expo-local-authentication
Next, import the package by adding the following line to the JavaScript or TypeScript file where you want to implement biometric authentication:
import * as LocalAuthentication from 'expo-local-authentication'
First, we must check whether the device hardware supports biometrics. We’ll use the hasHardwareAsync method provided by the Expo LocalAuthentication package we just imported when the page is mounted:
// wherever the useState is located
const [isBiometricSupported, setIsBiometricSupported] = React.useState(false);

// Check if hardware supports biometrics
  useEffect(() => {
    (async () => {
      const compatible = await LocalAuthentication.hasHardwareAsync();
      setIsBiometricSupported(compatible);
    })();
  });

// In our JSX we conditionally render a text to see inform users if their device supports
 <Text> {isBiometricSupported ? 'Your device is compatible with Biometrics'
    : 'Face or Fingerprint scanner is available on this device'}
        </Text>
The hasHardwareAsync method returns a promise that resolves to a boolean, hasHardwareAsync(): Promise<boolean>, indicating whether the user’s device supports biometrics.
For cases where there’s no biometric support on the user’s device, you should consider enabling alternative methods, such as passwords, to authenticate users.
To check whether biometrics are saved on the user’s device, we’ll use the isEnrolledAsync method. This method returns a promise that resolves to a boolean, isEnrolledAsync(): Promise<boolean>:
const handleBiometricAuth = async () => {
    const savedBiometrics = await LocalAuthentication.isEnrolledAsync();
      if (!savedBiometrics)
      return Alert.alert(
        'Biometric record not found',
        'Please verify your identity with your password',
        'OK',
        () => fallBackToDefaultAuth()
      );
}
Notice how we set the app to fall back to an alternative method of authentication when there’s no record of facial ID or fingerprint capabilities on the user’s device.
To actually authenticate users via fingerprint scan or touch ID/face ID, we’ll use the LocalAuthentication.authenticateAsync method. This returns a promise resolving to an object containing success, which can be true or false.
Here’s an example of the payload returned when success is false:
Object {
    "error": "lockout",
    "message": "Too many attempts. Try again later.",
    "success": false,
  },
The authenticateAsync accepts options of type LocalAuthenticationOptions as an argument. Here’s what the options accept:
LocalAuthenticationOptions = {
    promptMessage?: string;
    cancelLabel?: string;
    disableDeviceFallback?: boolean;
    fallbackLabel?: string;
  }
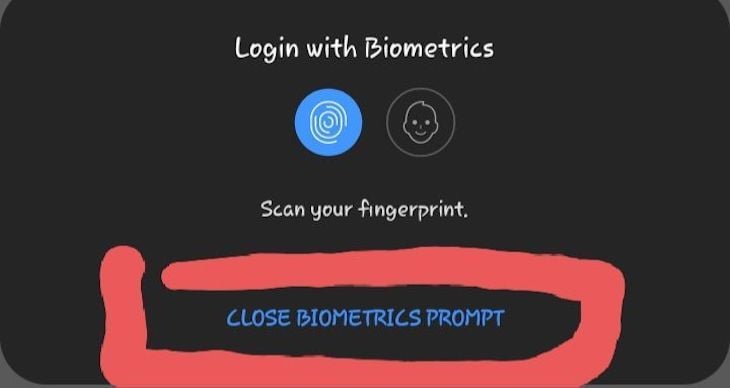
promptMessagepromptMessage is a message that’s shown alongside the touch ID or face ID prompt:

cancelLabelcancelLabel allows you to customize the default Cancel label that closes the biometrics prompt. Notice how the default Cancel changed to Close biometrics prompt.
For this to work on some Android devices, you may need to set the disableDeviceFallback to true.
disableDeviceFallbackdisableDeviceFallback enables you to decide whether, after multiple attempts at facial recognition or fingerprint ID, the app should fall back to authenticate users with a device passcode. This option is set to false by default.
You may need to set the disableDeviceFallback option to true for your users to have access to the facial recognition biometrics API.
fallbackLabelfallbackLabel allows you to customize the default passcode label. This option is only needed when disableDeviceFallback is false.
Here’s an example of how to use the authenticateAsync method:
const handleBiometricAuth = async () => {
  const biometricAuth = await LocalAuthentication.authenticateAsync({
        promptMessage: 'Login with Biometrics',
        disableDeviceFallback: true,
      });
}
On Android devices, permission are automatically added. On iOS, you’ll need to add infoPlist.NSFaceIDUsageDescription to your app.json file in your Expo app.
You must place the NSFaceIDUsageDescription under ios.infoPlist.NSFaceIDUsageDescription in the app.json file. The value can be something like the following:
APP_NAME needs to use Face ID / Touch ID to authenticate you
NSFaceIDUsageDescription is a message that tells the user why the app is requesting the ability to authenticate with face ID.
To use this package in a bare-bones React Native app, install react-native-unimodules, which enables you to use Expo modules in a React Native app.
Once you have successfully installed the React Native unimodule, you can implement local authentication the same way we did with Expo.
For iOS, you’ll need to add NSFaceIDUsageDescription to your info.plist file:
// info.plist
<key>NSFaceIDUsageDescription</key>
<string>$(PRODUCT_NAME) Authentication with TouchId or FaceID</string>
This key is required if your app uses APIs that access face ID.
For Android, you’ll need to add the following lines of code to your AndroidManifest.xml file:
<uses-permission android:name="android.permission.USE_BIOMETRIC" />
<uses-permission android:name="android.permission.USE_FINGERPRINT" />
react-native-biometricsreact-native-biometrics is a more secure way of handling biometric authentication because it uses both event- and result-based methods of biometric authentication.
This means it doesn’t just depend on a boolean returned from a user’s device to finish the authentication flow like react-native-touch-id and expo-local-authentication.
Upon success, the biometric API retrieves a cryptographic key and returns it to the React Native app; our app can now send the key to the server for authentication, and upon successful verification of the key, grants the user permission to protected parts of the app.
To integrate this library into our React Native app, create a bare React Native app; if you have an existing React Native app, you can go ahead to skip this step:
npx react-native init NameOfYourApp
Then, run the following command at the root of your app to start the server:
npx react-native start
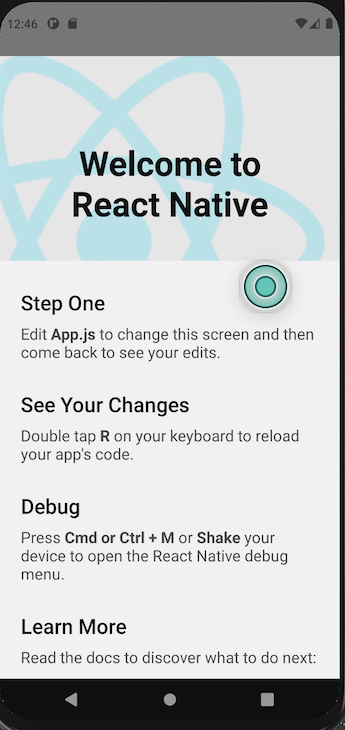
Next, run the following command to launch the app on Android emulator:
npx react-native run-android
You should get the app running as seen on the screen below. If you run into an error, the React Native team has a guide on how to set up your development environment.
Let’s integrate this package into our app. To begin, run the following command at the root level of the app to install it:
yarn add react-native-biometrics
#or
npm install react-native-biometrics
Now that we have it installed, let’s look at a couple of methods available to us.
isSensorAvailable()The isSensorAvailable() method detects if biometric support is available in a user’s device. It returns a Promise that resolves to the following objects:
interface IsSensorAvailableResult {
    available: boolean;
    biometryType?: 'TouchID' | 'FaceID' | 'Biometrics';
    error?: string;
}
Let’s check if an Android device has biometric support:
import ReactNativeBiometrics from 'react-native-biometrics';
<
Here, we check if the device has biometric records and then check the type of biometric support that is available by calling the ReactNativeBiometrics.Biometrics method:
 const isBiometricSupport = async () => {
    let {available, biometryType} =
      await ReactNativeBiometrics.isSensorAvailable();
    if (available && biometryType === ReactNativeBiometrics.Biometrics) {
      console.log('Biometrics is supported', biometryType);
    }
  };
  useEffect(() => {
    isBiometricSupport();
  }, []);
This method will return true if there are any biometric method records on the device, such as face ID or touch ID.
If you want to be specific about the biometric record available in the user’s device, use the following snippet instead:
  const isBiometricSupport = async () => {
    let {available, biometryType} =
      await ReactNativeBiometrics.isSensorAvailable();
    if (available && biometryType === ReactNativeBiometrics.TouchID) {
      console.log('TouchID is supported', biometryType);
    } else if (available && biometryType === ReactNativeBiometrics.FaceID) {
      console.log('FaceID is supported', biometryType);
    } else if (available && biometryType === ReactNativeBiometrics.Biometrics) {
      console.log('Biometrics is supported', biometryType);
    } else {
      console.log('Biometrics not supported', biometryType);
    }
  };
  useEffect(() => {
    isBiometricSupport();
  }, []);
This checks if the device has TouchID and FaceID separately.
Please note that ReactNativeBiometrics.TouchID and ReactNativeBiometrics.FaceID only work on iOS. For android devices, use ReactNativeBiometrics.Biometrics.
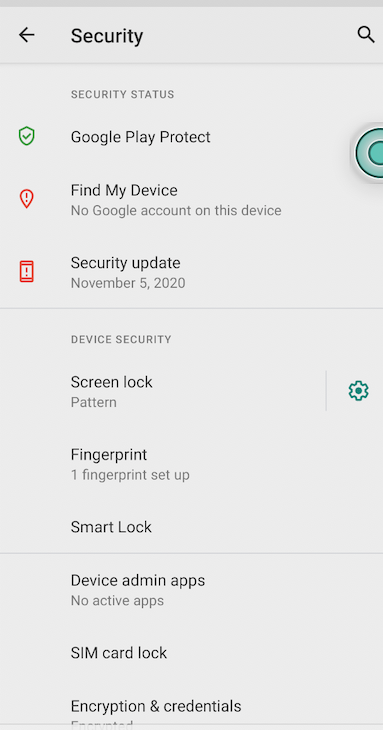
To test this out, check the console to see what logs out. If you run on an Android emulator, you need to enroll biometrics on the device.
To do this, go to Settings > Security > Fingerprint, then add a pattern or pin and run the following command on your terminal to enroll the fingerprint.
![]()
Once you get to the fingerprint screen, run the following command multiple times to register a fingerprint:
adb -e emu finger touch <finger_id>
Example: adb -e emu finger touch 5355aw3455
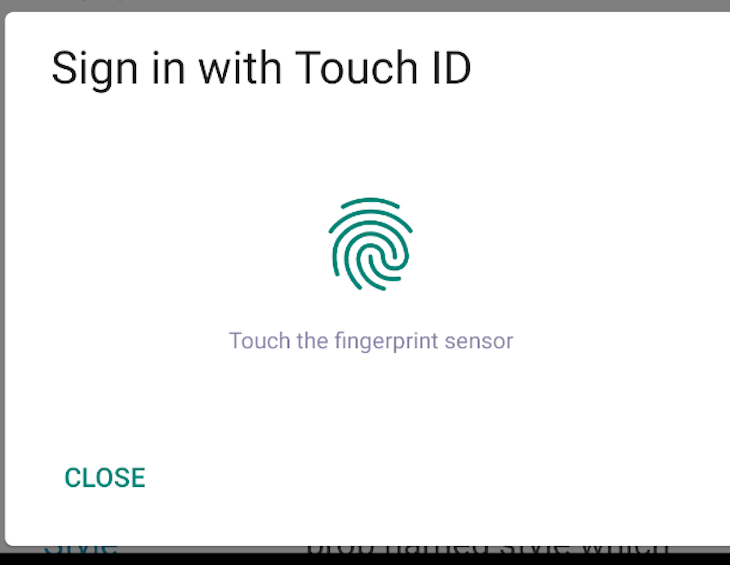
simplePrompt()The simplePrompt() method accepts a promptMessage and cancelButtonText parameters that display the prompt message and cancel text you want to display to your users. It returns a Promise that resolves to success, a boolean and an option error, and a string if an error occurs:
  const isBiometricSupport = async () => {
    let {success, error} = await ReactNativeBiometrics.simplePrompt({
      promptMessage: 'Sign in with Touch ID',
      cancelButtonText: 'Close',
    });
    console.log({success, error});
  };
The previous code will result in the following:
Local authentication has many use cases and I hope this tutorial makes it easier for you to implement biometric authentication with fingerprint (touch ID) and facial recognition (face ID) in your Expo and React Native apps.
The full code used in this tutorial is available on GitHub here and here
Feel free to drop a comment to let me know what you thought of this article. You can also find me on Twitter and GitHub. Thank you for reading!

LogRocket's Galileo AI watches sessions for you and and surfaces the technical and usability issues holding back your React Native apps.
LogRocket also helps you increase conversion rates and product usage by showing you exactly how users are interacting with your app. LogRocket's product analytics features surface the reasons why users don't complete a particular flow or don't adopt a new feature.
Start proactively monitoring your React Native apps — try LogRocket for free.

We built the same app in TanStack Start RSC and Next.js RSC. TanStack shipped 40% less JS and built 4x faster — but Next.js is still the safer production bet.

From RSC vulnerabilities and the Vercel breach to TypeScript 7.0 Beta and AI agents — the nine frontend storylines that defined H1 2026, ranked.

AI tools generate working React code fast, but miss race conditions, empty states, debouncing, and accessibility. Here’s how to catch bugs before production.

Learn how to use Gemini CLI subagents to delegate frontend, backend, testing, and docs tasks to specialized agents with guardrails and clear ownership.
Hey there, want to help make our blog better?
Join LogRocket’s Content Advisory Board. You’ll help inform the type of content we create and get access to exclusive meetups, social accreditation, and swag.
Sign up now

