InkWell class in FlutterThe addition of touch-based interactions can increase the usefulness of an app and enhance user experience. Going one step further and providing visual feedback based on user gestures can make an app even more engaging.

Flutter offers several widgets, such as GestureDetector, that can be used to respond to user touch events. However, they do not all provide visual feedback based on user gestures.
In this article, we’ll examine Flutter’s InkWell class, which can be used to offer visual feedback and respond to user touch events. We’ll demonstrate how to implement the InkWell class in Flutter and how to use InkWell to customize an app.
InkWell classThe InkWell class is a rectangular area of a Material widget that responds to touch events by displaying a clipped splash. The Material widget is responsible for the ink effects that are displayed when a touch event occurs. The Material refers to the area where the ink reactions are painted.
When tapped, the ink is painted in a rectangular area, and a highlight color spreads below the splash color. The below image, from the Flutter team, is a representation of how an InkWell looks when tapped:

The InkWell class needs a Material widget as an ancestor for the ink reactions to display correctly. The splash effect will not be visible if the InkWell class is used with opaque widgets, such as a Container with color. However, we can get around this by replacing an opaque widget with an Ink widget.
The InkWell class does not update its splashes to match up to the size of an animating parent Material widget. Using it with widgets that change in size should be avoided as the splashes will not adjust accordingly. The InkWell widget is not able to conform to the parent widget’s changing size.
InkWell has several properties that can be used to
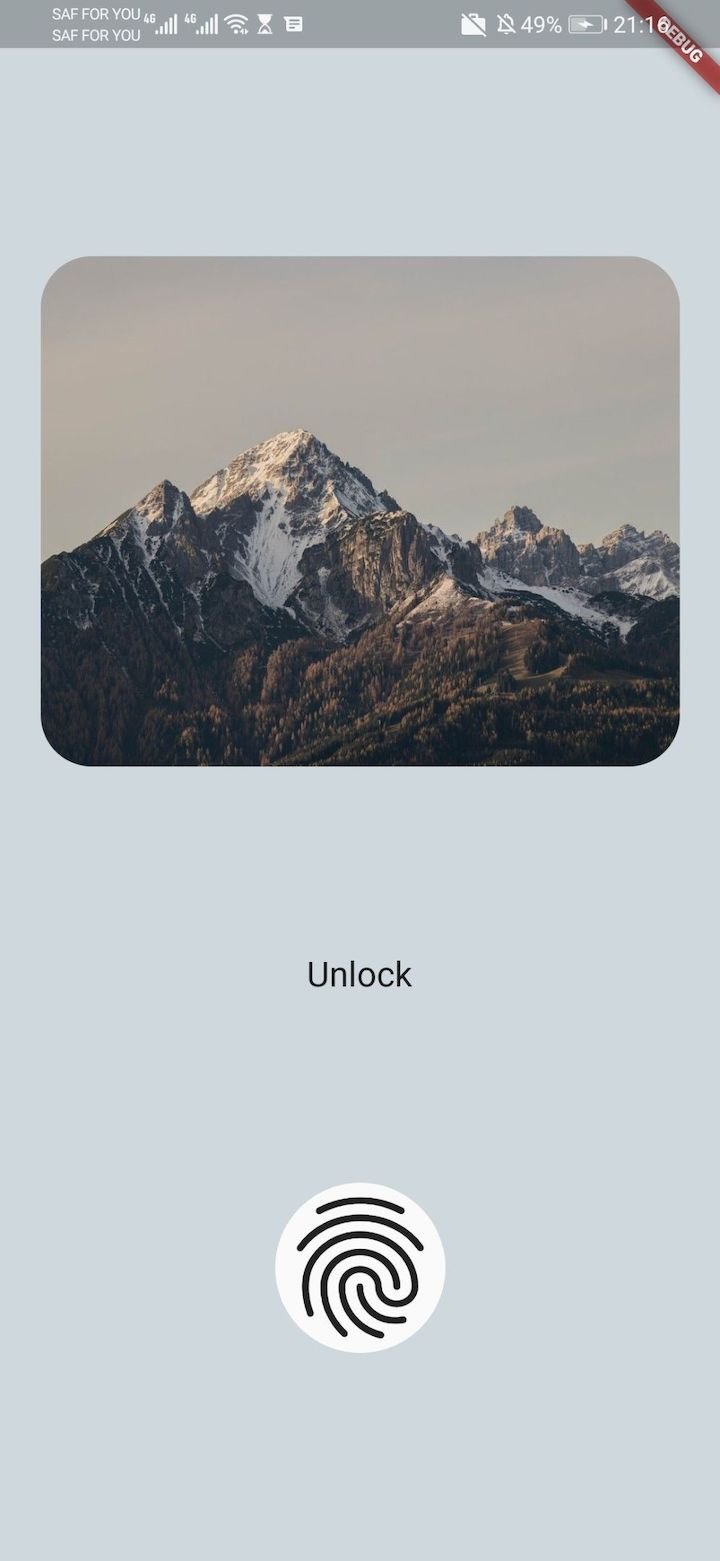
InkWellIn this tutorial, we’ll customize an app consisting of three widgets displayed in a vertical column:
image_widget.dart: the imagecustom_button_widget.dart: the textfingerprint_widget.dart: the fingerprint iconHere’s the app that we’ll customize:
InkWell to an app’s button, text, and imageTo start, we’ll update the fingerprint_widget.dart file:
return Material(
  shape: const RoundedRectangleBorder(
      borderRadius: BorderRadius.all(Radius.circular(50))),
  child: InkWell(
    onTap: (){},
    child: const Icon(
      Icons.fingerprint,
      size: 100,
    ),
  ),
);
We add an InkWell widget as the child of a Material widget. Then, we add an onTap handler. The InkWell splash effect is only visible when a gesture callback, onTap in this case, is added. With this code, the splash effect will be created when the fingerprint icon is tapped.
Next, we’ll update the custom_button_widget.dart file:
return InkWell(
  onTap: (){},
  child: Container(
    padding: const EdgeInsets.symmetric(vertical: 12, horizontal: 24),
     decoration: BoxDecoration(
         borderRadius: BorderRadius.circular(5),
        // adding color will hide the splash effect
       // color: Colors.blueGrey.shade200,
     ),
    child: const Text("Unlock", style: TextStyle(fontSize: 24),),
  ),
);
This widget contains an opaque Container widget. We wrap the Container widget with an InkWell widget and add the onTap handler. With this code, the splash effect will be created when the text is tapped. But, adding color to the Container will hide this effect, since the Container is opaque.
To address this issue, we replace the Container widget with an Ink widget. This ensures that the color or decoration applied to the Ink also paints in the InkWell and that the splash effect is visible.
Now, we’ll update the image_widget.dart file:
return Ink(
  width: double.infinity,
  height: 300,
  decoration: BoxDecoration(
      borderRadius: BorderRadius.circular(30),
      image: const DecorationImage(
          image: NetworkImage(
              "https://images.unsplash.com/photo-1589405858862-2ac9cbb41321?ixlib=rb-1.2.1&ixid=MnwxMjA3fDB8MHxwaG90by1wYWdlfHx8fGVufDB8fHx8&auto=format&fit=crop&w=1170&q=80"),
          fit: BoxFit.fill)),
  child: InkWell(onTap: (){},),
);
We use the Ink widget to display an image and add an InkWell widget as a child. The Ink has an image and decoration that paints without hiding the splash effect of the InkWell.
This video demonstrates the Flutter InkWell ripple effect. This effect occurs when a user touches the interactive widgets:
InkWell highlight and splash colorWhen we tap the InkWell widget, the highlight color is immediately painted over the widget. Then, the splash color is painted on top of the highlight, creating a ripple effect.
We’ll modify the three files to customize the highlight and splash colors:
InkWell(
  onTap: () {},
  highlightColor: Colors.blue.withOpacity(0.4),
  splashColor: Colors.green.withOpacity(0.5),
)
We give the InkWell a blue highlightColor and a green splashColor. We also add opacity to the colors to ensure some transparency when the colors paint over the widgets.
This video shows the app after the customization of the highlight and splash color:
On a touch event, the ink paints a rectangular shape that does not match the shape of the image or fingerprint areas. Next, we will modify the InkWell‘s rectangle’s shape.
InkWell borderAn InkWell has a rectangular shape. When tapped, the highlight color fills the rectangle. We use the borderRadius property or create a custom shape by using the customBorder property to clip the rectangle’s corners.
The borderRadius property is effective only if the customBorder is not assigned.
We’ll use the borderRadius property to modify the shape of the InkWell box.
First, we update the image_widget.dart and custom_button_widget.dart files:
borderRadius: BorderRadius.circular(30),
Then, we update the fingerprint_widget.dart file:
borderRadius: BorderRadius.circular(50),
These updates add a circular borderRadius to the InkWell widget. The borderRadius circularly clips the rectangle’s corners with the specified radius, (in this case, 30deg and 50deg).
The video shows the app after the borders of the InkWell box have been customized to match those of the image:
InkWellResponding to user gestures is one way to make an app more interactive. InkWell offers properties that can be used to respond to user gestures.
Here are some common user gestures and the callback that is triggered when the user gesture occurs:
onTap, onTapDown, and onTapCancelonDoubleTap callback is usedonLongPress callback is usedThe onTapDown callback is triggered when a user makes contact with the screen. When the contact results in a gesture that is not a tap, double-tap, or long press, the onTapCancel is triggered as a default.
We’ll create a method, showSnackBar, that takes in a String gesture. The function creates a SnackBar with Text to show the triggered gesture. It hides the previous displaying snack bar, if any, and displays a new snack bar:
showSnackBar(String gesture) {
  var snackBar =  SnackBar(
    content: Text('You $gesture'),
  );

  ScaffoldMessenger.of(context).hideCurrentSnackBar();
  ScaffoldMessenger.of(context).showSnackBar(snackBar);
}
We’ll handle the gesture callbacks in the image_widget.dart file:
InkWell(
  onTap: () {
    showSnackBar('tapped');
  },
  onDoubleTap: () {
    showSnackBar('double tapped');
  },
  onLongPress: () {
   showSnackBar('long pressed');
  },
  borderRadius: BorderRadius.circular(30),
  highlightColor: Colors.blue.withOpacity(0.4),
  splashColor: Colors.green.withOpacity(0.5),
)
When a user triggers a gesture event, a snack bar is displayed with the corresponding string gesture.
This video shows the app after it has been customized to respond to touch events:
Here’s a summary of important items to keep in mind when using the InkWell class with a Flutter app:
InkWell is designed for rectangular areas. To use a variant with a configurable shape, see InkResponseInkWell widget must have a Material widget as its parentInkWell’s splash will not automatically update to match changes in the size of its parent Material widgetInkWell widget’s color may be set via the color property of the Material widgetMaterial widget and InkWell widget will hide the ripple effect of an InkWellInk widget can replace opaque widgets. It ensures that the images and decorations are displayed correctly while keeping the ripple effect visibleInkWell will only be visible after a touch event handler, like onTap, has been addedFlutter’s InkWell class can be useful for making an app more interactive and informing a user that their gestures were successfully registered.
In this tutorial, we examined different attributes and customizations of the InkWell class and demonstrated how to implement the InkWell class in a Flutter app. We also reviewed some important items to note when working with the InkWell widget.
All the code in this article is available on GitHub. I hope you enjoyed this tutorial!
Install LogRocket via npm or script tag. LogRocket.init() must be called client-side, not
server-side
$ npm i --save logrocket

// Code:

import LogRocket from 'logrocket';
LogRocket.init('app/id');
// Add to your HTML:

<script src="https://cdn.lr-ingest.com/LogRocket.min.js"></script>
<script>window.LogRocket && window.LogRocket.init('app/id');</script>

Learn how to protect full-stack projects from NPM supply chain attacks with a practical security checklist.

Explore 15 essential MCP servers for web developers to enhance AI workflows with tools, data, and automation.

Learn how contrast-color() automatically picks accessible text colors using native CSS, without JavaScript.

Learn how to build a harness-style AI workflow using Claude Code with specialized Dev, QE, and Ops subagents, gated handoffs, MCP telemetry, and LEARNING.md.
Hey there, want to help make our blog better?
Join LogRocket’s Content Advisory Board. You’ll help inform the type of content we create and get access to exclusive meetups, social accreditation, and swag.
Sign up now

