Infinite scrolling is a common strategy on content-heavy platforms that prioritizes data pagination in API development. This strategy loads massive datasets gradually in small manageable chunks, improving the UX, especially for slower internet connections.

Previously, integrating features like infinite scrolling in Next.js required external libraries such as SWR or Tanstack Query, formerly React Query.
However, with newer Next.js versions — notably, Next.js 13 and beyond — Server Actions empower us to fetch initial data directly on the server. This enhances perceived performance by rendering content immediately without external dependencies.
In this post, we’ll explore how to implement infinite scrolling using Next.js Server Actions, covering server-side initial data fetching and client-side paginated data retrieval. We won’t delve into CSS for this article, but note that the finished project utilizes Tailwind CSS.
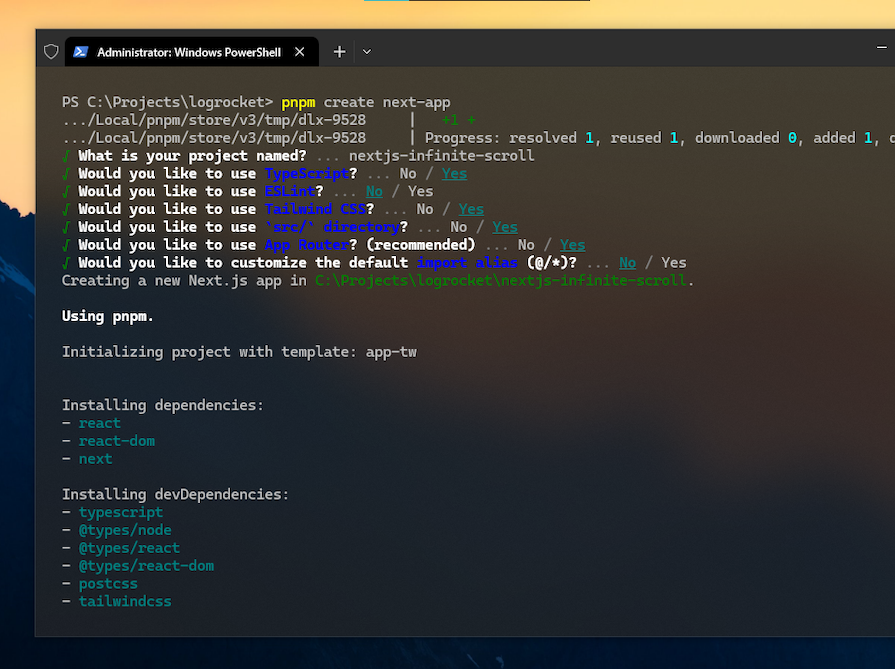
Let’s start by setting up our Next.js app. I’m using Create Next App with pnpm, but feel free to choose a different method and package manager if you prefer:
pnpm create next-app
Once you run this command, you should see something like the below:
If you use the same app setup as mine, simply run pnpm dev to start the app in development mode. This will generate the basic Next.js starter UI.
Since building Next.js apps with TypeScript is now the standard approach, I’m choosing to use it with this app. I’m also keeping the traditional src directory, though you may not necessarily have to do that. Below is an overview of the project structure:
.
└── nextjs-infinite-scroll
├── node_modules
├── public
├── src
│ ├── actions
│ ├── app
│ ├── components
│ ├── config
│ ├── types
│ └── utils
├── package.json
├── tsconfig.json
└── ...
I’ve added some subdirectories within the src directory — like config, types, and utils — to organize different types of data effectively. We’ll delve deeper into this structure later in the article.
To implement data loading, we’ll utilize a dummy REST API called TypiCode, which offers various types of dummy data for development and testing purposes. We’ll fetch some dummy blog posts using this service. The URL structure provided by this API is as follows:
http://jsonplaceholder.typicode.com/posts?_start=5&_limit=10
Upon requesting this URL, the response you’ll receive will be something like the following:
[
  {
    "userId": 1,
    "id": 1,
    "title": "...",
    "body": "..."
  },
  ...
]
Each of our posts will contain four fields. It’s important to set up a type data model for our post data in advance so that we can easily use it throughout the rest of the application. Managing these types in a separate types folder is a good way to keep things organized:
// types/Post.ts
export interface Post {
  postId: number;
  id: number;
  title: string;
  body: string;
}
Based on the structure of our API URL, we may want to set it up in a reusable manner so that we can easily use it whenever needed.
To ensure the security and organization of specific data, such as API keys, URLs, query arguments, and other API-related information, it’s crucial to store them in environment variables. However, since this post uses an open API with no confidential data, we will manage our constant values in a separate TypeScript file:
// config/constants.ts
export const API_URL = "https://jsonplaceholder.typicode.com/posts";
export const POSTS_PER_PAGE = 10;
In the above file, we’ve defined separate variables for the API URL and the number of posts per page, which we will use repeatedly later.
Now, we’ll create a utils folder to define a utility function for constructing the API URL with two query parameters, offset and limit:
// utils/getApirUrl.ts
import { API_URL } from "@/config/constants";

export const getApiUrl = (offset: number, limit: number): string => {
  return `${API_URL}?_start=${offset}&_limit=${limit}`;
};
Creating an error helper function to read different response codes and throw better error messages into the console would also be a good idea. We’ll use a lookup table and output different messages for different response codes:
// utils/handleResponseError.ts
export async function handleError(response: Response): Promise<Error> {
  const responseBody = await response.text();
  const statusCode = response.status;

  const errorMessages: { [key: number]: string } = {
    400: `Bad request.`,
    ...,
    ...,
  };

  const errorMessage = ...;

  console.error("Error fetching data:", errorMessage);

  return new Error(errorMessage);
}
Next, we’ll create and configure UI components to showcase the fetched data. We’ll create two main patterns: a PostCard that will be responsible for displaying individual Post listings, and a PostList containing multiple PostCard components.
PostCard componentThe PostCard component is straightforward and can be made to use all four parameters offered by the Post type. I’m using only the title and body to keep things simple. We won’t specify it as a client-specific component, as we’ll need to utilize it both on the client and server:
// components/PostCard.tsx
import { Post } from "@/types/Post";

type PostProps = {
  post: Post;
};

export default function PostCard({ post }: PostProps) {
  return (
    <div className="...">
      <h2 className="...">
        {post.title}
      </h2>
      <p className="...">{post.body}</p>
    </div>
  );
}
Below is a quick preview of the PostCard component. We took care of its look and feel using Tailwind CSS:

You can find all the CSS classes required to build the above in this PostCard.tsx file.
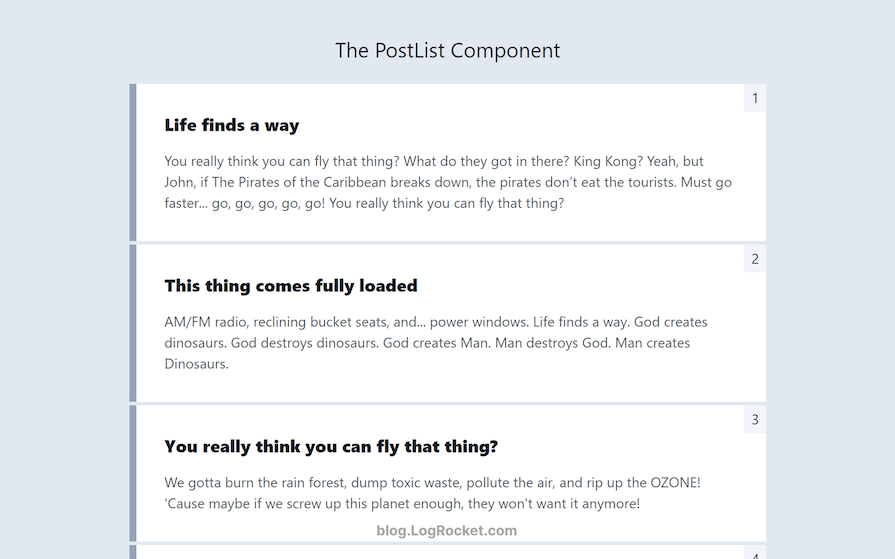
PostList componentThe PostList component won’t be too challenging either. However, it may not make much sense at the moment, as we’ll need to iterate through the fetched data and provide appropriate data to PostCard for each index.
For now, let’s create it like this, and we’ll optimize it later:
// components/PostList.tsx
import { Post } from "@/types/Post";

type PostListProps = {
  initialPosts: Post[];
};

export default function PostList({ initialPosts }: PostListProps) {
  return (
    <>
      <div className="...">
        ...
      </div>
    </>
  );
}
The above component takes an array of posts as a prop, which can be considered initial posts fetched from the server. We’ll work on further data loading in the next few segments.
The PostList component would appear something like the below. We’ll follow the same pattern in all the lists of posts we’ll be implementing:
A Next.js Server Action is basically a specialized function that enables us to execute code on the server side in response to user interactions on the client side. This capability facilitates tasks such as data fetching, user input validation, and other server-side operations.
Let’s set up a Server Action to load our posts on the server. We’ll use this action directly to load initial data to PostList and then delegate the ongoing responsibility of loading additional content on the client side to the PostList component, triggered by specific events:
// actions/getPosts.ts
"use server";
import { getApiUrl } from "@/utils/getApiUrl";
import { handleError } from "@/utils/handleError";

export const getPosts = async (
  offset: number,
  limit: number
): Promise<Post[]> => {
  const url = getApiUrl(offset, limit);

  try {
    const response = await fetch(url);
    const data = (await response.json()) as Post[];
    if (!response.ok) {
      throw await handleError(response);
    }
    return data;
  } catch (error: unknown) {
    console.error(error);
    throw new Error(`An error occurred: ${error}`);
  }
};
The action utilizes the two utility functions we defined earlier, getApirUrl and handleError. Also, note that every Next.js Server Action starts with a "use server" directive.
In the next step, we’ll enhance the PostList component to enable it to load data using the getPosts Server Action we just defined.
PostList componentNow, we‘ll use the useState Hook to manage existing posts and page numbers received from the server. Using the offset and POST_PER_PAGE properties, we‘ll establish the necessary logic to load the next cargo of posts.
Note that we need to designate this PostList component as a client component for user-driven data updates triggered by specific events, such as scrolling down the page or clicking a button:
// components/PostList.tsx
"use client";
import { useState } from 'react';
...

export default function PostList({ initialPosts }: PostListProps) {
  const [offset, setOffset] = useState(POSTS_PER_PAGE);
  const [posts, setPosts] = useState<Post[]>(initialPosts);
  const [hasMoreData, setHasMoreData] = useState(true);

  const loadMorePosts = async () => {
    if (hasMoreData) {
      const apiPosts = await getPosts(offset, POSTS_PER_PAGE);

      if (apiPosts.length == 0) {
        setHasMoreData(false);
      }

      setPosts((prevPosts) => [...prevPosts, ...apiPosts]);
      setOffset((prevOffset) => prevOffset + POSTS_PER_PAGE);
    }
  };

  return (
    <>
      <div className="...">
        {posts?.map((post) => (
          <PostCard key={post.id} post={post} />
        ))}
      </div>
    </>
  );
}
In the loadMorePosts function, we have three state variables working together to deliver different responsibilities: offset, posts, and hasMorePosts.
The posts variable holds the initial posts we expect to receive from the server in the PostList component whenever the page loads. We append new data to this array based on the hasMoreData boolean, which is set to true by default.
Let’s say we use the getPosts action and receive an empty response. In that case, we set the hasMorePosts boolean to false. This will stop making requests to load more content. Otherwise, we append the newer posts to the posts variable, and the POST_PER_PAGE value increments the current offset value.
To ensure the loadMorePosts function works as expected, we should trigger it through an event like clicking a button or scrolling down. For now, let’s add a button to the PostList component that the user can click to load more posts. Eventually, this click-based loading will be replaced with an infinite scroll feature.
Finally, the visibility of this trigger button is controlled by the hasMoreData boolean. Here’s the resulting code:
// components/PostList.tsx
export default function PostList({ initialPosts }: PostListProps) {
  const [offset, setOffset] = useState(POSTS_PER_PAGE);
  const [posts, setPosts] = useState<Post[]>(initialPosts);
  const [hasMoreData, setHasMoreData] = useState(true);
  ...

  return (
    <>
      <div className="...">
        {posts?.map((post) => (
          <PostCard key={post.id} post={post} />
        ))}
      </div>
      <div className="...">
        {hasMoreData ? (
          <button
            className="..."
            onClick={loadMorePosts}
          >
            Load More Posts
          </button>
        ) : (
          <p className="...">No more posts to load</p>
        )}
      </div>
    </>
  );
}
The final step is to integrate the PostList component into the page.tsx file at the app directory’s root.
As previously discussed, the PostList component requires an argument named initialPosts to populate the list with some initial data. We fetch this data using the getPosts Server Action and load the posts from 0 up to the value we specified for our POST_PER_PAGE constant:
...

export default async function Home() {
  const initialPosts = await getPosts(0, POSTS_PER_PAGE);

  return (
    <>
      <div className="...">
         <PostList initialPosts={initialPosts} />
      </div>
    </>
  );
}
That’s it! Now we can load additional posts by clicking the Load More Posts button. Below is a glimpse of how the implementation would look like in action:

You may find the component code here and its application in the root page.tsx file. In the next segment, we’ll extend our current implementation to include infinite scrolling for loading data instead of the load more button.
The basic idea of implementing infinite scroll here involves replacing the button implemented in the PostList component with a scroll-trigger element, such as a spinner or text indicating the loading.
When this element comes into view within the viewport, we trigger the loading of the next batch of data. This is basically how the infinite scroll feature works. We can detect the intersection of an element using the JavaScript Intersection Observer API.
We’ll cover two methods for implementing infinite scroll. One involves using a small dependency that simplifies using the Intersection Observer API in React. The other method involves directly using the Intersection Observer API, which is slightly more complex to implement in React.
Add the react-intersection-observer package as a normal dependency:
pnpm install react-intersection-observer
Let’s create a copy of the PostList component and name it PostListInfiniteRIO or any other suitable name. The main loadMorePosts loading function will remain unchanged.
We’ll utilize the useInView Hook provided by the react-intersection-observer library, which destructures the values it returns into the variables we provided below:
const [scrollTrigger, isInView] = useInView();
The scrollTrigger variable is a reference object we’ll attach to the element we want to observe. Meanwhile, isInView is a boolean value indicating whether the element is currently visible within the viewport.
Everything was happening synchronously in the PostList component, so we didn’t need to use the useEffect Hook. However, since we want to trigger loadMorePosts when scrolling down to our scrollTrigger element asynchronously, we need to use the useEffect Hook to observe our loading element:
useEffect(() => {
  if (isInView && hasMoreData) {
    loadMorePosts();
  }
}, [isInView, hasMoreData]);
Now, when the loading element intersects the viewport, loadMorePosts will be triggered with new values for the hasMoreData and isInView booleans.
Finally, we need to implement our scrollTrigger element as follows:
export default function PostListInfiniteRIO({ initialPosts }: PostListProps) {
  ...

  return (
    <>
      <div className="...">
        {posts?.map((post) => (
          <PostCard key={post.id} post={post} />
        ))}
      </div>
      <div className="...">
        {(hasMoreData && <div ref={scrollTrigger}>Loading...</div>) || (
          <p className="...">No more posts to load</p>
        )}
      </div>
    </>
  );
}
Now, we can easily implement this new component in the page.tsx file, replacing the PostList component. Alternatively, we can create a new route and consume this component in its root page.tsx file instead.
Here’s how it would look like in action in the browser window:
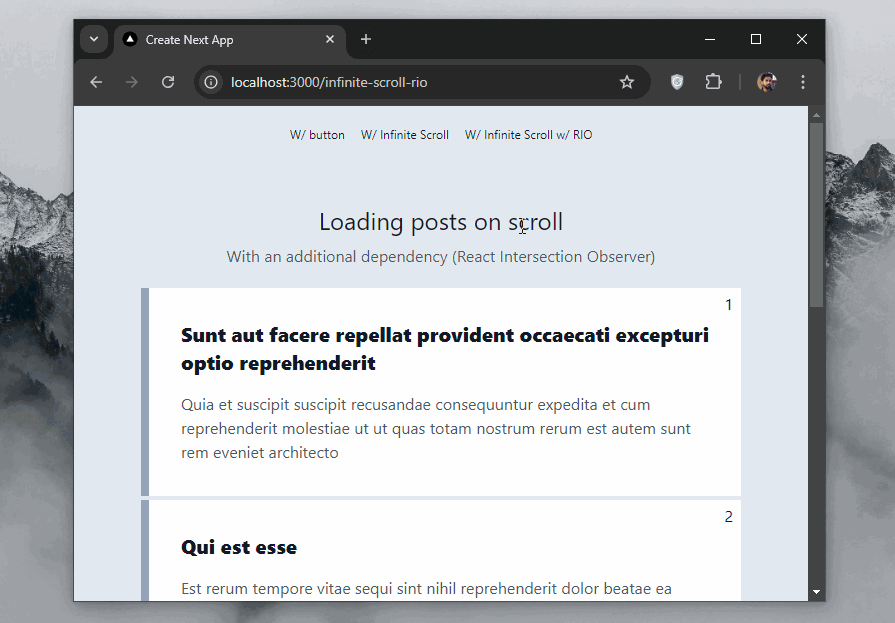
Find the implementation in the PostListInfiniteRIO component and the infinite-scroll-rio directory in the app router.
Instead of using an additional library, let’s consume the JavaScript Intersection Observer API directly in our component.
The new component we’re about to create is similar to the PostListInfiniteRIO we set up in the previous section. Only the useEffect portion differs, as it’s where the Intersection Observer API implementation goes.
As discussed in the last section, we need to utilize the useEffect Hook because some async tasks will be involved to accomplish the infinite scroll feature.
Since we don’t have any built-in referencing logic as offered by the react-intersection-observer library in the previous component, we need to set a reference for our scrollTrigger element using the useRef Hook:
// components/PostListInfinite.tsx
export default function PostListInfinite({ initialPosts }: PostListProps) {
  const [offset, setOffset] = useState(POSTS_PER_PAGE);
  const [posts, setPosts] = useState<Post[]>(initialPosts);
  const [hasMoreData, setHasMoreData] = useState(true);
  const scrollTrigger = useRef(null);

  // ...

  return (
    <>
      <div className="...">
        {posts?.map((post) => ())}
      </div>
      <div className="...">
        {hasMoreData ? (
          <div ref={scrollTrigger}>Loading...</div>
        ) : (
          <p className="...">No more posts to load</p>
        )}
      </div>
    </>
  );
}
Next, within the useEffect Hook, we should check if the window object exists as well as if the IntersectionObserver object is available:
useEffect(() => {
  if (typeof window === "undefined" || !window.IntersectionObserver) {
    return;
  }

  // ...
}, [hasMoreData]);
The useEffect Hook we used here depends only on the hasMoreData state for now. This is because we don’t have anything like the isInView boolean available, as we did in the previous component. We’ll revisit this segment after a few more steps.
The compatibility check introduced above is crucial because window and Web APIs are generally unavailable on the server side during initial rendering, potentially causing errors. If either of these two is found to be unsupported, the useEffect Hook exits early to prevent unnecessary operations.
If supported, the window object creates an IntersectionObserver instance to track the visibility of our scrollTrigger element. The loadMorePosts function is triggered whenever the threshold value reaches 0.5 — in other words, when the scrollTrigger element becomes at least 50 percent visible within the viewport, indicating that the user is scrolling toward it:
useEffect(() => {
  // ...

  const observer = new IntersectionObserver(
    (entries) => {
      if (entries[0].isIntersecting) {
        loadMorePosts();
      }
    },
    { threshold: 0.5 }
  );

  if (scrollTrigger.current) {
    observer.observe(scrollTrigger.current);
  }

  // Cleanup
  return () => {
    if (scrollTrigger.current) {
      observer.unobserve(scrollTrigger.current);
    }
  };
}, [hasMoreData, offset]);
By the end, we introduced a cleanup function to stop observing the element when the component unmounts or a dependency changes. This ensures the observer doesn’t leak memory and updates its behavior based on current conditions.
We also added offset to the dependency array to avoid the closure in the IntersectionObserver callback from using a stale value in the loadMorePosts function that can lead to repeated data loading and potential duplication.
This is a common issue with using closures in managing states. If you don’t know much about closures, you should check out the basics of JavaScript closures, higher-order functions, and currying.
Finally, either replace the PostList component in the page.tsx file at the app’s root, or create a separate route and implement it in its own page.tsx file.
As shown below, this would look identical to the previous implementation but with no additional dependencies used:
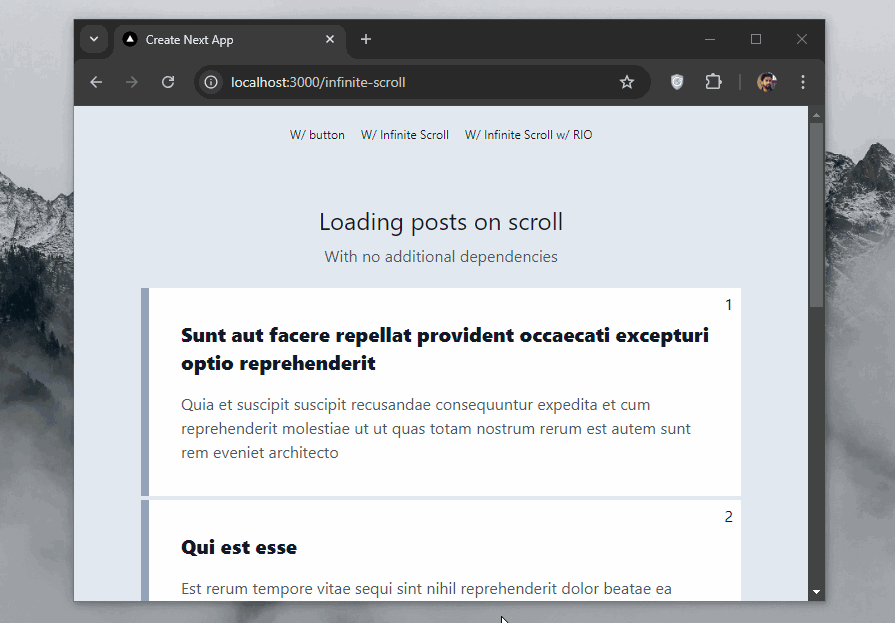
You may find all the associated code in the PostListInfinite component and the infinite-scroll directory inside the App Router.
Including an infinite scroll feature in your content-heavy Next.js project is a great way to improve UX by loading large datasets gradually page-by-page. In this tutorial, we explored how to implement infinite scroll using Next.js Server Actions.
We started with loading data on demand first and then covered two different approaches to implementing infinite scroll in Next.js. You should now have a solid understanding of on-demand paginated data loading and setting up an infinite scroll implementation in a content-heavy app.
You can find all the code we discussed above in this GitHub repository. If you have any questions, feel free to ask in the comment section below.
Debugging Next applications can be difficult, especially when users experience issues that are difficult to reproduce. If you’re interested in monitoring and tracking state, automatically surfacing JavaScript errors, and tracking slow network requests and component load time, try LogRocket.
LogRocket captures console logs, errors, network requests, and pixel-perfect DOM recordings from user sessions and lets you replay them as users saw it, eliminating guesswork around why bugs happen — compatible with all frameworks.
LogRocket's Galileo AI watches sessions for you, instantly identifying and explaining user struggles with automated monitoring of your entire product experience.
The LogRocket Redux middleware package adds an extra layer of visibility into your user sessions. LogRocket logs all actions and state from your Redux stores.


Modernize how you debug your Next.js apps — start monitoring for free.

Learn how to set up Meilisearch, index documents, and build keyword, semantic, and hybrid search with AI-powered retrieval.

Compare pnpm and npm across security defaults, disk usage, dependency strictness, and workspace policy to decide which package manager fits your project.

I migrated 20 production-style components from Tailwind to StyleX. Here’s what the data showed about LOC, CSS bundle size, build time, and type safety.

A guide for using JWT authentication to prevent basic security issues while understanding the shortcomings of JWTs.
Would you be interested in joining LogRocket's developer community?
Join LogRocket’s Content Advisory Board. You’ll help inform the type of content we create and get access to exclusive meetups, social accreditation, and swag.
Sign up now

