Editor’s note: This article was last updated by Ibiyemi Adewakun on 11 March 2024 to cover using Axios with the Vue 3 Composition API, as well as advanced Axios configurations and interceptors.

Axios is a promise-based HTTP client library for both browsers and Node.js applications, which means it can be used in frontend JavaScript applications as well as backend Node servers.
In this article, we will look at how to use Axios in a simple Vue.js application. Vue is a simple frontend JavaScript framework, so the Axios use case here will be for the browser.
The Replay is a weekly newsletter for dev and engineering leaders.
Delivered once a week, it's your curated guide to the most important conversations around frontend dev, emerging AI tools, and the state of modern software.
To follow along, you’ll need to install the following:
We’ll use npm as our JavaScript package manager, which is included when you install Node.
We will create our project using the Vue CLI, starting by running the following command:
$ npm create vue@latest
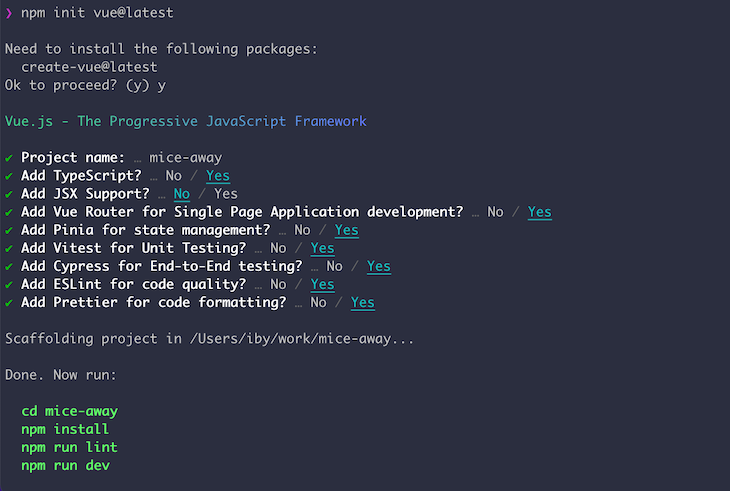
This command prompts us with options for how we would like to set up our project. I’ve chosen to name the project mice-away because — you guessed it — we’re building a fun cat-related app! We will also set it up to use TypeScript.
Here’s a vue view (I couldn’t help it 😅) of my project configuration; feel free to change yours as you prefer:

Axios provides access to the different HTTP methods through functions of their respective names. For example, you can use .post(…) for POST requests, or you can use .get(…) for GET requests, etc. Let’s look at options for using Axios for HTTP requests in our Vue project!
We can install Axios by running the following command:
$ npm i axios
Now that Axios is installed, we’ll look at two ways to use it in our project.
Vue 3 introduced the Composition API style for components, which allows our component to reference data variables and functions directly.
You can use Axios in your Vue composition API component by simply importing it into the component where you need to make an HTTP request. Here’s an example:
// AnimalFacts.vue

<template>
    <div class="row">
        <div class="col-md-12">
            <h3>Cat Facts</h3>
        </div>
        <div class="col-md-12">
            <ul class="list-group">
                <li v-for="(fact, index) in catFacts" :key="index" class="list-group-item">{{index + 1}}. {{fact.text}}</li>
            </ul>
        </div>
        <div class="row mt-3">
            <div class="col-md-12 text-center">
                <button @click="loadMoreFacts" class="btn btn-md btn-primary">{{ fetchingFacts ? '...' : 'Load more' }}</button>
            </div>
        </div>
    </div>
</template>

<script setup lang="ts">
    import { ref, onMounted } from 'vue'
    import axios from 'axios'

    interface AnimalFacts {
        text: string
    }
    const catFacts = ref([] as AnimalFacts[])
    const fetchingFacts = ref(false)
    async function loadMoreFacts() {
        fetchingFacts.value = true
        const catFactsResponse = await axios.get<AnimalFacts[]>('https://cat-fact.herokuapp.com/facts/random?animal_type=cat&amount=5')
        catFacts.value.push(...(catFactsResponse.data || []))

        fetchingFacts.value = false
    }
    async function fetchInitialCatFacts() {
        const catFactsResponse = await axios.get<AnimalFacts[]>('https://cat-fact.herokuapp.com/facts/random?animal_type=cat&amount=5')
        catFacts.value = catFactsResponse.data
    }
    onMounted(async () => {
        await fetchInitialCatFacts()
    })
</script>
💡 In the updated version of the article, we are demonstrating using Axios via imports with the Composition API style component definition. You can find more information about this API style here and reference the previous version’s implementation of the Options API here.
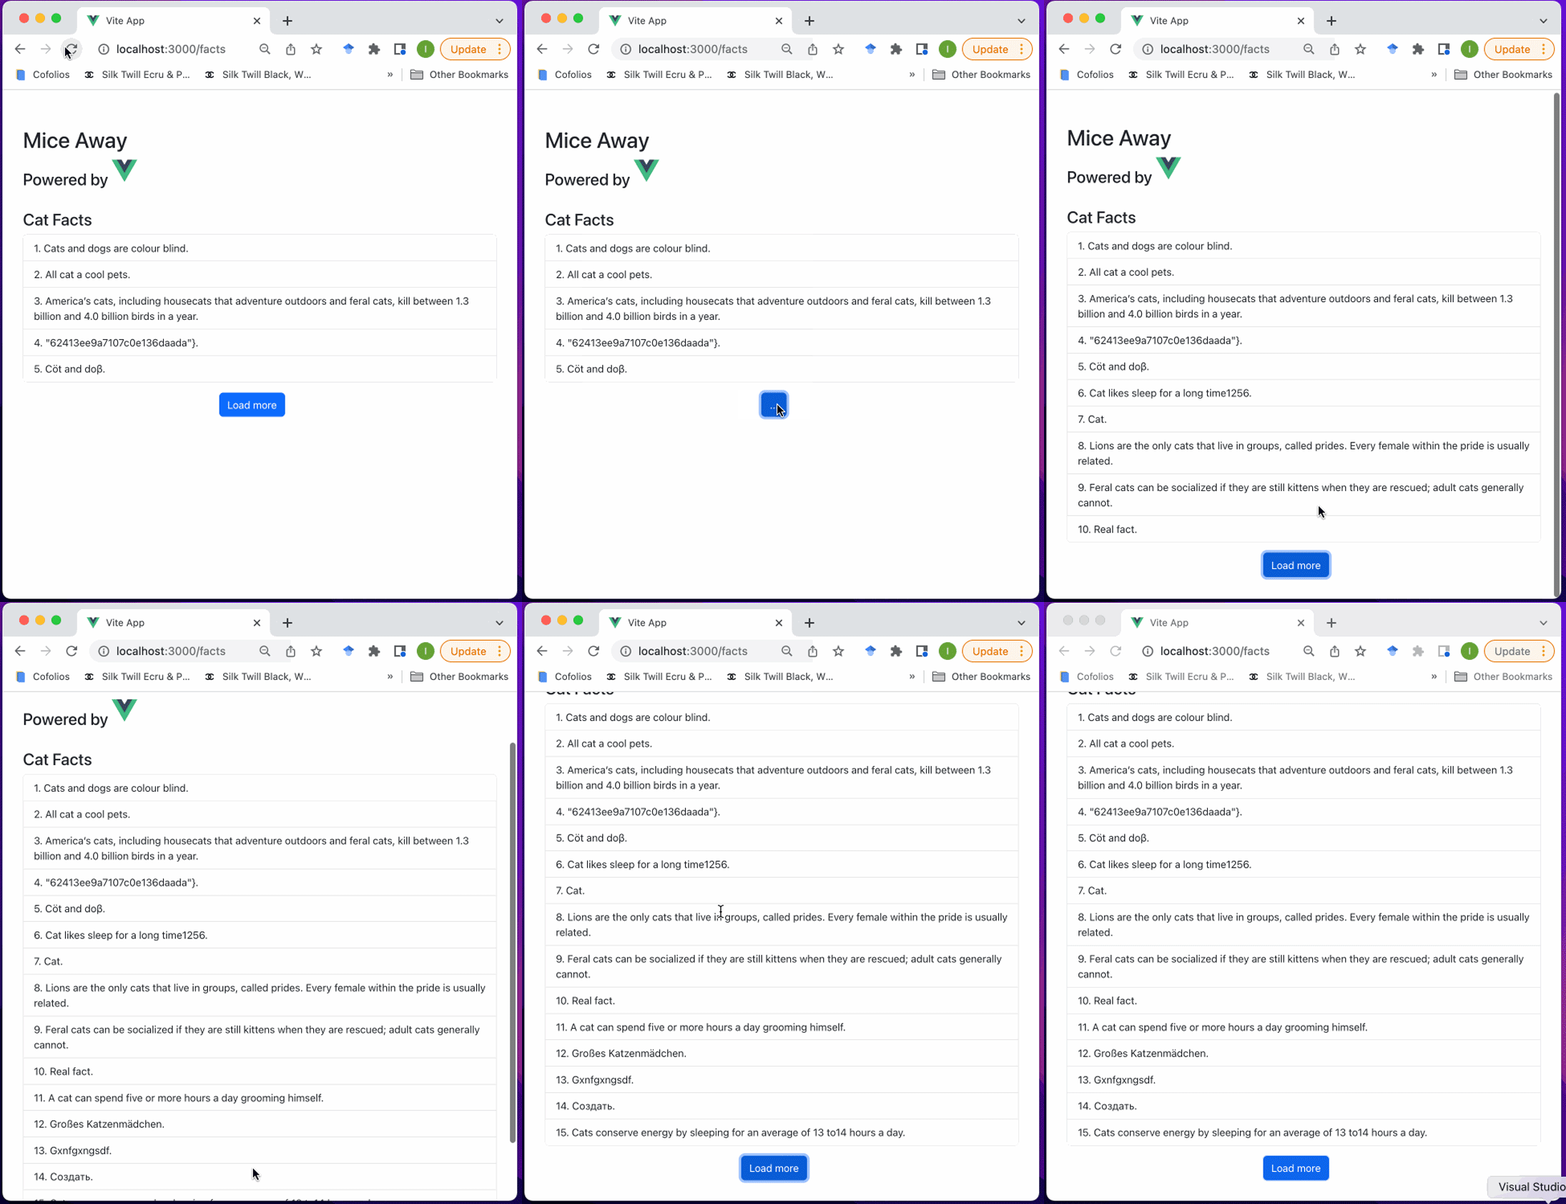
In this example, we imported Axios in our component and used it within one of the component methods to fetch data to display on the page by calling the GET method. You can see the result of this method below:

Another option for using Axios in our project is to create a plugin and assign a global Axios instance to our project. This option is useful when building an app to consume a specific API, which can be configured as the base URL.
Let’s create our Axios plugin!
First, we’ll create a directory to house our plugin by running the following in our terminal:
$ cd src/
$ mkdir plugins
Next, we will create our Axios plugin file axios.ts by running the following in our terminal:
$ touch axios.ts
Then, in our newly created axios.ts file, we will create an Axios instance and make it a global property:
// axios.ts

import axios from 'axios'
import type {App} from 'vue'

interface AxiosOptions {
    baseUrl?: string
    token?: string
}

export default {
    install: (app: App, options: AxiosOptions) => {
        app.config.globalProperties.$axios = axios.create({
            baseURL: options.baseUrl,
            headers: {
                Authorization: options.token ? `Bearer ${options.token}` : '',
            }
        })
    }
}
Now, we will register our plugin to our Vue instance in main.ts. While registering our Axios plugin, we will pass in the instance options, including our baseUrl:
// main.ts

import { createApp } from 'vue'
import { createPinia } from 'pinia'

import App from './App.vue'
import router from './router'
import axios from './plugins/axios'

const app = createApp(App)

app.use(createPinia())
app.use(router)
app.use(axios, {
    baseUrl: 'https://cataas.com/',
})

app.mount('#app')
Now that we have registered Axios, we have a global Axios object accessible as this.$axios. Let’s use it in our component:
// HomeView.vue

<template>
  <main>
    <div class="row">
      <div class="col-md-12 text-center mb-3">
        <span @click="selectTag(tag)" v-for="(tag, index) in visibileTags" :key="index"
          class="badge rounded-pill fs-5 me-2" :class="[tag === activeTag ? 'text-bg-primary' : 'text-bg-secondary']">
            #{{tag}}
        </span>
        <span @click="showNext()" class="badge rounded-pill text-bg-light fs-4">...</span>
      </div>
    </div>
    <div v-if="catImage" class="row">
      <div class="col-md-12 text-center">
        <img :src="catImage" class="img-fluid" height="500" width="450" :alt="activeTag ?? 'Default image'">
      </div>
    </div>
  </main>
</template>
<script lang="ts">
import { defineComponent } from 'vue'
import type {AxiosInstance} from 'axios'

declare module '@vue/runtime-core' {
  interface ComponentCustomProperties {
    $axios: AxiosInstance
    catTags: string[]
  }
}

interface DogBreed {
  name: string
}

export default defineComponent({
  name: 'HomeView',
  data() {
    return {
      catTags: [] as string[],
      displayStart: 0,
      displayCount: 5,
      activeTag: '',
      catImage: '',
    };
  },
  computed: {
    cleanCatTags() {
      return this.catTags.filter((tag) => tag !== '').map((tag) => tag.replace(/[&\/\\#,+()$~%.'":*?<>{}]/g, ''))
    },
    totalTags() {
      return this.cleanCatTags.length
    },
    displayEnd() {
      const sliceEnd = this.displayCount + this.displayStart
      return this.totalTags > sliceEnd ? sliceEnd : this.totalTags
    },
    visibileTags() {
      return this.cleanCatTags.slice(this.displayStart, this.displayEnd)
    },
    hasNextTags() {
      return this.displayEnd < this.totalTags
    }
  },
  methods: {
    async fetchCatTags() {
      const tagsResponse = await this.$axios.get('/api/tags')
      this.catTags = tagsResponse.data
    },
    showNext() {
      this.displayStart += this.displayCount
      this.selectTag(this.cleanCatTags[this.displayStart])
    },
    selectTag(tag: string) {
      const baseUrl = 'https://cataas.com/'
      this.catImage = `${baseUrl}cat/${tag}`
      this.activeTag = tag
    },
    loadDefaultCatImage() {
      const baseUrl = 'https://cataas.com/'
      this.catImage = `${baseUrl}cat/gif`
    }
  },
  async mounted() {
    await this.fetchCatTags()
    this.loadDefaultCatImage()
  },
});
</script>
In our component, we must overwrite the ComponentCustomProperties type to include $axios as a property. Without this, we would get the following compiler error:
Property $axios does not exist on type ComponentCustomProperties
In order to register $axios, we must also install Axios types by running npm i @types/axios and importing the Axios instance type AxiosInstance.
In the fetchCatTags method of our HomeView component, we used this.$axios to fetch cat tags, with which we can display cat images.
The difference between using our plugin instance and importing Axios directly into our component is that with the plugin, we can configure options for our Axios instance to avoid passing certain values for each request.
For example, with our plugin, we don’t have to pass in the baseUrl, and our request to /api/tags resolves to the baseUrl we configure.
You can see the result of using Axios with Vue by creating a plugin below:

Aside from providing convenient request methods for HTTP requests, Axios also provides some advanced configurations.
Axios provides options to perform actions before executing a request and returning a response. These are called request and response interceptors.
Interceptors are good for setting request configurations, such as headers (i.e,. authorization and content type), as well as checking and handling request errors. Here are some examples:
// Request interceptors
axios.interceptors.request.use(
  (config) => {
    // Do or set some things before the request is set

    // e.g. Authorization header
    config.headers["Authorization"] = `Bearer ${token}`

    // e.g. Content-type
    config.headers["Content-Type"] = "application/json"

    // e.g. set Base url
    config.baseURL = "https://base-url"

    return config
  },
  (error) => {
    return Promise.reject(error)
  })

// Response interceptors
axios.interceptors.response.use(
  (response) => {
    // do something i.e. return data object
    return response.data
  },
  (error) => {
    if (error?.response?.status === 403) {
      // Handle forbidden error e.g. show restricted access warning
    }

    if (error?.response?.status === 401) {
      // Handle unauthorized error e.g. refresh and set token in storage
    }

    throw error // forward other client errors
  })
Above, we’ve looked at the application of interceptors but Axios enhances the versatility of these interceptors by providing ways to remove them or apply them to specific Axios instances:
Here’s an example where we’re removing an Axios interceptor:
// Assign interceptor registration to a varaiable
const requestInterceptor = axios.interceptors.request.use((config) => {...})

// remove interceptor
axios.interceptors.request.eject(requestInterceptor)
Here’s an example where we’re adding an interceptor to a specific instance:
// Create axios instance
const instance = axios.create()
instance.interceptors.request.use((config) => {...})
Requests with Axios provide two callback functions: then for successful requests and catch for failed requests.
By default, Axios treats every response outside the 2xx response status code range as an error i.e., 401, 422, 500 response codes will resolve to the catch callback function. However, Axios also provides a validateStatus option to change what responses get treated as nonfailure responses. Here’s an example:
axios.get('/cats/1233', {
  validateStatus: function (status) {
    return status < 500; // Resolve only if the status code is less than 500
  }
})
In instances where users trigger a prolonged request within our application and subsequently exit that page, Axios provides a solution. By using its AbortController cancellation feature, we can terminate any initiated requests, eliminating the need for their responses once the user has left the relevant page:
// Request cancellation with Axios
const controller = AbortController()

axios.get('/cats/1233', {
  signal: controller.signal
}).then((response) => {...})

// Abort trigger
controller.abort()
AbortControllers are a recent addition to the JavaScript language, introduced as a part of theDOM(Document Object Model) specification. They provide a means to cancel asynchronous tasks. More details are available here.
In this article, we tried out two ways of using Axios in a Vue project. The first option was importing the Axios object directly into our component, which we used to fetch cat facts from a cool cat facts API.
Our second option was creating an Axios plugin that injected a global Axios object. We also configured our Axios instance’s base URL to a cat as a service API, which meant we didn’t have to specify the full URL in our requests.
You can find the entire code used in this article in my GitHub repo.
I hope you found this article useful. Please share any thoughts or questions you might have in the comment section!
Debugging Vue.js applications can be difficult, especially when users experience issues that are difficult to reproduce. If you’re interested in monitoring and tracking Vue mutations and actions for all of your users in production, try LogRocket.

LogRocket lets you replay user sessions, eliminating guesswork by showing exactly what users experienced. It captures console logs, errors, network requests, and pixel-perfect DOM recordings — compatible with all frameworks.
With Galileo AI, you can instantly identify and explain user struggles with automated monitoring of your entire product experience.
Modernize how you debug your Vue apps — start monitoring for free.

Russ Miles, a software development expert and educator, joins the show to unpack why “developer productivity” platforms so often disappoint.

Discover what’s new in The Replay, LogRocket’s newsletter for dev and engineering leaders, in the February 18th issue.

Learn how to recreate Claude Skills–style workflows in GitHub Copilot using custom instruction files and smarter context management.

Claude Code is deceptively capable. Point it at a codebase, describe what you need, and it’ll autonomously navigate files, write […]
Would you be interested in joining LogRocket's developer community?
Join LogRocket’s Content Advisory Board. You’ll help inform the type of content we create and get access to exclusive meetups, social accreditation, and swag.
Sign up now
2 Replies to "How to use Axios with Vue.js"
Thanks Buddy
how to use it with script setup?