With popular JavaScript frameworks and libraries such as React, Angular, and Vue, you can develop complex single-page applications and host them on platforms such as Netlify in only a few steps.

However, you might want to use these apps to run jobs, such as sending emails and accessing secret API credentials, which ordinarily requires setting up a server. Such jobs are usually impossible or ill-advised to run on the frontend. However, Netlify provides features for performing such actions from your Jamstack application without having to deploy a server.
One such feature is Netlify Functions. The goal of this article is to teach you how to send emails in a React application using event-driven Netlify Functions and SendGrid. The email will be in response to a form submission by a client.
Though we will be using React, the process should be similar for other frameworks with some slight variations.
A Netlify Function, like its name suggests, is a simple function that can be declared in JavaScript, Typescript, or Go and deployed with your frontend code to Netlify. Netlify then deploys your function to AWS without you having to set up an AWS account.
You declare Netlify Functions in a folder at the root of your frontend project directory. The path to the function is used as an endpoint to trigger the function.
By default, Netlify will look for your serverless function in the netlify/functions folder at the root of your project directory. If you want to declare the function in a different directory, include a netlify.toml configuration file and add information about the location of your function to it:
shell
project-folder
├── node_modules
├── netlify
|   ├── functions
|       ├── send-emails.js
├── package.json
├── package-lock.json
You can read more about the netlify.toml configuration file in the Netlify docs.
In the above project structure, the function send-emails.js has been declared in the netlify/functions folder. You can invoke it by making a request to the /.netlify/functions/send-emails endpoint.
While Netlify Functions need to be invoked by making a call to an endpoint, there is another flavor of Netlify Functions referred to as event-driven functions. They are invoked after certain events have been registered.
One such event is the submission-created event, which is emitted after a form submission has been verified by Netlify. A function must be named after the event for it to become an event-driven function.
In this article, we will be using an event-driven function to send an email after verifying a form submission.
You can check the Netlify documentation for a full list of available event triggers.
Ordinary Netlify Functions time out after ten seconds. If you want to execute a job that takes longer than that, you will have to use background functions.
Background functions run asynchronously in the background for up to 15min before they time out. You can turn ordinary Netlify Functions into background functions by adding a -background extension to its name. For example, send-emails-background.js is a background function.
Keep in mind, however, that background functions are still experimental at the time of writing this article.
Let us now create a simple React app in order to learn how to use Netlify Functions.
In this section, we will scaffold a React app using create-react-app. Run the command below on the terminal to create a fully configured React app in the email-app directory:
npx create-react-app email-app
You should see the email-app folder containing your React app after running the above command successfully.
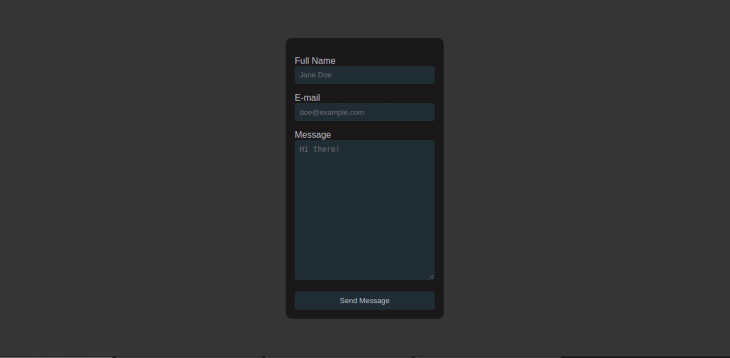
Now, let’s add a contact form to our app.
JSX formCreate ContactForm.js file in the src directory and paste in the code below:
export default function ContactForm() {
  return (
    <form name="contact-form" method="post">
      <div>
        <label htmlFor="name">Full Name</label> <br />
        <input
          type="text"
          id="name"
          name="name"
          placeholder="Jane Doe"
          required
        />
      </div>
      <div>
        <label htmlFor="email">E-mail</label> <br />
        <input
          type="email"
          id="email"
          name="email"
          placeholder="[email protected]"
          required
        />
      </div>
      <div>
        <label htmlFor="message">Message</label> <br />
        <textarea
          id="message"
          name="message"
          placeholder="Your message here!"
          required
        ></textarea>
      </div>
      <div>
        <input type="submit" className="submit" value="Send Message" />
      </div>
    </form>
  );
}
Copy and paste the code below in App.js, replacing the boilerplate code:
import "./App.css";
import ContactForm from "./ContactForm";

export default function App() {
  return (
    <div className="App">
      <ContactForm />
    </div>
  );
}
Let’s add a bit of styling to the form. Copy and paste the code below in the App.css file:
body {
  min-height: 95vh;
  display: flex;
  justify-content: center;
  align-items: center;
  background-color: rgb(54, 53, 53);
  color: #c5cdd3;
  font-family: sans-serif;
}
form {
  background-color: rgb(26, 24, 24);
  padding: 1em;
  border-radius: 10px;
}
div {
  padding-top: 1em;
}
input,
textarea {
  min-width: 250px;
  box-sizing: border-box;
  padding: 0.5em;
  outline: none;
  background-color: #222d35;
  border: 2px solid transparent;
  border-radius: 5px;
}
input:focus,
textarea:focus {
  border: 2px solid brown;
  color: #c5cdd3;
}
textarea {
  min-height: 250px;
  resize: vertical;
}
.submit {
  color: #c5cdd3;
}
.App {
  padding: 1em;
}
Netlify has a feature for managing form submissions; markup files are parsed at deployment. Adding data-netlify="true" or the netlify attribute to your form element is enough for Netlify to detect it and manage form submissions out of the box.
However, since we are dealing with React, what we added above is in JSX form. You will need to do a little more work to make your form detectable by Netlify bots when it is deployed.
Copy and paste the hidden form below just after the opening body tag in the index.html file in the public directory:
<form name="contact-form" netlify netlify-honeypot="bot-field" hidden>
  <input type="text" name="name" />
  <input type="email" name="email" />
  <textarea name="message"></textarea>
</form>
The above form is hidden from users because it will be used by Netlify bots. We have stripped the form of certain elements, leaving the bare bones input elements.
Copy and paste the input element below in your JSX form in the ContactForm component just after the opening form tag:
<input type="hidden" name="form-name" value="contact-form" />
By default, Netlify will start filtering submitted forms for spam. You can also configure Netlify to notify you via email, webhook, or Slack once a form submission has been verified.
After receiving a form submission, you will want to notify your client that their message has been received and their issue is being addressed. However, Netlify doesn’t have a built-in feature for sending an automated email response acknowledging receipt of the client’s message.
That will require you to use Netlify Functions and a third-party SMTP service. There are several SMTP service providers like SendGrid and Mailgun, among others. In this article, we will use SendGrid because it provides a free trial plan that doesn’t require a credit card. It also allows you to send up to 100 emails per day.
In the next section, we’ll sign up for SendGrid, verify our sender identity, and get an API key.
We’ll need an API key to interact with the SendGrid API programmatically.
Navigate to SendGrid and sign up using your email address. After logging in, verify your sender identity using single sender verification. The sender identity is what the client, or the recipient of the email, sees as the sender of the email.
Get an API key by clicking the Email API tab followed by Integration Guide. Choose the Web API setup method followed by Node.js as the preferred language. A page showing a step-by-step guide on how to send emails using SendGrid in Node should open.
Now we can create an API key by giving it an appropriate name.
Next, create a .env file at the root of the project directory and add the following lines of code to it:
# API key from SendGrid
SENDGRID_API_KEY=
# The email address which appears in the from field
SENDER_EMAIL=
The value of the SENDGRID_API_KEY environment variable is our SendGrid API key. That of SENDER_EMAIL is the sender email address we want to be displayed when the client receives our email.
Ignore the .env file by adding it to .gitignore so that we don’t accidentally push it to a remote git hosting service like GitHub, GitLab, or BitBucket; we don’t want to expose our API key.
Ordinarily, we would need the dotenv package to use environment variables in Node. It is unnecessary here because react-scripts uses dotenv under the hood.
In the next section, we will add the Netlify Function for sending an email.
Now, let’s add a Netlify Function for sending an automated email response whenever a client submits a form. We will send the email after Netlify emits the submission-created event.
An event-driven Netlify Function must have the same name as the event that will trigger it. There are several events that Netlify emits, but we are only interested in the submission-created event, which is emitted whenever a form submission has been verified.
As already mentioned, a function that needs to be triggered by the submission-created event must be named submission-created.js.
Run the command below to install netlify-cli. It is a handy npm package we can use to work with Netlify via the command line:
npm i netlify-cli -g
Successfully running the above command will install netlify-cli globally.
Create a folder at the root of the project directory and name it netlify. Create another folder in the netlify folder you have just created and name it functions.
Run the command below to create the Netlify Functions boilerplate code and pick the submission-created boilerplate when prompted. Use the up and down arrow keys to navigate through the list if you don’t see the submission-created option:
netlify functions:create submission-created
We should be able to see the submission-created.js file in the netlify/functions folder after successfully running the above command. This is what the contents of the file should look like:
A Netlify Function file will always export a single function that takes the event and context parameters. Note, however, that the context parameter is not required to send an email.
We can access the contents of the submitted form in the body field of the event object. The shape of the event object is shown below:
{
  path: '',
  httpMethod: '',
  queryStringParameters: {},
  multiValueQueryStringParameters: {},
  headers: {},
  multiValueHeaders: {},
  body: '{payload:{data:{}}}',
  isBase64Encoded: false
}
For us to send an email via SendGrid, we need the @sendgrid/mail package. We can install the required dependencies for a Netlify Function like any other dependency in a frontend app. Netlify will extract the dependencies and deploy them to AWS with our function when the application’s build process completes.
Run the command below to install the @sendgrid/mail npm package so that we can interact with the SendGrid web API from our function:
npm i @sendgrid/mail
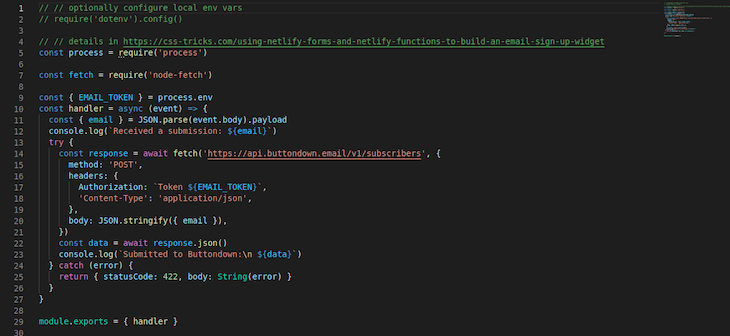
After successfully installing @sendgrid/mail, copy and paste the code below in the submission-created.js file we created above:
const sendGridMail = require("@sendgrid/mail");

const handler = async (event) => {
  try {
    const { name, email, message } = JSON.parse(event.body).payload.data;

    console.log(`name: ${name}, email: ${email}, message: ${message}`);

    sendGridMail.setApiKey(process.env.SENDGRID_API_KEY);
    const html = `
      <div>
         Hi ${name}! <br><br>
         Thanks for getting in touch.
         We have received your message
         and one of our customer care
         representatives will get in
         touch shortly
         <br><br>
         Best <br>
         John Doe
      </div>
    `;
    const mail = {
      from: process.env.SENDER_EMAIL,
      to: email,
      subject: "We have received your message",
      html,
    };
    await sendGridMail.send(mail);
    return {
      statusCode: 200,
      body: JSON.stringify({ message: "Email sent" }),
    };
  } catch (error) {
    return { statusCode: 422, body: String(error) };
  }
};

module.exports = { handler };
In the code above, we required the @sendgrid/mail package like any other Node package and destructured the submitted email from the payload. The mail object passed to the sendGridMail.send method, which contains all the necessary information required by SendGrid to send your email.
In the next section, we will test the function we have just added.
It is time to test our app. Start the local development server by running the command below on the terminal:
netlify dev
Successfully running the above command will start the development server on port 8888.
Once the form is submitted, you should then see an email delivered to your inbox. You can go ahead and deploy the app to Netlify using netlify-cli or using the continuous deployment feature via GitHub, Gitlab, or Bitbucket.
I have deployed the codebase for this app to GitHub, where you can clone the repository and explore more features of the platform.
And that is how you send emails using Netlify Functions and a third-party SMTP server! If you want to send emails using Netlify Functions but not in response to the submission-created event, you will have to use ordinary functions, although without Netlify’s built-in feature for handling forms.
It has become easy for frontend developers to provide a full-stack experience in a Jamstack application using serverless functions. As proven above, you can write your server-side code in a simple function and deploy with your frontend application, then leave it to platforms such as Netlify to do the rest for you.
Install LogRocket via npm or script tag. LogRocket.init() must be called client-side, not
server-side
$ npm i --save logrocket

// Code:

import LogRocket from 'logrocket';
LogRocket.init('app/id');
// Add to your HTML:

<script src="https://cdn.lr-ingest.com/LogRocket.min.js"></script>
<script>window.LogRocket && window.LogRocket.init('app/id');</script>

Learn how Storybook MCP enables AI agents to understand your component library, generate accurate UI, and validate code using documentation, stories, and automated tests.

Debug RSC hydration mismatches in production with Next.js instrumentation, Suspense isolation, HTML diffing, and CI smoke tests.

Explore why npm dependencies are a major supply chain security risk and how to protect JavaScript apps from compromised packages and transitive threats.

Enabled React Compiler v1.0 on a production Next.js app. Here’s every warning, breakage, and silent opt-out I documented — and what actually worked.
Hey there, want to help make our blog better?
Join LogRocket’s Content Advisory Board. You’ll help inform the type of content we create and get access to exclusive meetups, social accreditation, and swag.
Sign up now

