Authentication is one of the most important aspects of any application. It improves app security by verifying users before granting them access to different parts of the application. Authentication also enables companies to keep track of how many people are using their products.

It’s vitally important to configure authentication correctly. In fact, the Open Web Application Security Project (OWASP) identifies identification and authentication failures in its list of top ten web application security risks.
This tutorial will demonstrate the step-by-step process for implementing JWT user authentication in NestJS.
Jump ahead:
This tutorial is a hands-on demonstration. To follow along, ensure you have the following installed:
NestJS is a server-side application framework for Node.js that allows you to create scalable and efficient apps. It’s written in TypeScript and constructed with Express.js, a lightweight framework that’s fantastic on its own but lacks structure.
Nest has support for object-oriented programming, functional programming, and functional reactive programming. This frame work is a great choice if you want a lot of structure on your app’s backend.
Nest has similar syntax and structure to Angular, a frontend framework. It also employs TypeScript, services, and dependency injection, just like Angular. Nest uses modules and controllers and allows you to use the command-line interface to create controllers for a file.
To set up the project, you’ll first need to install the Nest CLI globally with the following command:
npm i -g @nestjs/cli
Once the installation is complete, create a new project, like so:
nest new auth-with-nest
Next, you’ll be prompted to choose a package manager to install the dependencies. For this demonstration, we’ll use Yarn.

Choose yarn and press the Enter key. Now, wait while Yarn installs all the required dependencies required to run the application.
To set up and connect your database, install the Mongoose package, bcrypt, and the NestJS wrapper with the following command:
npm install --save @nestjs/mongoose @types/bcrypt mongoose bcrypt
Now, update the app.module.ts file and set up Mongoose, like so:
import { MongooseModule } from '@nestjs/mongoose';
@Module({
  imports: [MongooseModule.forRoot('mongodb://localhost/authentication')],
})
In the above snippet, we imported the MongooseModule into the root AppModule.
To keep your code clean and well organized, create a module specifically for NestJS CLI users by running the following command:
nest g module users
The above code creates a user folder with a users.module.ts file and an app.module.ts updates file.
To create a user schema, create a users.model.ts file in the src/users folder and add the following code:
import { Prop, Schema, SchemaFactory } from '@nestjs/mongoose';
import { Document } from 'mongoose';

export type UserDocument = User & Document;

@Schema()
export class User {
  @Prop()
  username: string;

  @Prop()
  password: string;
}

export const UserSchema = SchemaFactory.createForClass(User);
Here, we’ve defined the shape of our User schema with the @Schema() decorator and the @Prop() decorator.
Mongoose will map the schema to a MongoDB collection. The schema defines the shape of the collection’s documents.
Now, replace the code in the user/user.module.ts file and make the userSchema available in the imports with the following code:
import { Module } from '@nestjs/common';
import { UsersService } from './user.service';
import { UsersController } from './user.controller';
import { MongooseModule } from "@nestjs/mongoose"
import { UserSchema } from "./user.model"

@Module({
  imports: [MongooseModule.forFeature([{ name: "user", schema: UserSchema }])],
  providers: [UsersService],
  controllers: [UsersController]
})
export class UserModule {}
With the user schema created, run the below command to create a user service:
nest g service users
This code creates a users.service.ts file and updates the app.module.ts file.
N.B., you can choose to create your files and folders manually, but the NestJS CLI will make your life easier by automatically updating the necessary folders
Now, add the following code to the users.service.ts file:
import { Injectable } from '@nestjs/common';
import { InjectModel } from '@nestjs/mongoose';
import { Model } from 'mongoose';
import { User, UserDocument } from './users.model';

@Injectable()
export class UsersService {
    constructor(@InjectModel('user') private readonly userModel: Model<UserDocument>) { }
    async createUser(username: string, password: string): Promise<User> {
        return this.userModel.create({
            username,
            password,
        });
    }
    async getUser(query: object ): Promise<User> {
        return this.userModel.findOne(query);
    }
}
Here, we used the @InjectModel() decorator to inject the userModel into the UsersService.
Now let’s create a user controller to define the API routes:
nest g service users
Add the code to the users.controller.ts file:
import { Body, Controller, Post, Get, Param } from '@nestjs/common';
import { UsersService } from './users.service';
import { User } from './users.model';
import * as bcrypt from 'bcrypt';

@Controller('auth')
export class UsersController {
    constructor(private readonly usersService: UsersService) { }

    @Post('/signup')
    async createUser(
        @Body('password') password: string,
        @Body('username') username: string,
    ): Promise<User> {
        const saltOrRounds = 10;
        const hashedPassword = await bcrypt.hash(password, saltOrRounds);
        const result = await this.usersService.createUser(
            username,
            hashedPassword,
        );
        return result;
    }
}
Here, we defined two API routes and consumed the services we created. We used bcrypt to hash the user password.
Let’s start by creating an auth module, like so:
nest g module auth
This command will create a new folder, auth, with an auth.module.ts file; it will also update the app.module.ts file.
Now, let’s implement a JSON web token to authenticate users into the application.
To get started, install the following dependencies:
npm install --save @nestjs/jwt passport-jwt
npm install --save-dev @types/passport-jwt
Next, create a new file, local.auth.ts, and add the following code:
import { Strategy } from 'passport-local';
import { PassportStrategy } from '@nestjs/passport';
import { Injectable, UnauthorizedException } from '@nestjs/common';
import { AuthService } from './auth.service';

@Injectable()
export class LocalStrategy extends PassportStrategy(Strategy) {
  constructor(private authService: AuthService) {
    super();
  }

  async validate(username: string, password: string): Promise<any> {
    const user = await this.authService.validateUser(username, password);
    if (!user) {
      throw new UnauthorizedException();
    }
    return user;
  }
}
Here, we implemented a passport-local strategy to authenticate the JSON web token. By default, the passport-local strategy expects username and password properties in the request body.
We also implemented the validate() method which the Passport middleware will call to verify the user using an appropriate strategy-specific set of parameters.
Next, replace the code in the AuthModule with the following:
import { Module } from "@nestjs/common"
import { UserModule } from "src/user/user.module";
import { AuthService } from "./auth.service"
import { PassportModule } from "@nestjs/passport"
import { JwtModule } from '@nestjs/jwt';
import { AuthController } from './auth.controller';
import { UsersService } from "src/user/user.service";
import { MongooseModule } from "@nestjs/mongoose"
import { UserSchema } from "../user/user.model"
import { LocalStrategy } from './local-strategy';


@Module({
  imports: [UserModule, PassportModule, JwtModule.register({
    secret: 'secretKey',
    signOptions: { expiresIn: '60s' },
  }), MongooseModule.forFeature([{ name: "user", schema: UserSchema }])],
  providers: [AuthService, UsersService, LocalStrategy],
  controllers: [AuthController],
})
export class AuthModule { }
Here, we imported the PassportModule and JwtModule into the array of imports. Then we used the register method to register JWT, providing the secret and expiration time.
We also made the UserSchema available in the imports and added the UserService and our LocalStrategy to the array of providers.
N.B., for security reasons, always save your JWT secret in an environment variable
Now, let’s add authentication features to the application.
With JWT and Passport configured, run the following command to create auth.service.ts and auth.controller.ts files in the auth folder.:
nest generate service auth
nest generate controller auth
Next, open the auth/auth.service.ts file and authenticate the users with the following code:
import { Injectable, NotAcceptableException } from '@nestjs/common';
import { UsersService } from 'src/user/user.service';
import * as bcrypt from 'bcrypt';
import { JwtService } from '@nestjs/jwt';

@Injectable()
export class AuthService {
    constructor(private readonly usersService: UsersService, private jwtService: JwtService) { }
    async validateUser(username: string, password: string): Promise<any> {
        const user = await this.usersService.getUser({ username });
        if (!user) return null;
        const passwordValid = await bcrypt.compare(password, user.password)
        if (!user) {
            throw new NotAcceptableException('could not find the user');
        }
        if (user && passwordValid) {
            return user;
        }
        return null;
    }
    async login(user: any) {
        const payload = { username: user.username, sub: user._id };
        return {
            access_token: this.jwtService.sign(payload),
        };
    }
}
Here, we created the validateUser method to check if a user from the user.model matches a user record from the database. If there is no match, the method returns a null value.
We also created the login method which uses the jwtService.sign method to generate a JWT access token for the returned user from the validate from our LocalStrategy.
Now, add the code snippet below to the auth/auth.controller.ts file to create a route for the user login.
import { Controller, Request, Post, UseGuards } from '@nestjs/common';
import { AuthService } from './auth.service';
import { AuthGuard } from '@nestjs/passport';

@Controller()
export class AuthController {
    constructor(private authService: AuthService) { }

    @UseGuards(AuthGuard('local'))
    @Post('auth/login')
    async login(@Request() req) {
        return this.authService.login(req.user);
    }
}
Here, we used the @UseGuards() decorator to enforce authentication when a user requests the login route. With the AuthGuard class, we’re able to authenticate a user using the local strategy.
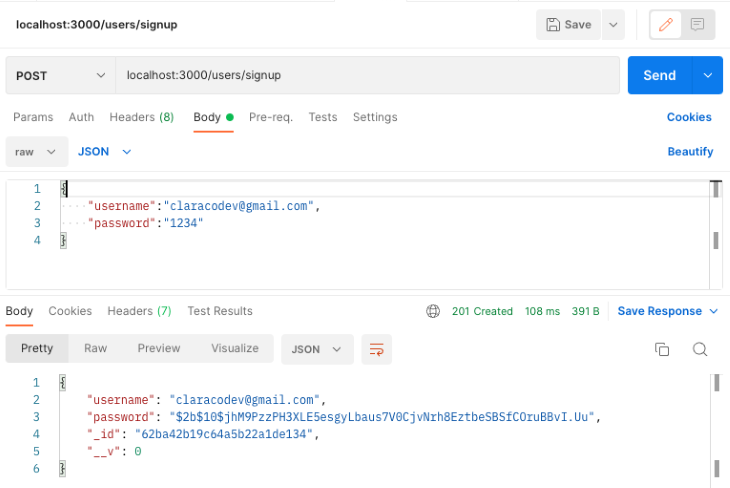
Now let’s test the application using Postman. We’ll start with the signup route.
First, start the application:
npm run start
Next, open Postman and test the signup route by sending a post request to the endpoint. localhost:3000/users/signup.
Now, test the login endpoint by sending a post request to the endpoint. localhost:3000/auth/login.
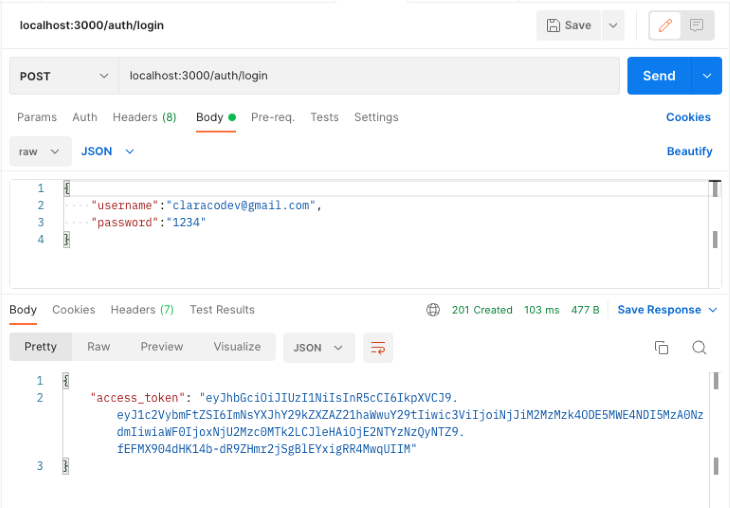
If the username and password exist in the database, the user will receive an access_token as shown above. With the access_token, the user will be able to access the protected routes in the API.
In this tutorial, we provided an overview of NestJS and then demonstrated how to implement JWT user authentication on a NestJS API.
Now that you have this knowledge, how will you handle user authentication in your next Nest project? To learn more about NestJS JWT authentication, refer to the official documentation.
Install LogRocket via npm or script tag. LogRocket.init() must be called client-side, not
server-side
$ npm i --save logrocket

// Code:

import LogRocket from 'logrocket';
LogRocket.init('app/id');
// Add to your HTML:

<script src="https://cdn.lr-ingest.com/LogRocket.min.js"></script>
<script>window.LogRocket && window.LogRocket.init('app/id');</script>

Learn how to set up Meilisearch, index documents, and build keyword, semantic, and hybrid search with AI-powered retrieval.

Compare pnpm and npm across security defaults, disk usage, dependency strictness, and workspace policy to decide which package manager fits your project.

I migrated 20 production-style components from Tailwind to StyleX. Here’s what the data showed about LOC, CSS bundle size, build time, and type safety.

A guide for using JWT authentication to prevent basic security issues while understanding the shortcomings of JWTs.
Hey there, want to help make our blog better?
Join LogRocket’s Content Advisory Board. You’ll help inform the type of content we create and get access to exclusive meetups, social accreditation, and swag.
Sign up now

