BEP-20 is the token standard of the Binance Smart Chain (BSC). The Binance Smart Chain is a programmable blockchain with support for smart contracts and EVM compatibility. This makes it a good candidate for building decentralized applications.

To interact with the BSC blockchain, a token based on the BEP-20 standard, BNB, is required to pay for transactions, just like Ether is used to pay for gas fees in the Ethereum blockchain. In fact, the BEP-20 standard is an extension of the ERC–20 standard on Ethereum. This makes it possible to build decentralized apps on the Binance Smart Chain using current Ethereum tooling.
In this tutorial, we’ll code a sample BEP-20 token by implementing the BEP-20 token standard, deploy it to the Binance Smart Chain testnet using Remix, verify the token source code on BscScan, and, finally, import the deployed token into MetaMask.
We’ll cover the following in detail:
This guide assumes prior knowledge of Solidity and EVM. Here’s a good resource on Solidity and one on EVM.
The Replay is a weekly newsletter for dev and engineering leaders.
Delivered once a week, it's your curated guide to the most important conversations around frontend dev, emerging AI tools, and the state of modern software.
A BEP-20 token requires certain functions to enable other accounts to interact with it properly. You can take a look at these as outlined in the official BEP-20 proposal. I recommend reading through the proposal to familiarize yourself with the required functions.
Most real-world tokens, however, extend this proposal in different ways. For example, most tokens add the ability to:
For the purposes of this tutorial, we’ll implement the base BEP-20 proposal and allow minting and burning of tokens. You can extend this even more as an exercise to get more familiar with working with tokens.
There are a few prerequisites to coding a BEP-20 token:
After coding the token in Remix, you can test, and then deploy it to a public network.
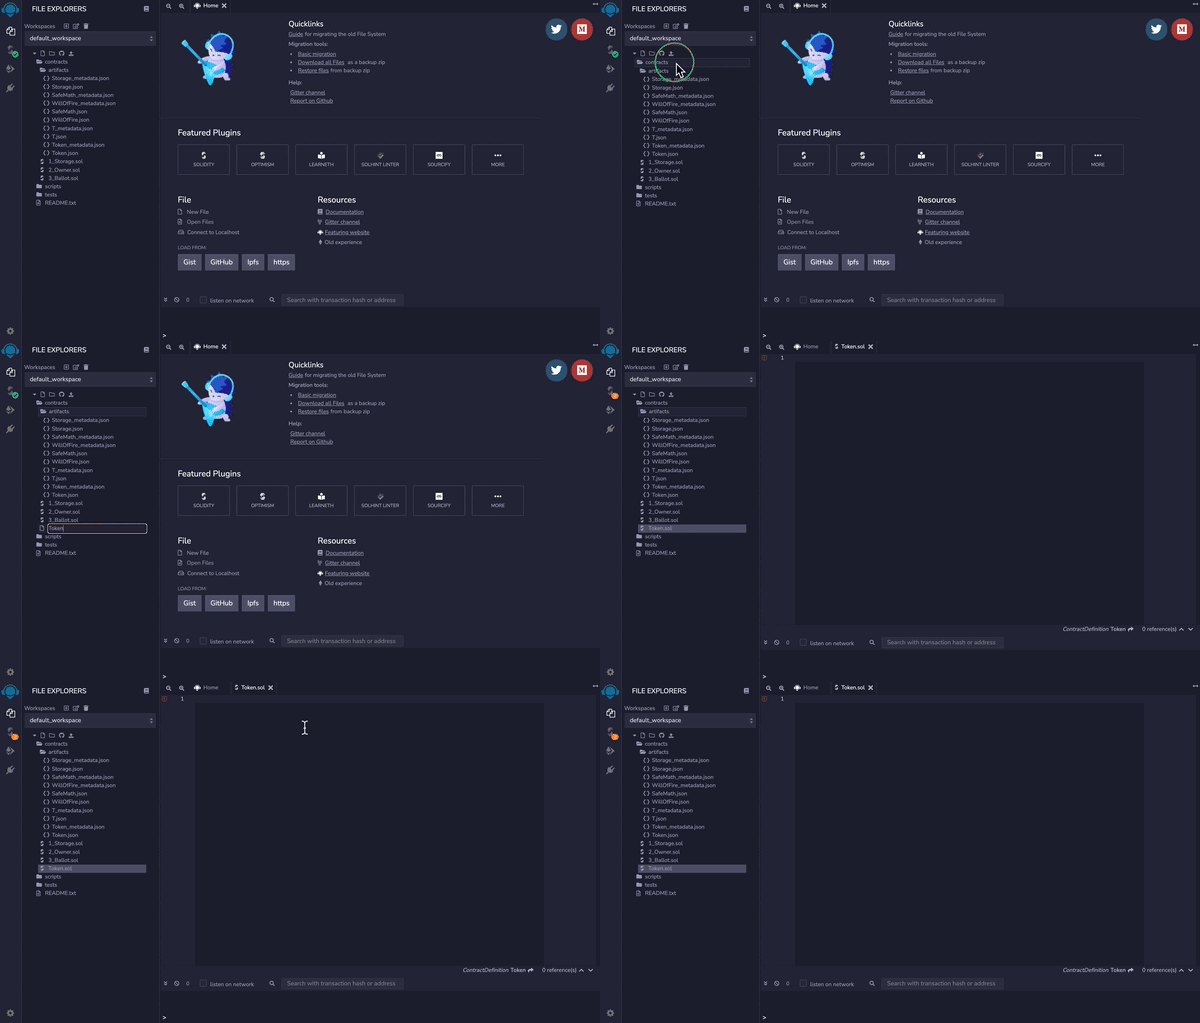
For now, open Remix and create a new Token.sol file under /contracts. Make sure it is open in the editor.
Let’s start coding out the BEP-20 token!

Declare a license and the version of Solidity the token is written in (we’ll be using the latest version 0.8 and above.
// SPDX-License-Identifier: GPL-3.0
pragma solidity >=0.8.0;
Create a new contract declaration called Token.
contract Token {
 // All subsequent code will be inside this block
}
Next, let’s initialize the variables and events required to implement the BEP-20 token standard one by one:
contract Token {
    string public name; // Holds the name of the token
    string public symbol; // Holds the symbol of the token
    uint8 public decimals; // Holds the decimal places of the token
    uint256 public totalSupply; // Holds the total suppy of the token
    address payable public owner; // Holds the owner of the token

    /* This creates a mapping with all balances */
    mapping (address => uint256) public balanceOf;
    /* This creates a mapping of accounts with allowances */
    mapping (address => mapping (address => uint256)) public allowance;

    /* This event is always fired on a successfull call of the
       transfer, transferFrom, mint, and burn methods */
    event Transfer(address indexed from, address indexed to, uint256 value);
    /* This event is always fired on a successfull call of the approve method */
    event Approve(address indexed owner, address indexed spender, uint256 value);

... code continues below (1)
If you read the proposal, you’ll notice the variables share the same name as some functions. This is useful because in Solidity v0.8 and above, public variables automatically generate getter functions.
So, in effect, we’ll have the following functions available automatically:
name()symbol()decimals()totalSupply()owner()balanceOf()allowance()Next, we define the constructor of the token contract. In this constructor, we specify the token’s details, such as name, symbol, etc. We mint (i.e., create) a specified amount of tokens and transfer them to the owner of the token.
Currently, we hardcode these values directly inside the constructor definition, but it’s also possible to retrieve them from the constructor arguments.
... code continues from above (1)

    constructor() {
        name = "RandomToken"; // Sets the name of the token, i.e Ether
        symbol = "RDT"; // Sets the symbol of the token, i.e ETH
        decimals = 18; // Sets the number of decimal places
        uint256 _initialSupply = 1000000000; // Holds an initial supply of coins

        /* Sets the owner of the token to whoever deployed it */
        owner = payable(msg.sender);

        balanceOf[owner] = _initialSupply; // Transfers all tokens to owner
        totalSupply = _initialSupply; // Sets the total supply of tokens

        /* Whenever tokens are created, burnt, or transfered,
            the Transfer event is fired */
        emit Transfer(address(0), msg.sender, _initialSupply);
    }

... code continues below (2)
We can now start defining the functions that are not automatically created for us. Remember, all public variables have getter functions defined automatically by Solidity 0.8 and above.
getOwner()getOwner() returns the address of the owner of the BEP-20 token. It simply returns the owner variable we initialized in the constructor.
... code continues from above (2)

    function getOwner() public view returns (address) {
        return owner;
    }

... code continues below (3)
transfer(address _to, uint256 _value)transfer(address _to, uint256 _value) transfers a specified amount of tokens to an address. This function basically deducts an amount (_value) from whichever address called the function. The deducted amount is then added to the address specified in the argument (_to).
... code continues from above (3)

    function transfer(address _to, uint256 _value) public returns (bool success) {
        uint256 senderBalance = balanceOf[msg.sender];
        uint256 receiverBalance = balanceOf[_to];

        require(_to != address(0), "Receiver address invalid");
        require(_value >= 0, "Value must be greater or equal to 0");
        require(senderBalance > _value, "Not enough balance");

        balanceOf[msg.sender] = senderBalance - _value;
        balanceOf[_to] = receiverBalance + _value;

        emit Transfer(msg.sender, _to, _value);
        return true;
    }

... code continues below (4)
transferFrom(address _from, address _to, uint256 _value)transferFrom(address _from, address _to, uint256 _value) transfers a specified amount of tokens from one address to another. This method differs from transfer in the sense that it allows an account to transfer tokens on behalf of another account.
To achieve this functionality, an allowance is approved by the recipient (_to) beforehand. All calls to this function then uses the preapproved allowance to make transfers.
An example use case of this method is a smart contract transferring tokens on your behalf and/or charging fees.
... code continues from above (4)

    function transferFrom(address _from, address _to, uint256 _value)
      public returns (bool success) {
        uint256 senderBalance = balanceOf[msg.sender];
        uint256 fromAllowance = allowance\[_from\][msg.sender];
        uint256 receiverBalance = balanceOf[_to];

        require(_to != address(0), "Receiver address invalid");
        require(_value >= 0, "Value must be greater or equal to 0");
        require(senderBalance > _value, "Not enough balance");
        require(fromAllowance >= _value, "Not enough allowance");

        balanceOf[_from] = senderBalance - _value;
        balanceOf[_to] = receiverBalance + _value;
        allowance\[_from\][msg.sender] = fromAllowance - _value;

        emit Transfer(_from, _to, _value);
        return true;
    }

... code continues below (5)
approve(address _spender, uint256 _value)approve(address _spender, uint256 _value) allows an account (_spender) to withdraw from another account (the caller) multiple times, up to the specified amount (_value). This method is what makes transferFrom possible because an account is able to authorize another account to make transfers on its behalf.
... code continues from above (5)

    function approve(address _spender, uint256 _value) public returns (bool success) {
        require(_value > 0, "Value must be greater than 0");

        allowance\[msg.sender\][_spender] = _value;

        emit Approve(msg.sender, _spender, _value);
        return true;
    }

... code continues below (6)
mint(uint256 _amount)mint(uint256 _amount) allows the token owner to create a specified amount (_amount) of new tokens and transfer them to themself. This increases the total supply of the token.
... code continues from above (6)

    function mint(uint256 _amount) public returns (bool success) {
        require(msg.sender == owner, "Operation unauthorised");

        totalSupply += _amount;
        balanceOf[msg.sender] += _amount;

        emit Transfer(address(0), msg.sender, _amount);
        return true;
    }

... code continues below (7)
burn(uint256 _amount)burn(uint256 _amount) allows a token holder to burn (i.e., destroy) a specified amount of existing tokens from their own account. This operation decreases the total supply of the token.
... code continues from above (7)

    function burn(uint256 _amount) public returns (bool success) {
      require(msg.sender != address(0), "Invalid burn recipient");

      uint256 accountBalance = balanceOf[msg.sender];
      require(accountBalance > _amount, "Burn amount exceeds balance");

      balanceOf[msg.sender] -= _amount;
      totalSupply -= _amount;

      emit Transfer(msg.sender, address(0), _amount);
      return true;
    }

... end of all code
Your source code should look exactly the same as the above.
Now that we’re done coding the token, it’s time to deploy it. For this tutorial, we’ll deploy the token contract using Remix.
Before we get started, we need:
Now that we have MetaMask configured and some BNB in our development account, we can go ahead and deploy the token contract to a public BSC network.
If you’ve been following this tutorial, then you already have Remix open. Otherwise, open Remix, create a new contract file, and paste in the contents of your token source code.
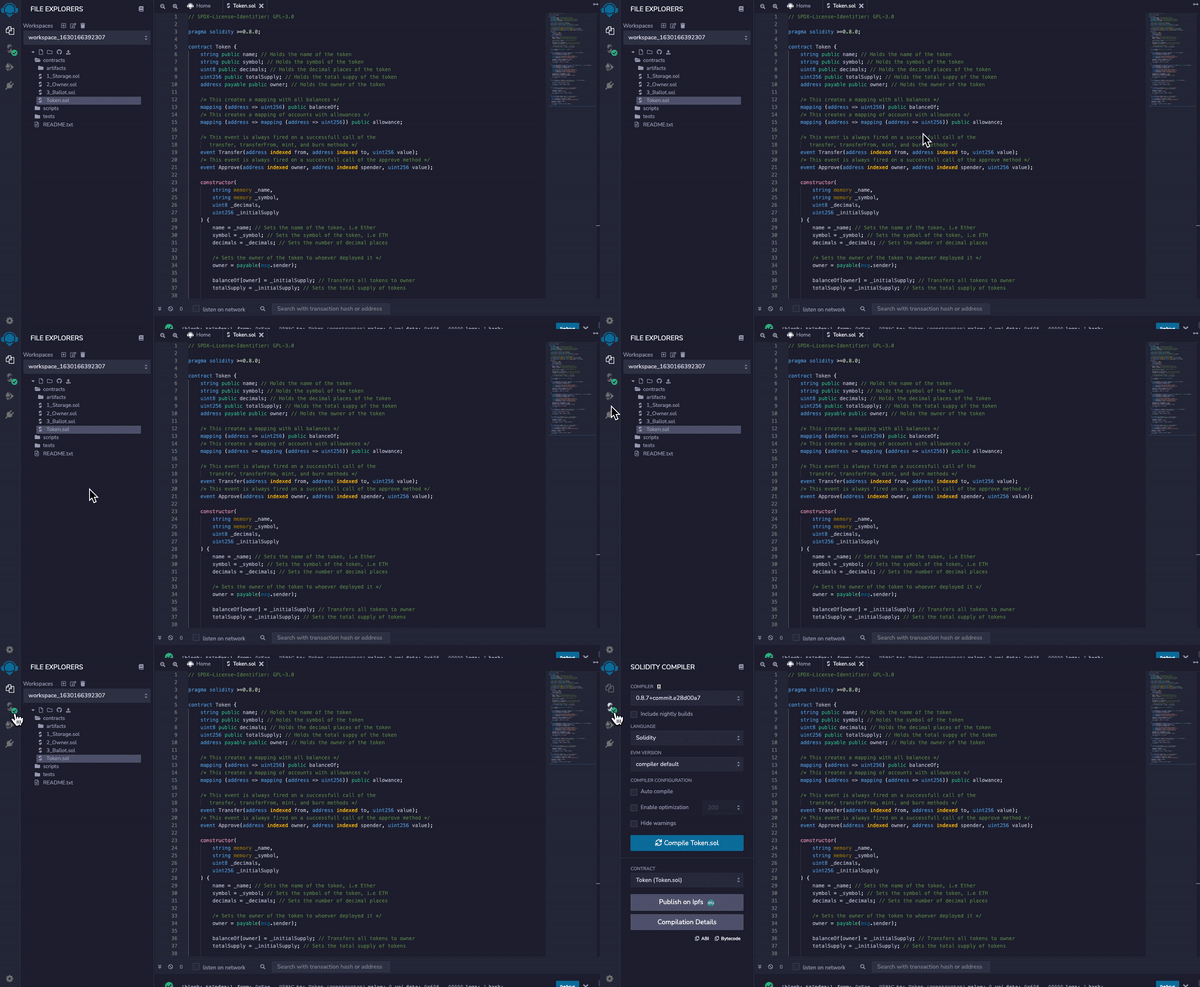
On the left sidebar, click on the Solidity compiler option (at the time of writing, it’s the second option), and click Compile Token.sol.
Click on the Deploy and run transactions option (third option).
Set the ENVIRONMENT to Injected Web3. A MetaMask prompt should pop up asking you to confirm the transaction. If it doesn’t, ensure you have MetaMask installed and configured on the right BSC network.
Click the Deploy button, confirm the transaction, and you should be able to see your contract under the Deployed Contracts section.
Copy the address of the deployed contract; you’ll need it in the next section. Simply click the Copy icon beside the deployed contract.

Once you have your token deployed on a public network, you may want to verify the source code on BscScan.
BscScan is a tool that allows you to view transactions occurring on the BSC network (both mainnet and testnet). When you verify the source code on BscScan, you lend extra legitimacy to the token because it allows everyone to see what’s going on under the hood of the token.
Thankfully, doing this verification is relatively easy, as long as you have access to the source code.
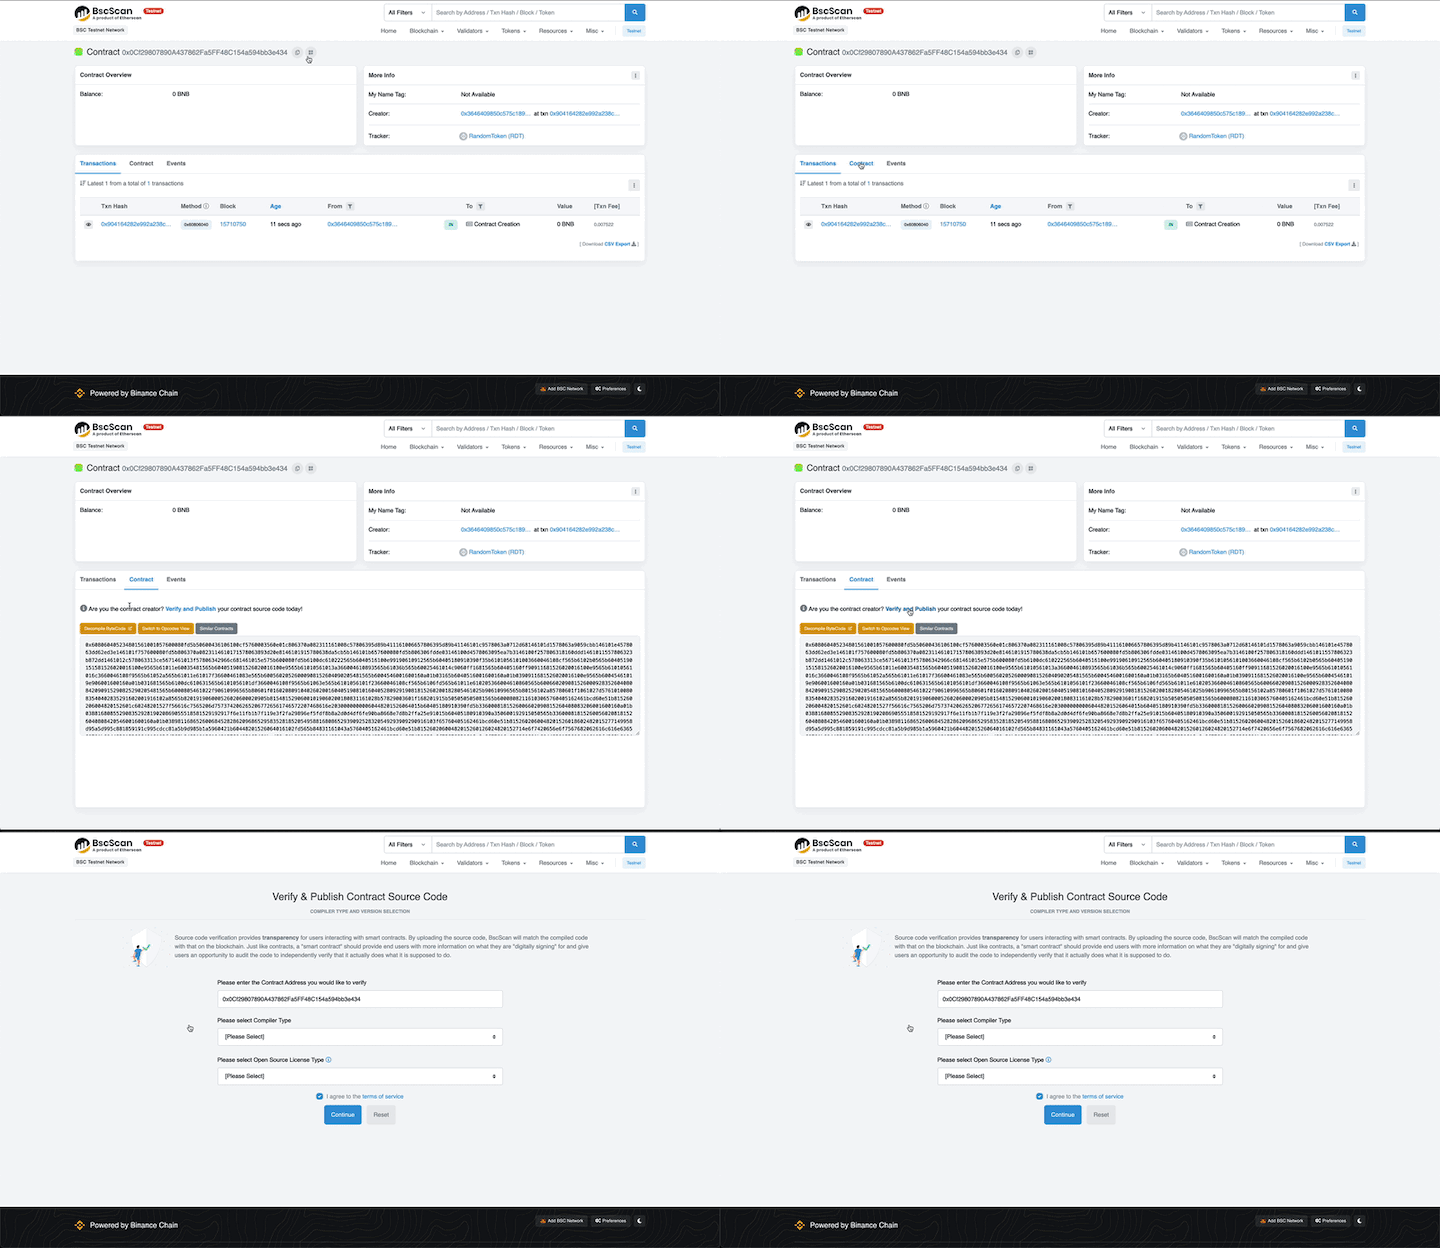
First, let’s view the deployed contract on BscScan (full GIF walkthrough below).
Navigate to the homepage. If you deployed to mainnet, visit BscScan Mainnet. If you deployed to testnet, visit BscScan testnet.
Paste in the address of the deployed contract you copied from the previous step into the search bar and hit enter.
You should see details of the token. Click on the Contract tab below the token details.
Click Verify and Publish and fill in the form as shown below.
Make sure the compiler version is exactly the same as in Remix and that the license field is set to the same as in the source code (in this case, GNU Public License 3.0). Then, click Continue.
You should see an input box to paste in the contract smart code. Copy the source code from the Remix editor, paste it in the box, and click Verify and Publish.

The token contract is now deployed and verified on BscScan, so it’s now possible to import the token in MetaMask and make transactions with it.
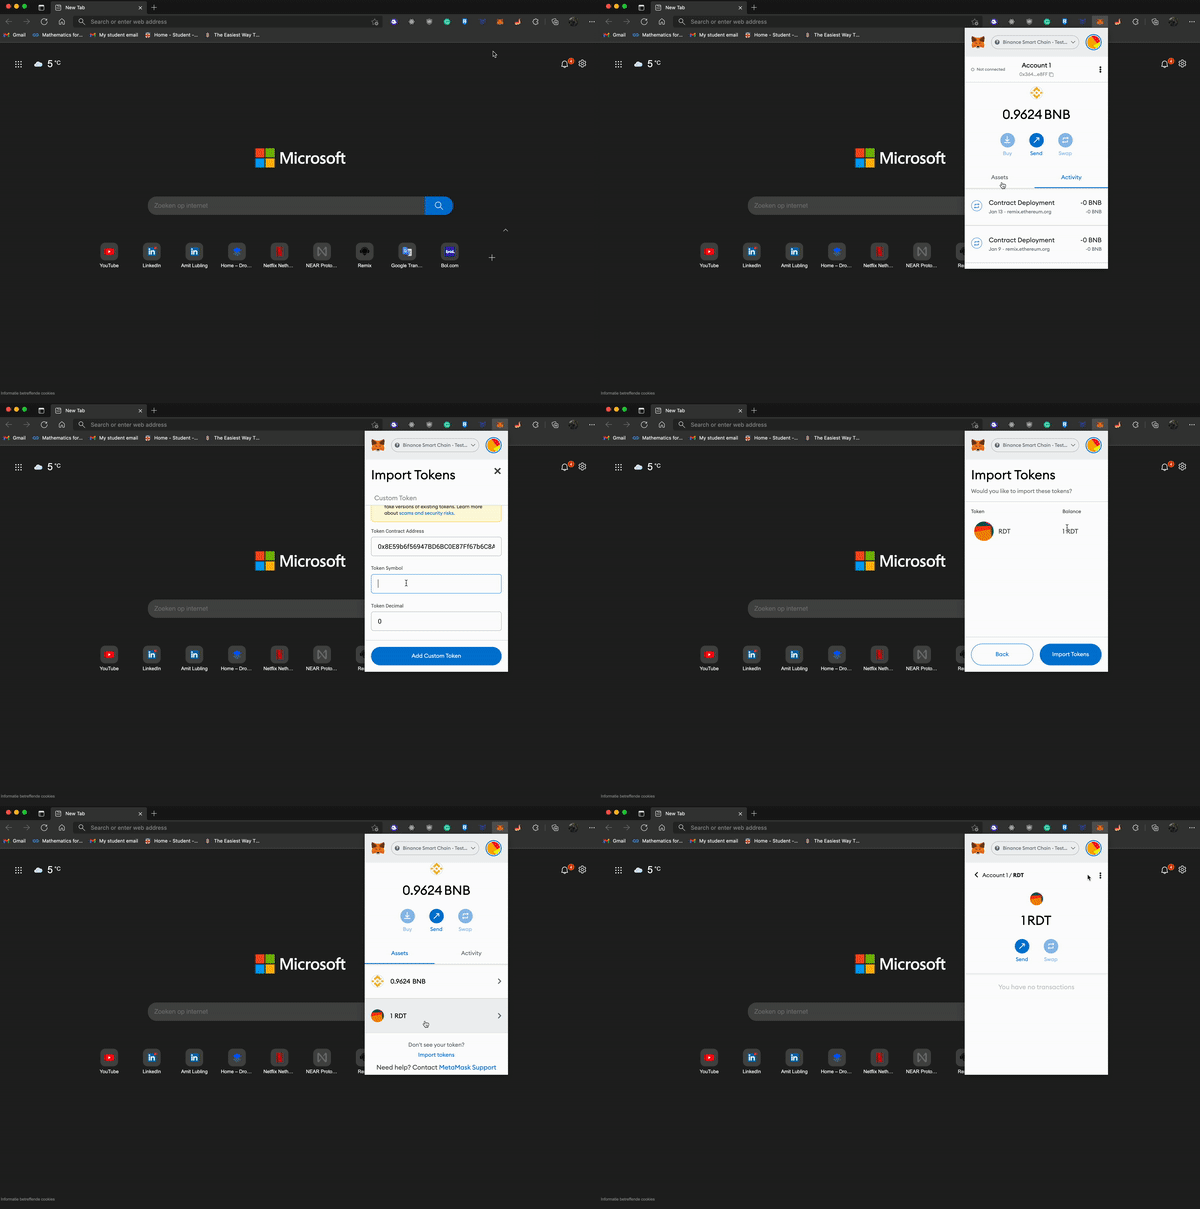
Now that the token contract is deployed on a public network, we can interact with it via MetaMask just like we would with any other token. However, there are a few steps to take before this is possible (full GIF walkthrough below).
First, open MetaMask and ensure that it is on the right network; it should be a Binance Smart Chain network.
Next, ensure that you’re using the same account that you deployed the token contract with. Also ensure that you’re on the Assets tab and then click Import tokens.
Paste in the deployed token contract address you copied earlier. MetaMask should read the token symbol and decimals automatically.
Click Add Custom Token and confirm the operation by clicking Import Tokens. That’s it!

You should now be able to perform actions such as sending tokens to another address. The Swap functionality may or may not be available, depending on the network you’ve deployed to.
If you followed this tutorial all the way to the end, you should have a good understanding of the BEP-20 proposal, how to use Remix for coding and deployment, how to verify a token’s source code on BscScan, and how to import any token into MetaMask using the token address.
You can build on this knowledge by:
Deploying a BEP-20 token on the Binance Smart Chain is not as difficult as you may imagine. I hope this tutorial helps you get started!
Client-side issues that impact users’ ability to activate and transact in your apps can drastically affect your bottom line. If you’re interested in monitoring UX issues, automatically surfacing JavaScript errors, and tracking slow network requests and component load time, try LogRocket.

LogRocket lets you replay user sessions, eliminating guesswork around why bugs happen by showing exactly what users experienced. It captures console logs, errors, network requests, and pixel-perfect DOM recordings — compatible with all frameworks.
LogRocket's Galileo AI watches sessions for you, instantly identifying and explaining user struggles with automated monitoring of your entire product experience.
Modernize how you debug web and mobile apps — start monitoring for free.

Russ Miles, a software development expert and educator, joins the show to unpack why “developer productivity” platforms so often disappoint.

Discover what’s new in The Replay, LogRocket’s newsletter for dev and engineering leaders, in the February 18th issue.

Learn how to recreate Claude Skills–style workflows in GitHub Copilot using custom instruction files and smarter context management.

Claude Code is deceptively capable. Point it at a codebase, describe what you need, and it’ll autonomously navigate files, write […]
Would you be interested in joining LogRocket's developer community?
Join LogRocket’s Content Advisory Board. You’ll help inform the type of content we create and get access to exclusive meetups, social accreditation, and swag.
Sign up now
10 Replies to "How to create and deploy a BEP-20 token to the Binance smart chain"
Hello,
Thanks for the great tutorial! However I run into a problem; when I compile I get an error message relating to this line:
function transferFrom(address _from, address _to, uint256 _value)
public returns (bool success) {
uint256 senderBalance = balanceOf[msg.sender];
uint256 fromAllowance = allowance\[_from\][msg.sender]; // this is the line ****
uint256 receiverBalance = balanceOf[_to];
The error reads:
ParseError: Expected ‘;’ but got ‘ILLEGAL’
–> contracts/OZOToken.sol:51:42:
|
51 | uint256 fromAllowance = allowance\[_from\][msg.sender];
| ^
Could you please help?
Marc
Hello Marc, did you find a solution? Thanks
Has anyone figured out the solution?
Just change “\[” and “\]” to “[” and “]” (remove all “\” from the code)
after senderbalance = you should type balances[] instead of balanceOf
Thanks for sharing this useful methods.
Good post. Would like to try on this
thanks for the useful post. however my wallet show 0.000000001 as a balance, instead of 1000000000. Can you explain me why?
Hello, can you tell me how much fee for create BSC token?
Hi, I’m a beginner, so I wanted to make my own token. I succeeded, then I added liquidity to the pacage and after that I wanted to withdraw it to increase my credit and because ten dollars was not enough. I couldn’t rewoke via pancake, so I did it via Dogeswap. Did it work but my coins didn’t arrive and ended up somewhere else (WBN)? Please help. My wallet is
0x8f3e298d94581c54329b8b81e1be940d624e0224
and my token 0xcecdb0b806b52ab5af4ac55c6113c759b43aa905
Here it happened: 0xa3Ea82e5b1041070AFcBa051dB15AfA9A42078d2, my cake lp (WBN) was gone from my wallet.