Blockchain technology and the crypto space in general are one of the major trends in the world right now. The number of increasing buzzwords such as NFTs, ETFs, DApps, and DeFi are undeniable markers to this assertion.

Even in the areas of mobile and web technologies, decentralized applications and the concept of the decentralized web is now a thing, and anyone who intends to stay ahead and up to date is jumping on the current trend.
Before we go on, let’s briefly define some of the terminologies that we’ll encounter in this article.
We all know that a contract is an agreement between two persons or parties. This will make smart contracts an extension of an agreement that is written in code and saved on a blockchain network that is verifiable, irreversible, and self executing.
According to Investopedia, a blockchain network, on the other hand, is a distributed database that is shared among the nodes of a computer network. As a database, a blockchain stores information electronically in digital format.
In this article I will walk you through:
What we are going to build is a simple smart contract for voting between two values, which are alpha and beta. For the scope of this tutorial, we will not be going into any of the complexities such as verifying a user and the number of times a user can vote; we are just going to focus on creating a simple smart contract in Solidity and deploying it within our application using Flutter. Flutter is a UI toolkit that enables users to create UIs quickly and with added flexibility.
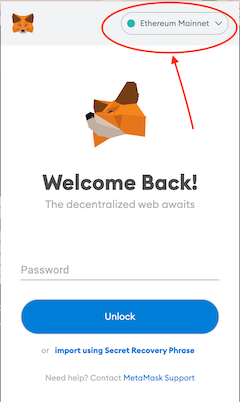
To get started, we need to download and make use of MetaMask. So, click on this link to add the MetaMask extension to your browser (preferrably Chrome).
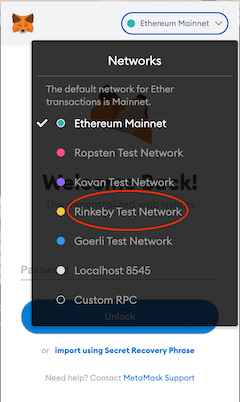
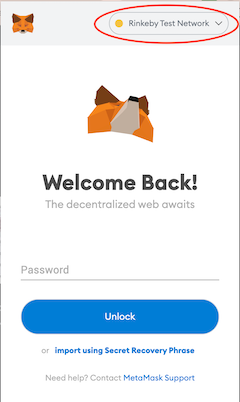
After you’re done with that, create and set up your crypto wallet. Since this is for learning purposes, change your network from Ethereum Mainnet to Rinkeby Test Network as described in the images below.
Once you’ve got that sorted out, you are going to need some test Ether to handle gas fees when carrying out certain transactions with our smart contract. One of the ways you can go about this is making use of the Rinkeby Faucet. Follow the link for detailed instructions.
The next thing we are going to do is write our smart contract in Solidity. We will be making use of Remix, which is an online integrated development environment (IDE) for Solidity, something similar to DartPad for Dart.
The link to Remix IDE can be found here.
If the folders you find on the left-hand side of the IDE are confusing, you can delete and create a new file. We are just going to create a new file called voting.sol.
The sol extension stands for Solidity, just like the .dart extension used for creating files when writing our Dart and Flutter classes:
pragma solidity 0.6.6;

contract Voting{

int alpha;
int beta;

constructor() public {
   alpha  = 0;
    beta = 0;
}

function getTotalVotesAlpha() view public returns(int) {
    return alpha;
}

function getTotalVotesBeta() view public returns(int){
    return beta;
}

function voteAlpha () public{
    alpha = alpha+1;
}

function voteBeta () public{
    beta = beta+1;
}
}
Now let’s look at understanding the structure of this simple smart contract:
pragma solidity 0.6.6;
The first line is the declaration of the version of Solidity we will be using, which in our case is version 0.6.6.
Line 3 of our code is how you declare a contract, similar to class declaration in other programming languages:
int alpha;
int beta;
We also have two variable declarations of type integers, which are alpha and beta:
constructor() public {
   alpha  = 0;
    beta = 0;
}
Next is our constructor declaration, and whenever we create an instance of this class, we want to initialize our fields using the constructor:
function getTotalVotesAlpha() view public returns(int) {
    return alpha;
}

function getTotalVotesBeta() view public returns(int){
    return beta;
}
Next up we have these two functions above, which do similar things. The first function returns the value of alpha and the second function returns the value of beta. If you look closely, you’ll notice the view attribute added to it. This means this function is a read-only function and does not modify any of the fields in our contract.
In Solidity, all our functions are marked with access modifiers, which determine the scope of the function or field. In our case, we have a public access modifier, which means that this function can be called from outside our contract.
Lastly, the return type is specified before our curly braces.
The rest of our function simply increases the value of our fields by 1.
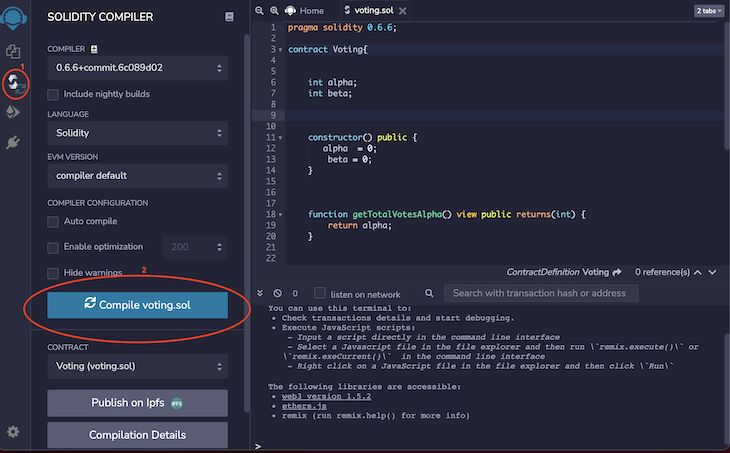
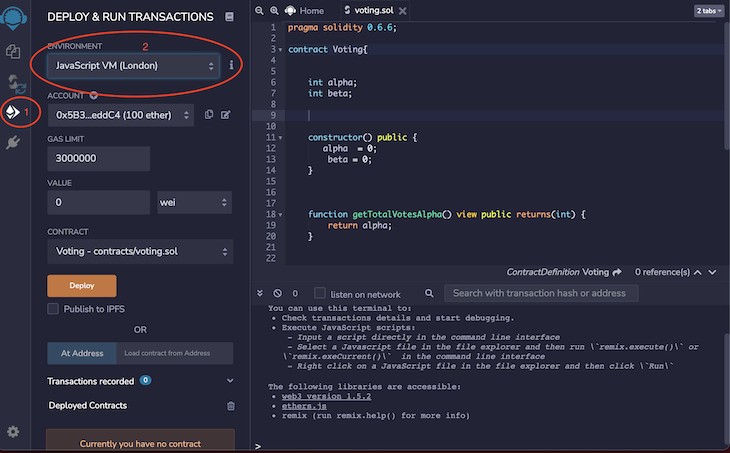
Now click on Compile, which is on the left-hand pane on our IDE, as shown in the image below.
Once your smart contract compiles successfully, click on Deploy and run the tab as shown below. Change your environment from JavaScript VM to Injected Web3.
Once you are done with this, you can click on the Compile tab once more and select one or more functions from the smart contract that you want to test out and see the results right there in the terminal.
After successfully writing our smart contract, we need a blockchain server to run on. There are many ways to do this — one of them is by using Ganache to run a personal blockchain. But for simplicity, we are going to use Infura, which is a platform that provides us blockchain access to Ethereum, amongst others.
Simply create an account and create a project on the platform and you will get a URL. Take note and be sure to change the network of the created project from Mainnet to Rinkeby.
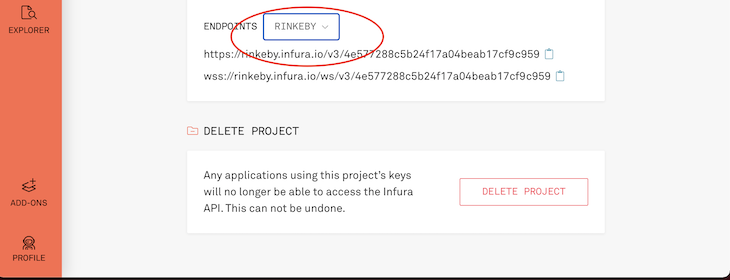
Below the network you can see that we are provided with two links. You can pick any of those and you are good to go.
The next thing we are going to do is create a new Flutter project and add the following dependencies in our pubspec file:
web3dart: ^2.3.3
http: ^0.13.4
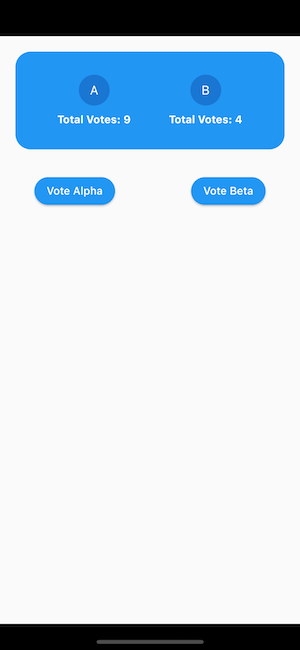
Our screen is going to be a simple screen with two buttons to vote either alpha or beta, and we will have the total scores displayed above the buttons.
We start off by creating these variables:
late Client httpClient;

late Web3Client ethClient;

//Ethereum address
final String myAddress = "0x8fF1b659bDC9D6eF5d99823B155cfdf47eF2944d";

//url from Infura
final String blockchainUrl = "https://rinkeby.infura.io/v3/4e577288c5b24f17a04beab17cf9c959";

//strore the value of alpha and beta
var totalVotesA;
var totalVotesB;
In our initState callback, we are going to initialize our httpClient and Web3client and call a method to get the values of alpha and beta from our smart contract:
@override
void initState() {
  httpClient = Client();
  ethClient = Web3Client(
      blockchainUrl,
      httpClient);
  getTotalVotes();
  super.initState();
}
In order to understand how getTotalVotes should work, let’s have a look at the following functions and break down each of them.
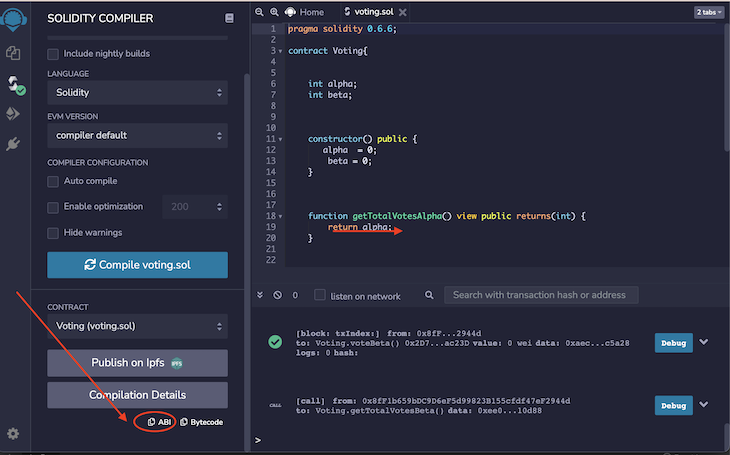
Before then, we are going to go back to Remix IDE, and on the Solidity Compiler tab, we are going to copy the ABI of our smart contract as shown in the image above, take it to our Flutter IDE, and create a new file. In our case, we would name it contract.json, and it is going to be in our assets folder. After that, we go ahead and add it to our pubspec file and run the flutter pub get command:
# To add assets to your application, add an assets section, like this:
assets:
  - assets/contract.json


Future<DeployedContract> getContract() async {
//obtain our smart contract using rootbundle to access our json file
  String abiFile = await rootBundle.loadString("assets/contract.json");


  String contractAddress = "0xee3F5a4361ec47C57394Fc028C3fBCCd0e9f1B5d";


  final contract = DeployedContract(ContractAbi.fromJson(abiFile, "Voting"),
      EthereumAddress.fromHex(contractAddress));

  return contract;
}

Future<List<dynamic>> callFunction(String name) async {
  final contract = await getContract();
  final function = contract.function(name);
  final result = await ethClient
      .call(contract: contract, function: function, params: []);
  return result;
}

Future<void> getTotalVotes() async {
  List<dynamic> resultsA = await callFunction("getTotalVotesAlpha");
  List<dynamic> resultsB = await callFunction("getTotalVotesBeta");
  totalVotesA = resultsA[0];
  totalVotesB = resultsB[0];

  setState(() {});
}
Construct a contract using the DeployedContract class from our web3dart package, which takes in the ABI file, name of our smart contract (which in our case was Voting), and the contract address and returns it from our function.
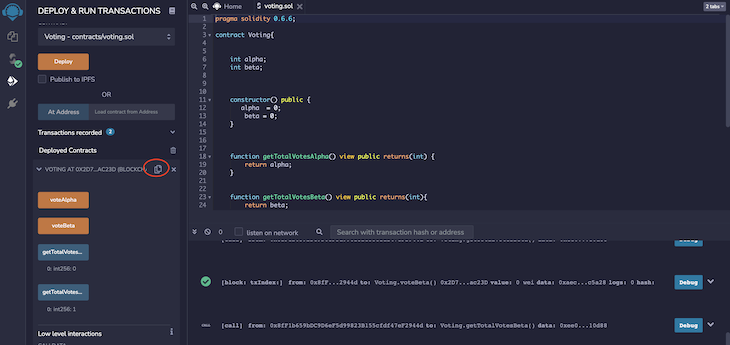
Note, to get the contract address, go back to your Remix IDE, click on the Deploy and Run tab, and click the copy icon below the Deployed Contracts as illustrated below.
The next function will be used to call a function inside of our smart contract:
final result = await ethClient
      .call(contract: contract, function: function, params: []);
The line above is how we connect to our smart contract with the call extension from the web3dart EthereumClient class. The result of this operation is a list that the function returns:
Future<List<dynamic>> callFunction(String name) async {
  final contract = await getContract();
  final function = contract.function(name);
  final result = await ethClient
      .call(contract: contract, function: function, params: []);
  return result;
}
And finally, in the getTotalVotes method, we are going to use this callFunction to call functions such as getTotalVotesAlpha and getTotalVotesBeta, which we created in our smart contract. Be sure that the name you pass matches exactly what you have on your deployed contract.
Once we get down the function to receive the values of our votes, the next action is voting. Similar to what we’ve done, we are going to use the ABI file to construct a request by calling the functions inside of it.
What makes the voting action different is that we are doing a write and not a read request. So, we are going to make use of our private key from MetaMask. Or you can make use of any private key; it would go through, since this is a test account.
Also, instead of using the call, we are instead going to use sendTransaction and pass our private key, a transaction object, and specify the chainId, which in our case (Rinkeby) is 4:
Future<void> vote(bool voteAlpha) async {
  snackBar(label: "Recording vote");
  //obtain private key for write operation
  Credentials key = EthPrivateKey.fromHex(
      "f6417d3d4c5cc294ace85aa196fcde0ca792550e085f65fff459423e597ff306");

  //obtain our contract from abi in json file
  final contract = await getContract();

  // extract function from json file
  final function = contract.function(
    voteAlpha ? "voteAlpha" : "voteBeta",
  );

  //send transaction using the our private key, function and contract
  await ethClient.sendTransaction(
      key,
      Transaction.callContract(
          contract: contract, function: function, parameters: []),
      chainId: 4);
  ScaffoldMessenger.of(context).removeCurrentSnackBar();
  snackBar(label: "verifying vote");
  //set a 20 seconds delay to allow the transaction to be verified before trying to retrieve the balance
  Future.delayed(const Duration(seconds: 20), () {
    ScaffoldMessenger.of(context).removeCurrentSnackBar();
    snackBar(label: "retrieving votes");
    getTotalVotes();

    ScaffoldMessenger.of(context).clearSnackBars();
  });
}
After that, we set a delay of 20 seconds because the transaction takes a while to get verified before retrieving our balance again.
If everything is set, when you run your project, you are going to have this.

This simple implementation of a smart contract should get you started with exploring and learning more. You can decide to add interesting features to this like authentication, ensuring that a user does not vote more than one time, and also applying good state management approaches to your application.
To learn more about Solidity, you can check out their documentation here.
To get access to the repository for this project, check the link below:
https://github.com/Ekeminie/blockchain-evoting
Client-side issues that impact users’ ability to activate and transact in your apps can drastically affect your bottom line. If you’re interested in monitoring UX issues, automatically surfacing JavaScript errors, and tracking slow network requests and component load time, try LogRocket.

LogRocket lets you replay user sessions, eliminating guesswork around why bugs happen by showing exactly what users experienced. It captures console logs, errors, network requests, and pixel-perfect DOM recordings — compatible with all frameworks.
LogRocket's Galileo AI watches sessions for you, instantly identifying and explaining user struggles with automated monitoring of your entire product experience.
Modernize how you debug web and mobile apps — start monitoring for free.

Learn how to protect full-stack projects from NPM supply chain attacks with a practical security checklist.

Explore 15 essential MCP servers for web developers to enhance AI workflows with tools, data, and automation.

Learn how contrast-color() automatically picks accessible text colors using native CSS, without JavaScript.

Learn how to build a harness-style AI workflow using Claude Code with specialized Dev, QE, and Ops subagents, gated handoffs, MCP telemetry, and LEARNING.md.
Would you be interested in joining LogRocket's developer community?
Join LogRocket’s Content Advisory Board. You’ll help inform the type of content we create and get access to exclusive meetups, social accreditation, and swag.
Sign up now

