Watch the summary here:
Creating a 2D Multiplayer Game with Vue.js and Socket.io
No Description
When it comes to real-time communication between multiple clients and a server, RESTful and GraphQL APIs are often not the best approach due to having to constantly poll them for changes to data. Instead, the preferred approach is to use sockets, whether that be a web socket or something else.
Because sockets are great for real-time data, they are very beneficial towards online multiplayer games. Players can interact in their game, the data is sent to the server, and the server broadcasts it to the other players in the game. This is where we’re going to take our example.
In this tutorial, we’re going to explore web browser based gaming using Vue.js, but we’re going to include sockets through Socket.io for a multiplayer perspective.
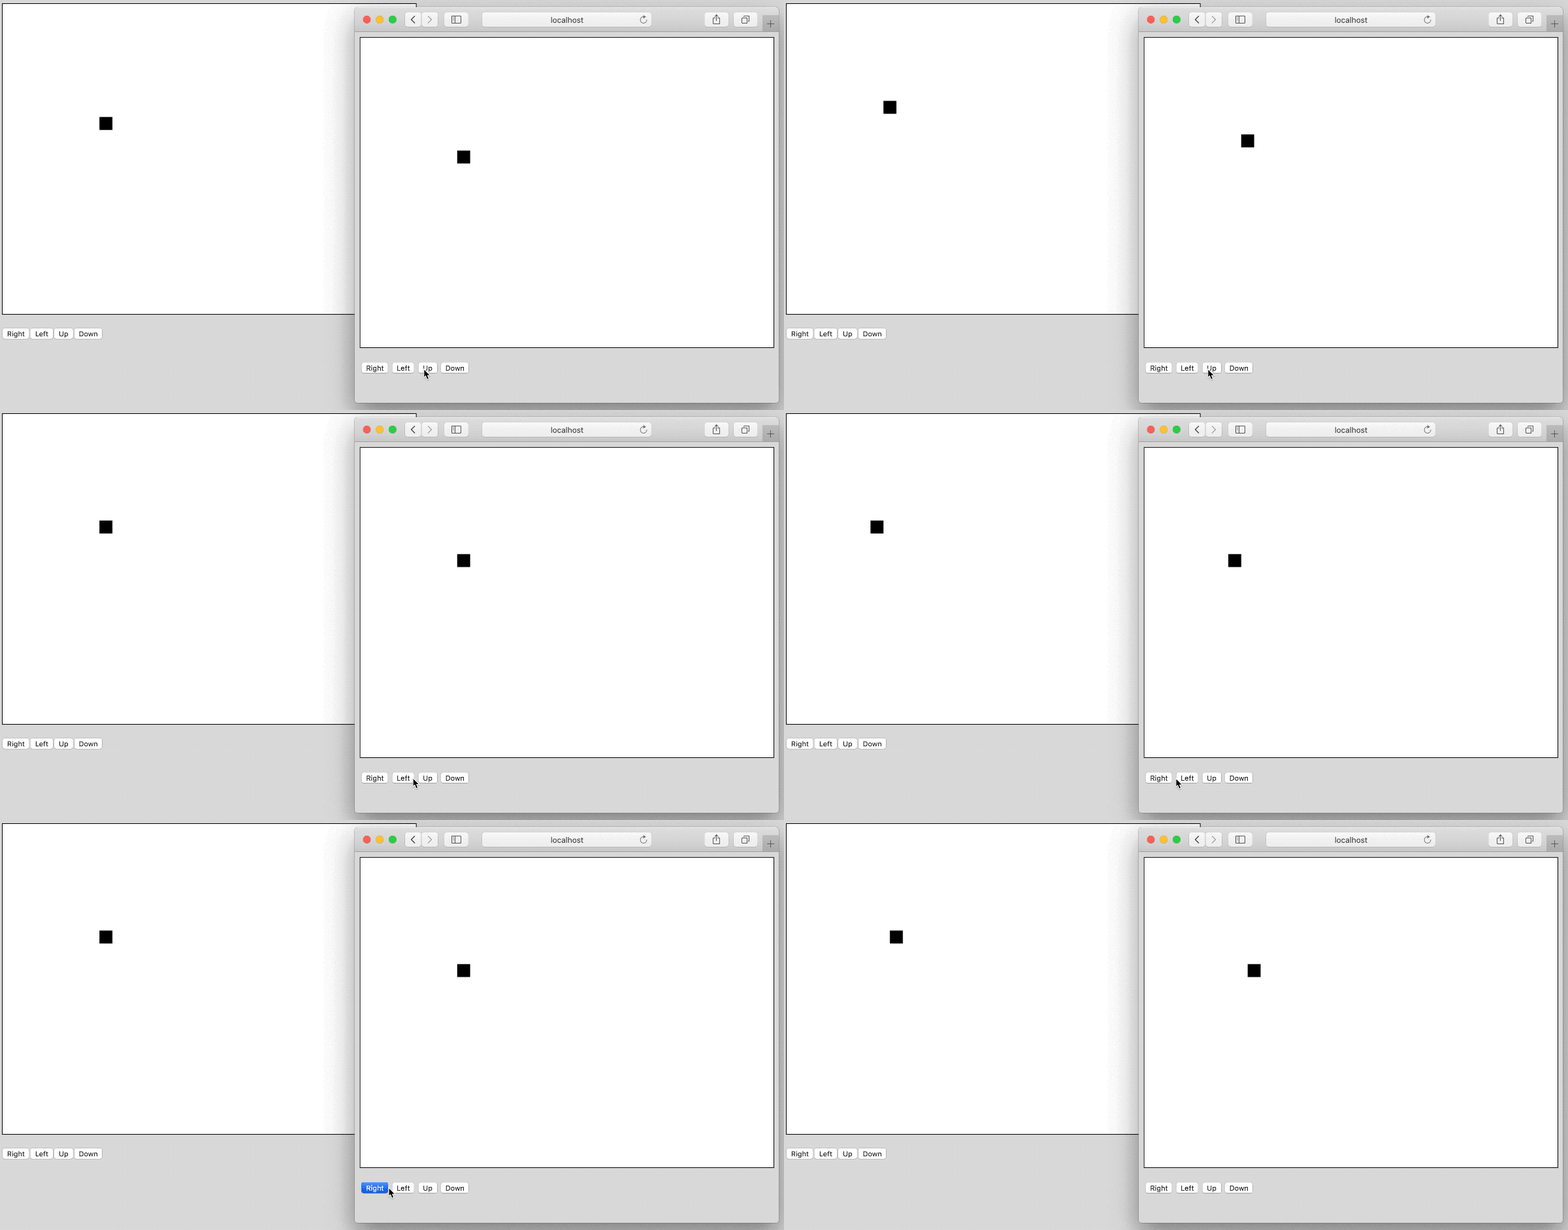
To get an idea of what we want to accomplish, take a look at the following animated image:

First, you’ll notice that there has been a bait and switch in regards to the gaming aspect. Yes, this is a foundation to a game that we’re going to explore, but we won’t be making an actual game. Instead, you’ll notice that we have two web browser windows opened where any changes we make to one is reflected in the other.
To sum up, what is happening, the buttons send a message to the server that we want to move the canvas rectangle in a certain direction. Rather than the client changing the box position, the server responds with the new box position so all the clients are in sync and no one is spoofing the position to cheat.

While Vue.js is the focus of this particular tutorial, all of the heavy lifting is done by our server which will be created using Node.js.
Assuming you have Node.js installed, create a new directory to represent your server and execute the following to create a new project:
npm init --y
npm install express socket.io --save
touch app.js
The above commands will create a package.json file and install our two project dependencies to it. The above commands will also create an app.js file for all of our server-side logic. If your operating system doesn’t support the touch command, go ahead and create the app.js file however makes the most sense to you.
To start things off, open the app.js file and add the following boilerplate JavaScript code:
const Express = require("express")();
const Http = require("http").Server(Express);
const Socketio = require("socket.io")(Http);

var position = {
    x: 200,
    y: 200
};

Http.listen(3000, () => {
    console.log("Listening at :3000...");
});
In the above code, we are importing and initializing each of the packages that we had previously installed. We are also starting our server on port 3000. Because we won’t be using a database in this example, any changes to the data in our game will persist for as long as the server is running using the position variable.
This pseudo-game will only have one piece of data associated with it and that is the x and y position data.
Now we can start adding the more defining logic to our server:
Socketio.on("connection", socket => {
    socket.emit("position", position);
    socket.on("move", data => {
        switch(data) {
            case "left":
                position.x -= 5;
                Socketio.emit("position", position);
                break;
            case "right":
                position.x += 5;
                Socketio.emit("position", position);
                break;
            case "up":
                position.y -= 5;
                Socketio.emit("position", position);
                break;
            case "down":
                position.y += 5;
                Socketio.emit("position", position);
                break;
        }
    });
});
In our connection listener, we are listening for new client connections. When a client connects, the stored position of our square is emitted so that way the client can update the canvas. While a copy of the position will be kept locally on the client, we’ll never be relying on the client to supply the position.
After the socket connection is established for any particular client, a listener is created. When the client sends a message titled move, the data sent with that message is used to determine how the position should change. After the position data changes, it is sent back to the client.
You’ll notice that we have a position title and a move title for our messages. They can be called whatever you want as long as you are consistent between your client and server. In our case move represents messages sent from the client to move the object while position represents messages that contain the actual position.
You might also notice that emit is being used on socket as well as Socketio. In the case of socket, the message is only being sent to one particular client while messages sent using Socketio are broadcasted to all connected clients.
We can start our Node.js server as of now and begin working on our Vue.js application.
We created our server, but we don’t have anything in place to render our game or the position changes.
Assuming you have the Vue CLI installed, execute the following outside of your Node.js project directory:
vue create client
When prompted, choose to use the defaults. Navigate within your Vue.js project directory and execute the following command to install Socket.io once again:
npm install socket.io --save
Remember, we’re working with two different projects, both using Socket.io, hence the need to install Socket.io twice.
Within the Vue.js project create a src/components/BlockGame.vue file to represent our game component. This file should contain the following boilerplate code:
<template>
    <div>
        <canvas ref="game" width="640" height="480" style="border: 1px solid black;"></canvas>
    </div>
</template>

<script>
    import io from "socket.io-client";
    export default {
        name: 'BlockGame',
        data() {
            return {
                socket: {},
                context: {},
                position: {
                    x: 0,
                    y: 0
                }
            }
        },
        created() { },
        mounted() {
            this.context = this.$refs.game.getContext("2d");
        },
        methods: { }
    }
</script>

<style scoped></style>
In the code above, we have an HTML canvas for our game referenced by game. We can’t access the DOM directly in Vue.js, so we have to use proper references.
Inside of the <script> tags we are importing the Socket.io client and we are defining a few variables to be used within our component. After the HTML view has mounted, we can make use of the mounted method to obtain reference to our HTML canvas object.
This is where we start getting into the Socket.io details.
Before the view mounts, we want to establish a connection to our Socket.io server that we had previously created. We can do this in the created method like this:
created() {
    this.socket = io("http://localhost:3000");
},
Once we have a connection to our server, we can begin listening for changes to the position broadcasted by the server so that way we can render them. Because this will be rendering, we need to make sure the view is ready. For this reason, we must listen for changes in the mounted method like so:
mounted() {
    this.context = this.$refs.game.getContext("2d");
    this.socket.on("position", data => {
        this.position = data;
        this.context.clearRect(0, 0, this.$refs.game.width, this.$refs.game.height);
        this.context.fillStyle = "#FFFFFF";
        this.context.fillRect(0, 0, this.$refs.game.width, this.$refs.game.width);
        this.context.fillStyle = "#000000";
        this.context.fillRect(this.position.x, this.position.y, 20, 20);
    });
},
In the above code, we have a listener for position messages. Remember, our server is sending messages labeled position, so we need to be ready to receive them.
When we receive position information, we clear the canvas, render a background of our choosing, and then draw a rectangle based on the coordinate information returned in the listener. This happens every time the server says our position changed.
So how do we change our position? Let’s build a method for the job:
methods: {
    move(direction) { this.socket.emit("move", direction); },
}
The above move method expects a direction. This direction is emitted to the server. Remember, the server is listening for messages labeled as move. We don’t actually move the rectangle ourselves after calling the move method. We only actually move after we get a response from the server with the new position.
Let’s create a few buttons that make use of this new move method:
<template>
    <div>
        <canvas ref="game" width="640" height="480" style="border: 1px solid black;"></canvas>
        <p>
            <button v-on:click="move('right')">Right</button>
            <button v-on:click="move('left')">Left</button>
            <button v-on:click="move('up')">Up</button>
            <button v-on:click="move('down')">Down</button>
        </p>
    </div>
</template>
Inside the <template> tags, we have four buttons that each pass a direction to the move method. Nothing fancy is happening with what we’re doing.
As of now, we have a BlockGame component, but it isn’t hooked up to our application. To do this, open the project’s src/App.vue file and include the following:
<template>
    <div id="app">
        <BlockGame />
    </div>
</template>

<script>
    import BlockGame from './components/BlockGame.vue'

export default {
        name: 'app',
        components: {
            BlockGame
        }
    }
</script>

<style>
    body {
        background-color: #ddd;
    }
</style>
Our BlockGame component is pretty self-contained, so just importing it and then using it within the <template> block is enough to get us going.
Assuming the server is currently running, this can be tested by now running the Vue.js client.
You just saw how to use Vue.js with Socket.io to build a simple game. This game is simple because there is no competitive angle. We essentially created a game server with Node.js and a client with Vue.js. The server sent position information to each of the clients and the clients used that position information to render a 2D object on the screen.
If you want to see a basic chat example with Socket.io, I created an example a few years back with Angular titled, Create a Real Time Chat Application with the CEAN Stack and Socket.io.
Debugging Vue.js applications can be difficult, especially when there are dozens, if not hundreds of mutations during a user session. If you’re interested in monitoring and tracking Vue mutations for all of your users in production, try LogRocket.

LogRocket is like a DVR for web and mobile apps, recording literally everything that happens in your Vue apps, including network requests, JavaScript errors, performance problems, and much more. Instead of guessing why problems happen, you can aggregate and report on what state your application was in when an issue occurred.
The LogRocket Vuex plugin logs Vuex mutations to the LogRocket console, giving you context around what led to an error and what state the application was in when an issue occurred.
Modernize how you debug your Vue apps — start monitoring for free.
Would you be interested in joining LogRocket's developer community?
Join LogRocket’s Content Advisory Board. You’ll help inform the type of content we create and get access to exclusive meetups, social accreditation, and swag.
Sign up now
Making carousels can be time-consuming, but it doesn’t have to be. Learn how to use React Snap Carousel to simplify the process.

Consider using a React form library to mitigate the challenges of building and managing forms and surveys.

In this article, you’ll learn how to set up Hoppscotch and which APIs to test it with. Then we’ll discuss alternatives: OpenAPI DevTools and Postman.

Learn to migrate from react-native-camera to VisionCamera, manage permissions, optimize performance, and implement advanced features.