Node Version Manager, or NVM, is a tool that helps manage Node versions and is a convenient way to install Node. Like npm or Yarn help manage Node packages, NVM specializes in Node.js version management, enhancing development flexibility and environment control.
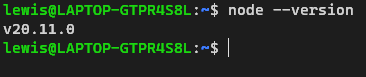
This also means you can install multiple Node versions onto your machine and switch among them when necessary. And to see the active version, simply run node --version. This will execute the active Node and give you the version:
To learn how you can switch between different versions of Node.js, continue reading this guide. I’ll use Node Version Manager (NVM) to install Node versions directly from the CLI and effortlessly switch between Node versions.
Editor’s note — This post was updated on March 10, 2025, by Yan Sun, to expand Windows coverage with nvm-windows, reorganize key sections for a smoother read, and add a detailed comparison of NVM vs. alternatives like Volta to help you choose the best tool.
For Linux or Mac users, use nvm with the following commands:
# Install nvm using crul
curl -o- https://raw.githubusercontent.com/nvm-sh/nvm/v0.39.7/install.sh | bash
# Install a specific Node.js version
nvm install 20.18.0
# Switch to it
nvm use 20.18.0
# Set as default
nvm alias default 20.18.0
For Windows users, use nvm-windows. After running the Windows installer, use the following commands to install and switch the Node.js version. Those commands are the same as in the Linux environment:
# Install a specific Node.js version
nvm install 20.18.0
# Switch to it
nvm use 20.18.0
More details on that later in this blog.
NVM can be installed and used to manage Node versions independently of any existing installations on your system. So, having a Node version on your machine isn’t necessary. And if you already have one, it won’t impact NVM installation.
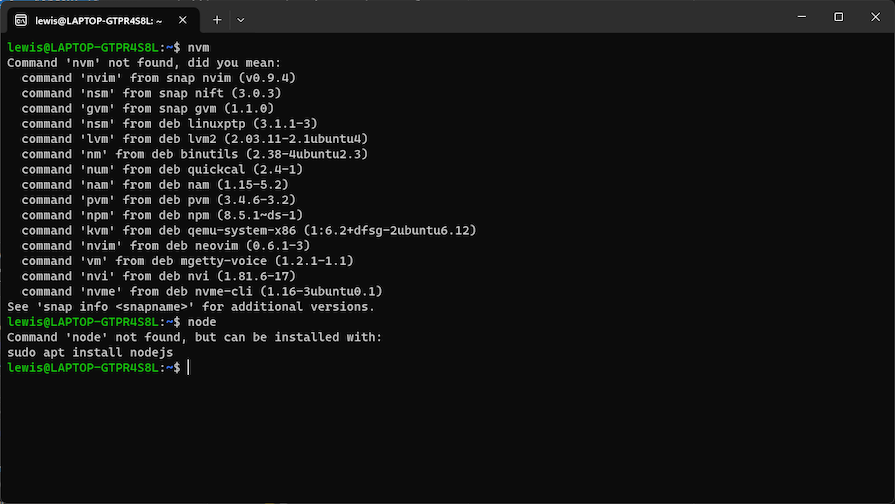
Executing nvm and node in the terminal reveals that both commands are unrecognized, displaying the messages Command nvm not found and Command node not found, respectively. It then provides guidance on how to install Node.js:
However, because we are not installing Node directly, we’ll focus on using NVM. To install NVM, run the following command on your terminal:
curl -o- https://raw.githubusercontent.com/nvm-sh/nvm/v0.39.7/install.sh | bash
cURL comes with most Linux-based operating systems. If for any reason, you do not have cURL installed on your machine, you can download it from this guide. Running the above command downloads a script and runs it. This script downloads the entire NVM repository to ~/.nvm and adds the source lines from the snippet below to the correct shell startup script, that is, ~/.bash_profile, ~/.zshrc, ~/.profile, or ~/.bashrc, depending on the shell program you are using.
In my case, I’m using ~/.bashrc:
//source line added
export NVM_DIR="$HOME/.nvm"
[ -s "$NVM_DIR/nvm.sh" ] && \. "$NVM_DIR/nvm.sh"  # This loads nvm
[ -s "$NVM_DIR/bash_completion" ] && \. "$NVM_DIR/bash_completion"  # This loads nvm bash_completion
After that, exit the terminal and reopen it. Run nvm and now you should see the following:

You have successfully installed NVM. Now, let’s install and manage multiple Node versions.
To install a Node version, run the following command:
nvm install --<the node version>
Let’s start by installing the latest LTS version, which is version 20.11.0 at the time of writing this article. This is done by running nvm install --lts, which produces the following screen:
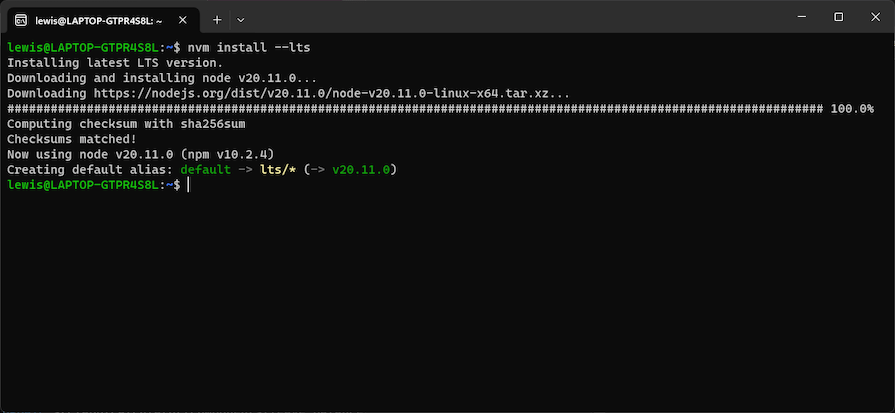
We now have npm v10.2.4 as well. After this installs, it will automatically set the default Node version to the LTS just downloaded.
For this tutorial, we want three Node versions running on our machine. To find the list of available Node versions, run this:
nvm ls-remote
Running nvm install node installs the latest Node version available at the time. If we want to install v12.22.7, we simply run nvm install 12.22.7:

This downloads v12.22.7 from the source and installs it. At the time of using 12.22.7, the npm version is 6.14.15. Whenever you download a new version, it replaces the previous one that was in use. Now, let’s install version 14.18.1 with nvm install 14.18.1:

We can now view all the versions we downloaded so far; currently, we have three Node versions installed using NVM. To see the full list, run the following command:
nvm ls
>
The list then appears:
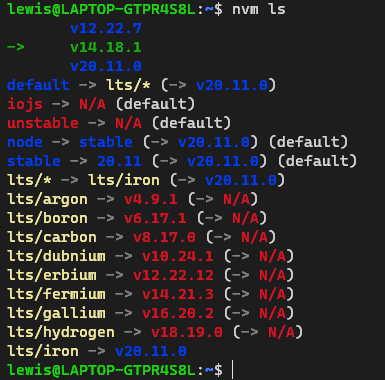
The first three lines show the list of Node versions with the arrow pointing to the 14.18.1 version that is currently in use; when a version is used, it displays as green. If you have more than three versions installed, they will also be displayed.
The best feature of NVM is the ability to easily switch between different Node versions. Say we have to use v20.11.0 and then switch to 14.18.1; we can run either nvm use 20.11.70 or nvm use 14.18.1 to switch to either version:
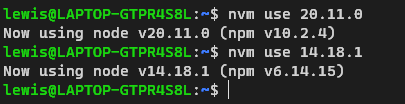
Note that because we only have one version that begins with 12, 14, or 20, we can switch versions with a simple nvm use 20, nvm use 12, or nvm use 14 commands:

Often, you may not need a particular version of Node for the projects you are working on. With NVM, you can easily remove the versions you don’t need. To remove a version, just run the following command:
nvm uninstall <the version number>
The terminal will then show that the version is uninstalled:

You must note that each installed version is independent, meaning global packages on the previous versions won’t be available on a new installation.
We covered how to check the active version in the introduction to this article. Simply run node --version, and it will return the version.
To ensure that globally installed packages like Gatsby CLI are accessible after switching Node.js versions with NVM, it’s important to understand how NVM manages these packages. If you have the Gatsby CLI installed globally on version 14 of Node, for instance, when you switch to version 16 or any other version using NVM, the Gatsby CLI will not be available in the version you just switched to.
We can fix this by bringing all global packages to the new version of Node right when we first install it.
Note — Since NVM is Linux-based, the installation sections and everything mentioned above will only work for Linux-based macOS or Linux-based distributions. We will discuss how to use nvm in Windows in a later section.
Sometimes, despite following instructions, things just don’t work—especially under time pressure. Troubleshooting NVM while trying to install a legacy Node version to fix a production issue is hardly an ideal way to spend an afternoon.
Fortunately, it’s not so hard to troubleshoot, and hopefully resolve problems we may encounter with NVM. Let’s imagine we’ve just done the above, and we run nvm, and get the following result:
What happened? Our computer can’t find NVM. To double-check this, let’s run which nvm, which will produce the path to the nvm tool, if it exists on our local system:
![]()
No result. So our computer can’t find nvm in the currently set PATH variable.
Depending on your system, you’ll either have a .bashrc or .zshrc file responsible for setting the path for your shell when it starts up. To find out for sure, type echo $SHELL in your terminal:
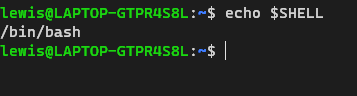
So, we have a Bash shell. If you have zsh, it’ll have /bin/zsh instead. Either way, type cd ~ to navigate to our home directory. Once there:
nano .bashrczsh shell, type nano .zshrcThen, scroll down to the bottom of the file. In my case, it looks like this:

In my case, I temporarily disabled these lines to address a separate issue with my Bash shell but failed to uncomment them afterward. To correct this, I need to remove the comment markers from these lines:

After saving this file, I can run source .bashrc, and then run nvm again to observe that nvm is now executable:

Sometimes, you might be working on an older piece of software for a long time. Let’s imagine we have to work on something that uses Node 14.
We could write nvm use 14 in the terminal each time, but this will get old quickly. Plus, if we’re halfway through making changes and realize we’re using the wrong version, we could waste a lot of time.
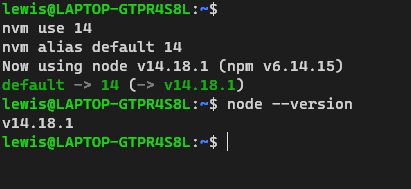
Fortunately, we can easily set a default version of Node that can be used each time the terminal starts up. To use Node 14 in our current session, and also use it in future sessions, we can type the following:
nvm use 14
nvm alias default 14
The result of this is that Node 14 is set as our active Node version:
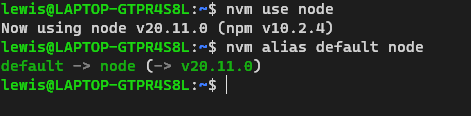
And once we want to get back to the latest version of Node, we can use the following:
nvm use node
nvm alias default node
This will bring us back to version 20 of Node:
Since the official NVM tool is designed for Linux-based systems, Windows users need to use an alternative called nvm-windows.
Firstly, we must uninstall the existing Node.js installation to prevent conflicts during the NVM setup.:
C:\Program Files\ NodeJs, C:\Users\[UserName]\AppData\Roaming\npm and C:\Users\[UserName]\AppData\Roaming\npm-cacheNext, download the latest NVM for Windows installer from the official GitHub repository. Extract and run the downloaded installer, then follow the on-screen instructions. Accept the license agreement and choose the default installation paths to complete the installation.
To verify the installation, open a new command prompt and run the following command:
nvm -v
We should see the installed NVM version if the installation is successful.
Here are the common commands for using NVM on Windows:
// To install a specific Node.js version
nvm install 20.0.0

// To list available Node.js versions
nvm list

// To use a specific version of Node.js,
nvm use 20.0.0

// Set the default version
nvm alias default 20.0.0

// To uninstall a specific version of Node.js
nvm uninstall 20.0.0
While nvm-windows is still functional, its GitHub repo indicates that it will be replaced by a successor called Runtime.
Runtime will incorporate features to enhance security, such as improved isolation between different Node.js versions and better integration with security best practices. It may also offer performance optimization and cross-platform support, making it easier to manage Node.js versions across different operating systems.
Since Runtime is still under development, for users needing a stable solution for managing Node.js versions on Windows today, stick with nvm-windows. In the meantime, keep an eye on the announcement of Runtime.
At the time of writing this post, the beta version of the Runtime hasn’t been released yet. To get notified of the Runtime release, you can complete this form.
Node.js developers frequently juggle projects requiring different versions of Node.js. Without a version manager:
NVM eliminates these headaches by enabling seamless switching between versions. For example, you can maintain legacy projects (Node10.16 to 12) while using modern tools with Node 20 LTS, and test compatibility across versions without system-wide changes.
Although NVM is a popular choice for managing Node.js versions, it isn’t the only way. Depending on your operating system and workflow, you might prefer one of these alternatives:
Volta is a modern, cross-platform tool for managing Node.js versions. Volta tracks the project we’re working on based on the current directory. It automatically selects and uses the correct versions of tools.
Using Volta, we can switch Node versions per project using a package.json configuration. To install Volta, run the command below:
curl https://get.volta.sh | bash
To install and pin a specific version of Node.js, run:
// install a specific version of Node.js
volta install [email protected]
// pin a specific version of Node.js
volta pin [email protected]
We can manually install Node.js by downloading the appropriate version from nodejs.org. It is suitable for users who only need one version. However, when multiple versions are required, we need to switch manually.
Here is a comparison of NVM and its alternatives:
| Method | Pros | Cons |
| NVM | Flexible, widely used, supports macOS/Linux | Requires separate tools for Windows (nvm-windows) |
| Volta | Fast, per-project versioning, native support for Windows, macOS, Linux | Fewer customization options than NVM |
| Download from the Node.js Website | Simple, official source | No version switching, manual updates |
We can choose the best tool based on our project needs, OS, and workflow:
In this article, I covered how to use NVM for managing multiple Node.js versions. NVM streamlines the process of installing, switching, and removing Node.js versions, enabling developers to efficiently manage different projects with varying Node.js requirements. I also explored the coming successor of nvm-windows, Runtime, and the alternatives of NVM like Volta.
Through practical examples, I demonstrated how NVM addresses common versioning challenges across Windows, macOS, and Linux.
 Monitor failed and slow network requests in production
Deploying a Node-based web app or website is the easy part. Making sure your Node instance continues to serve resources to your app is where things get tougher. If you’re interested in ensuring requests to the backend or third-party services are successful, try LogRocket.

LogRocket lets you replay user sessions, eliminating guesswork around why bugs happen by showing exactly what users experienced. It captures console logs, errors, network requests, and pixel-perfect DOM recordings — compatible with all frameworks.
LogRocket's Galileo AI watches sessions for you, instantly identifying and explaining user struggles with automated monitoring of your entire product experience.
LogRocket instruments your app to record baseline performance timings such as page load time, time to first byte, slow network requests, and also logs Redux, NgRx, and Vuex actions/state. Start monitoring for free.

I migrated 20 production-style components from Tailwind to StyleX. Here’s what the data showed about LOC, CSS bundle size, build time, and type safety.

A guide for using JWT authentication to prevent basic security issues while understanding the shortcomings of JWTs.

Discover how to build, render, and automate product demo videos with Remotion, replacing traditional screen recordings with reusable React code.

Chrome’s Modern Web Guidance embeds modern web platform skills into AI coding agents, helping them choose native HTML, CSS, and browser APIs over legacy patterns.
Would you be interested in joining LogRocket's developer community?
Join LogRocket’s Content Advisory Board. You’ll help inform the type of content we create and get access to exclusive meetups, social accreditation, and swag.
Sign up now

