
Data binding is a fundamental concept in Vue.js that synchronizes data between the view and the underlying logic (model) of an application.

By default, Vue.js uses one-way data binding, where data flows in a single direction — from a parent component to a child component or from a JavaScript object to the template. The data does not flow in reverse:
<template>
   <div>
       <p>{{message}}</p>
   </div>
</template>

<script setup>
   import {ref} from 'vue';

   const message = ref('Hello, Vue!');
</script>
In this example, changes can only be made directly to the message reactive variable, which updates the displayed text in the template, not the other way around.
One-way data binding provides a simple mechanism for dynamically binding data within a Vue application. However, it’s not great when data needs to be updated in both directions — from the model (script) to the view (template) and vice versa.
This is where two-way data binding comes into play.
The Replay is a weekly newsletter for dev and engineering leaders.
Delivered once a week, it's your curated guide to the most important conversations around frontend dev, emerging AI tools, and the state of modern software.
Two-way data binding makes up for what the legacy data binding in Vue.js lacks by allowing data to flow both ways — from the model to the view and vice versa.
Think of two-way data binding as a real-time sync between the data object and the DOM, similar to a two-way mirror. When a data property updates, it reflects immediately in any bound DOM elements using a directive like v-model.
Similarly, when a user interacts with the DOM — such as typing into an input field bound by v-model — the data in the Vue instance updates automatically, creating a real-time feedback loop (two-way) between the data and DOM.
Consider the previous example, but now with a form:
<template>
   <div>
        <form action="/">
           <label>Input box</label>
           <input v-model="message" />
        </form>
        <div>
           <p>Message:</p>
           <span>{{message}}</span>
        </div>
   </div>
</template>

<script setup>
   import {ref} from 'vue';

   const message = ref('Hello, Vue!');
</script>
Using the v-model directive, we can not only display the value of the message variable dynamically in the template but also edit and mutate it through the input field within the Form element.
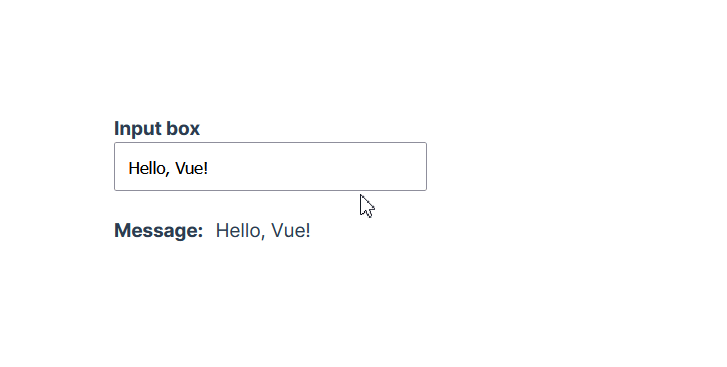
This functionality is not exclusive to the input element; other form components such as checkboxes and radio buttons work similarly.
With all that said about one-way and two-way data binding, let’s look at some practical use cases of the v-model directive.
While using two-way data binding within a single component is powerful, it truly shines when binding data between two components, where data flows downstream and upstream.
The v-model directive makes creating custom components that support two-way data binding convenient. It allows a custom component to receive a value prop from its parent component, which can be bound to an input element in the template. The component can then emit an event to signal changes back to the parent.
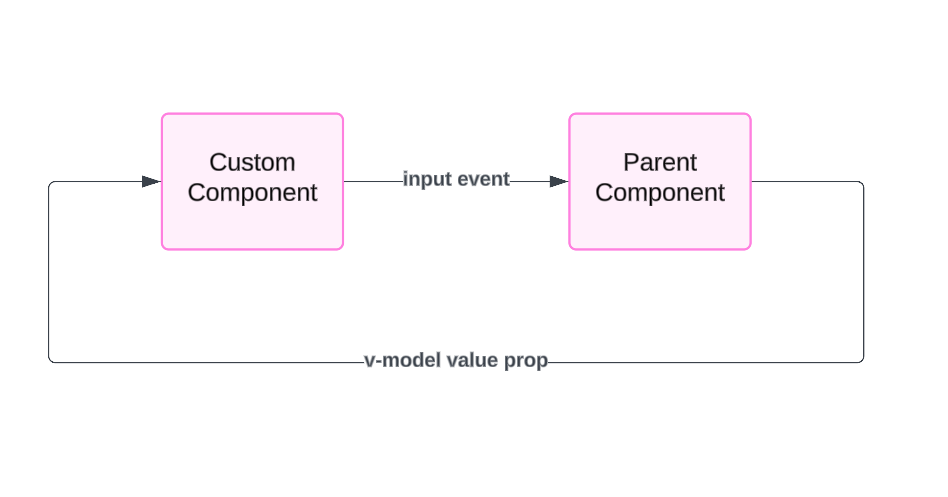
For instance, let’s say we want to make our previous code modular and create a custom component for the Form element, whose sole purpose is to display the text input field:
//components/Form.vue

<template>
 <form action="/">
   <label>Input box</label>
   <input v-model="message"/>
 </form>
</template>
With these changes, the v-model directive on the input element no longer has access to the message variable, making it ineffective within the new Form component.
To address this, we need to remove v-model="message" attribute from the input element and instead add it to the <Form/> component declaration in the parent component like so:
//App.vue

<script setup>
import {ref} from "vue";
import Form from "@/components/Form.vue";

const message = ref('Hello, Vue!');

</script>

<template>
 <div class="greetings">
   <Form v-model="message" />
   ...
 </div>
</template>
This will bind the message variable to the entire component, not just the input element this time.
Now, we can access the data within the component using defineProps and pass it to the input field using the :value directive as follows:
//components/Form.vue

<template>
 <form action="/">
   <label>Input box</label>
   <input :value="modelValue" />
 </form>
</template>

<script setup>
 defineProps(['modelValue']);
</script>
modelValue is a special prop name used to pass the bound variable’s value to a child component.
So far, we have only handled the downstream data flow between these components. If you check the browser, the input field should now display the message variable’s value, but it can’t update the data:
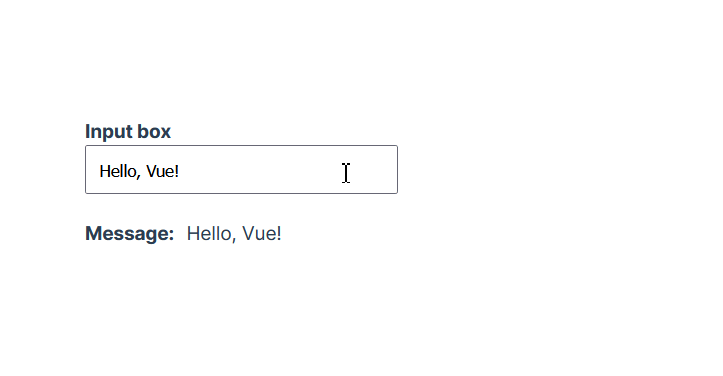
To handle the upstream data flow and update the data from the Form component, we need to capture the input field’s value and emit it using the update:modelValue event:
//component/Form.vue

<script setup>
 defineProps(['modelValue']);

 const emit = defineEmits(['update:modelValue']);

 const updateModel = (e)=>{
   const value = e.target.value;
   emit('update:modelValue', value);
 };

</script>

<template>
 <form action="/">
   <label>Input box</label>
   <input @input="updateModel" :value="modelValue" />
 </form>
</template>
The update:modelValue is a built-in event that handles two-way data binding in custom components. When a component emits this event with a new value, it signals to the parent component to update the bound variable (in this case, message) with the new value.
Because of this, we don’t need to make additional changes to the parent component — it will automatically update the message variable when the Form component emits the new value.
Now, both components are bound, but our code is somewhat verbose. If we were to implement this on a larger scale, the code could quickly become difficult to manage.
Next, we’ll look at how we can simplify two-way data binding using the new defineModel utility function.
defineModelThe Vue 3 Composition API introduced several innovative features and brought significant improvements to existing ones. One such improvement is the simplification of two-way data binding using the defineModel macro, introduced in Vue 3.4.
The defineModel macro automates the process of setting up the modelValue prop and the update:modelValue event by creating a reactive reference to the prop and updating it automatically when the input field’s value changes.
This removes the need to manually emit events whenever the form data changes, as we did in the previous example.
We can use defineModel to simplify our code as follows:
//components/Form.vue

<script setup>
  const inputValue = defineModel();
</script>

<template>
 <form action="/">
   <label>Input box</label>
   <input v-model="inputValue" />
 </form>
</template>
Here, defineModel takes care of both data synchronization and event emission under the hood. Here’s a breakdown of the steps involved:
modelValue prop ( inputValue) — The const inputValue = defineModel(); line declares a modelValue prop within the component. By default, this prop will work with v-model, meaning when the component is used, it can accept a v-model binding from a parent componentv-model directive on the <input> element binds inputValue to the input field. When the user types into the input, v-model triggers an automatic emission of the update:modelValue event. This updates the parent component with the new valueThe defineModel macro not only simplifies two-way data binding but also reduces the size of our code by a whopping 66%.
The utility function provides several additional features worth exploring. Refer to the documentation to learn more about them.
As an application grows, it is often recommended to move state management into a global store and use a tool like Pinia for effective management.
However, the reality is that developers often seek simpler approaches when deciding about state management. This is where two-way data binding comes in, offering a less complicated path to state management and improving how developers handle it.
While two-way data binding was not initially intended for complex state management due to the verbosity of using v-model for even basic state handling, the release of the defineModel macro in Vue 3.4 simplified state separation.
This allows developers to maintain Vue’s two-way binding without the friction associated with alternative methods.
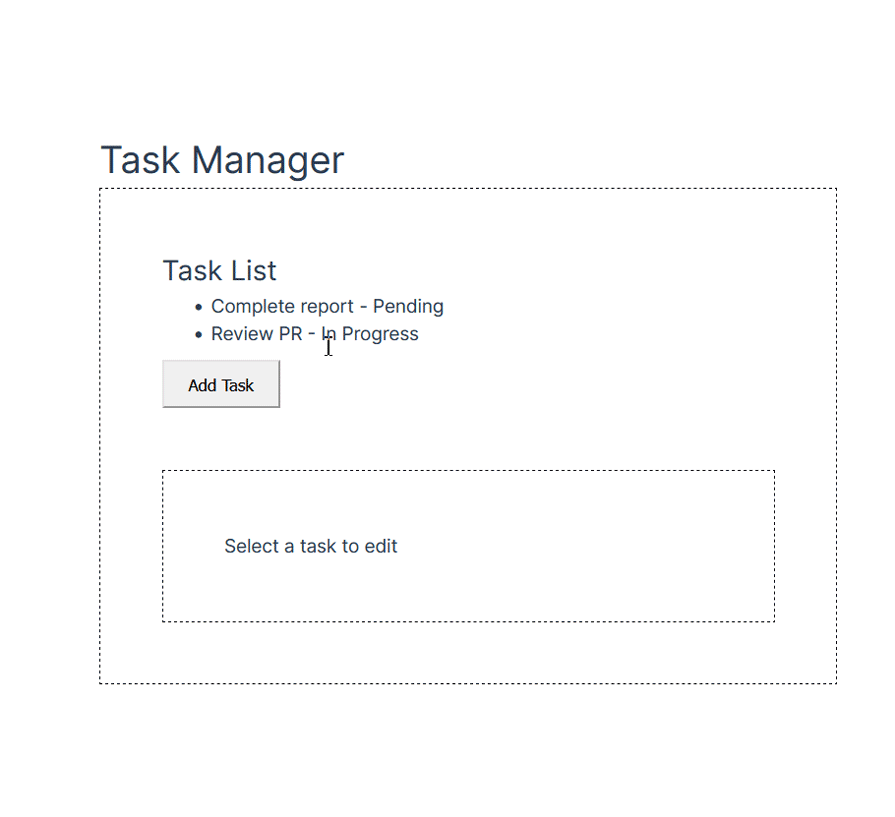
Consider a task management app as an example:
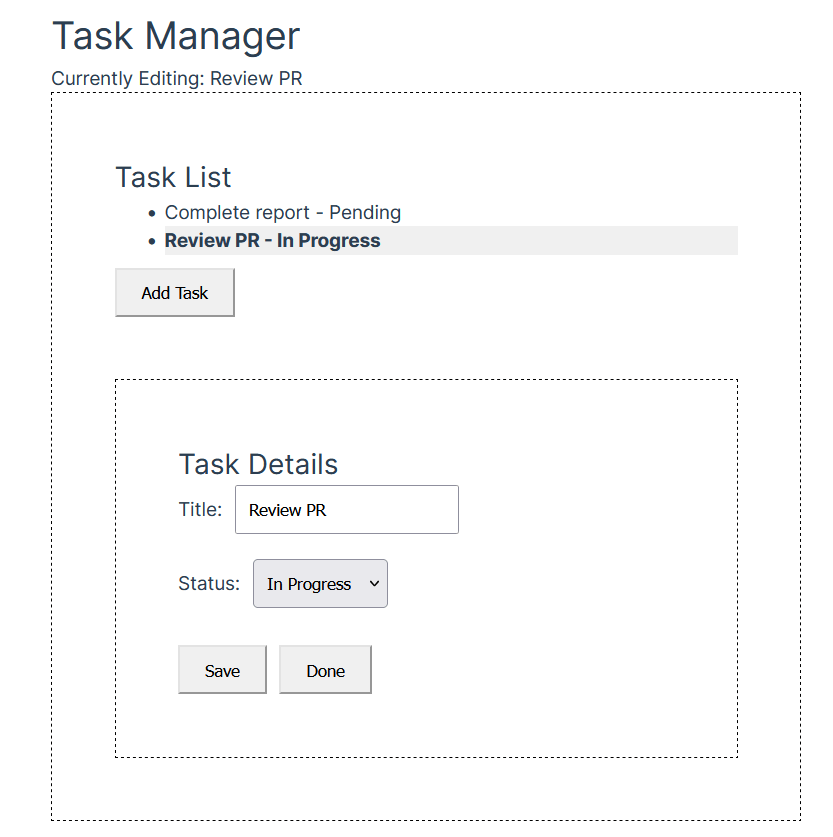
This app consists of a TaskManager component with two nested components: TaskList and TaskDetails. The TaskList component renders a list of tasks from the parent component.
When users select a task from the list, the TaskDetails component displays the task’s details. When users edit a selected task and save the changes, those changes should be reflected in both the parent component and the TaskList component.
The TaskManager parent component is as follows:
//TaskManager.vue

<template>
 <div>
   <h1>Task Manager</h1>
   <p v-if="selectedTask">
     Currently Editing: {{ selectedTask.title }}
   </p>

   <div class="container">
     <!-- Task list -->
     <TaskList
         v-model="tasks"
         v-model:selected="selectedTask" />

     <!-- Task details -->
     <TaskDetails
         v-model="selectedTask" />
   </div>
 </div>
</template>

<script setup>
import { ref } from 'vue';
import TaskList from '@/components/TaskList.vue';
import TaskDetails from '@/components/TaskDetail.vue';

// Initial task state
const tasks = ref([
 { title: 'Complete report', status: 'Pending' },
 { title: 'Review PR', status: 'In Progress' }
]);

// Selected task for editing
const selectedTask = ref();
</script>
Here, the states are declared and passed down to the TaskList and TaskDetail components using bindings.
Next, the TaskDetail component:
//components/TaskDetail.vue

<template>
 <div v-if="selected">
   <h2>Task Details</h2>
   <label>
     Title:
     <input v-model="title" />
   </label>
   <label>
     Status:
     <select v-model="status">
       <option>Pending</option>
       <option>In Progress</option>
       <option>Completed</option>
     </select>
   </label>
   <div>
     <button @click="handleSave">Save</button>
     <button @click="handleCancel">Done</button>
   </div>
 </div>
 <p v-else>
   Select a task to edit
 </p>
</template>

<script setup>
import { ref, watch } from 'vue';

const selected = defineModel({
 required: true
});

const title = ref('');
const status = ref('');

// Sync local state with the selected task
watch(selected, (task) => {
 if (!task) return;
 title.value = task.title;
 status.value = task.status;
});

function handleSave() {
 if (!selected.value) return;
 selected.value.title = title.value;
 selected.value.status = status.value;
}

function handleCancel() {
 selected.value = undefined;
}
</script>
This component uses the watch function to monitor changes in the selected task. If a change is detected, it copies the state into local variables (title and status). This way, it can mutate state without altering the original state until the user saves the edit.
The TaskList component contains a list of tasks and a function that adds a new task to the state:
//components/TaskList.vue

<template>
 <div>
   <h2>Task List</h2>
   <ul>
     <li
         v-for="(task, index) in tasks"
         :key="index"
         :class="{ selected: selected === task }"
         @click="selected = task">
       {{ task.title }} - {{ task.status }}
     </li>
   </ul>
   <button @click="handleAddTask">Add Task</button>
 </div>
</template>

<script setup>
const tasks = defineModel({
 required: true
});

const selected = defineModel('selected', {
 required: true
});

function handleAddTask() {
 tasks.value.push({ title: 'New Task', status: 'Pending' });
}
</script>
Without the simplification offered by the defineModel macro, managing this application would be a nightmare, even as a small app.
While the utility function has done a great job of simplifying state management in the app, we can further improve code readability and maintainability by using composables.
Composables are reusable functions in Vue 3 that encapsulate state logic for common tasks such as date formatting or currency conversion, which may be needed in various parts of an application.
Composable functions are similar to hooks in React, which allow you to separate logic for reuse across multiple components.
We can leverage composables to further simplify our code by separating the state logic from the components. To do this, we simply pull out the states in our components into separate functions:
//composables/task.js

import {ref} from "vue";

export const useTask = () => {
   const tasks = ref([
       { title: 'Complete report', status: 'Pending' },
       { title: 'Review PR', status: 'In Progress' }
   ]);

   // Selected task for editing
   const selectedTask = ref();
   return {
       tasks,
       selectedTask
   };
};
Here, we’ve separated the task and selectedTask states from the TaskManager component into an external function called useTask() within a task.js composable.
Now, if we refactor the TaskManager component, it’ll look like this:
//TaskManager.vue

<template>
 <div>
   <h1>Task Manager</h1>
   <p v-if="selectedTask">
     Currently Editing: {{ selectedTask.title }}
   </p>

   <div class="container">
     <!-- Task list -->
     <TaskList
         v-model="tasks"
         v-model:selected="selectedTask" />

     <!-- Task details -->
     <TaskDetails
         v-model="selectedTask" />
   </div>
 </div>
</template>

<script setup>
import TaskList from '@/components/TaskList.vue';
import TaskDetails from '@/components/TaskDetail.vue';
import {useTask} from "@/composables/task.js";

const {tasks, selectedTask} = useTask();
</script>
We simply import the newly created composable and destructure the states from it. The component functions as before, but the code is cleaner.
We’ll do the same for the TaskDetail component:
//composables/taskDetail.js

import { ref, watch } from 'vue';

export const useDetail = (selected) => {

   const title = ref('');
   const status = ref('');

   // Sync local state with the selected task
   watch(selected, (task) => {
       if (!task) return;
       title.value = task.title;
       status.value = task.status;
   });

   function handleSave() {
       if (!selected.value) return;
       selected.value.title = title.value;
       selected.value.status = status.value;
   }

   function handleCancel() {
       selected.value = undefined;
   }

   return {
       title,
       status,
       handleSave,
       handleCancel,
   };
};
Then, refactor the TaskDetail component:
//components/TaskDetail.vue

<template>
 <div v-if="selected">
   <h2>Task Details</h2>
   <label>
     Title:
     <input v-model="title"/>
   </label>
   <label>
     Status:
     <select v-model="status">
       <option>Pending</option>
       <option>In Progress</option>
       <option>Completed</option>
     </select>
   </label>
   <div>
     <button @click="handleSave">Save</button>
     <button @click="handleCancel">Done</button>
   </div>
 </div>
 <p v-else>
   Select a task to edit
 </p>
</template>

<script setup>
import {useDetail} from "@/composables/taskDetail.js";

const selected = defineModel({
 required: true
});

const {
 handleCancel,
 handleSave,
 status,
 title
} = useDetail(selected);
</script>
The TaskDetail component is much cleaner after separating related states and logic using composables. With this approach, we can easily manage, refactor, and test large and complex components in our applications while maintaining Vue’s two-way binding.
When working with two-way data binding in Vue, especially in complex applications, keeping performance and maintainability in mind is important. Here are performance considerations and best practices to follow when implementing two-way data binding:
While two-way binding might be a great solution for managing shared states in small to moderate applications, using a state management library like Pinia in larger applications will help to manage shared states across components efficiently.
You might find yourself using deep watchers ({ deep: true }) to observe nested changes in an object. However, they can be expensive as they must traverse all nested properties. Consider restructuring the data or using targeted watchers instead.
When creating custom components with v-model, ensure that emitted updates are handled properly to avoid infinite loops or excessive updates. Emit events manually for finer control when v-model alone isn’t sufficient for complex data flows.
Make use of composable functions to separate business logic from the component’s UI. This will reduce the amount of direct data binding in templates.
In this article, we explored the intricacies of two-way data binding in Vue and demonstrated how the mechanism functions in applications of varying complexity. We specifically highlighted tools and functionalities, such as the defineModel macro and the composition API composables, which significantly improve how we work with two-way data binding.
Whether you are an experienced developer or new to Vue, two-way data binding and its associated tools will help you follow best practices and build better, more manageable applications without relying on third-party tools.
Debugging Vue.js applications can be difficult, especially when users experience issues that are difficult to reproduce. If you’re interested in monitoring and tracking Vue mutations and actions for all of your users in production, try LogRocket.

LogRocket lets you replay user sessions, eliminating guesswork by showing exactly what users experienced. It captures console logs, errors, network requests, and pixel-perfect DOM recordings — compatible with all frameworks.
With Galileo AI, you can instantly identify and explain user struggles with automated monitoring of your entire product experience.
Modernize how you debug your Vue apps — start monitoring for free.

React Server Components and the Next.js App Router enable streaming and smaller client bundles, but only when used correctly. This article explores six common mistakes that block streaming, bloat hydration, and create stale UI in production.

Gil Fink (SparXis CEO) joins PodRocket to break down today’s most common web rendering patterns: SSR, CSR, static rednering, and islands/resumability.

@container scroll-state: Replace JS scroll listeners nowCSS @container scroll-state lets you build sticky headers, snapping carousels, and scroll indicators without JavaScript. Here’s how to replace scroll listeners with clean, declarative state queries.

Explore 10 Web APIs that replace common JavaScript libraries and reduce npm dependencies, bundle size, and performance overhead.
Hey there, want to help make our blog better?
Join LogRocket’s Content Advisory Board. You’ll help inform the type of content we create and get access to exclusive meetups, social accreditation, and swag.
Sign up now