Google offers services for maintaining the persistence of data over time. Data used by our applications should be available when we need it, easily accessible, and preferably structured to be ready for use by our app.

Cloud Firestore and Firebase Realtime Database are two services provided by Google. Both can do what our application requires, but have a variety of differences between them — this actually make them the best fit for specific application types.
This article will show you which database is preferable for Flutter application querying. To get started, we will provide a quick breakdown of what this article covers, our example use case, prerequisites, and our processes.
Let’s get started.
In this article, we will guide you through the following:
We will create an application that allows registered users on the platform to cast votes on a particular topic or decision to be made.
The sample dataset to be used will enable us to showcase the difference between Cloud Firestore and Realtime Database on two grounds:
Our flow will take up the following structure:
Cloud Firestore is a NoSQL document database that simplifies storing, syncing, and querying data for apps on a global scale.
It is a great way to put the backend on a Flutter app without the hassle of having a server. Cloud Firestore enables complex querying structures when compared to realtime databases. Because our data is structured when stored (as documents), we can perform more cumbersome or impossible queries compared to Realtime Database.
For our example, we will need a backend source that shares data between all apps and can track the persistence of the votes cast by different members in different locations.
With Cloud Firestore, we can create collections for users who can participate in a voting session and group for the list of possible decisions for which they can cast votes. When we make our collections, we will integrate Cloud Firestore into our application and build our Flutter widgets using data from that collection. Firestore handles most of the smaller details, ensuring persistent info updates and the relaying of changes to all existing app instances.
Go ahead and create a new Flutter application to carry out our operations with Firestore.
To get started, we will create a Flutter project.
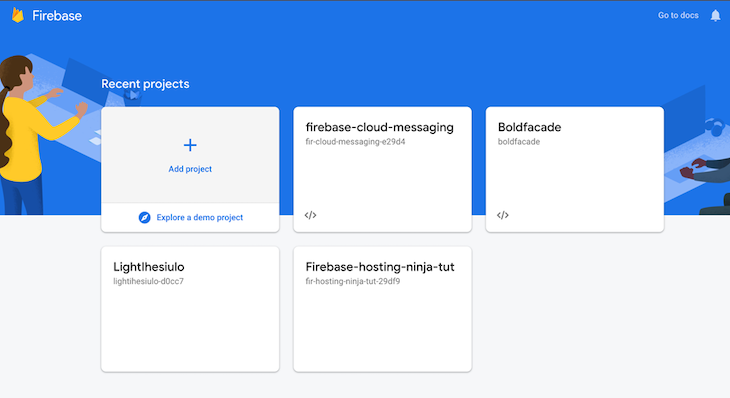
First, we need to set up a Firebase project for our application. To do this, head on to Firebase and create a new project.
We will use our app name, votersapp. Next, click “Continue” to create a project. (Note: Enabling Google Analytics is a personal choice).
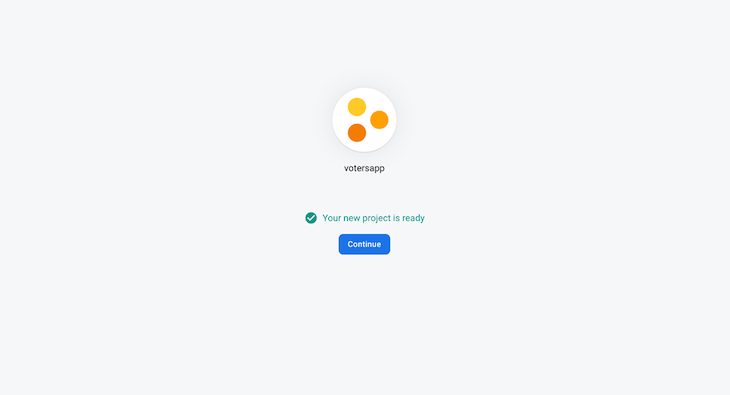
After creating the project, click “Continue” and register the individual apps for the project. We will register our project for an Android device by clicking the Android icon on our current page. The process is largely the same if we register an iOS application or register both platforms.
Move to our Flutter application for the Android package name field; copy the company name (reverse domain name), and input it. This can be found in the androidmanifest.xml file.
Once complete, click to download the config file and then click “Next”.
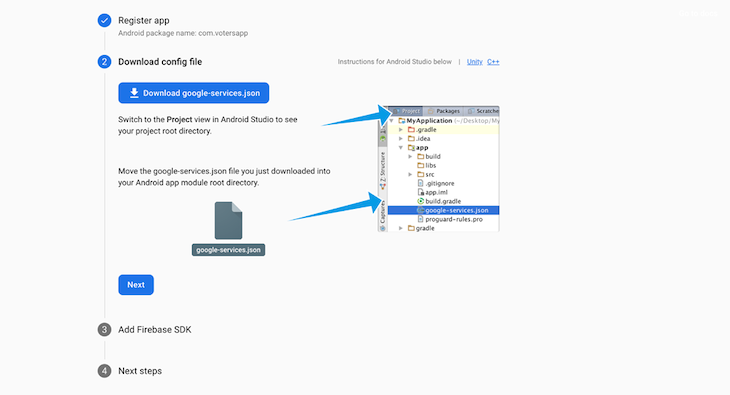
Now, we will have to set up some basic configurations to ensure that Firebase can complete the registration of our application and communicate with it.
Drag the google-services.json file we downloaded earlier and insert it into our android/app/ directory.
Set up the Firebase Gradle plugin. Open the build.gradle file in our Flutter project Android directory and add this code to the following dependencies below:
classpath 'com.google.gms:google-services:4.3.10
{
classpath 'com.android.tools.build:gradle:4.1.0'
classpath "org.jetbrains.kotlin:kotlin-gradle-plugin:$kotlin_version"
}
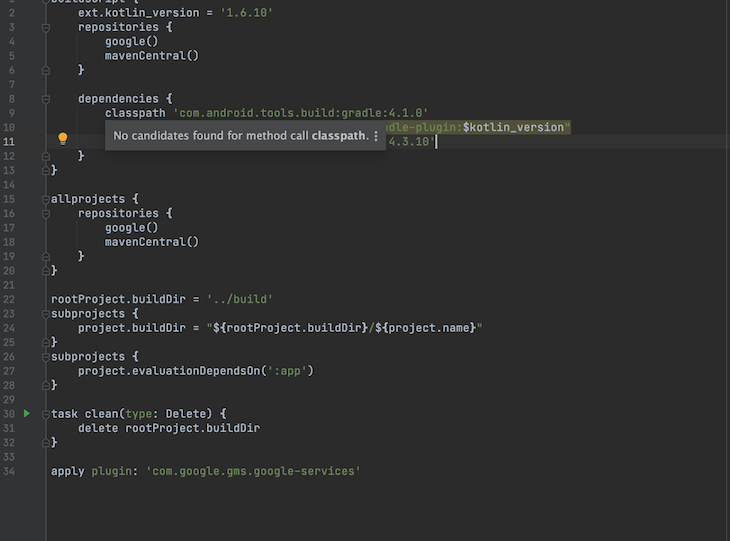
Next, open the android/app/build.gradle file, and add the following to the apply plugin key: ‘com.google.gms.google-services’.

Next, head on to https://pub.dev/packages/cloud_firestore, get the latest version of Cloud Firestore and add it to our pubspec.YAML file.
Run the Flutter pub get to grab the plugin.
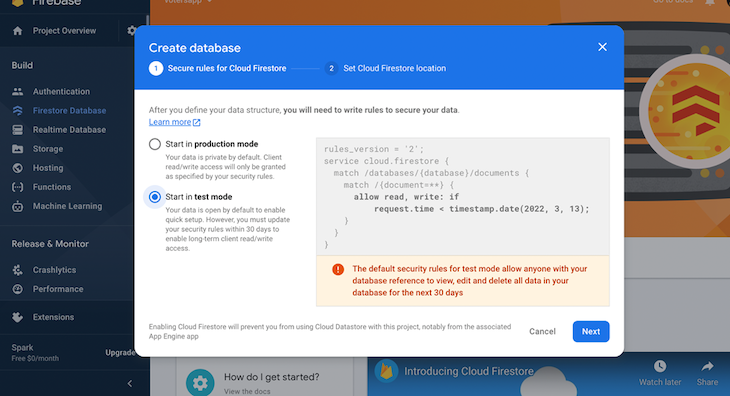
Next, select Cloud Firestore from our console dashboard. Under build/firestore database, select “test mode” and enable it.
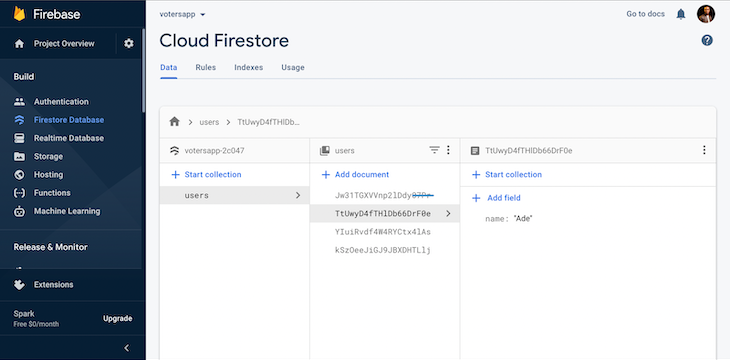
Next, we will create a collection called “Users.” The collection will hold a document of each user who can vote. We will then populate it with four users; “Ade,” “Bisi,” “David,” and “Claire”.
With this, we have our backend all set up. Now, we will need our application to communicate with our Firebase backend. We will use the Cloud Firestore plugin in our Flutter application.
For our Flutter application, I will show a screenshot to demonstrate the core idea of this tutorial.
import 'package:flutter/material.dart';
import 'package:firebase_core/firebase_core.dart';
import 'package:cloud_firestore/cloud_firestore.dart';

Future<void> main() async {
WidgetsFlutterBinding.ensureInitialized();

 await Firebase.initializeApp();
 runApp(const MyApp());
}

class MyApp extends StatelessWidget {
 const MyApp({Key? key}) : super(key: key);

 // This widget is the root of your application.
 @override
 Widget build(BuildContext context) {
 return MaterialApp(
 title: 'Flutter Demo',
 theme: ThemeData(
 primarySwatch: Colors.blue,
 ),
 home: const MyHomePage(title: 'Flutter Demo Home Page'),
 );
 }
}

class MyHomePage extends StatefulWidget {
 const MyHomePage({Key? key, required this.title}) : super(key: key);

 final String title;

 @override
 State<MyHomePage> createState() => _MyHomePageState();
}

class _MyHomePageState extends State<MyHomePage> {
 final Stream<QuerySnapshot> _usersStream =
 FirebaseFirestore.instance.collection('users').snapshots();

 @override
Widget build(BuildContext context) {
 return Scaffold(
 appBar: AppBar(
 title: Text(widget.title),
 ),
 body: SingleChildScrollView(
 child: Container(
 margin: EdgeInsets.symmetric(
  vertical: MediaQuery.of(context).size.height * 0.04,
  horizontal: MediaQuery.of(context).size.width * 0.04),
 child: Column(
  mainAxisAlignment: MainAxisAlignment.start,
  crossAxisAlignment: CrossAxisAlignment.start,
  children: <Widget>[
  const Text(
   'Enter user name',
  style: TextStyle(fontSize: 16),
  ),
  const SizedBox(
  height: 10,
  ),
  TextField(

  onChanged: (value) {
  //Do something with the user input.

  },
  decoration: const InputDecoration(
  hintText: 'Enter your password.',
  contentPadding:
   EdgeInsets.symmetric(vertical: 10.0, horizontal: 20.0),
  border: OutlineInputBorder(
   borderRadius: BorderRadius.all(Radius.circular(6.0)),
  ),
  ),
  ),

  , icon: Icon(Icons.add), label: Text('Add user')),
  const SizedBox(
  height: 20,
  ),
  StreamBuilder<QuerySnapshot>(
  stream: _usersStream,
  builder: (BuildContext context,
   AsyncSnapshot<QuerySnapshot> snapshot) {
   if (snapshot.hasError) {
   return const Text('Something went wrong');
   }
   if (snapshot.connectionState == ConnectionState.waiting) {
   return const Text("Loading");
   }
   return ListView(
   shrinkWrap: true,
   children:
   snapshot.data!.docs.map((DocumentSnapshot document) {
   Map<String, dynamic> data =
    document.data()! as Map<String, dynamic>;
   return ListTile(
   title: Text(data['name']),
   );
   }).toList(),
   );
  })
  ],
 ),
 ),
 ),
 );
}
}
In the above code, we imported the plugins needed for our Flutter application.
(Note: Firestore requires a Firebase core, so we added that to our pubspec.YAML file and imported it into our application as well.)
The code below initializes Firebase into our app. As an additional note, when building our widget, we have a text field and a list of our current users on our database. We wrapped our widget with SingleChildScrollView and set our ListView ShrinkWrap property to true to avoid overlap.
WidgetsFlutterBinding.ensureInitialized();

await Firebase.initializeApp();
The code below is the leading powerhouse — It performs the read function from our Cloud Firestore.
final Stream<QuerySnapshot> _usersStream =
 FirebaseFirestore.instance.collection('users').snapshots();
It gets an instance of our user collection and stores it in our Stream<QuerySnapshot> variable.
The code below is a Flutter widget — this creates a stream which updates the widget state whenever there is a change to the data snapshot on the database. It displays a list of all users.
StreamBuilder<QuerySnapshot>(
  stream: _usersStream,
  builder: (BuildContext context,
   AsyncSnapshot<QuerySnapshot> snapshot) {
   if (snapshot.hasError) {
   return const Text('Something went wrong');
   }
   if (snapshot.connectionState == ConnectionState.waiting) {
   return const Text("Loading");
   }
   return ListView(
   shrinkWrap: true,
   children:
   snapshot.data!.docs.map((DocumentSnapshot document) {
   Map<String, dynamic> data =
    document.data()! as Map<String, dynamic>;
   return ListTile(
   title: Text(data['name']),
   );
   }).toList(),
   );
  })
  )
To perform a write operation, we will first create a collection instance and a variable to hold our user text input. An example is shown here:
CollectionReference users = FirebaseFirestore.instance.collection('users');
String name = '';
Next, we will create a function that inserts a document into our database using Cloud Firestore.
Future<void> addUser() {
 // Call the user's CollectionReference to add a new user
 return users
  .add({
  'name': name, // John Doe
 })
  .then((value) => print("User Added"))
  .catchError((error) => print("Failed to add user: $error"));
}
We added a button widget in our code and set the onPressed function to update the name variable with the text field’s contents. Our codebase becomes this:
import 'package:flutter/material.dart';
import 'package:firebase_core/firebase_core.dart';
import 'package:cloud_firestore/cloud_firestore.dart';

Future<void> main() async {
 WidgetsFlutterBinding.ensureInitialized();
 await Firebase.initializeApp();
 runApp(const MyApp());
}

class MyApp extends StatelessWidget {
 const MyApp({Key? key}) : super(key: key);

 // This widget is the root of your application.
 @override
 Widget build(BuildContext context) {
 return MaterialApp(
  title: 'Flutter Demo',
  theme: ThemeData(
  primarySwatch: Colors.blue,
  ),
  home: const MyHomePage(title: 'Flutter Demo Home Page'),
 );
 }
}

class MyHomePage extends StatefulWidget {
 const MyHomePage({Key? key, required this.title}) : super(key: key);

 final String title;

 @override
 State<MyHomePage> createState() => _MyHomePageState();
}

class _MyHomePageState extends State<MyHomePage> {
 final Stream<QuerySnapshot> _usersStream =
  FirebaseFirestore.instance.collection('users').snapshots();

 CollectionReference users = FirebaseFirestore.instance.collection('users');

 String name = '';

 Future<void> addUser() {
 // Call the user's CollectionReference to add a new user
 return users
  .add({
  'name': name, // John Doe
 })
  .then((value) => print("User Added"))
  .catchError((error) => print("Failed to add user: $error"));
 }

 @override
 Widget build(BuildContext context) {
 return Scaffold(
  appBar: AppBar(
  title: Text(widget.title),
  ),
  body: SingleChildScrollView(
  child: Container(
   margin: EdgeInsets.symmetric(
    vertical: MediaQuery.of(context).size.height * 0.04,
    horizontal: MediaQuery.of(context).size.width * 0.04),
   child: Column(
   mainAxisAlignment: MainAxisAlignment.start,
   crossAxisAlignment: CrossAxisAlignment.start,
   children: <Widget>[
    const Text(
     'Enter user name',
    style: TextStyle(fontSize: 16),
    ),
    const SizedBox(
    height: 10,
    ),
    TextField(
    onChanged: (value) {
     //Do something with the user input.
     name = value;
    },
    decoration: const InputDecoration(
     hintText: 'Enter your password.',
     contentPadding:
      EdgeInsets.symmetric(vertical: 10.0, horizontal: 20.0),
     border: OutlineInputBorder(
     borderRadius: BorderRadius.all(Radius.circular(6.0)),
     ),
    ),
    ),
    const SizedBox(
    height: 5,
    ),
    ElevatedButton.icon(
     onPressed: (){
     addUser();
    }, icon: Icon(Icons.add), label: Text('Add user')),
    const SizedBox(
    height: 20,
    ),
    StreamBuilder<QuerySnapshot>(
     stream: _usersStream,
     builder: (BuildContext context,
      AsyncSnapshot<QuerySnapshot> snapshot) {
     if (snapshot.hasError) {
      return const Text('Something went wrong');
     }
     if (snapshot.connectionState == ConnectionState.waiting) {
      return const Text("Loading");
     }
     return ListView(
      shrinkWrap: true,
      children:
       snapshot.data!.docs.map((DocumentSnapshot document) {
      Map<String, dynamic> data =
       document.data()! as Map<String, dynamic>;
      return ListTile(
       title: Text(data['name']),
      );
      }).toList(),
     );
     })
   ],
   ),
  ),
  ),
 );
 }
}
Other Cloud Firestore functions are listed here:
https://firebase.flutter.dev/docs/firestore/usage/.
(Note: In Cloud Firestore, we can chain filters and combine filtering and sorting on a property in a single query.)
Setting up our Firebase backend project is similar what we’ve done with Cloud Firestore, only that, when selecting our database, we select the Realtime Database and not the Firestore database.
We will use a different plugin for this section compared to Cloud Firestore. Thus, in our pubspec.YAML file, we add Firebase_database as a dependency. For our Flutter application, we need to follow the steps below.
First, we import Firebase_database into our Dart file.
import 'package:firebase_database/firebase_database.dart';
Next, to initialize our application, we use the code below:
WidgetsFlutterBinding.ensureInitialized();
await Firebase.initializeApp();
It should be noted that Realtime Database stores data as JSON, which enables us access to nodes of the data via a DatabaseReference. For example, if we store our data as in the following, we can create references for each find. That is:
{
 "users":
   “One”: {
  "name": "Ade"
 },
   “Two”: {
  "name": "Bisi"
 },
   ‘Three”: {
  "name": "David"
 },
   ‘Four”: {
  "name": "Claire"
 }
}
We can create a reference to a node by providing a path:
DatabaseReference ref = FirebaseDatabase.instance.ref("voters/1/users/1");
(Note: If you do not provide a path, the reference will point to the root of your database.)
For this section, we will write data to our database by adding a new user just like we did in Firestore. To do this, we need to follow these steps.
First, create a reference to the path we want to write to.
final refDataInstance = FirebaseDatabase.instance.reference().child('users');
Below, we have our complete code that reads data from our Realtime database and writes new users to our database.
import 'package:firebase_database/ui/firebase_animated_list.dart';
import 'package:flutter/material.dart';
import 'package:firebase_core/firebase_core.dart';
import 'package:firebase_database/firebase_database.dart';

Future<void> main() async {
 WidgetsFlutterBinding.ensureInitialized();

 var app = await Firebase.initializeApp();
 runApp(MaterialApp(
  title: 'Flutter Demo',
  theme: ThemeData(
  primarySwatch: Colors.blue,
  ),
  home: MyHomePage(app: app, title: 'Flutter Demo')));
}

class MyHomePage extends StatefulWidget {
 final FirebaseApp app;

 const MyHomePage({Key? key, required this.title, required this.app})
  : super(key: key);

 final String title;

 @override
 State<MyHomePage> createState() => _MyHomePageState();
}

class _MyHomePageState extends State<MyHomePage> {
 final refDataInstance = FirebaseDatabase.instance.reference().child('users');

 String name = '';

 @override
 Widget build(BuildContext context) {
 return Scaffold(
  appBar: AppBar(
  title: Text(widget.title),
  ),
  body: SingleChildScrollView(
  child: Container(
   height: MediaQuery.of(context).size.height,
   margin: EdgeInsets.symmetric(
    vertical: MediaQuery.of(context).size.height * 0.04,
    horizontal: MediaQuery.of(context).size.width * 0.04),
   child: Column(
   mainAxisAlignment: MainAxisAlignment.start,
   crossAxisAlignment: CrossAxisAlignment.start,
   children: <Widget>[
    const Text(
    'Enter user name',
    style: TextStyle(fontSize: 16),
    ),
    const SizedBox(
    height: 10,
    ),
    TextField(
    onChanged: (value) {
     //Do something with the user input.
     name = value;
    },
    decoration: const InputDecoration(
     hintText: 'Enter your password.',
     contentPadding:
      EdgeInsets.symmetric(vertical: 10.0, horizontal: 20.0),
     border: OutlineInputBorder(
     borderRadius: BorderRadius.all(Radius.circular(6.0)),
     ),
    ),
    ),
    const SizedBox(
    height: 5,
    ),
    ElevatedButton.icon(
     onPressed: () {
     // adds new user to DB
     refDataInstance.push().child('name').set(name).asStream();
     },
     icon: const Icon(Icons.add),
     label: const Text('Add user')),
    const SizedBox(
    height: 20,
    ),
    Flexible(
     child: FirebaseAnimatedList(
    shrinkWrap: true,
    query: refDataInstance,
    itemBuilder: (BuildContext context, DataSnapshot snapshot,
     Animation<double> animation, int index) {
     return ListTile(
     title: Text(snapshot.value['users']),
     );
    },
    )),
   ],
   ),
  ),
  ),
 );
 }
}
We make use of the expression below to perform our write operation. Using the instance of our database reference, we can write the value of our name variable in the onTap function of our elevatedButton widget.
refDataInstance.push().child('name').set(name).asStream();
Using the FirebaseAnimatedList widget by Firebase, we can perform a live stream write or read whenever we change our database.
FirebaseAnimatedList(
 shrinkWrap: true,
 query: refDataInstance,
 itemBuilder: (BuildContext context, DataSnapshot snapshot,
  Animation<double> animation, int index) {
 return ListTile(
  title: Text(snapshot.value['users']),
 );
 },
)
(Note: In a realtime database, we can filter or sort data in a single query on only one property, not multiple.)
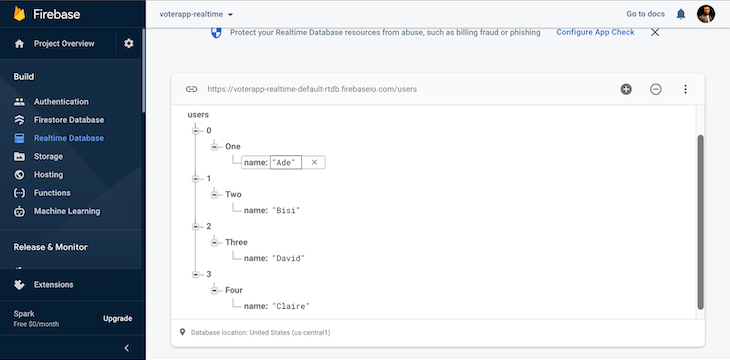
Cloud Firestore enables complex querying structures compared to Realtime databases. Because our data is structured when stored (as documents), we can perform cumbersome queries in Cloud Firerstore.
We can choose to filter or sort data in a single query on only one property, compared to only multiple properties as in the Realtime Database. In Cloud Firestore, we can chain filters and combine filtering and sorting on a property in a single query.
If we want to fetch data in descending order, Cloud Firestore is very useful where Realtime Database offers no query feature, and we can also chain multiple “where” methods to create more specific queries (logical AND) in Cloud Firestore.
users.whereEqualTo("name", "Bisi").whereEqualTo("vote", 0);
For these reasons, I would advocate strongly for Cloud Firestore when looking for a database with the best querying ability for a Flutter application. We have seen how Cloud Firestore edges its Firebase counterpart with the few samples above.
Happy coding 💻
Would you be interested in joining LogRocket's developer community?
Join LogRocket’s Content Advisory Board. You’ll help inform the type of content we create and get access to exclusive meetups, social accreditation, and swag.
Sign up now
Learn how to integrate MediaPipe’s Tasks API into a React app for fast, in-browser object detection using your webcam.

Integrating AI into modern frontend apps can be messy. This tutorial shows how the Vercel AI SDK simplifies it all, with streaming, multimodal input, and generative UI.

Interviewing for a software engineering role? Hear from a senior dev leader on what he looks for in candidates, and how to prepare yourself.

Set up real-time video streaming in Next.js using HLS.js and alternatives, exploring integration, adaptive streaming, and token-based authentication.