At one time, the creation of rich and interactive graphical experiences on the web was only possible with the now-defunct Adobe flash player plugin. But, the advent of WebGL changed the game. It brought about an era of rich visualization on the web.

WebGL is a JavaScript-rendering API that offers high-performance 2D and 3D interactive graphics capability and GPU acceleration. The API works within any compatible web browser without plugins, unlike its predecessor. However, WebGL has a steeper learning curve, so several frameworks have been built upon the API to ease the complications of working with it directly.
Here are some of the most popular frameworks built on WebGL:
In this article, we’ll review everything you need to know to start using PixiJS, a super-fast WebGL framework for rendering 2D graphics, with React. The demo portion of this article will include several PixiJS animation examples.
Jump ahead:
To follow along with this tutorial, you should have the following:
PixiJS is designed to work with HTML5 out of the box. Implementing it in a library like React requires a helper library, such as ReactPixi, that will facilitate the integration and rendering of the PixiJS applications.
ReactPixi is an open source library for rendering high-performant PixiJS applications in React. The library provides useful components that make writing PixiJS applications easier and faster using React’s declarative style.
Let’s walk through an example to see how to implement and render a PixiJS application in react.
As a first step, we need to set up a sample React project and install the required packages.
Let’s bootstrap a React app with create-react-app by running the following command in the terminal:
npx create-react-app pixi-react-app
create-react-app will install the latest version of React inside a pixi-react-app folder. However, at the time of writing, ReactPixi doesn’t support React v18. So, before we can use the library in our project, we will need to downgrade React to version 17.
To do this, first, open the package.json file in the root folder of the project and replace the following lines of code:
"react": "^18.0.0"
"react-dom": "^18.0.0"
With this snippet:
"react": "^17.0.2"
"react-dom": "^17.0.2"
Next, go to the index.js file and replace the following code:
import ReactDOM from 'react-dom/client'
With this command:
import ReactDOM from 'react-dom';
Also, replace the following code:
const root = ReactDOM.createRoot(document.getElementById('root'));
root.render(
  <React.StrictMode>
    <App />
  </React.StrictMode>
);
With this snippet:
ReactDOM.render(
  <React.StrictMode>
    <App />
  </React.StrictMode>,
  document.getElementById('root')
);
Finally, delete the node_modules folder in the project’s root folder and run:
npm install
After running the above command, your React project will be downgraded to v17. Now you can go ahead and install PixiJS and ReactPixi:
npm install pixi.js @inlet/react-pixi
After setting up the project, clean up the boilerplate codes and files. Next, open the App.js file, and import the Stage component from ReactPixi:
import Stage from "@inlet/react-pixi"
PIXI doesn’t render objects directly to the DOM. Instead, it has a renderer that generates an HTML5 canvas that serves as a display area for objects like sprites and textures in the browser. The Stage component that we just imported contains the underlying code for creating a PIXI renderer.
The component also serves as a root container object called the Stage in PIXI. This Stage object is a root container that holds all the objects we want PIXI to display to the renderer.
You can add the Stage component to the App.js component like so:
const App = () => {
  return(
  <Stage>
  </Stage>
)}
Now, start the development server by running npm start within the terminal. You should see a rectangular-shaped canvas element in your browser similar to the image below.

The rendered black square is the display area where PIXI will display objects.
The Stage component accepts properties that can be used to configure the canvas. For example, the width and height props are set to determine the dimensions of the canvas.
const App = () => {
  return(
  <Stage width={300} height={300}>
  </Stage>
)}
We can also use the options prop to set more properties, such as anti-aliasing (antialias), autoDensity, and backgroundColor, to the Stage component.
const App = () => {
  return(
  <Stage
  width={300}
  height={300}
  options={{
  backgroundColor: 0x012b30,
  antialias: true
  }}>

  </Stage>
)}
Now, let’s see how we can render objects to the canvas.
Sprites are the building blocks of PixiJS. These special images can be manipulated and controlled with code. Sprites are useful for making interactive and animated graphics with the help of properties that let us control their position, size, and a host of other features.
Rendering sprites with ReactPixi is fairly straightforward. The library provides a Sprite component that can be used to load and render images to the browser. This component negates the complications of converting sprite images into WebGL textures before loading them to the renderer.
To use the Sprite component, import it inside the App.js file like so:
import { Stage, Sprite} from '@inlet/react-pixi'
The Sprite component provides several useful properties that can be used to manipulate and control the appearance and position of sprite images. One example is the image property, which accepts a relative or absolute URL of the image to be rendered to the canvas.
Loading a sprite to the canvas is as simple as nesting the Sprite component inside the Stage JSX tags and passing a URL pointing to the image source to the image prop:
...
import wizard from "./wizard.png";

const App = () => {
  return(
  <Stage ...>
      <Sprite image={wizard} />
  </Stage>
)}
After you’ve loaded an image and saved your project, you should see the Sprite image rendered inside the canvas in the browser.
Some optional props of the Sprite component include the width and height props and the x and y props. The width and height properties are used to manipulate the dimensions of the sprite, whereas the x and y properties are used to position the sprite. The x prop positions the sprite on the x axis, while the y prop positions it on the y axis.
<Sprite image={wizard} x={150} y={150}/>
We can do more with ReactPixi than just load images to the renderer. The library provides a Graphics component that utilizes PIXI’s low-level drawing tool to enable us to draw different kinds of shapes and lines and also add textures to the renderer.
Let’s use the Graphics component to draw a rectangular shape to the renderer.
First, import the Graphics component from ReactPixi and nest it inside the Stage tags:
import { Stage, Sprite, Graphics} from '@inlet/react-pixi'
Next, create a function with the following code and pass it as a value inside the Graphics draw prop:
const App = () => {

    const draw = g => {
      g.beginFill(0x0033cc, 1)
      g.drawRect(250, 150, 150, 120)
      g.endFill()
    };

  return(
  <Stage ...>
      <Sprite image={wizard} />
      <Graphics draw={draw}/>
  </Stage>
)}
Inside the draw function, we’ll set the fill color of the shape with the beginFill method, and then draw the shape with the drawRect method. The drawRect‘s arguments are the x, y, height, and width properties, respectively.
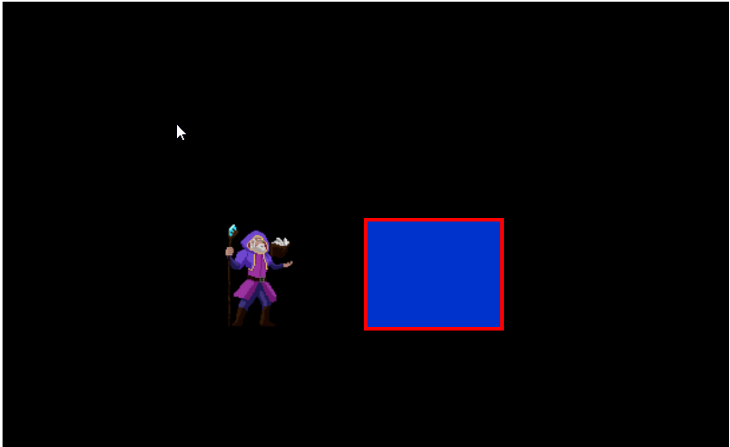
After you’ve saved the project, a blue box should appear next to the Sprite image we loaded earlier inside the canvas.
![]()
We can give the shape an outline by adding a lineStyle method inside the draw function and giving it the following properties:
  const draw = g => {
    ...
    g.lineStyle(4,0xff0000,1)
    g.endFill()
  };
The draw prop is a callback function that gets called every time its properties change. So be sure to memoize it by declaring the draw function inside React’s useCallback hook:
  const draw = useCallback(g => {
    g.beginFill(0x0033cc, 1)
    g.lineStyle(4,0xff0000,1)
    g.drawRect(250, 150, 150, 120)
    g.endFill()
  },[]);
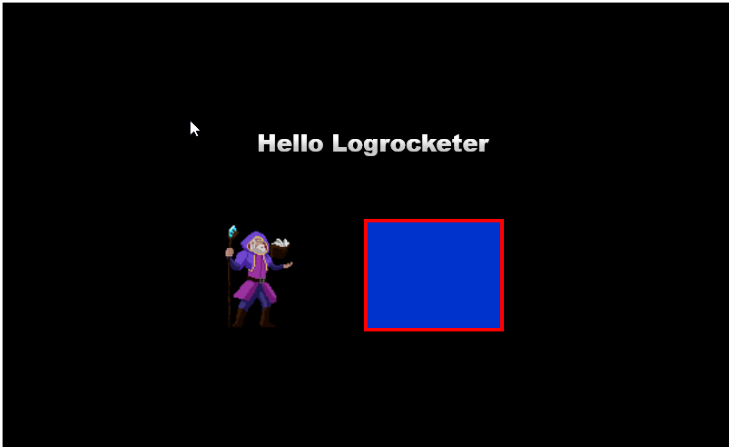
ReactPixi’s Text component utilizes PIXI’s Text object under the hood to display text to the renderer. The component has two primary props: text, which accepts the text to be displayed, and style, which accepts an object that defines the text properties.
<Text
    text="Hello World"
    style={
      new TextStyle({
        align: 'center',
        fill: ['#ffffff', '#00ff99'], // gradient
        stroke: '#01d27e',
        strokeThickness: 5,
        letterSpacing: 20,
  />
To use the Text component in your project, first import it from ReactPixi:
import { Stage, Sprite, Graphics, Text } from '@inlet/react-pixi';
Next, add it to the Stage and pass it some textStyle props:
const textStyle = new TextStyle({
  align: "center",
  fontWeight: "bold",
  fill: ["#26f7a3", "#01d27e"],
  stroke: "#eef1f5",
  strokeThickness: 1,
  letterSpacing: 5,
  wordWrap: false,
  wordWrapWidth: 350
})

const App = () => (
  <Stage ...>
     ….
     <Text text="Hello Logrocketer" style={textStyle}/>
     ….
  </Stage>
);
After saving the project, we see the text “Hello Logrocketer” rendered to the canvas.
ReactPixi provides a withFilters function that simplifies the process of adding filters to objects in the renderer. The function uses PIXI’s global object to access the filter object and its properties.
To add filters to our sprite, we must first import the withFilters function and the PIXI global object from PixiJS like so:
import { Stage, Sprite, Graphics, Text, withFilter } from '@inlet/react-pixi';
import * as PIXI from 'pixi.js';
The withFilters function accepts two arguments, a container component, and an object config.
const Filters = withFilters(Container, {
  blur: PIXI.filters.BlurFilter
});
The Container argument gives the withFilters function the characteristics of a container object.
As mentioned previously, a container is an object that is used for grouping other objects that are to be displayed in the renderer. The filter we set on the Container will be applied to the objects nested within the container.
The second argument, which is the filter config, contains the filter’s preferences. This is where we access the filter object from the PIXI global object and set the kind of filter we want to apply to the container. In this case, we’re applying a blur filter using the BlurFilter object property.
Don’t forget to import the Container component from ReactPixi like so:
import { Stage, Sprite, Graphics, Text, withFilter, Container } from '@inlet/react-pixi';
Now that we’ve configured a filter container, let’s apply it to our Sprite. Add the Filters container to the Stage and nest the Sprite component inside. Then, pass a blur prop to the container and give it the following property:
const App = () => (
  <Stage>
     ….
    <Filters blur={{ blur: 5 }} >
      <Sprite image={wizard} .../>
    </Filters>
     ….
  </Stage>
);
This will add a blur filter effect to the sprite in the renderer. You can adjust the blur effect by changing the value of the blur prop.
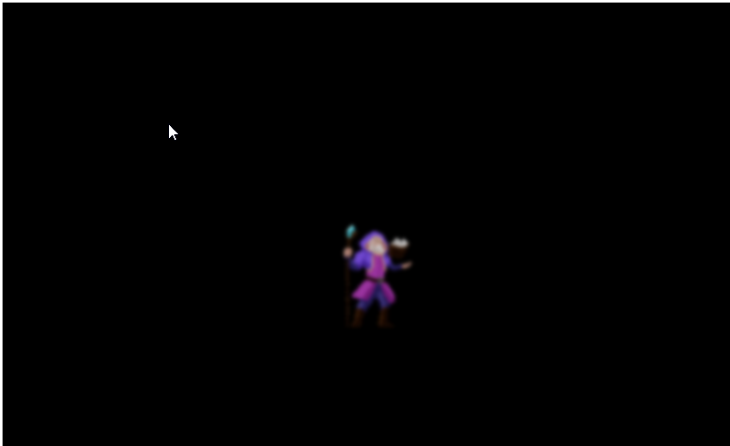
A looper, also referred to as a game loop, is required to animate objects in PIXI. The gameLoop function is called 60 times per second, and every code nested inside the function gets called just as frequently.
For example, the following code will make the wizard sprite move to the left at a rate of 1 pixel per frame:
function setup() {
  app.ticker.add((delta) => gameLoop(delta));
}
function gameLoop(delta) {
  wizard.x -= 1;
}
A looper function is created using PIXI’s ticker event; it is the equivalent of JavaScript’s requestAnimationFrame method. ReactPixi provides a useTick Hook that binds a listener to the ticker event. With it, we can animate the position and state of the Sprite.
Before we begin animating, we’ll first import the useTick and useState Hooks from ReactPixi and React, respectively:
import { useTick, ... } from '@inlet/react-pixi';
import {..., useState} from 'react'
Next, let’s create a new component for the wizard Sprite and nest it within a container in the App.js component:
...
const Wizard = () =>{
  return(
    <Sprite
      image={wizard}
      x={x}
      y={y}
      anchor={0.5}
      scale={1.3}
    />
  )
}

const App = () => (
  <Stage ...>
    <Wizard />
     ….
  </Stage>
);
Now. add the following code inside the Sprite component function:
import { Stage, Container, Sprite, Text, Graphics, withFilters,useTick } from '@inlet/react-pixi'
import { useState, useCallback} from "react";
import * as PIXI from "pixi.js"
import wizard from "./wizard.png";

let i = 0;

const Wizard = () =>{
  const [x, setX] = useState(0)
  const [y, setY] = useState(0)

  useTick(delta =>{
    i += 0.05 * delta;
    setX(Math.sin(i) * 100)
    setY(Math.sin(i/1.5) * 100)
   });

  return(
    <Sprite
      image={wizard}
      x={x}
      y={y}
      anchor={0.5}
      scale={1.3}
    />
  )
}
const App = () => (
  <Stage ...>
    <Wizard />
     ….
  </Stage>
);
In the above code block, we declare a variable, i, and assign it a value of 0. Next, we create two state variables, x and y, with an initial value of 0 using the useState Hook. Then, we call the useTick Hook and pass to it a callback function.
Inside the callback function, we assign a delta value to the i variable and set the sine result of the variable’s value multiplied by 100 to the x and y state variables.
Finally, we pass the value of the x and y state variables to the Sprite‘s x and y props, respectively.
After saving the code, your sprite should animate similarly to the wizard shown below:
![]()
In this article, we demonstrated how to create a PIXI canvas, load sprites, text, and graphic objects into the renderer, add filters to objects, and animate objects.
The purpose of this article is to give you an idea of how to implement PixiJS applications in React. Visit the ReactPixi and PixiJS documentation to learn more about the framework and how you can use it to create complex interactions in your projects.
Install LogRocket via npm or script tag. LogRocket.init() must be called client-side, not
server-side
$ npm i --save logrocket

// Code:

import LogRocket from 'logrocket';
LogRocket.init('app/id');
// Add to your HTML:

<script src="https://cdn.lr-ingest.com/LogRocket.min.js"></script>
<script>window.LogRocket && window.LogRocket.init('app/id');</script>
Hey there, want to help make our blog better?
Join LogRocket’s Content Advisory Board. You’ll help inform the type of content we create and get access to exclusive meetups, social accreditation, and swag.
Sign up now
Learn how OpenAPI can automate API client generation to save time, reduce bugs, and streamline how your frontend app talks to backend APIs.

Discover how the Interface Segregation Principle (ISP) keeps your code lean, modular, and maintainable using real-world analogies and practical examples.

<selectedcontent> element improves dropdowns

Learn how to implement an advanced caching layer in a Node.js app using Valkey, a high-performance, Redis-compatible in-memory datastore.


