Editor’s note: This article was last updated on 2 October 2023 to add information about how to handle routing with MUI and Next.js.

Getting started with your projects as quickly as possible can be an essential factor in web development — both in business and private contexts. That’s why frameworks like Next.js and libraries like MUI are so popular and useful.
In this blog post, we’ll cover the process of setting up Next.js with MUI through the following sections:
Before we have a look at the concrete setup, let me first explain what Next.js and MUI are and why the setup can be different from using MUI in other scenarios.
The Replay is a weekly newsletter for dev and engineering leaders.
Delivered once a week, it's your curated guide to the most important conversations around frontend dev, emerging AI tools, and the state of modern software.
MUI, formerly Material UI, is a very well-documented library of components that implements Google’s Material Design system. This library is open source and fully customizable. Right out of the box, MUI offers production-ready components like buttons, alerts, menus, tables, and much more.
Next.js is a very popular framework for developing fully functional web apps with React. Next.js not only handles the configuration of your project, but it also offers solutions for problems like data fetching and routing.
Another reason why Next.js is so popular is that it allows you to pre-render every page of your web app. As a consequence, Next.js will generate HTML in advance on the server side, instead of making JavaScript do all of that on the client side. This behavior normally leads to improved performance and SEO.
However, when combined with MUI, server-side rendering presents us with some challenges. Even though MUI is designed to be rendered on the server side, developers need to make sure that this functionality is correctly integrated — and this is exactly what this blog post is about.
Generally, it is not necessary to render CSS on the server side. But if you don’t include the styles in your server response and let the CSS be injected by the client, you’ll risk FOUC, or flickering.
To follow along, I’d recommend having basic knowledge of JavaScript, React, and Next.js — especially principles like server-side rendering. You can also follow along with the source code for this blog post.
In order to get started, let’s create a new Next.js project. For that, change into a directory where you want to store your project and run:
npx create-next-app@latest
In the process, you’ll be asked to name your project. Choose whatever you like here. You will also be prompted to choose various settings. For the sake of this tutorial, choose No in each case, except when asked about using the App Router. Here is a preview of the prompts you will see:
What is your project named? … next-mui
✔ Would you like to use TypeScript? … No / Yes
✔ Would you like to use ESLint? … No / Yes
✔ Would you like to use Tailwind CSS? … No / Yes
✔ Would you like to use `src/` directory? … No / Yes
✔ Would you like to use App Router? (recommended) … No / Yes <=== choose yes for this one
✔ Would you like to customize the default import alias? … No / Yes
The reason we say yes to using the App Router is that, as of version 13, Next.js has introduced a new type of router called the App Router. The setup will be far simpler with this router.
After that, navigate to your project with:
cd <project-name>
Finally, the last step is to install the necessary packages:
npm install @mui/material @emotion/react @emotion/styled @emotion/cache
You’ll notice that we install packages from a library called Emotion. Emotion is a library that is used in the latest version of MUI (5) to create styles. It allows you to write CSS in JavaScript.
Once you have installed all packages, go ahead and start your Next.js application:
npm run dev
To create your custom theme, first replace all the styles in the page.module.css file in the app directory with the following CSS:
.container {
 padding: 0 2rem;
 display: flex;
 flex-direction: column;
 justify-content: center;
 align-items: center;
 height: 100vh;
 background-color: aquamarine;
}
Now, jump over to the page.js file in your app directory and replace the code with the following:
import styles from './page.module.css'
import Switch from "@mui/material/Switch";

const label = { inputProps: { "aria-label": "Switch demo" } };

export default function Home() {
 return (
   <div className={styles.container}>
     <div>
       <span>With default Theme:</span>
     </div>
     <Switch {...label} defaultChecked />
     <Switch {...label} />
     <Switch {...label} disabled defaultChecked />
   </div>
 );
}
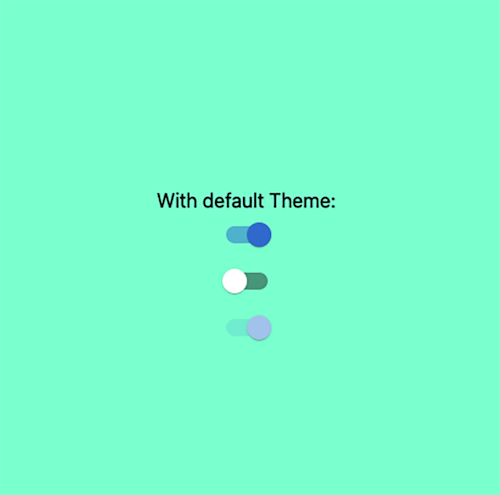
As you can see in the code above, we imported a Switch component, which we use three times with three different states. At this point, your webpage should look like this:

Next, let’s actually implement our custom theme. For that, you’ll need to create a new directory at the root level of your project. In my case, I called it utils.
Inside that directory, create a file called theme.js and add the following code:
import { createTheme } from "@mui/material/styles";

export const theme = createTheme({
 palette: {
   primary: {
     main: "#fcba03",
   },
 },
});
This file will allow you to override MUI’s default theme settings. For the sake of simplicity, we will only change the primary palette to orange.
To actually apply these changes, we need to tell our webpage to use this custom theme. This is done in our theme registry. Inside our utils directory, create a file called ThemeRegistry.js and add the following code:
'use client';
import { useState } from 'react';
import createCache from '@emotion/cache';
import { useServerInsertedHTML } from 'next/navigation';
import { CacheProvider } from '@emotion/react';
import { ThemeProvider } from '@mui/material/styles';
import CssBaseline from '@mui/material/CssBaseline';
import theme from './theme';

// This implementation is from emotion-js
// https://github.com/emotion-js/emotion/issues/2928#issuecomment-1319747902
export default function ThemeRegistry(props) {
  const { options, children } = props;
  const [{ cache, flush }] = useState(() => {
    const cache = createCache(options);
    cache.compat = true;
    const prevInsert = cache.insert;
    let inserted = [];
    cache.insert = (...args) => {
      const serialized = args[1];
      if (cache.inserted[serialized.name] === undefined) {
        inserted.push(serialized.name);
      }
      return prevInsert(...args);
    };
    const flush = () => {
      const prevInserted = inserted;
      inserted = [];
      return prevInserted;
    };
    return { cache, flush };
  });
  useServerInsertedHTML(() => {
    const names = flush();
    if (names.length === 0) {
      return null;
    }
    let styles = '';
    for (const name of names) {
      styles += cache.inserted[name];
    }
    return (
      <style
        key={cache.key}
        data-emotion={`${cache.key} ${names.join(' ')}`}
        dangerouslySetInnerHTML={{
          __html: styles,
        }}
      />
    );
  });
  return (
    <CacheProvider value={cache}>
      <ThemeProvider theme={theme}>
        <CssBaseline />
        {children}
      </ThemeProvider>
    </CacheProvider>
  );
}
This piece of code is courtesy of MUI’s documentation — you shouldn’t have to touch it at all.
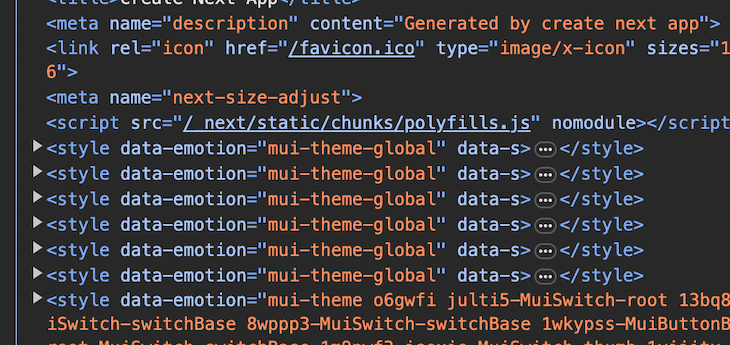
Essentially, the ThemeRegistry component allows you to tie together your cache, your custom theme, and Next’s navigation. This prevents any style flickering when loading or navigating within your app.
Concretely, what it does is insert your MUI styling inside of your <head/> HTML tag. If you open your dev tools after everything is set up, you will see new style tags inserted into your HTML:

The only thing left to do is add your new ThemeRegistry to your app’s layout so that the custom theme can be applied globally.
To do so, let’s go to layout.js in your app directory and add your new component by wrapping it around the children value:
import './globals.css'
import { Inter } from 'next/font/google'
import ThemeRegistry from '@/utils/ThemeRegistry'
const inter = Inter({ subsets: ['latin'] })
export const metadata = {
  title: 'Create Next App',
  description: 'Generated by create next app',
}
export default function RootLayout({ children }) {
  return (
    <html lang="en">
      <body className={inter.className}>
        <ThemeRegistry options={{ key: 'mui-theme' }}>{children}</ThemeRegistry>
      </body>
    </html>
  )
}
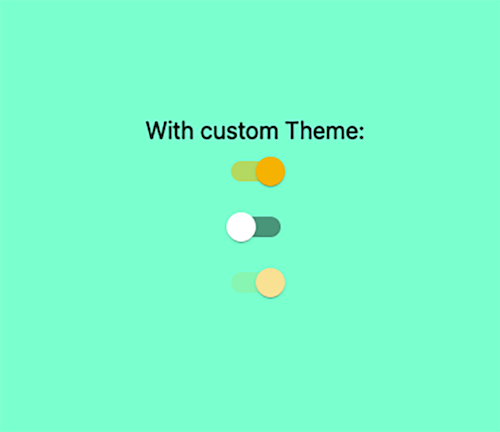
Now, your page should look like this:

Not all your styling has to be done in your global theme. Some occasions will require you to adapt your styling based on a component’s props.
Unfortunately, to keep the Next.js server-side rendering benefit, we can’t use the styled() utility. Thankfully, MUI also provides you with a prop called sx, which you can use to customize the styling of a single component. This allows you to style a specific component like a button based on various situations (e.g., success, failure, etc.).
Let’s create a custom slider and change its color. This custom component will receive a warning prop and you will adapt the color of it:
import Switch from "@mui/material/Switch";
const CustomSlider = ({warning}) => (
    <Switch
        sx={{
          '& .MuiSwitch-thumb': {
            color: warning ? '#D66460' : '#A3A3D3',
          }
        }}
      />
)
export default CustomSlider;
And then inside of your pages.js, let’s call your custom sliders:
import styles from './page.module.css'
import Switch from "@mui/material/Switch";
import CustomSlider from './CustomSlider';
const label = { inputProps: { "aria-label": "Switch demo" } };
export default function Home() {
 return (
   <div className={styles.container}>
     <div>
       <span>With default Theme:</span>
     </div>
     <Switch {...label} defaultChecked />
     <Switch {...label} />
     <Switch {...label} disabled defaultChecked />
     <CustomSlider warning={true} />
     <CustomSlider warning={false} />
   </div>
 );
}
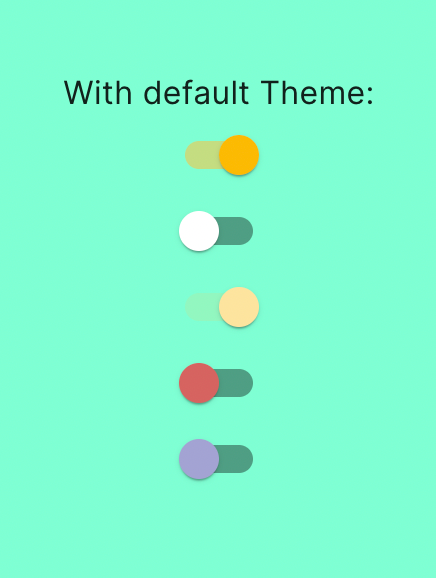
You should now see this. As you can see, your bottom two sliders rendered differently than the global theme due to the prop:

One point of confusion that can arise with MUI and Next.js is the fact that they both provide their own Link component. The Link component from Next.js is important as it handles all the navigation, but the Link component from MUI is also necessary for styling. How can you combine both?
Thankfully, The MUI Link component accepts a prop called component, which allows it to be tied to a third-party framework with its own routing, such as Next.js.
Inside your page.js, let’s tie your MUI Link with a Next.js Link by using the component prop:
{...}

import Link from '@mui/material/Link';
import * as NextLink from 'next/link';

const label = { inputProps: { "aria-label": "Switch demo" } };

export default function Home() {
 return (
   <div className={styles.container}>
     {...}
     <Link component={NextLink} href="/about">To About page</Link>
   </div>
 );
}
Let’s also create your About page so you can see the navigation.
Inside your app directory, create a new directory called about, and inside of it, add a file called page.js. Inside of this page.js, you can add a title and another link back to the homepage:
// app/about/pages.js
import Link from '@mui/material/Link';
import * as NextLink from 'next/link';
export default function About() {
 return (
   <div>
     <div>About Page</div>
     <Link component={NextLink} href="/">To Home page</Link>
   </div>
 );
}
On your homepage, you should now see a link with your global styling and be able to navigate to the About page:

For any links that will leave your application, such as external or deep links, you don’t need Next’s Link component because you are leaving your app’s router:
<Link href="http://www.google.com">To google</Link>
By the end of this tutorial, you should have styled a Next.js application with all the benefits that both MUI and Next have to offer. The MUI library comes with many pre-built components while also giving you the flexibility of styling individual components. As for Next.js, its power rests in its router, which allows you to very easily implement navigation.
Thankfully, as we saw in this article, setting up Next.js in combination with MUI is quite straightforward. If you want to get started right away, feel free to clone the repo with the code from this blog post.
Debugging Next applications can be difficult, especially when users experience issues that are difficult to reproduce. If you’re interested in monitoring and tracking state, automatically surfacing JavaScript errors, and tracking slow network requests and component load time, try LogRocket.
LogRocket captures console logs, errors, network requests, and pixel-perfect DOM recordings from user sessions and lets you replay them as users saw it, eliminating guesswork around why bugs happen — compatible with all frameworks.
LogRocket's Galileo AI watches sessions for you, instantly identifying and explaining user struggles with automated monitoring of your entire product experience.
The LogRocket Redux middleware package adds an extra layer of visibility into your user sessions. LogRocket logs all actions and state from your Redux stores.


Modernize how you debug your Next.js apps — start monitoring for free.

React Server Components and the Next.js App Router enable streaming and smaller client bundles, but only when used correctly. This article explores six common mistakes that block streaming, bloat hydration, and create stale UI in production.

Gil Fink (SparXis CEO) joins PodRocket to break down today’s most common web rendering patterns: SSR, CSR, static rednering, and islands/resumability.

@container scroll-state: Replace JS scroll listeners nowCSS @container scroll-state lets you build sticky headers, snapping carousels, and scroll indicators without JavaScript. Here’s how to replace scroll listeners with clean, declarative state queries.

Explore 10 Web APIs that replace common JavaScript libraries and reduce npm dependencies, bundle size, and performance overhead.
Would you be interested in joining LogRocket's developer community?
Join LogRocket’s Content Advisory Board. You’ll help inform the type of content we create and get access to exclusive meetups, social accreditation, and swag.
Sign up now
8 Replies to "Getting started with MUI and Next.js"
thank you Kevin ❤️❤️
Following your post to the letter and I’m getting an error when running dev after copy/pasting the index.js file, says I’m missing @emotion/styled. Should I install this or am I doing something wrong?
Hey David, thank your for your comment! Did you run `npm install` on the root level of the project before trying to run `npm run dev`?
Hi David, this is true for me as well. The fix is to install that dependency: npm install @emotion/styled
Hey Dan-Levi, thank you for your comment! I added @emotion/styled as a dependency to the project, now everything should work again!
Thank you for your detailed guide! I just tried to follow it and ran into a problem, about which I asked a [question on SO](https://stackoverflow.com/questions/74763315/does-mui-require-all-pages-to-be-csr-when-using-the-new-app-directory-in-nextjs).
Maybe you can find the time to participate there. Thanks!
Hi Kevin, thanks for this. Do you have an example that doesn’t use getInitialProps, because it is now deprecated? The latest version of Next recommends getStaticProps or getServerSideProps instead, but neither are supported for use in _document.js
Thanks Kevin for providing this.
Parts of it did not work with the current version of NextJs/MUI, but I was able to find ways to make it work. I would be glad to give you the tweaked code, if you want to update this great tutorial.