
Excalibur.js is a game development engine written in plain JavaScript (or TS) to develop games. It’s a great starting point for developers already familiar with JavaScript development because it eliminates the need to set up special tools — you can use Node and npm with your favorite editor. Excalibur also eliminates the requirement of learning a new language like GDScript or C# — you can simply use JavaScript. The game runs directly in the browser, so you can run and test it in an environment you’re already familiar with.
This article assumes you have a good understanding of JavaScript and JavaScript tools like Node and npm. However, you don’t need to know game development or Excalibur.js. Game development is a vast field, and this article will only introduce the basics to get you started, as well as provide some helpful tips to write your first game. Like learning any other development, you’ll still need to make a lot of projects and read docs and other tutorials to improve!
You might be asking: Why another game development tutorial?
There are a lot of good tutorials for making games. Given the number of games that are there on Steam and the app store, this is by no means a niche domain. Additionally, most game engines have a “Getting started” guide in their official docs. So, why am I writing this article?
In my experience, a lot of game development tutorials have the same problem as beginner web development tutorials. They do a great job of covering the basics, introducing key concepts, and explaining them well. If you follow along, you’ll likely end up with a nice, working to-do game. But just like the dreaded “tutorial hell” of web dev, I often find myself stuck after finishing a game dev tutorial — caught in a limbo where I understand the fundamentals but have no clear idea of what to do next to build my own game, rather than just another to-do app clone.
It’s like when, after finishing a React tutorial, you know what hooks are, what props are, and maybe even something about state management. But you’re not sure how to make your own website using these concepts.
So, I’m writing this with the hopes that it will help you write your own game. The first section will show you the basics you need to understand to make any game in Excalibur.js. Then, in the second section, I’ll talk about a method of using five implementation questions that I find helpful while developing a game. You should be able to apply that to your concepts and make your game.
Let’s get started!
The Replay is a weekly newsletter for dev and engineering leaders.
Delivered once a week, it's your curated guide to the most important conversations around frontend dev, emerging AI tools, and the state of modern software.
A game engine occupies the same space in game development that a JavaScript engine occupies in frontend development: it handles the main game loop of displaying things on screen, accepts inputs from users, runs code in response to them, and updates the overall state of the game.
Most games need these functionalities in one form or another, so instead of everyone having to write their own loop implementations, all of these get abstracted in the engine, which can be used as a sort of library in the case of Excalibur.js.
Excalibur is a strictly 2D game engine written in JavaScript. As mentioned earlier, the biggest advantage it offers web developers is familiarity, making it a great starting point for game development. That said, Excalibur has some downsides: building for desktop or console can be tricky, and it’s limited to 2D. If you’re looking to create something in 3D, you might want to check out a different game engine like Three.js.
“Hello World” is a popular example used to validate that the compiler/interpreter of your programming language is correctly installed and functioning. We will do the same by setting up Excalibur.js and displaying a square on the screen as a game dev equivalent of a “Hello World” example.
We’ll use npx and the Excalibur CLI to set up a basic template. Run the following:
npx create-excalibur@latest
In the options, select the following:
Using Vite allows for an easier change-build-run cycle by using a single command.
This will bootstrap a basic project, and you can run npm run start to start the Vite server. On the localhost, you will see the sample, where a sword moves on the screen in a square. Let’s change this to make a stationary square so we can understand the basics of creating an object in Excalibur.
Open the player.ts file. This is where our “player,” i.e., the sword, is defined. There is a lot here, and you can look through and read the comments to get an idea of what functionality is possible. For our purposes, we will simply delete this and start from scratch.
Delete all the contents from the file and add the following:
import { Actor, Color, Engine, Rectangle, vec } from "excalibur";
export class Player extends Actor{
  constructor(){
    super({
      name: "Player",
      pos:vec(250,250),
      width:100,
      height:100
    })
  }
  onInitialize() {
    this.graphics.add(new Rectangle({width:100,height:100,color:Color.Purple}));
    this.on('pointerdown',(e)=>{
      console.log("You clicked at point ",e.worldPos.toString());
    });
  }
}
We start by importing the classes and functions from Excalibur. Then, we define our “player” class. As the rest of the demo code already uses the class name Player, we’ll keep it the same, but you can change it if you also update the references in other places. The Actor class is provided by Excalibur, and anything that can move, collide with other things, and react to a player’s input must extend this class.
We start our constructor by calling super(), which sets up the basic functionality provided by the Actor class, and should always be done. We provide it an object with information about our “player”:
x = 250 ; y = 250100, which are used in collision calculationsFor the position, remember that like most game engines, the X axis starts on the top-right and increases on the left, while the Y axis starts on the top-right and increases downwards.
The onInitialize method is used for one-time initializations before the character is rendered on the screen. Here, we can load the sprite, set up animations, and set up listeners for signals. In our code, we’ll add a rectangle using the this.graphics.add method.
this.graphics is the built-in graphics context for Actor classes and is used to draw them on the screen — either a simple shape or a sprite loaded from a sprite sheet, which we’ll see later. Here, we use a simple rectangle and provide the width, height, and color to the Rectangle constructor.
We then set an event listener and listen for pointer click events. In the handler, we log the position of the mouse pointer at the click time. If you run it in the browser, you will see something like this:
As you can see, after clicking the Play game button, our rectangle fades in, and when we click on it, the click position is logged in the console. Next, we will see how we can make our character react to user input.
Now that we know how to display a basic shape, we can move on to handling inputs from the player.
The most common way players will interact will be with a mouse and keyboard. We saw how to handle clicks in the previous section, so now let’s see how we can make our square move when the user presses an arrow button.
The Actor base class provides an update method, which is used by the engine to update the actor’s state. In this method, we can check if any key is pressed and then update our square’s position:
update(engine,elapsed) {
    super.update(engine,elapsed);
}
N.B., We must call super.update in our overriding because, otherwise, the core update implementation won’t be called, which can break our basic functionality.
Using the engine.input.keyboard.isHeld function, we can check if a key is pressed. This returns true if the given key is held down. Several other functions can be used to check the key down and release events, such as wasPressed or wasReleased.
We’ll check if the left arrow was held and update the square’s position accordingly:
...
super.update(engine, elapsed);
if (engine.input.keyboard.isHeld(Keys.ArrowRight)) {
  this.pos = this.pos.add(vec(3, 0));
}
If the key is held, we update the position by three pixels. An important thing to note is that this will be called on each frame render, so if your game is running at a high frame rate, this will be called more times than if it is running at a low frame rate. So, for example, if the game runs at 30fps, the player will see a 3 * 30 = 90px change in one second, whereas if the game runs at 60fps, the user will see a 3 * 60 = 180px change in one second.
To solve this issue, we can use the elapsed parameter, which gives the milliseconds since the last call to update. We can use that and define the vector as vec(3*elapsed,0) to make movement consistent irrespective of the frame rate.
If we replicate the same for the remaining three directions, we get a square that we can move using arrow keys:
In a similar way, we can also handle the mouse or joystick inputs as well. For mouse events, we can set up the event listener for clicks in our onInitialize methods as we did in the last section.
After handling player inputs, we will now see how levels work in Excalibur. In most games, you will need to switch from one level to the next, and in Excalibur, levels can be defined as Scenes.
A Scene is a collection of actors that are active together. This can include anything from start and end screens, individual levels, and even different stages within a level. The key thing to remember is that only one scene can be active at a time, and the engine only updates actors that belong to that scene. Anything outside the active scene won’t be rendered or updated.
Let’s take a look at the level.ts file, which has the default scene we have been using so far:
export class MyLevel extends Scene {
    override onInitialize(engine: Engine): void {
        const player = new Player();
        this.add(player); // Actors need to be added to a scene to be drawn
    }
    ...
After the imports, the MyLevel class is defined, extending the built-in Scene class. In the onInitialize method, we create our square by instantiating the Player class and then adding it to this scene.
Let’s finally take a look at the main.ts file. This is meant mostly to instantiate the Engine instance, add scenes to it, and start the game. Among other things, this is what we see:
...
scenes: {
  start: MyLevel
},
...
We declare the scene with the name start as MyLevel. Then, in the start call, we’ll run this:
game.start('start',
...
We provide the name of the first scene to run after the player clicks on the start button, along with the transition options for how we want to transition into that scene.
Let’s rename the class Level1 and update the references as well. Then, let’s add a text label showing Level1. In the onInitialize method of the Level1 class, we add the following:
const title = new Label({
    text: "LEVEL 1",
    pos: vec(300,100),
    font: new Font({
        family: 'impact',
        size: 48,
        unit: FontUnit.Px
    })
})
this.add(title);
We provide the constructor of the Label class the text, position, and font to be used. We then add it to the level similar to the player object. Now, if you run the game, you will see that it has the label displayed. Next, we will see how we can change the scenes.
For our example, we will change the scene from Level1, which we have been using until now, to a scene called Level2. For now, the only difference between them will be the label, which will show the names of the respective levels. In an actual game, we would probably parameterize this and pass in the label text; but, for now, we will make a completely different class for Level2.
We will also change the constructor of these levels to take a player instance and set the player from there. This way, both levels will share the same player instance:
export class Level1 extends Scene {
  player: Player;
  constructor(p: Player) {
    super();
    this.player = p;
  }
  ...
In the onInitialize function, we’ll add the player as follows:
this.add(title);
this.add(this.player);
In main.ts, we construct the player instance, pass it the level constructor, and register them in the engine as follows:
let player = new Player(vec(100,250));
...
scenes: {
    level1: new Level1(player),
    level2: new Level2(player),
}
...
Excalibur triggers an event when an object leaves the viewport, and we will use that in the Player’s onInitialize function to trigger the scene change:
...
this.on("exitviewport", () => {
  let next = engine.currentSceneName == "level1" ? "level2" : "level1";
  engine.goToScene(next, {
    destinationIn: new FadeInOut({
      duration: 2000,
      direction: "in",
      color: Color.Black,
    }),
  });
});
...
We check the current level name and select the other level as the next scene. We also provide a FadeIn transition similar to the game.start call in main.ts so the change of scene has a smooth transition.
Finally, to get a wrap-around behavior where if the player exists from the left, it appears on the right in the next level, we add the following in both levels’ onActivate function:
onActivate(context: SceneActivationContext<unknown>): void {
    this.player.pos.x %= this.engine.screen.width
    if (this.player.pos.x < 0) {
      this.player.pos.x = this.engine.screen.width;
    }
    this.player.pos.y %= this.engine.screen.height;
    if (this.player.pos.y < 0) {
      this.player.pos.y = this.engine.screen.height;
    }
}
onActivate is called each time a scene is made active, so we’ll update the position correctly when we transition from one scene to another. If you run this, you will get a smooth transition when the player character exits the viewport:
In most games, you will need to detect some kind of collision in order to perform certain actions:
In Excalibur, when collision detection is enabled on something, it will emit a collision event and call the onCollision method when it collides with something. For our example, we will add two squares, and each will take the player to another level when the player collides with them. We will create a Level3 like the above and add it to the engine:
...
scenes: {
  level1: new Level1(player),
  level2: new Level2(player),
  level3: new Level3(player),
},
...
Create another class called LevelSelector as follows:
export class LevelSelector extends Actor {
  next: string;
  label: string;
  engine: Engine;
...
}
This class has three members: next stores the level to go to, label stores the display text, and engine stores the reference to the engine.
Then we have the constructor:
constructor(levelName: string, label: string, pos: Vector, engine: Engine) {
  super({
    name: "LevelSelector",
    pos: pos,
    width: 100,
    height: 100,
  });
  this.next = levelName;
  this.label = label;
  this.engine = engine;
}
In the onInitialize method, we’ll create the square and label to display the following:
onInitialize(engine: Engine): void {
  const square = new Rectangle({
    width: 50,
    height: 50,
    color: Color.Magenta,
  });
  const title = new Text({
    text: this.label,
    font: new Font({
      family: "impact",
      size: 12,
      unit: FontUnit.Px,
    }),
  });
  let group = new GraphicsGroup({
    members: [{
        graphic: square,
        offset: vec(0, 0),
      },
      {
        graphic: title,
        offset: vec(0, 60),
  }]});
  this.graphics.add(group);
}
Here, instead of using a single graphic like Rectangle or Text, we use GraphicsGroup to display both of them. We also assign an offset to the text to make it appear below the square.
Finally, we add the onCollisionStart method as follows:
onCollisionStart(self: Collider,other: Collider,
    side: Side, contact: CollisionContact ): void {
    if (other.owner instanceof Player) {
      this.engine.goToScene(this.next);
    }
  }
We get self as a reference to the object on which the method is called and other as the other body that is colliding with it. These are both instances of the Collider class and also store other information about the collision. The actual Actor that collided is stored in the .owner field. We check if the other.owner is Player, and change the level to the next one.
After making the appropriate changes in Level2 and Level3 to always start the Player at a fixed position instead of wrap-around, we get our desired behavior:
If we touch the level 2 selector, we’ll change to level 2, and if we touch the level 3 selector, we change to level 3. Read more about collision detection and the types of collisions available in Excalibur here.
Sprites are images or animations used in games to represent characters, objects, and other elements. Most of the time, we don’t use simple squares or shapes for characters — we use more detailed images. A sprite sheet is a single, large image that contains multiple smaller sprites arranged in a grid. This makes it easier to manage sprites, as we can use one image instead of handling multiple separate files.
We will be using a pre-made sprite pack downloadable from itch.io. When using pre-made sprites, always ensure you have the appropriate license to use them for your purposes. Some assets are free to use for any game, some are free for personal use but not for commercial use, and some require purchasing a license for any use. Make sure you have the correct permission to use the assets.
For our example, you can download the asset pack here. The pack includes a lot of assets, but we’ll only be using a few for this and the next section. After downloading the zip, extract the files from the Tiny Swords (Update 010) directory (in the zip) into our public/assets directory. Once that is done, you will have public/assets/Deco, public/assets/Factions, and others ready to use.
We’ll use the Factions/Knights/Troops/Warrior/Blue/Warrior_blue.png image for our player. You can open and see that the image contains individual frames of various animations, such as idle, walking, and attacking, laid out in a grid.
If we open one of the sprite sheets, we can see the available animations. Open Factions/Knights/Troops/Warrior/Blue/Warrior_blue.png. Here, we have eight rows, each with six columns. The first row is idle/standing frames. If we look carefully, the knight is slowly bobbing up and down. The next row is the walking animation.
The next two rows are two attacks facing left, then the next two rows are two attacks facing front, and finally, the last two are two attacks facing backward. For now, we will only use the standing and walking animations. You will also notice that there is a .aseprite file, which is a popular format for sprite sheets and animations. However, working with it and seeing it require another package and software, respectively, so for now, we will simply use the .png file. You can read more about its use here.
First, open the resources.ts file. This file is used to load resources like images and sounds. In a larger game, you might split this up so that each level or stage only loads its necessary resources when it starts. But for our case, we’ll load everything at the beginning. By default, the Sword resource is already loaded. Now, let’s add the Knight resource:
export const Resources = {
  Sword: new ImageSource("./images/sword.png"),
  Knight: new ImageSource(
    "./assets/Factions/Knights/Troops/Warrior/Blue/Warrior_Blue.png"
  ),
} as const;
Now, in Player.ts, we’ll load it as follows. Keep in mind that this isn’t the best approach — normally, you’d define it in resources.ts and import it separately. But for the sake of this example, we’ll do it this way.
First, add idleAnimation as a member of our Player class:
idleAnimation: Animation;
Then, in our constructor, we create a sprite sheet from this as follows:
let spriteSheet = SpriteSheet.fromImageSource({
  image: Resources.Knight,
  grid: {
    rows: 8,
    columns: 6,
    spriteWidth: 192,
    spriteHeight: 192,
  },
});
Here, we specify the grid rows and columns as we saw above, and for the height and width of individual sprites, we divide the height and width of the whole image by rows and columns to get the numbers.
Then, we create an animation from this and assign it to idleAnimation as follows:
this.idleAnimation = Animation.fromSpriteSheet( spriteSheet, range(0, 5),
  100, AnimationStrategy.Loop
);
Next, we pass in the sprite sheet we created earlier, then specify the range of individual sprites that make up the animation.
Sprites are numbered starting from 0, beginning at the top left and moving right, row by row. So, the first row contains sprites 0, 1, 2, 3, 4, and 5, and the second row continues with 6, 7, 8, 9, 10, 11, and so on. Since the idle animation sprites are in the same row, we can define the range directly. However, if they were arranged in columns or scattered across different positions, we could use fromSpriteSheetCoordinates instead of fromSpriteSheet and provide their exact locations as an array.
The third parameter here is the number of milliseconds per frame, which is specified on the asset page above the license information, 100ms. Finally, we want to loop this animation continuously.
For the final step, we change our onInitialize method to use this instead of our simple square:
onInitialize(engine: Engine): void {
    this.graphics.use(this.idleAnimation);
    ...
Now, if you run the game, you will see that instead of our square, we have the knight image!
Yay! For an extra bit of fun, you can replace the levelSelector sprite with a tower instead of the square, so it looks as if the knight walks into the tower for the next level.
You can also pass a scale value in the super call within Player‘s constructor to adjust the sprite’s size. Right now, the scale is (1,1), meaning the sprite appears at its original size. If you set it to a value less than 1, the image will shrink accordingly:
...
scale:vec(0.5,0.5),
...
Because we still glide when moving, let’s add a walking animation. We’ll create more member variables to store the walking animations and separate the left and right-facing animations. Because you now know how to do the animation, the code below will be brief and show only the crucial steps.
First, we’ll define the members we need:
idleAnimationRight: Animation;
idleAnimationLeft: Animation;
walkingAnimationLeft: Animation;
walkingAnimationRight: Animation;
facingRight: boolean;
Rename the current idleAnimation to idleAnimationRight. Then, in the constructor, create idleAnimationLeft by cloning idleAnimationRight and flipping it horizontally. We’ll also set facingRight to true:
this.facingRight = true;
...
this.idleAnimationLeft = this.idleAnimationRight.clone();
this.idleAnimationLeft.flipHorizontal = true;
You can use the same technique to create the walkingAnimationRight and create walkingAnimationRight by flipping it horizontally.
Now, in the update method, we’ll change the previous ifs to a chain of if-else-if and add an else at the end. This else will be the case when no key is pressed. We use the corresponding idle animation based on the facingRight flag:
...} else {
  if (this.facingRight) {
    this.graphics.use(this.idleAnimationRight);
  } else {
    this.graphics.use(this.idleAnimationLeft);
  }
}
In the check for the right arrow key, we set the facingRight to true, and use the walkingAnimationRight animation:
if (engine.input.keyboard.isHeld(Keys.ArrowRight)) {
  this.facingRight = true;
  this.graphics.use(this.walkingAnimationRight);
  this.pos = this.pos.add(vec(2, 0));
} else...
I also increase the position by 2 instead of 3 to slow the movement speed. Similarly, in the left key check, we set facingRight to false and use the walkingAnimationLeft. Finally, for the up and down keys, we don’t have any separate animations, and we use the walking animations based on the facingRight flag. The result would look like this:
As you can see, the knight correctly faces the direction of the key and uses the correct animation as well. Yay!
In this final part of the basic introduction, we’ll explore what a tilemap is and how to use it in our games. Tiles are small, repeatable images that can be combined to create a larger scene. A tileset is simply a collection of these individual tiles, usually arranged in a single image, much like a sprite sheet. A tilemap is a design made using these tiles, typically serving as the game’s background or level layout.
However, when using special formats like .tmx, we can attach properties to specific tiles or tile types. For example, we can mark border tiles as solid to prevent the player from walking through them or define a specific tile as the player’s starting position.
For this example, you can see the image assets/Terrin/Ground/Tilemap_Flat.png. This consists of individual square tiles, which can be composed to create a larger level layout. We can load this up and split it into sprites and manually design the level programmatically one tile at a time; however, that would be extremely tedious and quite slow. Instead, we will use a popular program called Tiled, which can be downloaded from here. We will then create a tilemap from the image we saw earlier and use it in our game.
Note that I will not be doing an in-depth explanation for Tiled itself. You can refer to the docs for that. We will only review the steps relevant to our case.
First, open Tiled and create a new map using File→New→New Map:
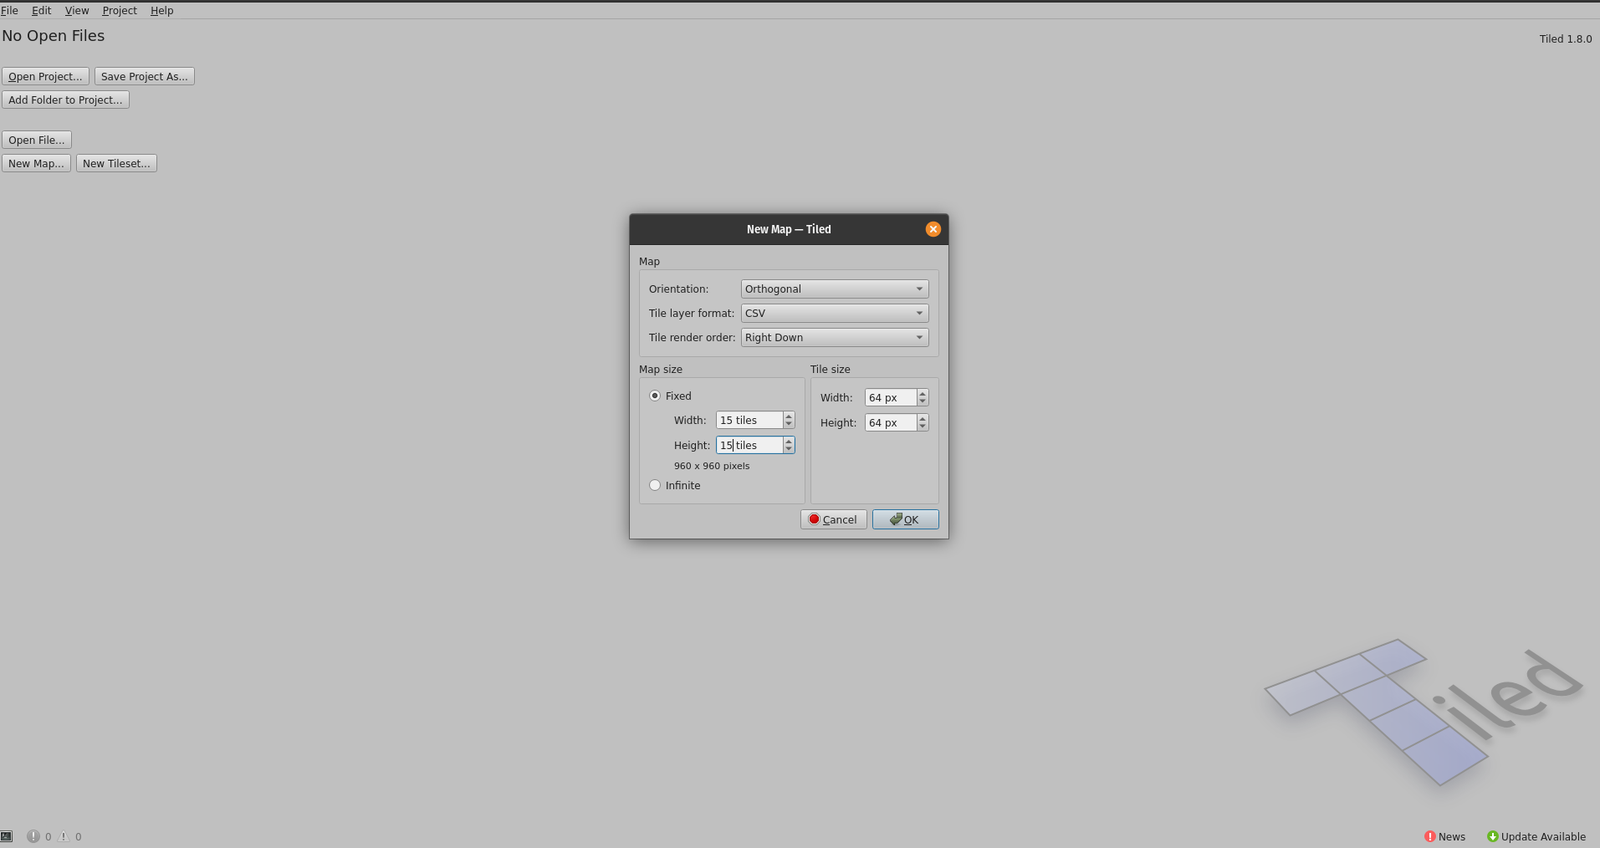
Here, change the width and height in the map size section to 15 tiles each, and in the tile size, use the width and height as 64 px and then click OK. The tile width and height can be found on the asset page above the license section:
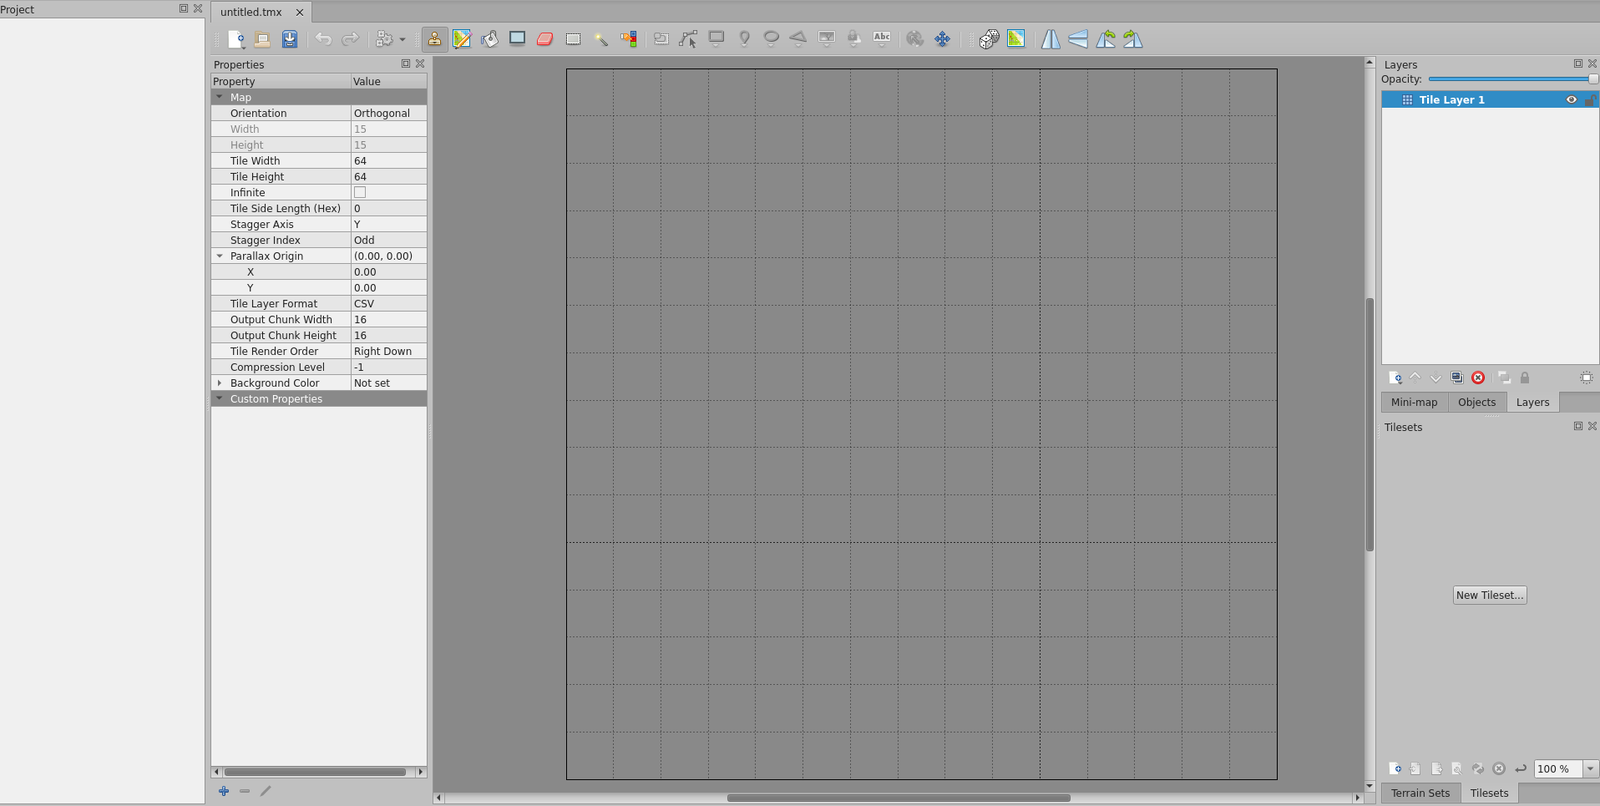
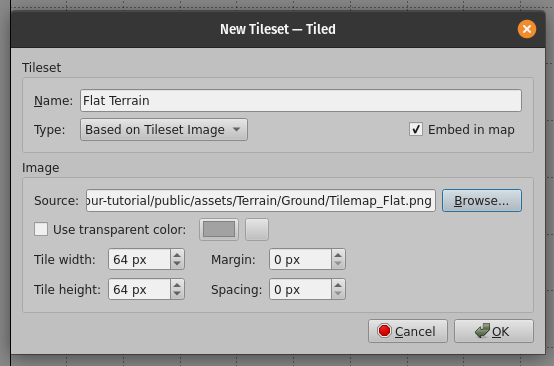
This will create an empty project. In the bottom right section, click on New Tileset…. In the pop-up box, set the name as Flat Terrain , select the tilemap_flat image we saw above, and click on OK:
Now, if you adjust the size of the docks, you will be able to see the whole image, and the individual tiles will be selectable on hover and click:
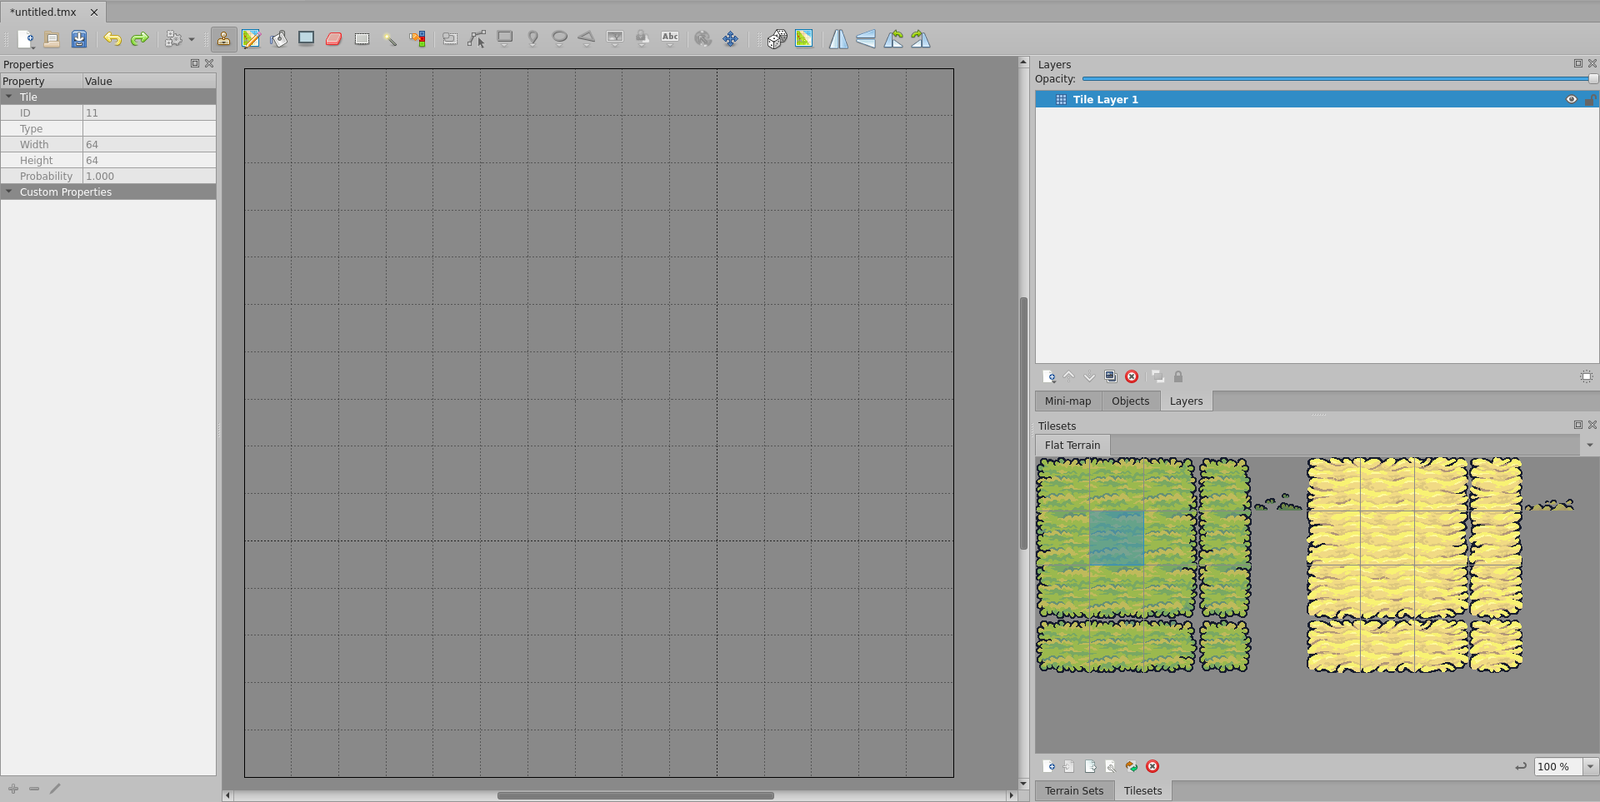
You can select the specific tile you want and use it to draw directly on the grid:
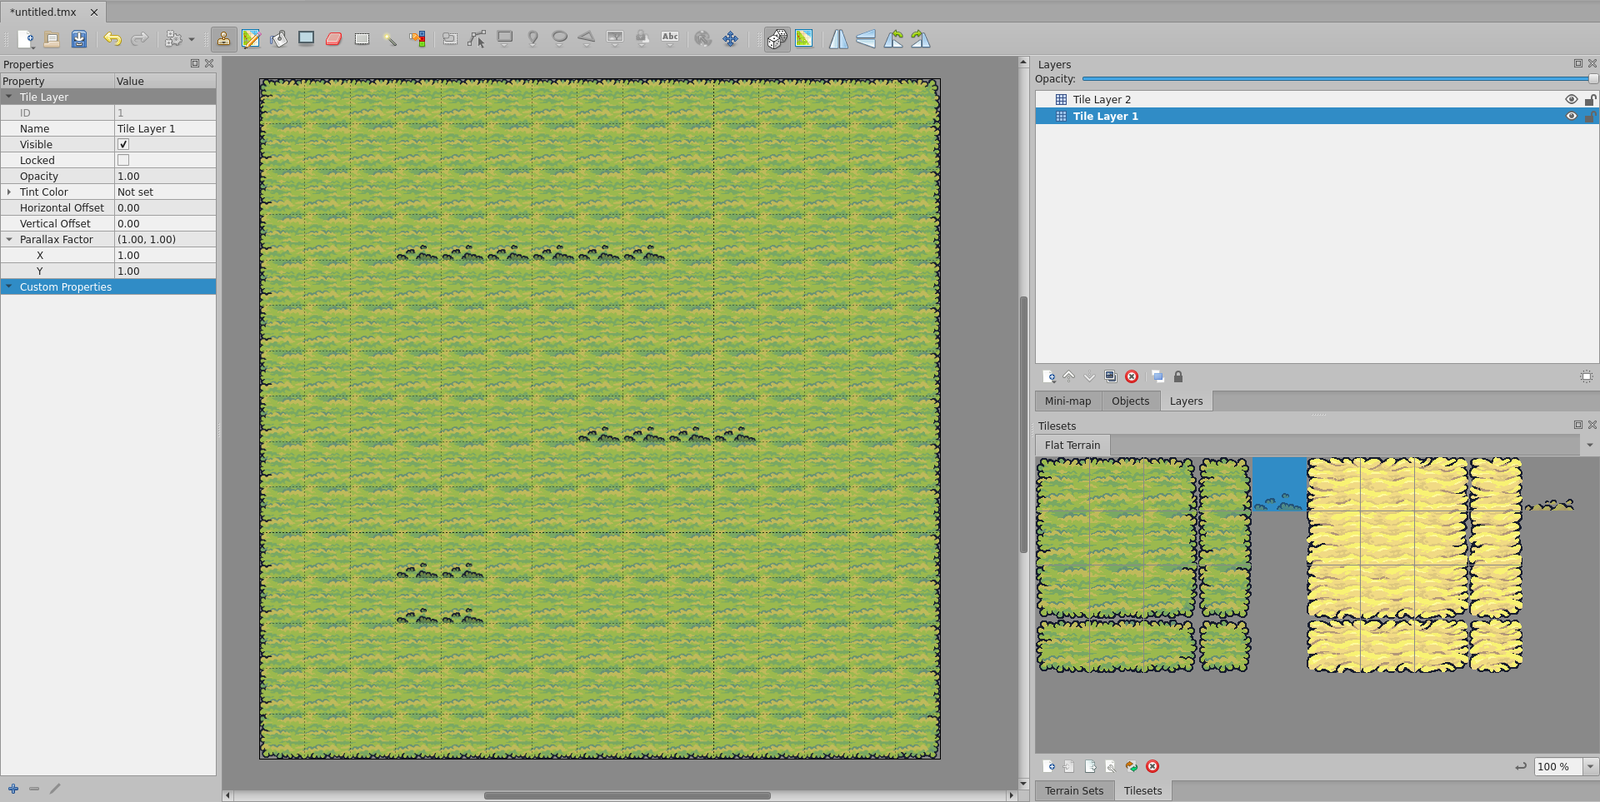
To place the tiles on top of another like the grass tiles, we need to create another layer in the right top panel, select it, and then add the grass tiles. You can also use the bucket fill tool in the top bar to fill in the middle section once you are done adding the borders.
We can also specify some other details using the object layer. For example, we can specify the starting position of the player or the position of the enemies, etc. For that, select the object tab next to the layers and click on the add object layer icon in the toolbar above the tabs.
Now you will have an object layer listed in the layers tab. Select that layer, and in the top toolbar, select the Insert Rectangle tool. Then, you can click and drag to create a rectangle object:
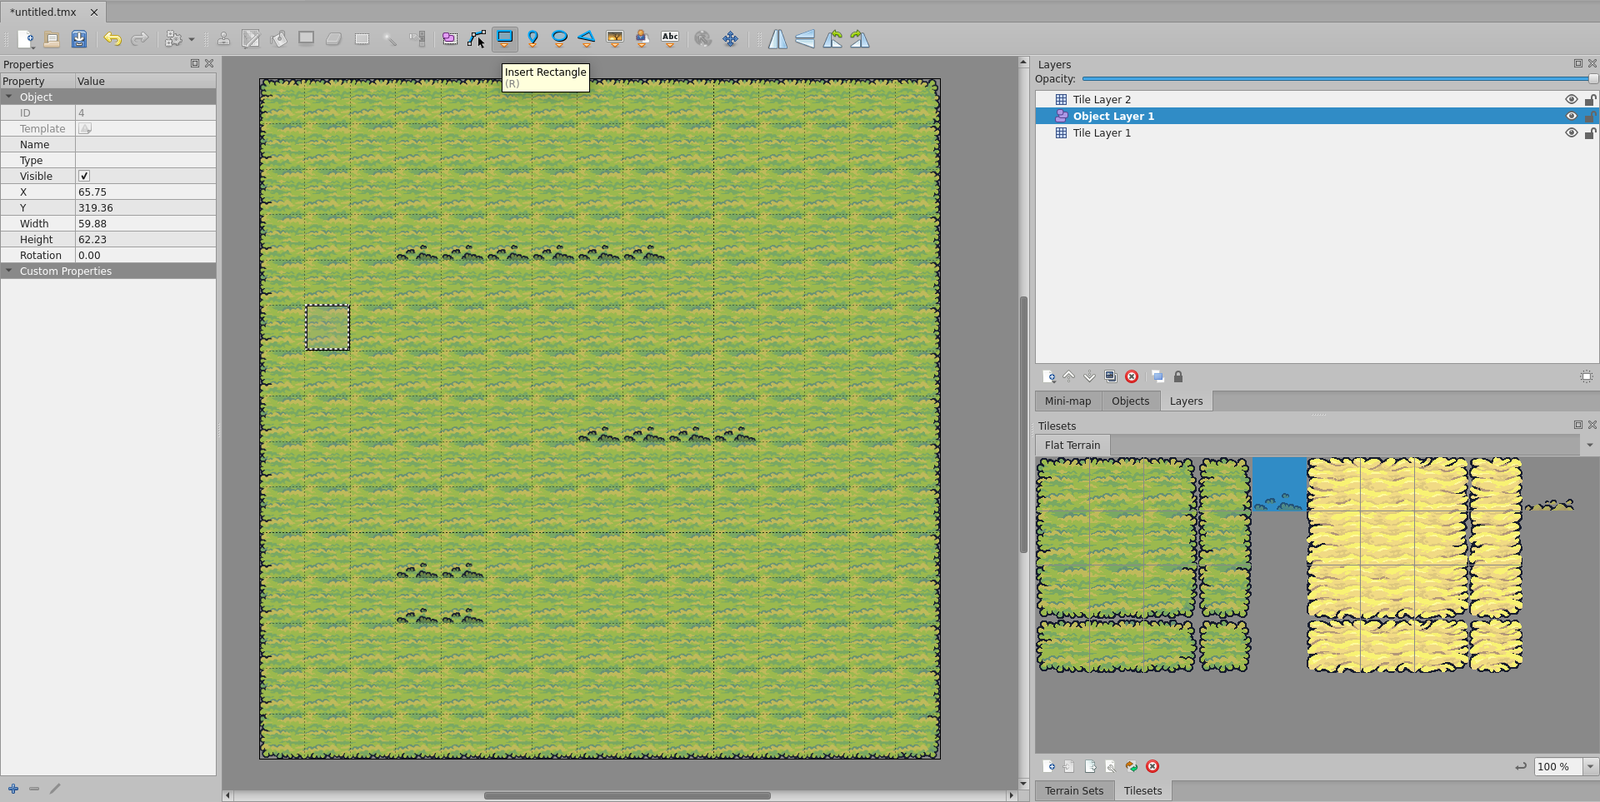
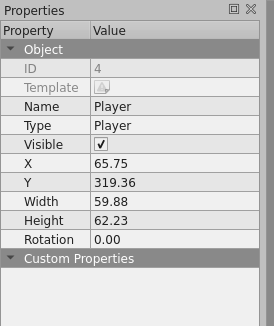
In the left-top sidebar panel, give it a name and type (in newer versions, this will be called class) like Player:
Then, in the File menu, click on Save As… and select a location in our assets directory. Give it a name like level.tmx and save.
Now, in our project directory, run the following npm command to add the tiled plugin:
npm install --save-exact @excaliburjs/plugin-tiled
Then, in resources.ts, after the loop, we‘ll add the following:
export const TiledLevelMap = new TiledResource("./assets/level.tmx");
loader.addResource(TiledLevelMap);
We also create a bare-bones level called TiledLevel:
export class TiledLevel extends Scene {
  constructor() {
    super();
  }
}
And in the main.ts, we’ll add this level to scenes:
scenes: {
  level1: new Level1(player),
  level2: new Level2(player),
  level3: new Level3(player),
  tiledLevel: TiledLevel,
},
Then, change the game.start call as follows:
game
  .start("tiledLevel", {loader})
  .then(() => {TiledLevelMap.addToScene(game.currentScene);});
If you run the game now, you will see that our tilemap is being used. However, there is no player or anything else. For that, we can use entity factories.
In the tiled resource creation, we pass an options object as follows:
export const TiledLevelMap = new TiledResource("./assets/level.tmx", {
  entityClassNameFactories: {
    Player: (props: FactoryProps) => {
      return new Player(vec(props.worldPos.x, props.worldPos.y));
    },
  },
});
We can also add custom properties to the Tiled object, and we will get them via props.object.properties. Here, we can set values for resources such as coins in the treasure box, the type of enemy, and so on.
Now, if we run the game, we will see this:
However, as you see in the end, our player can move beyond the boundaries as well as under the grass. For that, let’s edit the tilemap, move the borders of the map to a separate level called boundaries, and add a custom bool property solid as true:
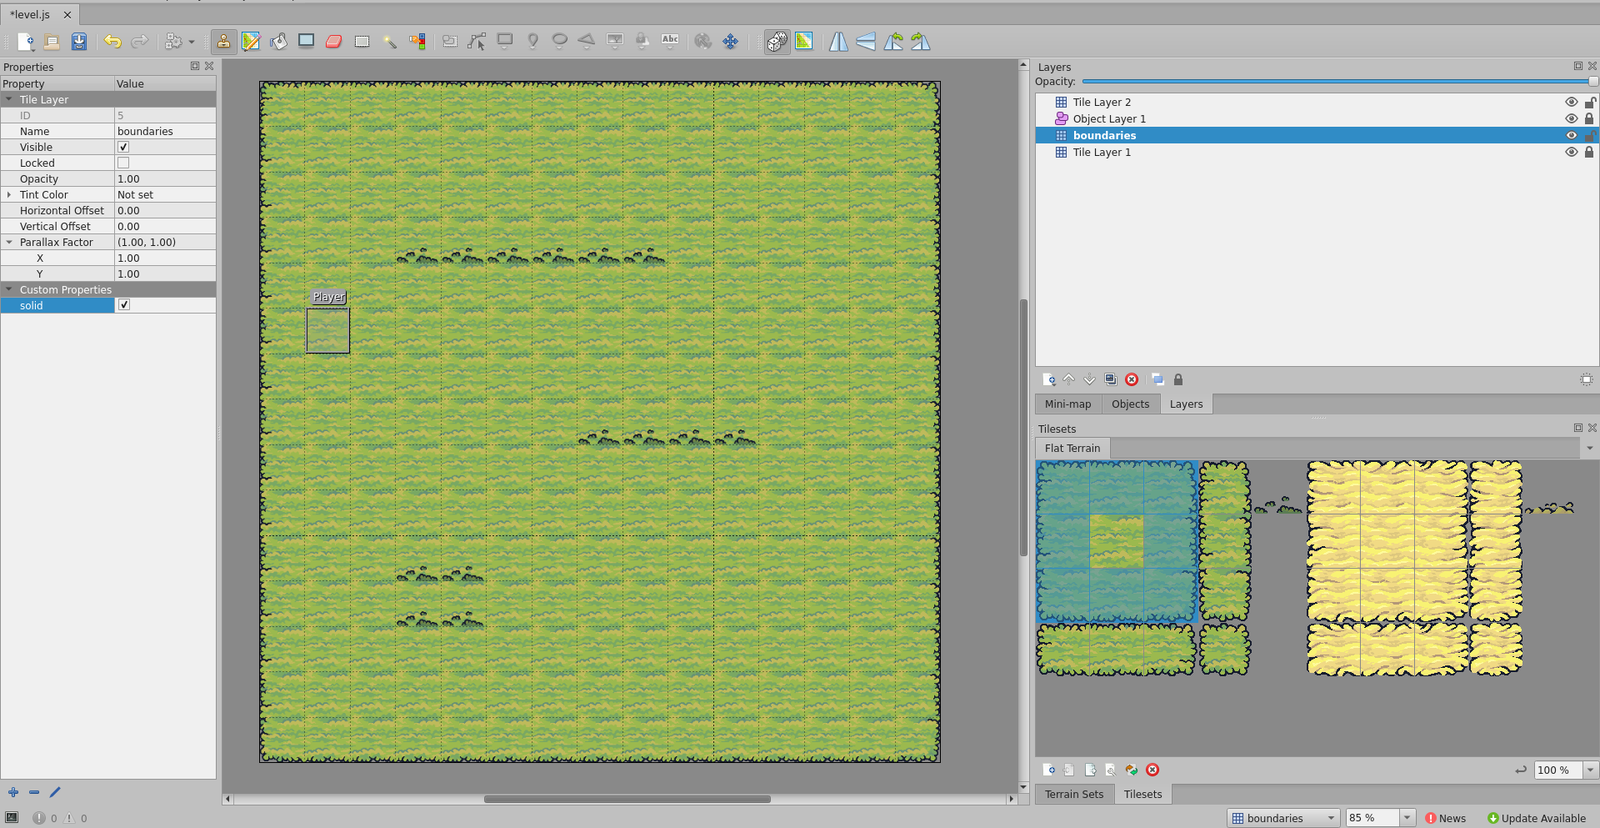
We will also update the Player constructor’s super call and pass in z as 10 to make it appear on top of everything.
We also need to set the CollisionType of the player to Active so it can collide with other objects and be stopped by the solid objects:
super({
...
  z: 10,
  collisionType: CollisionType.Active,
  scale: vec(0.5, 0.5),
});
Now, if you run this, you will see that the player is stopped by the boundary tiles instead of walking over them, and the player sprite is drawn over the grass instead of below it. Note that because of our tile size, we have a full square, which acts as a boundary instead of a thin strip at the end.
With this, we have covered all the concepts needed to make our first game in Excalibur. Now, let’s actually make our game!
As I mentioned at the start, one issue that I faced when learning game development was getting stuck after finishing the tutorial. I knew the basic concepts but wasn’t sure how to use them to make the game I wanted to make. So, to make it easier, I created a set of questions that loosely followed the engine loop and used them to decide what I needed to do next.
This is not all-encompassing, and you will still need to learn a lot and make more projects on your own to get to know the engine better. But with the basic concepts and the following steps, you’ll be able to graduate from simply copying a tutorial to making a project by yourself.
When building a web app, we break it down into smaller, manageable parts — individual screens — and develop them one at a time. Similarly, we’ll break the game into smaller pieces and ask key questions for each part. While we’ll still need to iterate over everything to refine and create a cohesive gameplay experience, this approach helps make things more manageable (especially for your first project, where everything might feel overwhelming).
For each “part” of the game, ask yourself the following:
I’ll refer to these as the “implementation questions” in the rest of the article, as these will help us think about how to implement a part of the game.
In the rest of this section, I will implement a very basic game using the concepts we learned above. While doing so, I will demonstrate how I think using our list of implementation questions. You can find the source code for each step in this repository.
Remember, this isn’t the best way, but it’s a good enough way to get started and break free from tutorial hell. Instead of just following this example, come up with your own concept and apply the same thought process to build your game. Like beginner web projects, cloning a simple existing game can be a great way to start.
For my example, I’m creating a simple top-down fighting game where you control a character, battle enemies, and advance to the next level after defeating them all. Early on, I’ll focus more on level design and gameplay rather than UI elements, using simple placeholders for now and refining them later. Feel free to take a different approach!
I’ll first delete all the existing .ts files except main.ts , player.ts , resources.ts, and tiledLevel.ts . Because we were only using these four files at the end of the last section, there shouldn’t be any change in the game.
Let’s follow the questions and think about what should happen after the player clicks on the Play Game button:
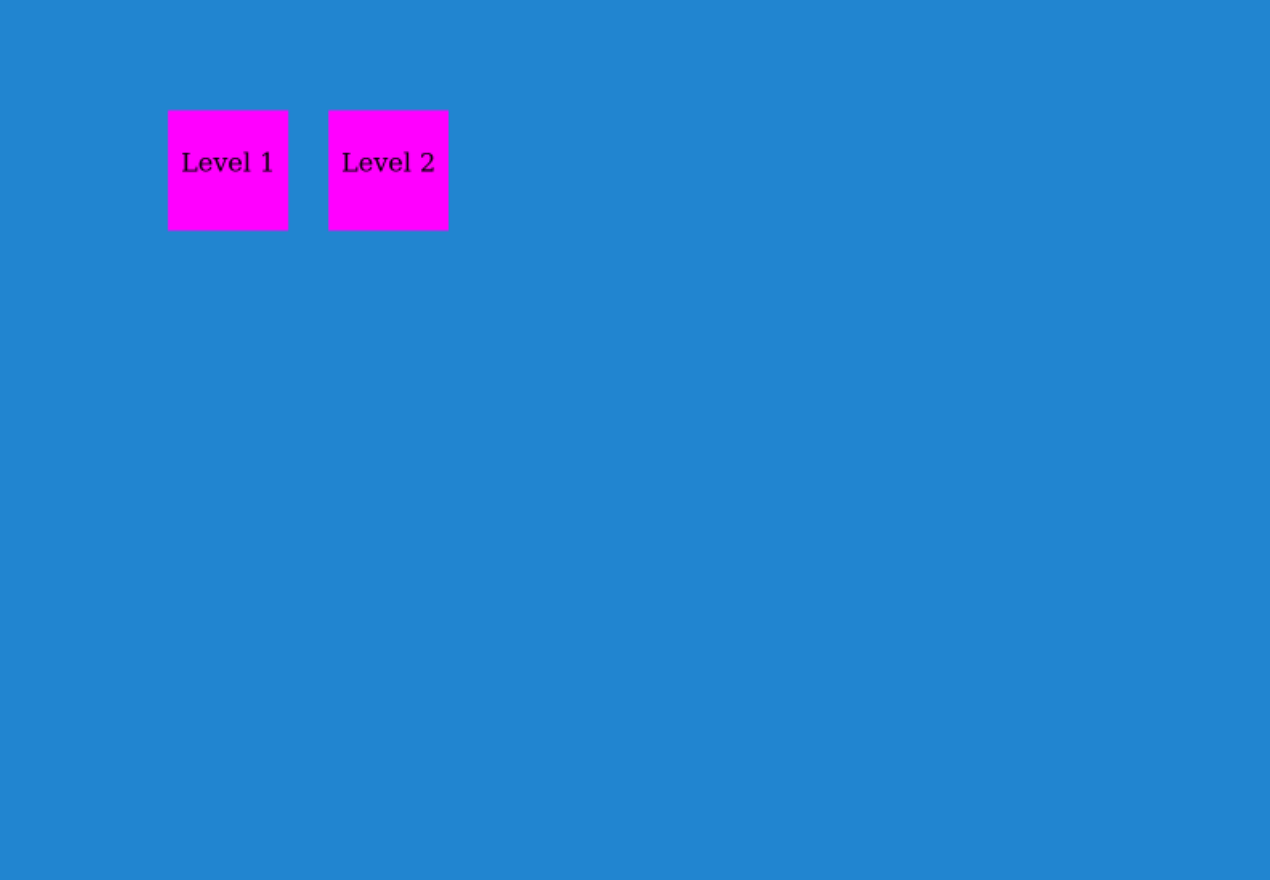
I created a new scene called LevelSelector, and an actor called LevelIcon. The LevelIcon takes in a callback and its position and simply shows a square with the given label. When clicked, it will call the callback. In the level selector, I created two of these and added them to the level scene. For the callback, it simply logs in the level name for now, but after creating the levels, I will use engine.goToScene to change the level:
Now, I want to design the first level, so let’s start again with our implementation questions:
For this, I’ll design a larger tilemap. I want the camera to focus on the player while staying within a bounding box to prevent showing empty space. To achieve this, I’ll implement a custom camera strategy and add it to the player’s onInitialize method (more details can be found here). I’ll also reset the player’s scale to (1,1) and increase their speed. The result will look something like this:
Next, we will add enemy characters to the level. Here are our implementation questions for this step in our game development process:
Not every one of the implementation questions is applicable here. For this, the only change will be adding enemy characters, and their behavior will be set in the next step.
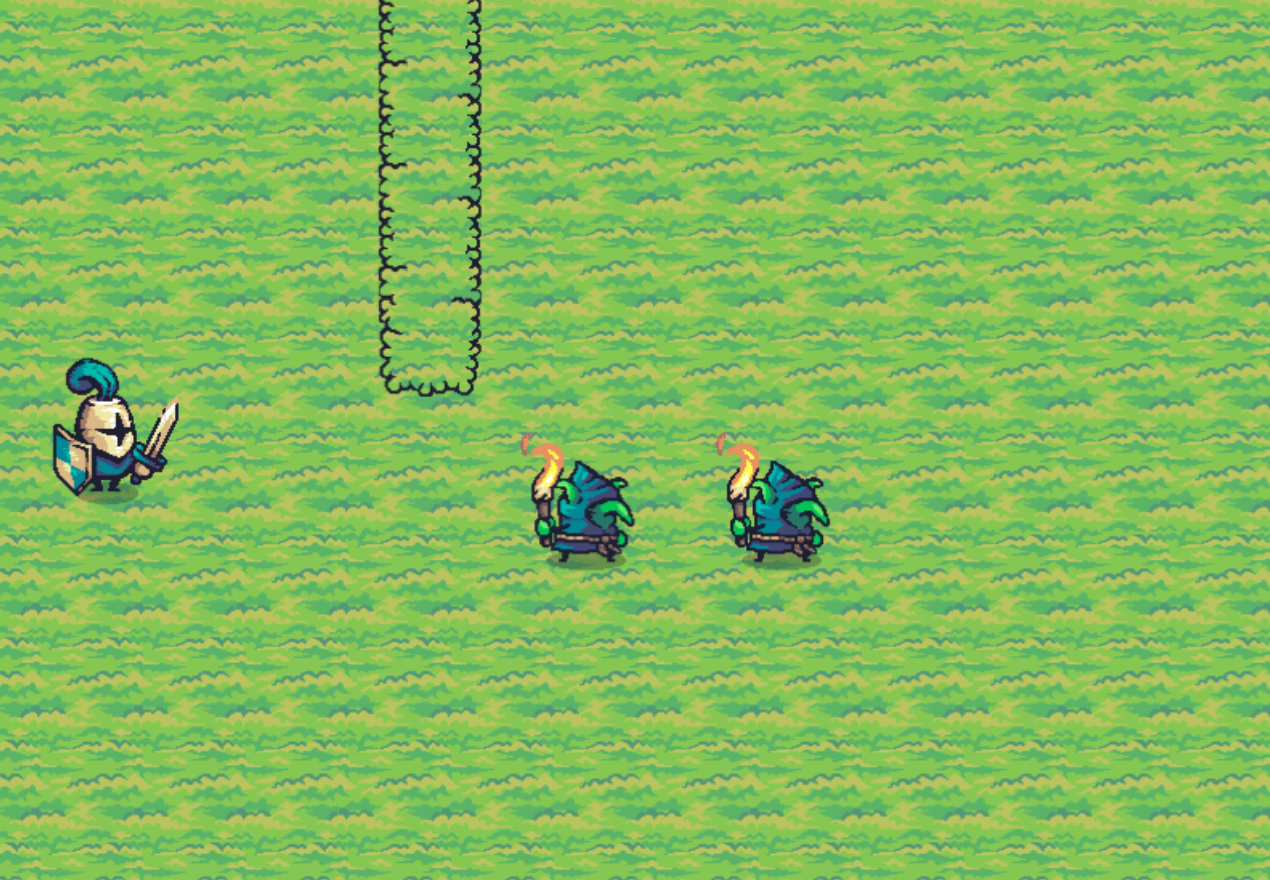
So, we will add another class for the enemy and load the sprite sheet accordingly. You can find these steps in the source good, as you can for each step in this process. After adding everything, we will see goblins in the scene:
I’ll update the method in the goblin class to check if the player is within a certain distance. If the player is close enough, the goblin will start moving toward them and stop at a small distance. If the player moves too far away while being chased, the goblin will stop and stand still. The result will look like this:
As you can see, the goblins follow the player and can walk over the hedges, while the player cannot. Next, we will add an attack for the player.
For this, I had to change the update logic as well as add another class member called attacking in the Player class. I also shared Excalibur’s EventEmitter between the player and all goblins so that the player can send an attack event that goblins can react to. There are other — and possibly better — ways to do this, but this will do for now.
After this, our game will look like this:
As you can see, after three attacks, the goblins are gone. Now, on to goblin attacks!
Now, the goblins attack the player, but their attacks are slower than the player’s and have a short cool-down, preventing continuous damage. I still need to add an animation to indicate when the player is hit.
And that’s it for this post! There’s still plenty to improve — bugs to fix, UI and sound to add, etc. — but now you have a framework for thinking through your game development process.
As I mentioned earlier, this isn’t the ultimate guide to making a game. As your project grows more complex, these five implementation questions won’t always be enough, and you’ll need to make more thoughtful design choices. But this approach is a solid starting point to help you break free from tutorial hell and start building your first game.
In this post, we started with the basic concepts of Excalibur.js. After covering them, we saw how we can think in terms of five questions to implement your first game piece by piece. With this, you can begin your game development journey! Be sure to share it with me in the comments if you upload it somewhere.
The code for the demo is available in my GitHub repository here.
There’s no doubt that frontends are getting more complex. As you add new JavaScript libraries and other dependencies to your app, you’ll need more visibility to ensure your users don’t run into unknown issues.
LogRocket is a frontend application monitoring solution that lets you replay JavaScript errors as if they happened in your own browser so you can react to bugs more effectively.

LogRocket works perfectly with any app, regardless of framework, and has plugins to log additional context from Redux, Vuex, and @ngrx/store. Instead of guessing why problems happen, you can aggregate and report on what state your application was in when an issue occurred. LogRocket also monitors your app’s performance, reporting metrics like client CPU load, client memory usage, and more.
Build confidently — start monitoring for free.

React Server Components and the Next.js App Router enable streaming and smaller client bundles, but only when used correctly. This article explores six common mistakes that block streaming, bloat hydration, and create stale UI in production.

Gil Fink (SparXis CEO) joins PodRocket to break down today’s most common web rendering patterns: SSR, CSR, static rednering, and islands/resumability.

@container scroll-state: Replace JS scroll listeners nowCSS @container scroll-state lets you build sticky headers, snapping carousels, and scroll indicators without JavaScript. Here’s how to replace scroll listeners with clean, declarative state queries.

Explore 10 Web APIs that replace common JavaScript libraries and reduce npm dependencies, bundle size, and performance overhead.
Would you be interested in joining LogRocket's developer community?
Join LogRocket’s Content Advisory Board. You’ll help inform the type of content we create and get access to exclusive meetups, social accreditation, and swag.
Sign up now