Developed by Google in 2017, Flutter is an open-source UI software development kit for cross-platform application development. The Flutter framework comprises a software development kit (SDK) and their widget-based UI library.

Flutter in_app_purchase (IAP) is a first-party Flutter package that allows developers to implement in-app purchases in their app from the App Store on iOS or Google Play on Android. Two other solutions, flutter_inapp_purchase, and purchases_flutter, also provide similar functionalities.
In this article, we aim to guide you on which IAP is best for your Flutter application. Each IAP plugin has different functionalities; meaning it’s important to know which one is the best fit for your app.
Read on to get an understanding of which you should go for.
The Replay is a weekly newsletter for dev and engineering leaders.
Delivered once a week, it's your curated guide to the most important conversations around frontend dev, emerging AI tools, and the state of modern software.
In this article, we will discuss:
To proceed, I recommend you to have:
Now, with all that out of the way, let’s begin! Feel free to skip ahead to any one of the bulleted sections below:
There’s a significant amount of setup required for testing in-app purchases successfully; this includes registering new app IDs and store entries to use for testing in both the Play Developer Console and in App Store Connect.
Both Google Play and the App Store require developers to configure an app with in-app items for purchase in order to call their in-app purchase APIs — both stores have extensive documentation on how to do this.
Below are links to high-level guides that can help:
There are three main types of in-app purchases. They are:
In-app purchases are required as you cannot use any third-party systems to handle payments through either mobile app store.
To do this, you will need an Apple iOS Developer Program account and have published an app to the App Store. You can find details on publishing your app by following this link.
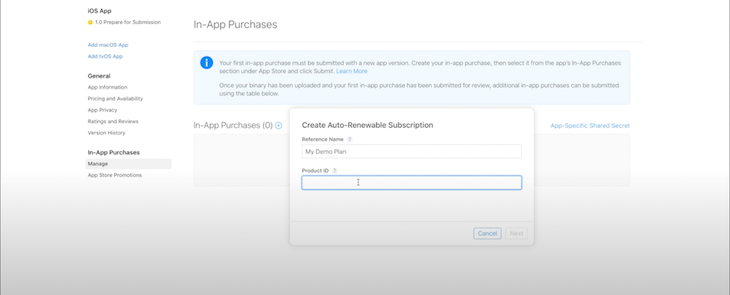
Now, head on to App Store Connect and select In-App Purchases from the tab on the left panel.

In the App Store connect section, select Consumable type, then click Ok. Next, provide a name and a product_ID.
(Note: Remember the product ID, because it is the same for the Google Play Store.)

Next, set your pricing details and a display name for your product.
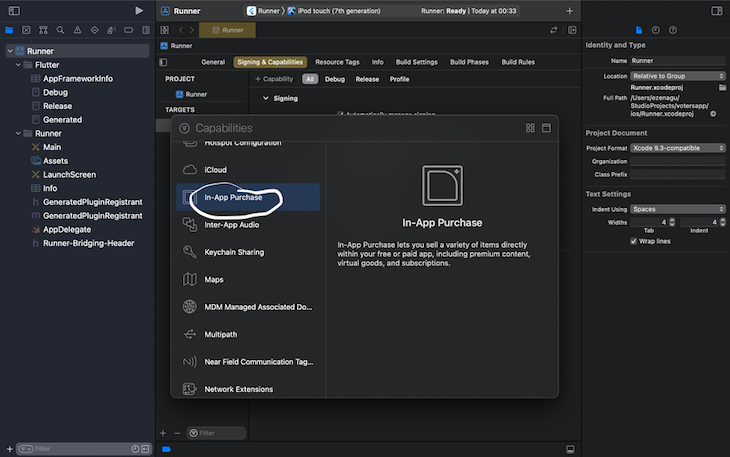
After this, we will head on to Xcode and enable the In-App Purchase capability. To do this, Open the Flutter project in Xcode and follow the path Runner>Signing & Capabilities>Add Capability.

With this, you are done with the setup for in-app purchases for iOS.
Like iOS, for Android, you will need a Google Developer account and have an application published to the Play Store. Details on publishing an Android app to the Play Store are beyond the scope of this article, but you can find information regarding this here.
You need to create at least an alpha version of your application, which allows you to test Google in-app purchases locally on your device.
(Note: This does not work if you do not have a release for your app. Additionally, you should also bear in my that you must add your email address as a tester on the track)
Now, head to the Store presence tab. Follow In-app products, then Managed products. In Google Play, you don’t get to select whether it’s a consumable product or not; the application handles this option automatically.

Next, create a new product with the same product_ID used for the iOS setup and set your product to Active.
Once we have set the pricing and other details for your application, we are done setting up our Android app for in-app purchases.
in_app_purchase is a Flutter plugin that supports in-app purchases through an underlying store, such as the App Store (on iOS) or Google Play (on Android). With it, we can perform the following:
The code blocks below focus on the in_app_purchase Flutter plugin for implementation, but it should be noted that the features for in_app_purchase can be implemented using specific state management technology like Bloc or Firebase to manage the state of purchases.
To get started, we will follow the steps below:
First, add the plugin to your pubspec.yaml file.

(Note: You can find the latest release of Flutter in_app_purchase here)
Next, go ahead and import in_app_purchase into your application and import the Flutter dart.io to perform the platform check.
Then, call your widget class Purchase after setting your testID variable to the project’s name on the Play Store or App Store.
const String testID = 'book_test';
We have an instance of InAppPurchase instantiated here:
final InAppPurchase _iap = InAppPurchase.instance;
Now, we will create some properties to hold our values later.
(Note: See the comments in each code block for an explanation of the function of each line of code)
// checks if the API is available on this device
bool _isAvailable = false;
// keeps a list of products queried from Playstore or app store
List<ProductDetails> _products = [];
// List of users past purchases
List<PurchaseDetails> _purchases = [];
// subscription that listens to a stream of updates to purchase details
late StreamSubscription _subscription;
// used to represents consumable credits the user can buy
int _credits = 0;
The method below retrieves the product list. It gets a list of all the products from our account, either on the Play Store or App Store, and makes them available in a ProductDetailsResponse response variable.
Future<void> _getUserProducts() async {
 Set<String> ids = {testID};
 ProductDetailsResponse response = await _iap.queryProductDetails(ids);

 setState(() {
 _products = response.productDetails;
 });
}
Call the method below when you want to purchase a new product.
void _buyProduct(ProductDetails prod){
 final PurchaseParam purchaseParam = PurchaseParam(productDetails: prod);
 _iap.buyConsumable(purchaseParam: purchaseParam, autoConsume: false);
}
We need to set the code below to distinguish the status of our purchases. This method checks if the item has been purchased already or not.
void _verifyPurchases(){
 PurchaseDetails purchase = _hasPurchased(testID);
 if(purchase != null && purchase.status == PurchaseStatus.purchased){
 _credits = 10;
 }
}
The method below retrieves the user’s previous purchases.
Future<void> _getPastPurchases() async {
 QueryPurchaseDetailsResponse response = await _iap.queryPastPurchases();
The code retrieves a list of past purchases made on the product, populates our purchases list, and rebuilds the widget to reflect any additional features.
for(PurchaseDetails purchase in response.pastPurchases){
 if(Platform.isIOS){
 _iap.completePurchase(purchase);
 }
 }
 setState(() {
 _purchases = response.pastPurchases;
 });
}
Below is a representation of the entire code:
import 'dart:async';

import 'package:Flutter/material.dart';
import 'package:in_app_purchase/in_app_purchase.dart';
import 'dart:io';
import 'package:in_app_purchase_android/in_app_purchase_android.dart';


void main() {
 runApp(
 const MaterialApp(
 home: Purchase()
 ),
 );
}


const String testID = 'book_test';

class Purchase extends StatefulWidget {

 const Purchase({Key? key}) : super(key: key);

 @override
 _PurchaseState createState() => _PurchaseState();

}

class _PurchaseState extends State<Purchase> {

 // Instantiates inAppPurchase
 final InAppPurchase _iap = InAppPurchase.instance;

 // checks if the API is available on this device
 bool _isAvailable = false;

 // keeps a list of products queried from Playstore or app store
 List<ProductDetails> _products = [];

 // List of users past purchases
 List<PurchaseDetails> _purchases = [];

 // subscription that listens to a stream of updates to purchase details
 late StreamSubscription _subscription;

 // used to represents consumable credits the user can buy
 int _coins = 0;


 Future<void> _initialize() async {

 // Check availability of InApp Purchases
 _isAvailable = await _iap.isAvailable();


 // perform our async calls only when in-app purchase is available
 if(_isAvailable){

 await _getUserProducts();
 await _getPastPurchases();
 _verifyPurchases();

 // listen to new purchases and rebuild the widget whenever
 // there is a new purchase after adding the new purchase to our
 // purchase list

 _subscription = _iap.purchaseStream.listen((data)=> setState((){

 _purchases.addAll(data);
 _verifyPurchases();
 }));

 }
 }


 // Method to retrieve product list
 Future<void> _getUserProducts() async {
 Set<String> ids = {testID};
 ProductDetailsResponse response = await _iap.queryProductDetails(ids);

 setState(() {
 _products = response.productDetails;
 });
 }

 // Method to retrieve users past purchase
 Future<void> _getPastPurchases() async {
 QueryPurchaseDetailsResponse response = await _iap.queryPastPurchases();

 for(PurchaseDetails purchase in response.pastPurchases){
 if(Platform.isIOS){
 _iap.completePurchase(purchase);
 }
 }
 setState(() {
 _purchases = response.pastPurchases;
 });
 }

 // checks if a user has purchased a certain product
 PurchaseDetails _hasUserPurchased(String productID){
 return _purchases.firstWhere((purchase) => purchase.productID == productID);
 }


 // Method to check if the product has been purchased already or not.
 void _verifyPurchases(){
 PurchaseDetails purchase = _hasUserPurchased(testID);
 if(purchase.status == PurchaseStatus.purchased){
 _coins = 10;
 }
 }

 // Method to purchase a product
 void _buyProduct(ProductDetails prod){
 final PurchaseParam purchaseParam = PurchaseParam(productDetails: prod);
 _iap.buyConsumable(purchaseParam: purchaseParam, autoConsume: false);
 }


 void spendCoins(PurchaseDetails purchase) async {
 setState(() {
 _coins--;
 });
 if(_coins == 0 ){
 var res = await _iap.consumePurchase(purchase);
 }
 }

 @override
 void initState() {
 _initialize();
 super.initState();
 }

 @override
 void dispose() {

 // cancelling the subscription
 _subscription.cancel();

 super.dispose();
 }


 @override
 Widget build(BuildContext context) {
 return Scaffold(
 appBar: AppBar(
 title: Text(_isAvailable ? 'Product Available': 'No Product Available'),
 ),
 body: Center(
 child: Column(
 children: [

 // Looping over products from app store or Playstore
 // for each product, determine if the user has a past purchase for it
 for (var product in _products)

 // If purchase exists
 if(_hasUserPurchased(product.id) != null)
  ...[
  Text('$_coins', style: const TextStyle(fontSize: 30),),
  ElevatedButton(
  onPressed: ()=> spendCoins(_hasUserPurchased(product.id)),
  child: const Text('Consume')),
  ]

 // If not purchased exist
 else ...[
  Text(product.title,),
  Text(product.description),
  Text(product.price),
  ElevatedButton(
  onPressed: () => _buyProduct(product),
  child: const Text(''))
 ]
 ],
 ),
 ),
 );
 }
}
We’ve now implemented Flutter in-app purchases using the Flutter in_app_purchase plugin. This plugin gives you control over your implementations. When you need to apply some business logic to your implementation, this plugin gives you the necessary control to do so.
This is another Flutter plugin that handles in-app purchases.
Unlike the official in_app_purchase, this was created by dooboolab, an organization that works on open source projects. This plugin differs from the former in the greater availability of methods it provides to users to perform operations in the application.
To use this application, just as in in_app_purchase, we will have to set up our in-app configuration for our application on Google Play Store using our developer account and iOS on the App Store.
The process is the same as highlighted above.
To get started, do the following:
Install it by adding it to your pubspec.yaml file. You can then import it into your application.
We can initialize our application using the method provided, and also end the connection using:
await FlutterInappPurchase.instance.initConnection;
await FlutterInappPurchase.instance.endConnection;
We can purchase an item from products offered using:
FlutterInappPurchase.instance.requestPurchase(item.productId);
Similarly, just like in our code above, we can also get a list of products we have available in our account using:
await
    FlutterInappPurchase.instance.getProducts(_productLists);
The code above returns a list that can be stored and looped to display individual products.
We can also create a stream for subscriptions, which helps us track changes made in purchases:
FlutterInappPurchase.purchaseUpdated.listen((productItem) {})
We can also listen to errors, as well:
FlutterInappPurchase.purchaseError.listen((purchaseError) {})
Several options are provided to us by this method, all available in their provided supplementary documentation.
Another method we can use to implement in-app purchasing in our application is using the paid-for purchases_flutter plugin. This is a plugin that implements in-app purchases using RevenueCat’s solution.
RevenueCat is a third-party agency that simplifies the implementation of in-app purchases in applications. When using the official Flutter plugin (in_app_purchase), you are required to implement your logic on the server to handle processes like purchase validation, subscriptions, and cancellations.
Doing this is a lot of logic work, and as such, alternatives can be attractive as they can do much of the heavy lifting. purchases_flutter can handle this logic for you, and implementing in-app purchases in your app is much more accessible as a result. RevenueCat’s server will handle the purchase validation and all the in-between logic and middleware.
(Note: purchases_flutter is a paid solution)
Similar to the other implementations of in-app purchases listed above, you will need to set up active in-app purchases on the Play Store and App Store.
(Note: Details on how to go about this are highlighted above)
purchases_flutter is RevenueCat’s plugin for implementing their SDK in a Flutter application.
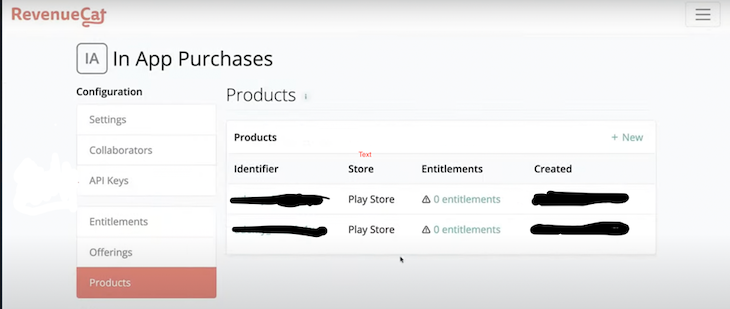
After setting up in-app purchases on the Play Store and App Store, you will need to create an account with RevenueCat. Follow the process found here at RevenueCat to set up your account with your products/subscriptions and link RevenueCat to your Play Store account to enable it to handle the billing process.
Next, you will need to install and import the plugin into your application. Get the latest version of the plugin from here.
RevenueCat also has webhooks that can be implemented with your application to signal to your backend the updates, purchases, or activities occurring, just in case you need to store that in your database. Some of the existing webhooks include:
Based on the requirements for purchases_flutter, you will need to add permission billing to your AndroidManifest.xml file.
<uses-permission android:name="com.android.vending.BILLING" />
await Purchases.setDebugLogsEnabled(true);
await Purchases.setup(_APIKey);
The above code initializes RevenueCat in our application. _apiKey here is from the API Keys module in RevenueCat upon account creation.

RevenueCat uses entitlement to determine the access level of your products. You can use this to set membership levels and offer premium content to your users. The Entitlements module to the left gives you the option to do this.
RevenueCats’ offering describes what is displayed in our application. This way, you can package multiple products into one offering. This offering serves as a container that can have various entitlements within it.
With this, you can display related entitlements in different application sections. A typical example is a subscription plan that enables monthly payments and allows yearly payments. You can update the offerings in RevenueCat, which will reflect the changes in all applications.
To get all the offerings created, you can use the offerings method provided by the purchases_flutter plugin.
await Purchases.getOffering();
(Note: To test the outcome in your emulator, ensure the emulator has Play Store activated and enabled in your AVD manager)
So, we can have our class for our purchase as such:
import 'package:Flutter/services.dart';
import 'package:votersapp/main.dart';

class PurchaseFlutterAPI{
 static final _APIKey = ’YOUR API KEY’;

// initialize function to be called to initialize our purchase_Flutter plugin
 static Future init() async{
 await Purchases.setDebugLogEnabled(true);
 await Purchases.setup(_APIKey);
 }

// gets a list of offerings from RevenueCat and stores it in a list for use in our app
 static Future<List<Offering>> fetchOffers() async {
 try{
 final offerings = await Purchases.getOffering();
 final activeOffering = offerings.current;

 return (activeOffering == null) ? [] : [activeOffering];
 } on PlatformException catch (e) {
 return [];
 }
 }
 }
}
The above code retrieves the list of offerings and makes them available to the activeOffering variable. It can display a list of offerings to the user.
To purchase the list received from the action above, we have:
await Purchases.purchasePackage(package);
(Note: The keyword “package” is the selected package to be purchased)
Once the purchase has been made, you can see your purchases in your RevenueCat dashboard and view the details of the transaction.
All applications require setup of in-app purchasing for both the Android and iOS platforms, but differ from each other in the following ways.
in_app_purchase is Flutter’s official plugin for in-app purchases in Flutter applications. It comes backed with functions and methods to query your chosen app store and perform operations relating to in-app purchases.
Although these functionalities are available, you will have to write a substantial amount of code to verify your application and store information of purchases in your database. It can be a little overwhelming if you want to implement your in-app purchases as quickly as possible, but offers the benefit of giving you all the control you need to handle operations, as well as what to do with data relating to purchases.
Any new updates are sure to be implemented here first and the plugin has an active community, alongside Google developers who are consistently working on it.
This is not Flutter’s official release, so there can be concerns over the community in terms of regular updates and how secure and efficient the plugin can be. It provides more functions, making it more accessible, but the processes are similar in what they do, irrespective of how it’s used.
It does not offer a solution to implement logic; thus, you will have to write to implement verification and some other functions while using this solution.
This plugin requires a little more effort to set up the functionalities of RevenueCat to work with Google Play and the App Store, but once achieved, it takes away the tedium that can come from implementing and keeping track of purchase operations in your application by automating and simplifying processes.
It provides simple and easy functions that make it comparatively effortless to query products and perform purchases. However, this third-party plugin is not free but do not fret because we will provide you with an alternative.
If you need an easy but full-scale third-party solution, and if you prefer pay-as-you-grow model, you can try implementing in-app purchases using Adapty. The whole process is described in this tutorial.
Thanks for reading and happy coding!
Install LogRocket via npm or script tag. LogRocket.init() must be called client-side, not
server-side
$ npm i --save logrocket

// Code:

import LogRocket from 'logrocket';
LogRocket.init('app/id');
// Add to your HTML:

<script src="https://cdn.lr-ingest.com/LogRocket.min.js"></script>
<script>window.LogRocket && window.LogRocket.init('app/id');</script>

@container scroll-state: Replace JS scroll listeners nowCSS @container scroll-state lets you build sticky headers, snapping carousels, and scroll indicators without JavaScript. Here’s how to replace scroll listeners with clean, declarative state queries.

Russ Miles, a software development expert and educator, joins the show to unpack why “developer productivity” platforms so often disappoint.

Discover what’s new in The Replay, LogRocket’s newsletter for dev and engineering leaders, in the February 18th issue.

Learn how to recreate Claude Skills–style workflows in GitHub Copilot using custom instruction files and smarter context management.
Hey there, want to help make our blog better?
Join LogRocket’s Content Advisory Board. You’ll help inform the type of content we create and get access to exclusive meetups, social accreditation, and swag.
Sign up now
One Reply to "3 ways to implement Flutter in-app purchasing"
Your code for ‘in_app_purchase’ doesn’t work, has deprecated methods (along time ago).